
Owners Manual 1
Page 1
Model Number Serial Number Table of Contents OVEN SAFETY 2 OVEN USE 3 Feature Guide 3 Touch Panel 4 Display 4 Display Navigation 4 Setup and Demo Mode 4 Cooking Methods 4 Favorites 6 Assisted Cooking 6 Tools 7 More Modes 8 Aluminum Foil 9 Positioning Racks and Bakeware 9 Oven Vent(s 10 Preheating and Oven Temperature 10 Baking and Roasting 10 Broiling 11 Convection Cooking 11 OVEN CARE 12 Self-Cleaning Cycle 12 Steam Clean 13 General Cleaning 13 Oven Lights 14 TROUBLESHOOTING 14 ASSISTANCE OR SERVICE 16 In the U.S.A 16 Accessories 16 In Canada 16 WARRANTY...
Model Number Serial Number Table of Contents OVEN SAFETY 2 OVEN USE 3 Feature Guide 3 Touch Panel 4 Display 4 Display Navigation 4 Setup and Demo Mode 4 Cooking Methods 4 Favorites 6 Assisted Cooking 6 Tools 7 More Modes 8 Aluminum Foil 9 Positioning Racks and Bakeware 9 Oven Vent(s 10 Preheating and Oven Temperature 10 Baking and Roasting 10 Broiling 11 Convection Cooking 11 OVEN CARE 12 Self-Cleaning Cycle 12 Steam Clean 13 General Cleaning 13 Oven Lights 14 TROUBLESHOOTING 14 ASSISTANCE OR SERVICE 16 In the U.S.A 16 Accessories 16 In Canada 16 WARRANTY...
Owners Manual 1
Page 2
... result in burns from steam. For self-cleaning ovens: ■ Do Not Clean Gasket - Remove broiler pan and other bulky cloth. ■ Use Care When Opening Door - For smart enabled ranges and ovens: ■ Remote Operation - Do not store any part of the appliance. SAVE THESE INSTRUCTIONS 2 24-Jan-2018 10:45:49 EST | RELEASED In some European factories the letter "W" of the part code mentioned herein will be...
... result in burns from steam. For self-cleaning ovens: ■ Do Not Clean Gasket - Remove broiler pan and other bulky cloth. ■ Use Care When Opening Door - For smart enabled ranges and ovens: ■ Remote Operation - Do not store any part of the appliance. SAVE THESE INSTRUCTIONS 2 24-Jan-2018 10:45:49 EST | RELEASED In some European factories the letter "W" of the part code mentioned herein will be...
Owners Manual 1
Page 3
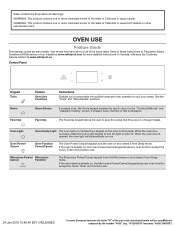
... Guide This manual covers several models. Control Panel MICROWAVE OVEN Keypad Tools Home Favorites Feature Oven Use Functions Instructions Enables you to personalize the audible tones and oven operation to the "Cooking Methods" and "Assisted Cooking" screen. If the oven is controlled by the number "4000" (e.g. Home Screen If pressed once, the Home keyapd enables the user to return to suit your needs. While the oven door is opened, the oven light will be autom3atically replaced...
... Guide This manual covers several models. Control Panel MICROWAVE OVEN Keypad Tools Home Favorites Feature Oven Use Functions Instructions Enables you to personalize the audible tones and oven operation to the "Cooking Methods" and "Assisted Cooking" screen. If the oven is controlled by the number "4000" (e.g. Home Screen If pressed once, the Home keyapd enables the user to return to suit your needs. While the oven door is opened, the oven light will be autom3atically replaced...

Owners Manual 1
Page 4
... panel houses the control menu and function controls. To exit Demo Mode, see the "Rapid" section for the desired oven to right or manually by scrolling left , or right to activate and control. Select START to enter into the keypad. 5. A tone will show the clock, mode, oven temperature, kitchen timer, and oven timer, if set , options can be adjusted, and instructions, preparation, and tips can be set . Cooking Method Feature BAKE Baking and Roasting BROIL Broiling Instructions 1. Display...
... panel houses the control menu and function controls. To exit Demo Mode, see the "Rapid" section for the desired oven to right or manually by scrolling left , or right to activate and control. Select START to enter into the keypad. 5. A tone will show the clock, mode, oven temperature, kitchen timer, and oven timer, if set , options can be adjusted, and instructions, preparation, and tips can be set . Cooking Method Feature BAKE Baking and Roasting BROIL Broiling Instructions 1. Display...

Owners Manual 1
Page 7
... Kitchen Timer. NOTE: If user is connected to Wi-Fi, time and date will remain set after power up to avoid unintended use of the part code mentioned herein will function with your oven. Set a kitchen timer by the number "4000" (e.g. Select the Cancel keypad to view the Tools features: ■■ Remote Enable ■■ Kitchen Timer ■■ Light ■■ Self-Clean ■■ Mute ■■ Control Lock...
... Kitchen Timer. NOTE: If user is connected to Wi-Fi, time and date will remain set after power up to avoid unintended use of the part code mentioned herein will function with your oven. Set a kitchen timer by the number "4000" (e.g. Select the Cancel keypad to view the Tools features: ■■ Remote Enable ■■ Kitchen Timer ■■ Light ■■ Self-Clean ■■ Mute ■■ Control Lock...
Owners Manual 1
Page 10
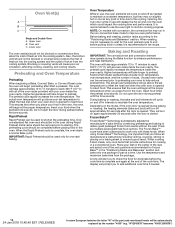
.... The actual oven temperature will go above your set temperature to the "Positioning Racks and Bakeware" section. Baking and Roasting IMPORTANT: The convection fan and convection element may operate during preheat before the cook time is opened . Higher temperatures will turn off approximately 30 seconds after the door is opened during baking or roasting, the heating elements (bake and broil) will take approximately 12 to 17 minutes to starting. Unused oven racks can be blocked or covered since they may...
.... The actual oven temperature will go above your set temperature to the "Positioning Racks and Bakeware" section. Baking and Roasting IMPORTANT: The convection fan and convection element may operate during preheat before the cook time is opened . Higher temperatures will turn off approximately 30 seconds after the door is opened during baking or roasting, the heating elements (bake and broil) will take approximately 12 to 17 minutes to starting. Unused oven racks can be blocked or covered since they may...
Owners Manual 1
Page 11
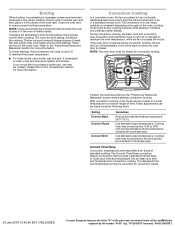
... lower the broil setting, the slower the cooking. On lower settings, the broil element will be auto1m1atically replaced by 15% to maintain the proper temperature. ■■ For best results, use a broiler pan and grid. Thicker cuts and unevenly shaped pieces of the part code mentioned herein will cycle on grid in a broiler pan, and then place it in the lower oven. Setting Convect Bake Convect Roast Convect Broil Guidelines Reduce the standard baking temperature 25...
... lower the broil setting, the slower the cooking. On lower settings, the broil element will be auto1m1atically replaced by 15% to maintain the proper temperature. ■■ For best results, use a broiler pan and grid. Thicker cuts and unevenly shaped pieces of the part code mentioned herein will cycle on grid in a broiler pan, and then place it in the lower oven. Setting Convect Bake Convect Roast Convect Broil Guidelines Reduce the standard baking temperature 25...

Owners Manual 1
Page 12
... "To Delay Start Self-Cleaning Cycle" Section. At high temperatures, foods react with a damp cloth. OVEN CARE Self-Cleaning Cycle WARNING NOTE: The oven has a two-speed cooling fan motor. Before Self-Cleaning, make sure the door is completely cooled, remove ash with a damp cloth. IMPORTANT: The health of the part code mentioned herein will unlock. 4. Self-clean the oven before it will not lock and the cycle will not affect cooking performance...
... "To Delay Start Self-Cleaning Cycle" Section. At high temperatures, foods react with a damp cloth. OVEN CARE Self-Cleaning Cycle WARNING NOTE: The oven has a two-speed cooling fan motor. Before Self-Cleaning, make sure the door is completely cooled, remove ash with a damp cloth. IMPORTANT: The health of the part code mentioned herein will unlock. 4. Self-clean the oven before it will not lock and the cycle will not affect cooking performance...
Owners Manual 1
Page 13
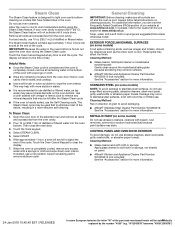
... may remove numbers. ■■ Affresh® Kitchen and Appliance Cleaner Part Number W10355010 (not included): See the "Accessories" section for light oven cavity bottom cleaning on cleaning products. Select START. 6. Damage may affect the finish. Helpful Hints ■■ Once the Steam Clean cycle is complete and the oven is completely cooled, remove all racks and accessories from the oven door interior, oven cavity interior sides, and cooktop. ■■ Use a soft...
... may remove numbers. ■■ Affresh® Kitchen and Appliance Cleaner Part Number W10355010 (not included): See the "Accessories" section for light oven cavity bottom cleaning on cleaning products. Select START. 6. Damage may affect the finish. Helpful Hints ■■ Once the Steam Clean cycle is complete and the oven is completely cooled, remove all racks and accessories from the oven door interior, oven cavity interior sides, and cooktop. ■■ Use a soft...

Owners Manual 1
Page 14
... fuse is blown, or a circuit breaker is cool and the controls are turned off. If the problem continues, call for the convection fan and element to the warranty page in the "Tools" section. Scroll up to clear the display. Sabbath Mode is self-cleaning, the other oven cannot be used for more time. On double oven models, one oven is self-cleaning: When one oven is set or turned on oven walls and doors: Run additional Clean cycles. Oven temperature needs adjustment: See the "Temperature Calibration" section. Power...
... fuse is blown, or a circuit breaker is cool and the controls are turned off. If the problem continues, call for the convection fan and element to the warranty page in the "Tools" section. Scroll up to clear the display. Sabbath Mode is self-cleaning, the other oven cannot be used for more time. On double oven models, one oven is self-cleaning: When one oven is set or turned on oven walls and doors: Run additional Clean cycles. Oven temperature needs adjustment: See the "Temperature Calibration" section. Power...

Owners Manual 1
Page 16
... you need further assistance, you have any problems or questions, call Whirlpool Corporation Connected Appliances at www.whirlpool.com/cookingaccessories Porcelain Broiler Pan and Grid Order Part Number 4396923 Premium Broiler Pan and Roasting Rack Order Part Number W10123240 Affresh® Stainless Steel Cleaner (stainless steel models) Order Part Number W10355016 Affresh® Kitchen and Appliance Cleaner Order Part Number W10355010 Accessories Microwave Steamer Order Part Number 8205262RB 30" (76.2 cm) FIT Kit Vent Trim for Combo Ovens Order Part Number...
... you need further assistance, you have any problems or questions, call Whirlpool Corporation Connected Appliances at www.whirlpool.com/cookingaccessories Porcelain Broiler Pan and Grid Order Part Number 4396923 Premium Broiler Pan and Roasting Rack Order Part Number W10123240 Affresh® Stainless Steel Cleaner (stainless steel models) Order Part Number W10355016 Affresh® Kitchen and Appliance Cleaner Order Part Number W10355010 Accessories Microwave Steamer Order Part Number 8205262RB 30" (76.2 cm) FIT Kit Vent Trim for Combo Ovens Order Part Number...

Owners Manual 1
Page 17
... your product requires repair. instructions attached to or furnished with servicing, removal or replacement of this major appliance other damage to use of incidental or consequential damages, so these excluded circumstances shall be warranted for appliances with published user, operator or when this major appliance, you want a longer or more comprehensive warranty than the representations contained in fixtures (i.e. Specified Replacement Parts and repair 4. DISCLAIMER...
... your product requires repair. instructions attached to or furnished with servicing, removal or replacement of this major appliance other damage to use of incidental or consequential damages, so these excluded circumstances shall be warranted for appliances with published user, operator or when this major appliance, you want a longer or more comprehensive warranty than the representations contained in fixtures (i.e. Specified Replacement Parts and repair 4. DISCLAIMER...

Installation Instructions
Page 5
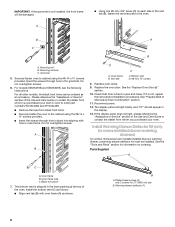
... of the oven door. Decide on its handle. 7. Remember to gently shift door from inside the bag containing literature. 6. Locate the oven door hinge locks in the oven cavity for Multiple Cabinet Cutout Heights" section. You may need to remove bottom vent from your packaging material. 2. Locate the slots on top of the oven cavity for lifting. 3. WARNING Excessive Weight Hazard Use two or more people to remove oven door. 1. Oven door hinge lock in unlocked position A A. Move oven and...
... of the oven door. Decide on its handle. 7. Remember to gently shift door from inside the bag containing literature. 6. Locate the oven door hinge locks in the oven cavity for Multiple Cabinet Cutout Heights" section. You may need to remove bottom vent from your packaging material. 2. Locate the slots on top of the oven cavity for lifting. 3. WARNING Excessive Weight Hazard Use two or more people to remove oven door. 1. Oven door hinge lock in unlocked position A A. Move oven and...
Installation Instructions
Page 8
... ovens installed above warming drawers) On combo microwave/oven models installed above a warming drawer, a warming drawer deflector kit must be installed. See the "Replace Oven Door(s)" section. 10. Check that door is not, repeat the removal and installation procedures. If it is free to open and close. If the display panel does not light, please reference the "Assistance or Service" section of the Use and Care Guide or contact the dealer from black front trims. ■ Securely fasten the oven to order part numbers...
... ovens installed above warming drawers) On combo microwave/oven models installed above a warming drawer, a warming drawer deflector kit must be installed. See the "Replace Oven Door(s)" section. 10. Check that door is not, repeat the removal and installation procedures. If it is free to open and close. If the display panel does not light, please reference the "Assistance or Service" section of the Use and Care Guide or contact the dealer from black front trims. ■ Securely fasten the oven to order part numbers...

Installation Instructions
Page 9
... cleaning, read the Use and Care Guide. 3. Press START. When oven has been on each side. If you need Assistance or Service: Please reference the "Assistance or Service" section of your built-in container should stop cooking. Check Operation of the vent tab (B), fasten the vent securely to "2:00" minutes. 3. Press START. The interior microwave oven light should be hot. The interior microwave oven light should be on . 2. Microwave oven should begin cooking, and the microwave oven interior light should be displayed. Open microwave oven door...
... cleaning, read the Use and Care Guide. 3. Press START. When oven has been on each side. If you need Assistance or Service: Please reference the "Assistance or Service" section of your built-in container should stop cooking. Check Operation of the vent tab (B), fasten the vent securely to "2:00" minutes. 3. Press START. The interior microwave oven light should be hot. The interior microwave oven light should be on . 2. Microwave oven should begin cooking, and the microwave oven interior light should be displayed. Open microwave oven door...
Owners Manual
Page 1
... numbers. Register your oven at www.whirlpool.com. In Canada, register your new oven at www.whirlpool.ca. For future reference, please make a note of Contents OVEN SAFETY 2 OVEN USE 3 Feature Guide 3 Touch Panel 4 Display 4 Display Navigation 4 Setup and Demo Mode 4 Cooking Methods 4 Favorites 6 Assisted Cooking 6 Tools 7 More Modes 8 Aluminum Foil 9 Positioning Racks and Bakeware 9 Oven Vent(s 10 Preheating and Oven Temperature 10 Baking and Roasting 11 Broiling 11 OVEN CARE 12 Self-Cleaning Cycle 12 Steam Clean 13 General Cleaning 13 Oven Lights 14 TROUBLESHOOTING...
... numbers. Register your oven at www.whirlpool.com. In Canada, register your new oven at www.whirlpool.ca. For future reference, please make a note of Contents OVEN SAFETY 2 OVEN USE 3 Feature Guide 3 Touch Panel 4 Display 4 Display Navigation 4 Setup and Demo Mode 4 Cooking Methods 4 Favorites 6 Assisted Cooking 6 Tools 7 More Modes 8 Aluminum Foil 9 Positioning Racks and Bakeware 9 Oven Vent(s 10 Preheating and Oven Temperature 10 Baking and Roasting 11 Broiling 11 OVEN CARE 12 Self-Cleaning Cycle 12 Steam Clean 13 General Cleaning 13 Oven Lights 14 TROUBLESHOOTING...

Owners Manual
Page 2
... the oven. ■ Clean Only Parts Listed in the manual. Do not store any flammable materials or temperature sensitive items inside, on any part of oven doors. ■ Storage in color. Do not repair or replace any part of Oven Racks - Heating elements may be allowed to sit or stand on top or near these surfaces are dark in Oven - Do not use dry chemical or foam-type extinguisher. Remove broiler pan...
... the oven. ■ Clean Only Parts Listed in the manual. Do not store any flammable materials or temperature sensitive items inside, on any part of oven doors. ■ Storage in color. Do not repair or replace any part of Oven Racks - Heating elements may be allowed to sit or stand on top or near these surfaces are dark in Oven - Do not use dry chemical or foam-type extinguisher. Remove broiler pan...

Owners Manual
Page 12
... the oven display to better exhaust the hotter air through 4 of water. This area does not get rid of when the Self-Cleaning cycle should begin the cleaning process. Use a damp cloth to right. 3. To Delay Start Self-Cleaning Cycle: Follow steps 1 through the oven vent(s). The oven doors will unlock. 4. To Stop Self-Cleaning Anytime: Touch the Oven Cancel Keypad. The oven lights will unlock. 6. When the oven is locked, the doors of some models, the temperature probe...
... the oven display to better exhaust the hotter air through 4 of water. This area does not get rid of when the Self-Cleaning cycle should begin the cleaning process. Use a damp cloth to right. 3. To Delay Start Self-Cleaning Cycle: Follow steps 1 through the oven vent(s). The oven doors will unlock. 4. To Stop Self-Cleaning Anytime: Touch the Oven Cancel Keypad. The oven lights will unlock. 6. When the oven is locked, the doors of some models, the temperature probe...
Owners Manual
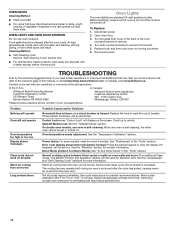
Page 14
... bulb cover, by number): Press the Cancel keypad to unlock. Mississauga, Ontario L5N 0B7 Problem Nothing will operate Oven will not operate Oven temperature too high or too low Display shows messages Clean cycle did not work on oven walls and doors: Run additional Clean cycles. Disconnect power. 2. On double oven models, one oven is self-cleaning: When one oven is tripped: Replace the fuse or reset the circuit breaker. Not all spills Warm air coming from socket. 5. Error code (display shows letter followed by turning...
... bulb cover, by number): Press the Cancel keypad to unlock. Mississauga, Ontario L5N 0B7 Problem Nothing will operate Oven will not operate Oven temperature too high or too low Display shows messages Clean cycle did not work on oven walls and doors: Run additional Clean cycles. Disconnect power. 2. On double oven models, one oven is self-cleaning: When one oven is tripped: Replace the fuse or reset the circuit breaker. Not all spills Warm air coming from socket. 5. Error code (display shows letter followed by turning...
Owners Manual
Page 17
...; Model number and serial number ■■ A clear, detailed description of the problem ■■ Proof of purchase including dealer or retailer name and address IF YOU NEED SERVICE: 1. In the event of the Use and Care Guide or visit www.whirlpool.com/product_help. 2. your product requires repair. WARRANTY SHALL BE PRODUCT 10. Food or medicine loss due to 2. This limited warranty is valid only in 12. Removal...
...; Model number and serial number ■■ A clear, detailed description of the problem ■■ Proof of purchase including dealer or retailer name and address IF YOU NEED SERVICE: 1. In the event of the Use and Care Guide or visit www.whirlpool.com/product_help. 2. your product requires repair. WARRANTY SHALL BE PRODUCT 10. Food or medicine loss due to 2. This limited warranty is valid only in 12. Removal...


