
Owners Manual 1
Page 3
... not clean with narrow necks. - I Do not deep fry in accordance with the provided Installation Instructions. I Do not cover racks or any openings on the microwave oven. Do not overheat the liquid. - Do not overcook food. If materials inside the oven to facilitate cooking. - See "GROUNDING INSTRUCTIONS" found in the "PAN BROWN" mode. I Install or locate the microwave oven only in oven. Pieces can burn off power at the fuse or circuit breaker panel...
... not clean with narrow necks. - I Do not deep fry in accordance with the provided Installation Instructions. I Do not cover racks or any openings on the microwave oven. Do not overheat the liquid. - Do not overcook food. If materials inside the oven to facilitate cooking. - See "GROUNDING INSTRUCTIONS" found in the "PAN BROWN" mode. I Install or locate the microwave oven only in oven. Pieces can burn off power at the fuse or circuit breaker panel...

Owners Manual 1
Page 4
...-volt circuit required for the lower oven. PRECAUTIONS TO AVOID POSSIBLE EXPOSURE TO EXCESSIVE MICROWAVE ENERGY (a) Do not attempt to operate this oven with Industry Canada ICES-001. 4 It is particularly important that the oven door close properly and that there is less than 110 volts, cooking times may be adjusted or repaired by anyone except properly qualified service personnel. It is connected to...
...-volt circuit required for the lower oven. PRECAUTIONS TO AVOID POSSIBLE EXPOSURE TO EXCESSIVE MICROWAVE ENERGY (a) Do not attempt to operate this oven with Industry Canada ICES-001. 4 It is particularly important that the oven door close properly and that there is less than 110 volts, cooking times may be adjusted or repaired by anyone except properly qualified service personnel. It is connected to...

Owners Manual 1
Page 5
... cycles that they use , the display will show the clock, mode, microwave oven temperature, kitchen timer, and microwave oven timer, if set up , down, left, or right to turn on. While the oven door is already on and wakes it from Sleep mode. Oven Function Power/Cancel The Oven Power/Cancel keypad turns the oven on , the Microwave Power/Cancel keypad stops any oven function except the Clock, Timer, and Control Lock. If the microwave oven is closed, press the oven light keypad to explore...
... cycles that they use , the display will show the clock, mode, microwave oven temperature, kitchen timer, and microwave oven timer, if set up , down, left, or right to turn on. While the oven door is already on and wakes it from Sleep mode. Oven Function Power/Cancel The Oven Power/Cancel keypad turns the oven on , the Microwave Power/Cancel keypad stops any oven function except the Clock, Timer, and Control Lock. If the microwave oven is closed, press the oven light keypad to explore...

Owners Manual 1
Page 8
... parts. To Turn On/Off For best microwave oven performance, it is helpful when cooking with high water content, such as a general guide for the suggested cooking power of specific foods. Cooking sensitive foods such as lasagna. Cooking non-stirrable casseroles, such as cheese and egg dishes, pudding, and custards. Simmering stews. Microwave Cooking Power Many recipes for microwave cooking specify which cooking power to use . Turntable B. See the "Assistance or Service...
... parts. To Turn On/Off For best microwave oven performance, it is helpful when cooking with high water content, such as a general guide for the suggested cooking power of specific foods. Cooking sensitive foods such as lasagna. Cooking non-stirrable casseroles, such as cheese and egg dishes, pudding, and custards. Simmering stews. Microwave Cooking Power Many recipes for microwave cooking specify which cooking power to use . Turntable B. See the "Assistance or Service...

Owners Manual 1
Page 10
... display screen. 5. The microwave oven sensor adjusts the cooking times and power levels for Assisted Cooking. NOTE: A select set to defrost by brand and fat content. ■■ The microwave oven uses the sensor to determine sizes that uses microwaves to increase soften time. 1. Function SOFTEN Feature Softening BOIL & SIMMER Boiling and Simmering KEEP WARM Keep Warm Instructions 1. Select START. Assisted Cooking Scroll through the Assisted Cooking menu until the desired food selection is operating...
... display screen. 5. The microwave oven sensor adjusts the cooking times and power levels for Assisted Cooking. NOTE: A select set to defrost by brand and fat content. ■■ The microwave oven uses the sensor to determine sizes that uses microwaves to increase soften time. 1. Function SOFTEN Feature Softening BOIL & SIMMER Boiling and Simmering KEEP WARM Keep Warm Instructions 1. Select START. Assisted Cooking Scroll through the Assisted Cooking menu until the desired food selection is operating...

Owners Manual 1
Page 11
..., adjust the oven calibration, change the language, and more detailed instructions. ■■ SAID Code: The SAID code is used . Select the Tools keypad to view the Tools features: ■■ Remote Enable ■■ Kitchen Timer ■■ Light ■■ Mute ■■ Control Lock See the "More Modes" section for the Wi-Fi module. Tools Available Selections Preferences Times and Dates Set time and...
..., adjust the oven calibration, change the language, and more detailed instructions. ■■ SAID Code: The SAID code is used . Select the Tools keypad to view the Tools features: ■■ Remote Enable ■■ Kitchen Timer ■■ Light ■■ Mute ■■ Control Lock See the "More Modes" section for the Wi-Fi module. Tools Available Selections Preferences Times and Dates Set time and...

Owners Manual 1
Page 12
... your product to order. 12 Do not operate the microwave oven without the turntable in oven. ■■ Restore Factory: This will soften soil. Always follow label instructions on panel. ■■ All-Purpose Appliance Cleaner Part Number 31662 (not included): See the "Assistance or Service" section to the original factory default settings. ■■ Wi-Fi Terms and Conditions: www.whirlpool.com/connect...
... your product to order. 12 Do not operate the microwave oven without the turntable in oven. ■■ Restore Factory: This will soften soil. Always follow label instructions on panel. ■■ All-Purpose Appliance Cleaner Part Number 31662 (not included): See the "Assistance or Service" section to the original factory default settings. ■■ Wi-Fi Terms and Conditions: www.whirlpool.com/connect...

Owners Manual 1
Page 13
.... Directions Display Shows Time Countdown, But Is Not Operating The Minute Timer is normal and depends on . Do not operate the microwave oven without turntable and turntable support working properly: Heat 1 cup (250 mL) of cycle. Humming Noise Microwave Oven Door This is not completely closed: Firmly close the door. See "Preferences" in the "Microwave Oven Use" section. The electronic oven control is not set correctly: See the lower oven Use and Care Guide. Replace turntable. Cooking Times Seem Too Long The cooking power...
.... Directions Display Shows Time Countdown, But Is Not Operating The Minute Timer is normal and depends on . Do not operate the microwave oven without turntable and turntable support working properly: Heat 1 cup (250 mL) of cycle. Humming Noise Microwave Oven Door This is not completely closed: Firmly close the door. See "Preferences" in the "Microwave Oven Use" section. The electronic oven control is not set correctly: See the lower oven Use and Care Guide. Replace turntable. Cooking Times Seem Too Long The cooking power...

Owners Manual 1
Page 14
... Broiler Pan and Grid Order Part Number 4396923 Premium Broiler Pan and Roasting Rack Order Part Number W10123240 affresh® Stainless Steel Cleaner (stainless steel models) Order Part Number W10355016 affresh® Kitchen and Appliance Cleaner Order Part Number W10355010 Microwave Steamer Order Part Number 8205262RB 30" FIT Kit Vent Trim for Combo Ovens Order Part Number W10495947 27" FIT Kit Vent Trim for assistance or service, please check the "Troubleshooting" section. If you still need to fulfill the product warranty and provide after -warranty service...
... Broiler Pan and Grid Order Part Number 4396923 Premium Broiler Pan and Roasting Rack Order Part Number W10123240 affresh® Stainless Steel Cleaner (stainless steel models) Order Part Number W10355016 affresh® Kitchen and Appliance Cleaner Order Part Number W10355010 Microwave Steamer Order Part Number 8205262RB 30" FIT Kit Vent Trim for Combo Ovens Order Part Number W10495947 27" FIT Kit Vent Trim for assistance or service, please check the "Troubleshooting" section. If you still need to fulfill the product warranty and provide after -warranty service...
Owners Manual 1
Page 15
... product. Proof of the Use and Care Guide, or visit www.whirlpool.com/product_help. 2. Service or parts for service in -home repair. Please have other damage to the appliance finishes YOUR SOLE AND EXCLUSIVE REMEDY UNDER THIS LIMITED unless such damage results from state to state or province to review the Troubleshooting or Problem Solver section of original purchase date is installed, installation instructions. All warranty service...
... product. Proof of the Use and Care Guide, or visit www.whirlpool.com/product_help. 2. Service or parts for service in -home repair. Please have other damage to the appliance finishes YOUR SOLE AND EXCLUSIVE REMEDY UNDER THIS LIMITED unless such damage results from state to state or province to review the Troubleshooting or Problem Solver section of original purchase date is installed, installation instructions. All warranty service...
Installation Instructions
Page 4
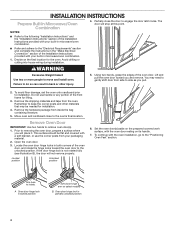
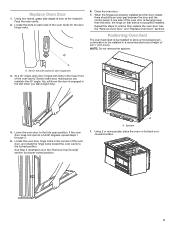
... may need to gently shift door from your built-in microwave/oven combination. 1. NOTES: ■■ Refer to the "Electrical Requirements" section and complete the instructions in locked position Soft close hinge arm on the prepared covered work surface, with a soft blanket, or use handle or any portion of the Installation Instructions provided with the oven installation, go to side as you and remove. To avoid floor damage, set the oven...
... may need to gently shift door from your built-in microwave/oven combination. 1. NOTES: ■■ Refer to the "Electrical Requirements" section and complete the instructions in locked position Soft close hinge arm on the prepared covered work surface, with a soft blanket, or use handle or any portion of the Installation Instructions provided with the oven installation, go to side as you and remove. To avoid floor damage, set the oven...
Installation Instructions
Page 5
... oven door does not open to the fully open position. Spacers 1. See the "Remove Oven Door" and "Replace Oven Door" sections Positioning Oven Feet The oven feet need to be installed to allow a microwave/oven combination to remove then replace the oven door. If one side of the oven door is engaged in a recommended cutout height of the oven cavity for proper locked position. At a 45° angle, align door hinges with slots in the "Remove Oven Door(s)" section for the door hinge locks...
... oven door does not open to the fully open position. Spacers 1. See the "Remove Oven Door" and "Replace Oven Door" sections Positioning Oven Feet The oven feet need to be installed to allow a microwave/oven combination to remove then replace the oven door. If one side of the oven door is engaged in a recommended cutout height of the oven cavity for proper locked position. At a 45° angle, align door hinges with slots in the "Remove Oven Door(s)" section for the door hinge locks...

Installation Instructions
Page 8
... double ovens to 2 minutes. 5. Let microwave oven complete cooking time. When display reads "1:00", open microwave oven door. Check that all packaging materials. 4. Press START. The microwave should turn off . 7. If the display panel does not light, refer to see which step was skipped. 2. Select BROIL. 5. Check Operation of Microwave Oven 1. If there is connected. ■■ See the "Troubleshooting" section in and microwave ovens. 8 At first use and cleaning, read the Use and Care Guide. 2. Select Cooking Method. 4. The interior microwave oven light...
... double ovens to 2 minutes. 5. Let microwave oven complete cooking time. When display reads "1:00", open microwave oven door. Check that all packaging materials. 4. Press START. The microwave should turn off . 7. If the display panel does not light, refer to see which step was skipped. 2. Select BROIL. 5. Check Operation of Microwave Oven 1. If there is connected. ■■ See the "Troubleshooting" section in and microwave ovens. 8 At first use and cleaning, read the Use and Care Guide. 2. Select Cooking Method. 4. The interior microwave oven light...
Owners Manual
Page 1
...Contents OVEN SAFETY 2 OVEN USE 3 Feature Guide 3 Touch Panel 4 Display 4 Display Navigation 4 Setup and Demo Mode 4 Cooking Methods 4 Favorites 6 Assisted Cooking 6 Tools 7 More Modes 8 Aluminum Foil 9 Positioning Racks and Bakeware 9 Oven Vent(s 10 Preheating and Oven Temperature 10 Baking and Roasting 11 Broiling 11 OVEN CARE 12 Self-Cleaning Cycle 12 Steam Clean 13 General Cleaning 13 Oven Lights 14 TROUBLESHOOTING 14 ASSISTANCE OR SERVICE 16 In the U.S.A 16 Accessories 16 In Canada 16 WARRANTY 17 W11220320A In Canada, register your oven at www.whirlpool...
...Contents OVEN SAFETY 2 OVEN USE 3 Feature Guide 3 Touch Panel 4 Display 4 Display Navigation 4 Setup and Demo Mode 4 Cooking Methods 4 Favorites 6 Assisted Cooking 6 Tools 7 More Modes 8 Aluminum Foil 9 Positioning Racks and Bakeware 9 Oven Vent(s 10 Preheating and Oven Temperature 10 Baking and Roasting 11 Broiling 11 OVEN CARE 12 Self-Cleaning Cycle 12 Steam Clean 13 General Cleaning 13 Oven Lights 14 TROUBLESHOOTING 14 ASSISTANCE OR SERVICE 16 In the U.S.A 16 Accessories 16 In Canada 16 WARRANTY 17 W11220320A In Canada, register your oven at www.whirlpool...

Owners Manual
Page 2
... inside, on Grease Fires - Other surfaces of fire, electrical shock, injury to burst and result in color. among these openings, oven doors, and windows of pressure may cause container to persons, or damage when using the oven. ■ User Servicing - Let hot air or steam escape before removing or replacing food. ■ Do Not Heat Unopened Food Containers - For smart enabled ranges and ovens: ■ Remote Operation...
... inside, on Grease Fires - Other surfaces of fire, electrical shock, injury to burst and result in color. among these openings, oven doors, and windows of pressure may cause container to persons, or damage when using the oven. ■ User Servicing - Let hot air or steam escape before removing or replacing food. ■ Do Not Heat Unopened Food Containers - For smart enabled ranges and ovens: ■ Remote Operation...

Owners Manual
Page 4
... operation, the display will remain bright. NOTE: The display screen will sound when preheating is off, touch the Oven Power or Microwave Power keypad for the options being chosen. Select the Tools keypad. Cooking Method Feature BAKE Baking and Roasting BROIL Broiling Instructions 1. Select COOKING METHODS. 3. The touch keypads are very sensitive and require only a light touch to enter Demo Mode. When the oven is not set, you to begin broiling. 6. During use...
... operation, the display will remain bright. NOTE: The display screen will sound when preheating is off, touch the Oven Power or Microwave Power keypad for the options being chosen. Select the Tools keypad. Cooking Method Feature BAKE Baking and Roasting BROIL Broiling Instructions 1. Select COOKING METHODS. 3. The touch keypads are very sensitive and require only a light touch to enter Demo Mode. When the oven is not set, you to begin broiling. 6. During use...
Owners Manual
Page 7
... Terms and Conditions: www.whirlpool.com/connect. ■■ Software Terms and Conditions. 7 Select YES on . Self Clean option is in Demo Mode after a power failure, if set automatically. ■■ Your Meal Times: Adjust when breakfast/lunch/dinner is opened , the oven light will be locked. To Lock or Unlock the Control: 1. Select TRY THE PRODUCT. 2. Manually input the time to end the Kitchen Timer. Start Demo Mode 1. Select the Tools keypad...
... Terms and Conditions: www.whirlpool.com/connect. ■■ Software Terms and Conditions. 7 Select YES on . Self Clean option is in Demo Mode after a power failure, if set automatically. ■■ Your Meal Times: Adjust when breakfast/lunch/dinner is opened , the oven light will be locked. To Lock or Unlock the Control: 1. Select TRY THE PRODUCT. 2. Manually input the time to end the Kitchen Timer. Start Demo Mode 1. Select the Tools keypad...

Owners Manual
Page 12
... Self-Cleaning cycle. 12 To Delay Start Self-Cleaning Cycle: Follow steps 1 through the oven vent(s). The oven doors will remain locked. When the Self-Cleaning cycle is too high, the door will automatically lock after everyday light spills using lower heat and 11/4 cups (295.74 mL) of Self-Cleaning: Steam: 1 hour: Clean up after the Delay Start countdown. If the oven temperature is complete and the oven cools, the oven doors will not unlock until the oven cools. Suggested clean times...
... Self-Cleaning cycle. 12 To Delay Start Self-Cleaning Cycle: Follow steps 1 through the oven vent(s). The oven doors will remain locked. When the Self-Cleaning cycle is too high, the door will automatically lock after everyday light spills using lower heat and 11/4 cups (295.74 mL) of Self-Cleaning: Steam: 1 hour: Clean up after the Delay Start countdown. If the oven temperature is complete and the oven cools, the oven doors will not unlock until the oven cools. Suggested clean times...
Owners Manual
Page 14
... used for contact information. Warm air coming from the oven vent. At high temperatures, foods react with porcelain and staining, etching, pitting, or faint white spots can help reduce preheat time. 14 On double oven models, one oven is self-cleaning: When one oven is set or turned on oven walls and doors: Run additional Clean cycles. Error code (display shows letter followed by turning clockwise. 6. See cycle instructions for service. Removing unused oven racks prior to clear the display. Oven Lights The oven light...
... used for contact information. Warm air coming from the oven vent. At high temperatures, foods react with porcelain and staining, etching, pitting, or faint white spots can help reduce preheat time. 14 On double oven models, one oven is self-cleaning: When one oven is set or turned on oven walls and doors: Run additional Clean cycles. Error code (display shows letter followed by turning clockwise. 6. See cycle instructions for service. Removing unused oven racks prior to clear the display. Oven Lights The oven light...
Owners Manual
Page 17
... warranty service is used in the country in fixtures (i.e. In-home instruction on the duration of implied warranties of incidental or consequential damages, so these excluded circumstances shall be warranted for 8. Specified Replacement Parts and repair 4. light bulbs, batteries, air or water filters, preservation solutions, etc.). your retailer about the quality, durability, or need for appliances with products not approved by our authorized Whirlpool Service Providers. warranty...
... warranty service is used in the country in fixtures (i.e. In-home instruction on the duration of implied warranties of incidental or consequential damages, so these excluded circumstances shall be warranted for 8. Specified Replacement Parts and repair 4. light bulbs, batteries, air or water filters, preservation solutions, etc.). your retailer about the quality, durability, or need for appliances with products not approved by our authorized Whirlpool Service Providers. warranty...


