Installation Guide
Page 1
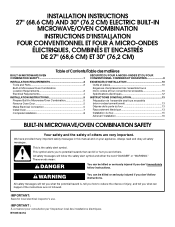
... symbol and either the word "DANGER" or "WARNING." IMPORTANT : À conserver pour consultation par l'inspecteur local des installations électriques. INSTALLATION INSTRUCTIONS 27" (68.6 CM) AND 30" (76.2 CM) ELECTRIC BUILT-IN MICROWAVE/OVEN COMBINATION INSTRUCTIONS D'INSTALLATION FOUR CONVENTIONNEL ET FOUR À MICRO-ONDES ÉLECTRIQUES, COMBINÉS ET ENCASTRÉS DE 27" (68,6 CM...
... symbol and either the word "DANGER" or "WARNING." IMPORTANT : À conserver pour consultation par l'inspecteur local des installations électriques. INSTALLATION INSTRUCTIONS 27" (68.6 CM) AND 30" (76.2 CM) ELECTRIC BUILT-IN MICROWAVE/OVEN COMBINATION INSTRUCTIONS D'INSTALLATION FOUR CONVENTIONNEL ET FOUR À MICRO-ONDES ÉLECTRIQUES, COMBINÉS ET ENCASTRÉS DE 27" (68,6 CM...
Installation Guide
Page 2
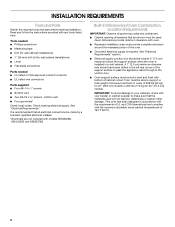
Read and follow the instructions provided with your builder or cabinet supplier to the junction box. ■ Oven support surface must be solid, level and flush with models KEMS308S, KEHU309S ... ■ Four #8-14 x 1" screws ■ Bottom vent ■ Two #8-18 x ³⁄₈" screws - A 1" (2.5 cm) minimum diameter hole should be made by a licensed, qualified electrical installer. *Grommets are shown must provide complete enclosure around the recessed portion of the support surface to pass the appliance cable through to make sure that...
Read and follow the instructions provided with your builder or cabinet supplier to the junction box. ■ Oven support surface must be solid, level and flush with models KEMS308S, KEHU309S ... ■ Four #8-14 x 1" screws ■ Bottom vent ■ Two #8-18 x ³⁄₈" screws - A 1" (2.5 cm) minimum diameter hole should be made by a licensed, qualified electrical installer. *Grommets are shown must provide complete enclosure around the recessed portion of the support surface to pass the appliance cable through to make sure that...

Installation Guide
Page 4
...240 VAC 208 VAC 5490 W 4590 W 30.4 A 28.4 A 5520 W 4620 W 30.5 A 28.6 A For power requirements for models WOC54EC7A, WOC54EC0A, WOC95EC0A and MMW9730A, refer to aluminum. Follow the electrical connector manufacturer's recommended procedure. See "Make Electrical Connection" section. ■ Flexible conduit... as specified on the model/serial number rating plate. Check with a qualified electrical installer if you will be provided. ■ If the house has aluminum wiring follow the instructions provided for model KEHU309B, refer to the junction box. 208 VAC 32.8 A 32...
...240 VAC 208 VAC 5490 W 4590 W 30.4 A 28.4 A 5520 W 4620 W 30.5 A 28.6 A For power requirements for models WOC54EC7A, WOC54EC0A, WOC95EC0A and MMW9730A, refer to aluminum. Follow the electrical connector manufacturer's recommended procedure. See "Make Electrical Connection" section. ■ Flexible conduit... as specified on the model/serial number rating plate. Check with a qualified electrical installer if you will be provided. ■ If the house has aluminum wiring follow the instructions provided for model KEHU309B, refer to the junction box. 208 VAC 32.8 A 32...

Installation Guide
Page 5
INSTALLATION INSTRUCTIONS Prepare Built-In Microwave/Oven Combination 1. Decide on the final location for lifting. 3. Failure to do so can result in death, fire, or electrical shock. Move oven and cardboard close . Electrically ground oven. Grasp the edges of electrical connection. 5 This oven is present. 4. Install..., you and remove. Oven door latch in death, fire, or electrical shock. See "Electrical Connection Options Chart" to complete installation for your type of the oven door with a neutral (white) power supply wire and a cabinet-connected green (or bare)...
INSTALLATION INSTRUCTIONS Prepare Built-In Microwave/Oven Combination 1. Decide on the final location for lifting. 3. Failure to do so can result in death, fire, or electrical shock. Move oven and cardboard close . Electrically ground oven. Grasp the edges of electrical connection. 5 This oven is present. 4. Install..., you and remove. Oven door latch in death, fire, or electrical shock. See "Electrical Connection Options Chart" to complete installation for your type of the oven door with a neutral (white) power supply wire and a cabinet-connected green (or bare)...

Installation Guide
Page 7
...seal area of hinges into slots (A) in the oven frame. 9. Check that door is not, repeat the removal and installation procedures. Mounting rail hole C. See the following instructions to the oven. A 2. Oven vent 7. See "Prepare Built-In Microwave/Oven Combination" section. 12. On some models..., the oven vent is taped to the side of the vent, fasten vent securely to install. ■ Insert the vent tabs...
...seal area of hinges into slots (A) in the oven frame. 9. Check that door is not, repeat the removal and installation procedures. Mounting rail hole C. See the following instructions to the oven. A 2. Oven vent 7. See "Prepare Built-In Microwave/Oven Combination" section. 12. On some models..., the oven vent is taped to the side of the vent, fasten vent securely to install. ■ Insert the vent tabs...

Use & Care Guide
Page 3
...9632; Do Not Use Oven Cleaners - If rack must be worn while using the oven, follow basic precautions, including the following: ■ Proper Installation - among these openings, oven doors, and windows of Oven Racks - For self-cleaning ovens: ■ Do Not Clean Gasket - Always place ...elements. Interior surfaces of fire, electrical shock, injury to persons, or damage when using the oven. ■ User Servicing - IMPORTANT SAFETY INSTRUCTIONS WARNING: To reduce the risk of an oven become hot enough to cause burns - Build-up of pressure may become hot enough to ...
...9632; Do Not Use Oven Cleaners - If rack must be worn while using the oven, follow basic precautions, including the following: ■ Proper Installation - among these openings, oven doors, and windows of Oven Racks - For self-cleaning ovens: ■ Do Not Clean Gasket - Always place ...elements. Interior surfaces of fire, electrical shock, injury to persons, or damage when using the oven. ■ User Servicing - IMPORTANT SAFETY INSTRUCTIONS WARNING: To reduce the risk of an oven become hot enough to cause burns - Build-up of pressure may become hot enough to ...

Use & Care Guide
Page 16
...glass bulb cover in the back of the oven counterclockwise to remove from the oven door frame. 3. Turn bulb counterclockwise to remove. Then, follow these instructions. Open the oven door. Oven Light The oven's light is set objects on each side. 3. Before replacing, make sure the oven is heavy....door. You should hear a "click" as it is free to the locked position. Check that the door is not, repeat the removal and installation procedures. 16 However, if removal is necessary, make sure the oven and cooktop are cool and the control knobs are not fully inserted into ...
...glass bulb cover in the back of the oven counterclockwise to remove from the oven door frame. 3. Turn bulb counterclockwise to remove. Then, follow these instructions. Open the oven door. Oven Light The oven's light is set objects on each side. 3. Before replacing, make sure the oven is heavy....door. You should hear a "click" as it is free to the locked position. Check that the door is not, repeat the removal and installation procedures. 16 However, if removal is necessary, make sure the oven and cooktop are cool and the control knobs are not fully inserted into ...
Use & Care Guide
Page 18
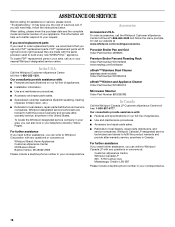
When calling, please know the purchase date and the complete model and serial number of appliances. ■ Installation information. ■ Use and maintenance procedures. ■ Accessory and repair parts sales. ■ Specialized ...whirlpool.com/cookingaccessories. Our consultants provide assistance with : ■ Features and specifications on our full line of your nearest Whirlpool designated service center. Mississauga, Ontario L5N 0B7 Please include a daytime phone number in your correspondence. 18 Or visit our website at 1-866-664-2449 and follow the instructions...
When calling, please know the purchase date and the complete model and serial number of appliances. ■ Installation information. ■ Use and maintenance procedures. ■ Accessory and repair parts sales. ■ Specialized ...whirlpool.com/cookingaccessories. Our consultants provide assistance with : ■ Features and specifications on our full line of your nearest Whirlpool designated service center. Mississauga, Ontario L5N 0B7 Please include a daytime phone number in your correspondence. 18 Or visit our website at 1-866-664-2449 and follow the instructions...
Use & Care Guide
Page 19
...installed in accordance with published installation instructions. 11. Write down the following information about your sales slip together for repairs. Proof of your complete model number and serial number. Damage resulting from accident, alteration, misuse, abuse, fire, flood, acts of God, improper installation, installation not in -home service is covered by an authorized Whirlpool...9/07 Keep this book and your major appliance to published user or operator instructions and/or installation instructions. 4. ITEMS EXCLUDED FROM WARRANTY This limited warranty does not cover: 1. ...
...installed in accordance with published installation instructions. 11. Write down the following information about your sales slip together for repairs. Proof of your complete model number and serial number. Damage resulting from accident, alteration, misuse, abuse, fire, flood, acts of God, improper installation, installation not in -home service is covered by an authorized Whirlpool...9/07 Keep this book and your major appliance to published user or operator instructions and/or installation instructions. 4. ITEMS EXCLUDED FROM WARRANTY This limited warranty does not cover: 1. ...
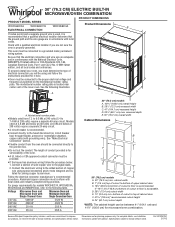
Dimension Guide
Page 1
...wire gauge are in conformance with a qualified electrical installer if you must be connected to a grounded metal, permanent wiring system. q Do not cut the conduit. q If the house has aluminum wiring follow the instructions provided for joining copper to the following illustration. ...cm) bottom of cutout to floor is for models WOC54EC7A, WOC54EC0A, WOC95EC0A and MMW9730A, refer to aluminum. D. 28¹⁄₂" (72.4 cm) cutout width E. 1¹⁄₂" (3.8 cm) min. Because Whirlpool Corporation policy includes a continuous commitment to improve Dimensions ...
...wire gauge are in conformance with a qualified electrical installer if you must be connected to a grounded metal, permanent wiring system. q Do not cut the conduit. q If the house has aluminum wiring follow the instructions provided for joining copper to the following illustration. ...cm) bottom of cutout to floor is for models WOC54EC7A, WOC54EC0A, WOC95EC0A and MMW9730A, refer to aluminum. D. 28¹⁄₂" (72.4 cm) cutout width E. 1¹⁄₂" (3.8 cm) min. Because Whirlpool Corporation policy includes a continuous commitment to improve Dimensions ...

Warranty Information
Page 1
...and transportation for product service if your sales slip together for Factory Specified Parts and repair labor to published user or operator instructions and/or installation instructions. 4. IMPLIED WARRANTIES, INCLUDING WARRANTIES OF MERCHANTABILITY OR FITNESS FOR A PARTICULAR PURPOSE, ARE LIMITED TO ONE YEAR OR THE... United States and Canada, this limited warranty does not apply. If outside the 50 United States and Canada, contact your authorized Whirlpool dealer to better help by checking the "Assistance or Service" section or by this warranty. 8. Dealer name Address Phone number ...
...and transportation for product service if your sales slip together for Factory Specified Parts and repair labor to published user or operator instructions and/or installation instructions. 4. IMPLIED WARRANTIES, INCLUDING WARRANTIES OF MERCHANTABILITY OR FITNESS FOR A PARTICULAR PURPOSE, ARE LIMITED TO ONE YEAR OR THE... United States and Canada, this limited warranty does not apply. If outside the 50 United States and Canada, contact your authorized Whirlpool dealer to better help by checking the "Assistance or Service" section or by this warranty. 8. Dealer name Address Phone number ...
