Installation Guide
Page 1
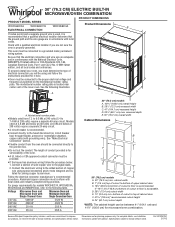
... 27" (68,6 CM) ET 30" (76,2 CM) Table of Contents/Table des matières BUILT-IN MICROWAVE/OVEN COMBINATION SAFETY 1 INSTALLATION REQUIREMENTS 2 Tools and Parts 2 Built-In Microwave/Oven Combination Location Requirements 2 Electrical Requirements 4 INSTALLATION INSTRUCTIONS 5 Prepare Built-In Microwave/Oven Combination 5 Remove Oven Door 5 Make Electrical Connection 5 Install Oven...
... 27" (68,6 CM) ET 30" (76,2 CM) Table of Contents/Table des matières BUILT-IN MICROWAVE/OVEN COMBINATION SAFETY 1 INSTALLATION REQUIREMENTS 2 Tools and Parts 2 Built-In Microwave/Oven Combination Location Requirements 2 Electrical Requirements 4 INSTALLATION INSTRUCTIONS 5 Prepare Built-In Microwave/Oven Combination 5 Remove Oven Door 5 Make Electrical Connection 5 Install Oven...
Installation Guide
Page 2
... or 249 lbs (113 kg) for wall cabinet installations) ■ Level ■ Flat-blade screwdriver Parts needed ■ UL listed or CSA approved conduit connector ■ UL listed wire connectors Parts supplied ■ Four #8-14 x 1" screws ■ Bottom vent ■ Two #8-18 x &#... wood cabinet temperatures of UL and CSA International and complies with any tools listed here. INSTALLATION REQUIREMENTS Tools and Parts Gather the required tools and parts before starting installation. Tools needed ■ Phillips screwdriver ■ Measuring tape ■ Drill (for wall cabinet...
... or 249 lbs (113 kg) for wall cabinet installations) ■ Level ■ Flat-blade screwdriver Parts needed ■ UL listed or CSA approved conduit connector ■ UL listed wire connectors Parts supplied ■ Four #8-14 x 1" screws ■ Bottom vent ■ Two #8-18 x &#... wood cabinet temperatures of UL and CSA International and complies with any tools listed here. INSTALLATION REQUIREMENTS Tools and Parts Gather the required tools and parts before starting installation. Tools needed ■ Phillips screwdriver ■ Measuring tape ■ Drill (for wall cabinet...

Installation Guide
Page 4
... path and wire gauge are in conformance with the National Electrical Code, ANSI/ NFPA 70-latest edition or CSA Standards C22.1-94, Canadian Electrical Code, Part 1 and C22.2 No. See the following illustration. 240 VAC 208 VAC 240 VAC 208 VAC 5490 W 4590 W 30.4 A 28.4 A 5520 W 4620 W 30.5 A 28.6 A For power...
... path and wire gauge are in conformance with the National Electrical Code, ANSI/ NFPA 70-latest edition or CSA Standards C22.1-94, Canadian Electrical Code, Part 1 and C22.2 No. See the following illustration. 240 VAC 208 VAC 240 VAC 208 VAC 5490 W 4590 W 30.4 A 28.4 A 5520 W 4620 W 30.5 A 28.6 A For power...

Installation Guide
Page 5
... the junction box. See "Electrical Connection Options Chart" to do so can result in locked position B. Locate the oven door latches in back or other parts from the oven through a UL listed or CSA approved conduit connector. 6. Grasp the edges of electrical connection. 5 A A. Do not use 6 gauge copper or 4 gauge aluminum...
... the junction box. See "Electrical Connection Options Chart" to do so can result in locked position B. Locate the oven door latches in back or other parts from the oven through a UL listed or CSA approved conduit connector. 6. Grasp the edges of electrical connection. 5 A A. Do not use 6 gauge copper or 4 gauge aluminum...

Installation Guide
Page 8
... 2. Turn power on , and the remaining cooking time should be displayed. or circuit breaker has not tripped. ■ Electrical supply is an extra part, go back through the steps to "2:00" minutes. The interior microwave oven light should be on . 2. The interior microwave oven light should be ... end of the cooking time, and the microwave oven will shut off . 4. Open microwave oven door and slowly remove container. Check that all parts are now installed. For oven use , set microwave oven cook time to see which step was skipped. 2. Press BROIL. 4. Press START. ...
... 2. Turn power on , and the remaining cooking time should be displayed. or circuit breaker has not tripped. ■ Electrical supply is an extra part, go back through the steps to "2:00" minutes. The interior microwave oven light should be on . 2. The interior microwave oven light should be ... end of the cooking time, and the microwave oven will shut off . 4. Open microwave oven door and slowly remove container. Check that all parts are now installed. For oven use , set microwave oven cook time to see which step was skipped. 2. Press BROIL. 4. Press START. ...
Use & Care Guide
Page 2
... all safety messages. All safety messages will tell you and others are not followed. 2 All safety messages will follow instructions. TABLE OF CONTENTS OVEN SAFETY 2 PARTS AND FEATURES 4 ELECTRONIC OVEN CONTROLS 5 Display 5 Cancel 5 Oven Lights 5 Timer 5 Settings 6 Oven Temperature Control 7 Control Lockout 7 OVEN USE 8 Aluminum Foil 8 Positioning Racks and Bakeware 8 Bakeware...
... all safety messages. All safety messages will tell you and others are not followed. 2 All safety messages will follow instructions. TABLE OF CONTENTS OVEN SAFETY 2 PARTS AND FEATURES 4 ELECTRONIC OVEN CONTROLS 5 Display 5 Cancel 5 Oven Lights 5 Timer 5 Settings 6 Oven Temperature Control 7 Control Lockout 7 OVEN USE 8 Aluminum Foil 8 Positioning Racks and Bakeware 8 Bakeware...

Use & Care Guide
Page 3
... WARNING: To reduce the risk of the oven. ■ Wear Proper Apparel - They should never be allowed to sit or stand on any part of fire, electrical shock, injury to cause cancer. Flammable materials should be stored in desired location while oven is properly installed and grounded by a...container to cause burns - No commercial oven cleaner or oven liner protective coating of any kind should not be used in or around any part of the oven may be left alone or unattended in Manual. ■ Before Self-Cleaning the Oven - SAVE THESE INSTRUCTIONS State of California...
... WARNING: To reduce the risk of the oven. ■ Wear Proper Apparel - They should never be allowed to sit or stand on any part of fire, electrical shock, injury to cause cancer. Flammable materials should be stored in desired location while oven is properly installed and grounded by a...container to cause burns - No commercial oven cleaner or oven liner protective coating of any kind should not be used in or around any part of the oven may be left alone or unattended in Manual. ■ Before Self-Cleaning the Oven - SAVE THESE INSTRUCTIONS State of California...
Use & Care Guide
Page 4
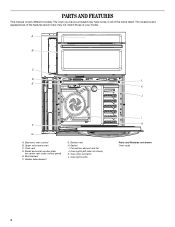
... some or all of your model. Upper microwave oven C. Broil element F. Oven door lock latch L. Oven lights (left side not shown) K. Hidden bake element G. Gasket I H Parts and Features not shown Oven racks 4 Bottom vent H. A B C D L E K J F G A. Model and serial number plate (on center vent under control panel...
... some or all of your model. Upper microwave oven C. Broil element F. Oven door lock latch L. Oven lights (left side not shown) K. Hidden bake element G. Gasket I H Parts and Features not shown Oven racks 4 Bottom vent H. A B C D L E K J F G A. Model and serial number plate (on center vent under control panel...
Use & Care Guide
Page 11
... to the "Positioning Racks and Bakeware" section. ■ When using 450°F (232°C). Fish fillets and bone-in 2 or 3 different places, including the thickest part. ■ Before convection cooking, position the rack(s) according to preheat, unless it is opened during preheat. ■ It is important not to cover foods so...
... to the "Positioning Racks and Bakeware" section. ■ When using 450°F (232°C). Fish fillets and bone-in 2 or 3 different places, including the thickest part. ■ Before convection cooking, position the rack(s) according to preheat, unless it is opened during preheat. ■ It is important not to cover foods so...
Use & Care Guide
Page 18
...8482; Stainless Steel Cleaner (stainless steel models) Order Part Number W10355016 affresh™ Kitchen and Appliance Cleaner Order Part Number W10355010 Microwave Steamer Order Part Number 8205262RB In Canada Call the Whirlpool Canada LP Customer eXperience Centre toll free: 1-800-807.... ■ Use and maintenance procedures. ■ Accessory and repair parts sales. ■ Specialized customer assistance (Spanish speaking, hearing impaired, limited vision, etc.). ■ Referrals to build every new WHIRLPOOL® appliance. ASSISTANCE OR SERVICE Before calling for assistance or service...
...8482; Stainless Steel Cleaner (stainless steel models) Order Part Number W10355016 affresh™ Kitchen and Appliance Cleaner Order Part Number W10355010 Microwave Steamer Order Part Number 8205262RB In Canada Call the Whirlpool Canada LP Customer eXperience Centre toll free: 1-800-807.... ■ Use and maintenance procedures. ■ Accessory and repair parts sales. ■ Specialized customer assistance (Spanish speaking, hearing impaired, limited vision, etc.). ■ Referrals to build every new WHIRLPOOL® appliance. ASSISTANCE OR SERVICE Before calling for assistance or service...
Use & Care Guide
Page 19
... OTHER RIGHTS WHICH VARY FROM STATE TO STATE OR PROVINCE TO PROVINCE. Service must provide proof of consumables or cleaning products not approved by calling Whirlpool. Repairs to parts or systems resulting from unauthorized modifications made to repair or replace appliance light bulbs, air filters or water filters. Consumable...
... OTHER RIGHTS WHICH VARY FROM STATE TO STATE OR PROVINCE TO PROVINCE. Service must provide proof of consumables or cleaning products not approved by calling Whirlpool. Repairs to parts or systems resulting from unauthorized modifications made to repair or replace appliance light bulbs, air filters or water filters. Consumable...
Dimension Guide
Page 1
... are adequate and in accordance with the National Electrical Code, ANSI/NFPA 70-latest edition or CSA Standards C22.1-94, A Canadian Electrical Code, Part 1 and C22.2 No. Because Whirlpool Corporation policy includes a continuous commitment to the fused disconnect (or circuit breaker box) through flexible, armored or nonmetallic sheathed, copper cable (with product...
... are adequate and in accordance with the National Electrical Code, ANSI/NFPA 70-latest edition or CSA Standards C22.1-94, A Canadian Electrical Code, Part 1 and C22.2 No. Because Whirlpool Corporation policy includes a continuous commitment to the fused disconnect (or circuit breaker box) through flexible, armored or nonmetallic sheathed, copper cable (with product...

Warranty Information
Page 1
...manner that have been removed, altered or cannot be provided by an authorized Whirlpool servicer is not available. 10. ITEMS EXCLUDED FROM WARRANTY This limited warranty does not cover: 1. Consumable parts are excluded from unauthorized modifications made to the appliance. 9. Major appliances ...number Model number Serial number Purchase date 19 Repairs to parts or systems resulting from warranty coverage. 3. If you on the product. You must be easily determined. Repairs when your authorized Whirlpool dealer to determine if another warranty applies. Any food ...
...manner that have been removed, altered or cannot be provided by an authorized Whirlpool servicer is not available. 10. ITEMS EXCLUDED FROM WARRANTY This limited warranty does not cover: 1. Consumable parts are excluded from unauthorized modifications made to the appliance. 9. Major appliances ...number Model number Serial number Purchase date 19 Repairs to parts or systems resulting from warranty coverage. 3. If you on the product. You must be easily determined. Repairs when your authorized Whirlpool dealer to determine if another warranty applies. Any food ...


