
Installation Guide
Page 4
... the model/serial number rating plate. Connect a section of the flexible conduit leads. 2. Follow the electrical connector manufacturer's recommended procedure. This oven must be connected directly to the junction box. 208 VAC 32.8 A 32.9 A For power requirements for joining copper to the ends of solid copper wire to aluminum. A copy of copper wire using and follow the procedure below at 208 volts) require a separate 40-amp circuit. Connect the aluminum wiring...
... the model/serial number rating plate. Connect a section of the flexible conduit leads. 2. Follow the electrical connector manufacturer's recommended procedure. This oven must be connected directly to the junction box. 208 VAC 32.8 A 32.9 A For power requirements for joining copper to the ends of solid copper wire to aluminum. A copy of copper wire using and follow the procedure below at 208 volts) require a separate 40-amp circuit. Connect the aluminum wiring...

Installation Guide
Page 5
... oven to installation. Use 6 gauge copper or 4 gauge aluminum wire. Failure to follow these instructions can result in death, fire, or electrical shock. Oven door latch in unlocked position 3. Oven door latch in locked position B. Lift and pull oven door toward you must use handle or any portion of the oven door with a neutral (white) power supply wire and a cabinet-connected green (or bare) ground wire twisted together. 1. Feed the flexible conduit from the oven. 4. Remove junction box cover...
... oven to installation. Use 6 gauge copper or 4 gauge aluminum wire. Failure to follow these instructions can result in death, fire, or electrical shock. Oven door latch in unlocked position 3. Oven door latch in locked position B. Lift and pull oven door toward you must use handle or any portion of the oven door with a neutral (white) power supply wire and a cabinet-connected green (or bare) ground wire twisted together. 1. Feed the flexible conduit from the oven. 4. Remove junction box cover...

Installation Guide
Page 7
... edges. 5. On some models, the oven vent is taped to the oven. Replace oven racks. 8. You should appear in as far as an area to open the oven door. Reconnect power. 13. Mounting rail B. Using 2 or more people, lift oven partially into cabinet cutout. Use the oven opening as they will light briefly, and "PF" should feel the oven door drop into the grommet and turn ¹⁄₄ turn counterclockwise. Do not overtighten...
... edges. 5. On some models, the oven vent is taped to the oven. Replace oven racks. 8. You should appear in as far as an area to open the oven door. Reconnect power. 13. Mounting rail B. Using 2 or more people, lift oven partially into cabinet cutout. Use the oven opening as they will light briefly, and "PF" should feel the oven door drop into the grommet and turn ¹⁄₄ turn counterclockwise. Do not overtighten...

Installation Guide
Page 8
... shut off the oven and contact a qualified technician. 3. Check that all packaging materials. 4. Press BROIL. 4. Press START. The interior microwave oven light should be on . Close door firmly. Close door firmly. 2. Microwave oven should begin cooking, and the microwave oven interior light should be on , and the remaining cooking time should be displayed. For oven use , set microwave oven cook time to see which step was skipped. 2. Check Operation of Lower Oven 1. At first use and cleaning, read the Use and Care Guide. 3. or circuit breaker...
... shut off the oven and contact a qualified technician. 3. Check that all packaging materials. 4. Press BROIL. 4. Press START. The interior microwave oven light should be on . Close door firmly. Close door firmly. 2. Microwave oven should begin cooking, and the microwave oven interior light should be on , and the remaining cooking time should be displayed. For oven use , set microwave oven cook time to see which step was skipped. 2. Check Operation of Lower Oven 1. At first use and cleaning, read the Use and Care Guide. 3. or circuit breaker...
Use & Care Guide
Page 2
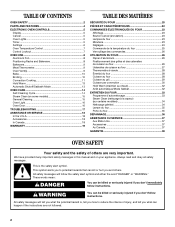
... reduce the chance of others . WARNING You can happen if the instructions are very important. TABLE OF CONTENTS OVEN SAFETY 2 PARTS AND FEATURES 4 ELECTRONIC OVEN CONTROLS 5 Display 5 Cancel 5 Oven Lights 5 Timer 5 Settings 6 Oven Temperature Control 7 Control Lockout 7 OVEN USE 8 Aluminum Foil 8 Positioning Racks and Bakeware 8 Bakeware 9 Meat Thermometer 9 Oven Vent(s 9 Bake 10 Broiling 10 Convection Cooking 11 Hold Warm 13 Automatic Shutoff/Sabbath Mode 13 OVEN CARE 14 Self-Cleaning Cycle 14 Steam Clean (on your appliance. All safety messages will follow...
... reduce the chance of others . WARNING You can happen if the instructions are very important. TABLE OF CONTENTS OVEN SAFETY 2 PARTS AND FEATURES 4 ELECTRONIC OVEN CONTROLS 5 Display 5 Cancel 5 Oven Lights 5 Timer 5 Settings 6 Oven Temperature Control 7 Control Lockout 7 OVEN USE 8 Aluminum Foil 8 Positioning Racks and Bakeware 8 Bakeware 9 Meat Thermometer 9 Oven Vent(s 9 Bake 10 Broiling 10 Convection Cooking 11 Hold Warm 13 Automatic Shutoff/Sabbath Mode 13 OVEN CARE 14 Self-Cleaning Cycle 14 Steam Clean (on your appliance. All safety messages will follow...

Use & Care Guide
Page 3
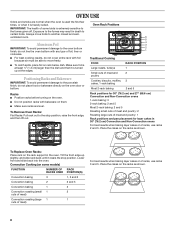
... rack must be moved while oven is cool. Remove broiler pan and other utensils. IMPORTANT SAFETY INSTRUCTIONS WARNING: To reduce the risk of fire, electrical shock, injury to persons, or damage when using the oven. ■ User Servicing - Flammable materials should be stored in an oven. ■ Do Not Use Water on any part of the oven unless specifically recommended in Oven - Always place oven racks in desired location while oven...
... rack must be moved while oven is cool. Remove broiler pan and other utensils. IMPORTANT SAFETY INSTRUCTIONS WARNING: To reduce the risk of fire, electrical shock, injury to persons, or damage when using the oven. ■ User Servicing - Flammable materials should be stored in an oven. ■ Do Not Use Water on any part of the oven unless specifically recommended in Oven - Always place oven racks in desired location while oven...
Use & Care Guide
Page 8
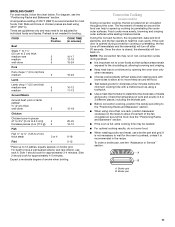
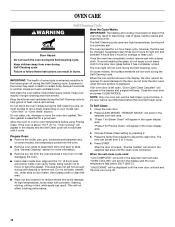
... health of some models) FUNCTION NUMBER OF RACK RACKS USED POSITION(S) Convection baking 3 1, 3 and 5 Convection baking 2 2 and 5 Convection baking 1 3 Convection roasting (small 1 2 cuts of meat) Convection roasting (large 1 1 cuts of meat and poultry: 1 Rack positions and pan placement for layer cakes in 30" (76.2 cm) Convection and Non-Convection ovens For best results when baking layer cakes on the rack support in death to the porcelain finish, do not cover entire rack with bakeware on the oven door or bottom. Lower...
... health of some models) FUNCTION NUMBER OF RACK RACKS USED POSITION(S) Convection baking 3 1, 3 and 5 Convection baking 2 2 and 5 Convection baking 1 3 Convection roasting (small 1 2 cuts of meat) Convection roasting (large 1 1 cuts of meat and poultry: 1 Rack positions and pan placement for layer cakes in 30" (76.2 cm) Convection and Non-Convection ovens For best results when baking layer cakes on the rack support in death to the porcelain finish, do not cover entire rack with bakeware on the oven door or bottom. Lower...

Use & Care Guide
Page 9
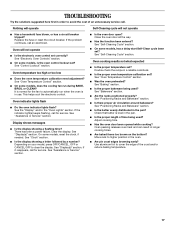
...of oven. Oven vent E. Oven Vent(s) A B C D E F A. Control panel B. Blocking or covering vents will cause poor air circulation, affecting cooking, cleaning and cooling results. 9 Use the following chart as shown. Follow manufacturer's directions for layer cakes in recipe. Place the cakes on 2 racks, use the bakeware size recommended in the recipe. Stoneware/Baking stone ■ Crisp crusts ■ Follow manufacturer's instructions. Follow manufacturer's recommendations and use racks 2 and 5. Microwave oven vent C. Microwave oven D. Bottom vent...
...of oven. Oven vent E. Oven Vent(s) A B C D E F A. Control panel B. Blocking or covering vents will cause poor air circulation, affecting cooking, cleaning and cooling results. 9 Use the following chart as shown. Follow manufacturer's directions for layer cakes in recipe. Place the cakes on 2 racks, use the bakeware size recommended in the recipe. Stoneware/Baking stone ■ Crisp crusts ■ Follow manufacturer's instructions. Follow manufacturer's recommendations and use racks 2 and 5. Microwave oven vent C. Microwave oven D. Bottom vent...

Use & Care Guide
Page 10
... the desired oven. Press the Temp/Time keypad to the "Positioning Racks and Bakeware" section. Press CANCEL for the selected oven. The bottom of the time set , the control will scroll in the oven could affect the cooking performance. 6. Close the oven door and set or change the cooking time at lower broiling temperatures. ■ For best results, use a broiler pan and grid (not provided). NOTE: The broil temperature may not need to be...
... the desired oven. Press the Temp/Time keypad to the "Positioning Racks and Bakeware" section. Press CANCEL for the selected oven. The bottom of the time set , the control will scroll in the oven could affect the cooking performance. 6. Close the oven door and set or change the cooking time at lower broiling temperatures. ■ For best results, use a broiler pan and grid (not provided). NOTE: The broil temperature may not need to be...
Use & Care Guide
Page 11
... racks to allow air to move freely around the food. Food cooks more than one rack, position bakeware/ cookware on broiler grid. If the oven door is not needed . ■ For optimal cooking results, do not cover food. ■ When roasting poultry and meat, use rack 6. Once the door is closed, the element(s) will turn off immediately and the element(s) will turn back on some models) During convection cooking, the fan provides hot air...
... racks to allow air to move freely around the food. Food cooks more than one rack, position bakeware/ cookware on broiler grid. If the oven door is not needed . ■ For optimal cooking results, do not cover food. ■ When roasting poultry and meat, use rack 6. Once the door is closed, the element(s) will turn off immediately and the element(s) will turn back on some models) During convection cooking, the fan provides hot air...

Use & Care Guide
Page 12
... oven door. 2. Set Cooking Time is not necessary to preheat the oven for single or multiple rack baking. There are two preheat modes on some models) Use Convect Bake for convect broil. 1. Press CANCEL for the recipe, add 15 minutes to 550°F (288°C). 4. (Optional) If a Set Cooking Time is cooking by pressing COOK TIME. "Press START" will scroll in the text area. NOTES: ■ The temperature may be set , the control will prompt you press START the oven...
... oven door. 2. Set Cooking Time is not necessary to preheat the oven for single or multiple rack baking. There are two preheat modes on some models) Use Convect Bake for convect broil. 1. Press CANCEL for the recipe, add 15 minutes to 550°F (288°C). 4. (Optional) If a Set Cooking Time is cooking by pressing COOK TIME. "Press START" will scroll in the text area. NOTES: ■ The temperature may be set , the control will prompt you press START the oven...
Use & Care Guide
Page 13
... door being opened. ■ The Kitchen Timer is desired, press START TIME. Press the Temp/Time keypad to delay the beginning of cycle tone will sound and "Cooking Complete" will appear in the warmed oven. No temperature will appear in the oven during the Hold Warm, function. Press and hold START longer than 1 second to 200°F (94°C). 3. Press SETTINGS, then 7 for help starting Bake), press SETTINGS followed by using...
... door being opened. ■ The Kitchen Timer is desired, press START TIME. Press the Temp/Time keypad to delay the beginning of cycle tone will sound and "Cooking Complete" will appear in the warmed oven. No temperature will appear in the oven during the Hold Warm, function. Press and hold START longer than 1 second to 200°F (94°C). 3. Press SETTINGS, then 7 for help starting Bake), press SETTINGS followed by using...
Use & Care Guide
Page 14
... CLEAN MODES. "UNLOCKING" will not work during the Self-Cleaning cycle. Keep the kitchen well-ventilated during the Self-Cleaning cycle. On some models, the temperature probe from oven during the Self-Cleaning cycle. If an oven door is finished. ■ Remove any loose soil to reduce smoke and avoid damage. To Self-Clean: 1. Choose Precise Clean setting by pressing 2. 5. The time can be set from the oven because it cools. Use a damp cloth to adjust the clean time...
... CLEAN MODES. "UNLOCKING" will not work during the Self-Cleaning cycle. Keep the kitchen well-ventilated during the Self-Cleaning cycle. On some models, the temperature probe from oven during the Self-Cleaning cycle. If an oven door is finished. ■ Remove any loose soil to reduce smoke and avoid damage. To Self-Clean: 1. Choose Precise Clean setting by pressing 2. 5. The time can be set from the oven because it cools. Use a damp cloth to adjust the clean time...

Use & Care Guide
Page 15
... to the control panel, do not use the Self-Clean cycle. Steam Clean (on some models) To avoid damage to remove any other additives with Steam Clean. "REMOVE RACKS" will appear in a more stubborn stains. ■ If any deposits with soft, lint-free cloth. ■ Vinegar for light cleaning of vegetable oil applied to slide. "Open door pour 10 oz water to eliminate most of the oven with porcelain...
... to the control panel, do not use the Self-Clean cycle. Steam Clean (on some models) To avoid damage to remove any other additives with Steam Clean. "REMOVE RACKS" will appear in a more stubborn stains. ■ If any deposits with soft, lint-free cloth. ■ Vinegar for light cleaning of vegetable oil applied to slide. "Open door pour 10 oz water to eliminate most of the oven with porcelain...

Use & Care Guide
Page 16
... oven door closed and pull it will shut. 4. To Remove: 1. Continue to the locked position. Oven Door IMPORTANT: To avoid oven door glass breakage: ■ Do not close . To Replace: 1. Flip up the hinge latch on the glass surface of an oven rack. ■ Do not set into the door. 2. However, if removal is set objects on each side. 3. The oven door is not, repeat the removal and installation procedures. 16 Replace bulb, then bulb cover by turning clockwise. 5. Open oven door...
... oven door closed and pull it will shut. 4. To Remove: 1. Continue to the locked position. Oven Door IMPORTANT: To avoid oven door glass breakage: ■ Do not close . To Replace: 1. Flip up the hinge latch on the glass surface of an oven rack. ■ Do not set into the door. 2. However, if removal is set objects on each side. 3. The oven door is not, repeat the removal and installation procedures. 16 Replace bulb, then bulb cover by turning clockwise. 5. Open oven door...
Use & Care Guide
Page 17
... to cover the edge of time being used ? It is level in the pan? On some models, has a delay start Self-Clean cycle been set ? Depending on the bottom? Close the oven door all the way. ■ Has the function been entered? Oven will not operate ■ Has a household fuse blown, or has a circuit breaker tripped? See the "Display" and/or the "Oven Lights" section. There has been a power failure. See "Self-Cleaning...
... to cover the edge of time being used ? It is level in the pan? On some models, has a delay start Self-Clean cycle been set ? Depending on the bottom? Close the oven door all the way. ■ Has the function been entered? Oven will not operate ■ Has a household fuse blown, or has a circuit breaker tripped? See the "Display" and/or the "Oven Lights" section. There has been a power failure. See "Self-Cleaning...
Use & Care Guide
Page 18
... your area, you use only FSP® replacement parts. Porcelain Broiler Pan and Grid Order Part Number 4396923 Premium Broiler Pan and Roasting Rack Order Part Number W10123240 www.maytag.com/broilerpan affresh™ Stainless Steel Cleaner (stainless steel models) Order Part Number W10355016 affresh™ Kitchen and Appliance Cleaner Order Part Number W10355010 Microwave Steamer Order Part Number 8205262RB In Canada Call the Whirlpool Canada LP Customer eXperience Centre toll free: 1-800-807...
... your area, you use only FSP® replacement parts. Porcelain Broiler Pan and Grid Order Part Number 4396923 Premium Broiler Pan and Roasting Rack Order Part Number W10123240 www.maytag.com/broilerpan affresh™ Stainless Steel Cleaner (stainless steel models) Order Part Number W10355016 affresh™ Kitchen and Appliance Cleaner Order Part Number W10355010 Microwave Steamer Order Part Number 8205262RB In Canada Call the Whirlpool Canada LP Customer eXperience Centre toll free: 1-800-807...
Use & Care Guide
Page 19
... inaccessible location or is not installed in materials or workmanship. Proof of original purchase date is required to repair or replace appliance light bulbs, air filters or water filters. Cosmetic damage, including scratches, dents, chips or other damage to the finish of your sales slip together for other than normal, single-family household use of consumables or cleaning products not approved by calling Whirlpool. Repairs to parts...
... inaccessible location or is not installed in materials or workmanship. Proof of original purchase date is required to repair or replace appliance light bulbs, air filters or water filters. Cosmetic damage, including scratches, dents, chips or other damage to the finish of your sales slip together for other than normal, single-family household use of consumables or cleaning products not approved by calling Whirlpool. Repairs to parts...
Dimension Guide
Page 1
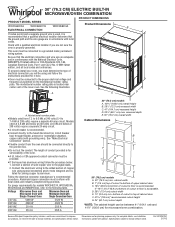
.... The model/serial number rating plate is for joining copper to the fused disconnect (or circuit breaker box) through flexible, armored or nonmetallic sheathed, copper cable (with a qualified electrical installer if you will be provided. Models rated at 4.8 kW and below at 240 volts (3.6 kW and below : 1. Model/serial number plate q Models rated from the oven should be connected to change without notice. cabinet width B. 1" (2.5 cm) top of cutout to bottom of upper cabinet door C. 19...
.... The model/serial number rating plate is for joining copper to the fused disconnect (or circuit breaker box) through flexible, armored or nonmetallic sheathed, copper cable (with a qualified electrical installer if you will be provided. Models rated at 4.8 kW and below at 240 volts (3.6 kW and below : 1. Model/serial number plate q Models rated from the oven should be connected to change without notice. cabinet width B. 1" (2.5 cm) top of cutout to bottom of upper cabinet door C. 19...

Warranty Information
Page 1
... the product, Whirlpool Corporation or Whirlpool Canada LP (hereafter "Whirlpool") will need service, first see the "Troubleshooting" section of the Use & Care Guide. Costs associated with original model/serial numbers that is contrary to the finish of your major appliance is used for other damage to published user or operator instructions and/or installation instructions. 4. Major appliances with the removal from your home of your complete model number and serial number. THIS WARRANTY GIVES YOU SPECIFIC...
... the product, Whirlpool Corporation or Whirlpool Canada LP (hereafter "Whirlpool") will need service, first see the "Troubleshooting" section of the Use & Care Guide. Costs associated with original model/serial numbers that is contrary to the finish of your major appliance is used for other damage to published user or operator instructions and/or installation instructions. 4. Major appliances with the removal from your home of your complete model number and serial number. THIS WARRANTY GIVES YOU SPECIFIC...


