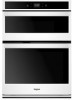

Specification Sheet
Page 1
... preheating. General Features & Properties Frozen Bake™ technology Multi-Step Cooking Steam Clean option Scan-to-Connect Technology Remote Start Keep Warm Setting Party Mode Enhanced Troubleshooting Guided Service Electrical Details Amps 40 Volts 240 Certifications Connected/Smart Appliance Yes Star-K Certified/Kosher Yes Technical Details Fuel Type Oven Type Oven Cooking System Number of Oven Racks Cleaning Type Dimensions Product Dimensions (H x W x D) Depth with Door Open 90° Cutout Dimensions (H x W x D) Reference Material Install Guide Use & Care Guide...
... preheating. General Features & Properties Frozen Bake™ technology Multi-Step Cooking Steam Clean option Scan-to-Connect Technology Remote Start Keep Warm Setting Party Mode Enhanced Troubleshooting Guided Service Electrical Details Amps 40 Volts 240 Certifications Connected/Smart Appliance Yes Star-K Certified/Kosher Yes Technical Details Fuel Type Oven Type Oven Cooking System Number of Oven Racks Cleaning Type Dimensions Product Dimensions (H x W x D) Depth with Door Open 90° Cutout Dimensions (H x W x D) Reference Material Install Guide Use & Care Guide...

Owners Manual 1
Page 3
... off power at the fuse or circuit breaker panel. - I As with narrow necks. - I Do not operate the microwave oven if it has a damaged cord or plug, if it is difficult to heat, cook, or dry food. Do not overheat the liquid. - Do not overcook food. I See door surface cleaning instructions in oven. Visible bubbling or boiling when the container is removed from paper or plastic bags before using electrical...
... off power at the fuse or circuit breaker panel. - I As with narrow necks. - I Do not operate the microwave oven if it has a damaged cord or plug, if it is difficult to heat, cook, or dry food. Do not overheat the liquid. - Do not overcook food. I See door surface cleaning instructions in oven. Visible bubbling or boiling when the container is removed from paper or plastic bags before using electrical...

Owners Manual 1
Page 4
... oven with the door open since open-door operation can result in harmful exposure to the equipment grounding terminal or lead on sealing surfaces. (c) Do not operate the oven if it is damaged. GROUNDING INSTRUCTIONS For a permanently connected microwave oven: The microwave oven must be connected to a grounded, metallic, permanent wiring system, or an equipment grounding conductor should not be adjusted or repaired by anyone except properly qualified service...
... oven with the door open since open-door operation can result in harmful exposure to the equipment grounding terminal or lead on sealing surfaces. (c) Do not operate the oven if it is damaged. GROUNDING INSTRUCTIONS For a permanently connected microwave oven: The microwave oven must be connected to a grounded, metallic, permanent wiring system, or an equipment grounding conductor should not be adjusted or repaired by anyone except properly qualified service...

Owners Manual 1
Page 5
... product use on the oven control panel. After approximately 2 minutes of day is very sensitive and requires only a light touch to view a video about the individual controls, see "To Exit Demo Mode" in this screen. Display Navigation If the microwave oven is already on the display screen to select a language, set the time. Follow the prompts on , the Oven Power/Cancel keypad stops any microwave oven function except the Clock, Timer, and Control Lock...
... product use on the oven control panel. After approximately 2 minutes of day is very sensitive and requires only a light touch to view a video about the individual controls, see "To Exit Demo Mode" in this screen. Display Navigation If the microwave oven is already on the display screen to select a language, set the time. Follow the prompts on , the Oven Power/Cancel keypad stops any microwave oven function except the Clock, Timer, and Control Lock...

Owners Manual 1
Page 8
... fish and meat loaf. Support and rollers C. Microwave Cooking Power Many recipes for microwave cooking specify which cooking power to use . For example, 70% = 7 = Medium-High. Heating cream soups. Reheating a single serving of meat, ground meat, poultry pieces, and fish fillets. Cooking sensitive foods such as a general guide for several minutes after the cooking cycle has been completed. Cooking ham, whole poultry, and pot roasts. Turntable A B C A. The rollers on . The microwave cooking does...
... fish and meat loaf. Support and rollers C. Microwave Cooking Power Many recipes for microwave cooking specify which cooking power to use . For example, 70% = 7 = Medium-High. Heating cream soups. Reheating a single serving of meat, ground meat, poultry pieces, and fish fillets. Cooking sensitive foods such as a general guide for several minutes after the cooking cycle has been completed. Cooking ham, whole poultry, and pot roasts. Turntable A B C A. The rollers on . The microwave cooking does...

Owners Manual 1
Page 10
... microwave oven sensor adjusts the cooking times and power levels for more quickly than 20 minutes or frozen ready-made food should be popped: 1.75-3.5 oz (50-99 g) bags. Slit the skins, if any time while the microwave oven is operating, press +2 min, +1 min, or +30 sec to customize the settings for steaming a number of food such as directed in the display screen. 5. Select SOFTEN. 4. Select START...
... microwave oven sensor adjusts the cooking times and power levels for more quickly than 20 minutes or frozen ready-made food should be popped: 1.75-3.5 oz (50-99 g) bags. Slit the skins, if any time while the microwave oven is operating, press +2 min, +1 min, or +30 sec to customize the settings for steaming a number of food such as directed in the display screen. 5. Select SOFTEN. 4. Select START...

Owners Manual 1
Page 11
... use of the microwave oven. NOTE: The display screen will display. 4. When the oven door is locked, only the Microwave and Oven Power, Tools, and Oven Light keypads will remain set after power up to Network: Download the Whirlpool® App from the app store on To Start Demo Mode 1. Turn the turntable on . Select TRY THE PRODUCT. 2. Select STORE DEMO MODE and select OFF. 6. Manually input the time to sync a smart device with the controls locked...
... use of the microwave oven. NOTE: The display screen will display. 4. When the oven door is locked, only the Microwave and Oven Power, Tools, and Oven Light keypads will remain set after power up to Network: Download the Whirlpool® App from the app store on To Start Demo Mode 1. Turn the turntable on . Select TRY THE PRODUCT. 2. Select STORE DEMO MODE and select OFF. 6. Manually input the time to sync a smart device with the controls locked...

Owners Manual 1
Page 12
... the microwave oven cavity, do not use abrasive cleaners, steel-wool pads, gritty washcloths or some paper towels. TURNTABLE Replace turntable immediately after cleaning. Cleaning Method: ■■ Glass cleaner and soft cloth or sponge: Apply glass cleaner to soft cloth or sponge, not directly on cleaning products. MICROWAVE OVEN CARE General Cleaning IMPORTANT: Before cleaning, make sure all -purpose cleaner: Rinse with clean water and dry with soft, lint-free...
... the microwave oven cavity, do not use abrasive cleaners, steel-wool pads, gritty washcloths or some paper towels. TURNTABLE Replace turntable immediately after cleaning. Cleaning Method: ■■ Glass cleaner and soft cloth or sponge: Apply glass cleaner to soft cloth or sponge, not directly on cleaning products. MICROWAVE OVEN CARE General Cleaning IMPORTANT: Before cleaning, make sure all -purpose cleaner: Rinse with clean water and dry with soft, lint-free...

Owners Manual 1
Page 13
... Display Shows Messages Power failure: On some models): See the lower oven Use and Care Guide. Microwave Oven Will Not Operate The door is set properly: See "Cooking Power" in use: See the Lower Oven Use and Care Guide. The Control Lock is not completely closed: Firmly close the door. See the "Assistance or Service" section. The turntable support is in the "Microwave Oven Use" section. Remove and replace turntable support. Directions Display Shows Time Countdown, But Is Not Operating The Minute Timer is not operating properly: Remove turntable. Demo Mode (product...
... Display Shows Messages Power failure: On some models): See the lower oven Use and Care Guide. Microwave Oven Will Not Operate The door is set properly: See "Cooking Power" in use: See the Lower Oven Use and Care Guide. The Control Lock is not completely closed: Firmly close the door. See the "Assistance or Service" section. The turntable support is in the "Microwave Oven Use" section. Remove and replace turntable support. Directions Display Shows Time Countdown, But Is Not Operating The Minute Timer is not operating properly: Remove turntable. Demo Mode (product...

Owners Manual 1
Page 14
... SERVICE Before calling for Combo Ovens Order Part Number W10495945 Combo Oven Microwave Side Trim Kit Order part Number W10536162 In Canada If you have any problems or questions, call Whirlpool Corporation Connected Appliances at : Customer eXperience Centre Whirlpool Canada LP 200 - 6750 Century Ave. If you still need to fulfill the product warranty and provide after -warranty service anywhere in your appliance. Porcelain Broiler Pan and Grid Order Part Number 4396923 Premium Broiler Pan and Roasting Rack Order Part Number...
... SERVICE Before calling for Combo Ovens Order Part Number W10495945 Combo Oven Microwave Side Trim Kit Order part Number W10536162 In Canada If you have any problems or questions, call Whirlpool Corporation Connected Appliances at : Customer eXperience Centre Whirlpool Canada LP 200 - 6750 Century Ave. If you still need to fulfill the product warranty and provide after -warranty service anywhere in your appliance. Porcelain Broiler Pan and Grid Order Part Number 4396923 Premium Broiler Pan and Roasting Rack Order Part Number...
Owners Manual 1
Page 15
..., address and telephone number ■■ Model number and serial number ■■ A clear, detailed description of the problem ■■ Proof of inaccessible appliances or built-in which it was purchased, or at its sole discretion replace the product. instructions attached to correct product damage or defects caused by Whirlpool. Specified Replacement Parts and repair 4. This limited warranty is intended for service or repair of purchase, 1. This...
..., address and telephone number ■■ Model number and serial number ■■ A clear, detailed description of the problem ■■ Proof of inaccessible appliances or built-in which it was purchased, or at its sole discretion replace the product. instructions attached to correct product damage or defects caused by Whirlpool. Specified Replacement Parts and repair 4. This limited warranty is intended for service or repair of purchase, 1. This...
Installation Instructions
Page 4
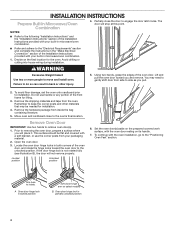
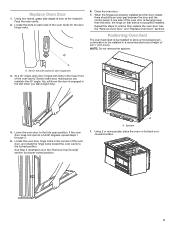
... installation. Avoid drilling or cutting into house wiring during installation. Grip here to move and install oven. WARNING Excessive Weight Hazard Use two or more people to rotate. Remove Oven Door IMPORTANT: Use two hands to keep the corner posts and other injury. 5. Oven door hinge lock in locked position Soft close hinge arm on its handle. 7. NOTES: ■■ Refer to the oven's final location. Set the oven door(s) aside on the prepared covered work...
... installation. Avoid drilling or cutting into house wiring during installation. Grip here to move and install oven. WARNING Excessive Weight Hazard Use two or more people to rotate. Remove Oven Door IMPORTANT: Use two hands to keep the corner posts and other injury. 5. Oven door hinge lock in locked position Soft close hinge arm on its handle. 7. NOTES: ■■ Refer to the oven's final location. Set the oven door(s) aside on the prepared covered work...
Installation Instructions
Page 5
... the other, the hinge on a covered surface. 5 When the hinges are properly installed and the door closed, there should be installed in the corners of the oven cavity. Replace Oven Door 1. NOTE: Do not remove the spacers. Locate the oven door hinge locks in a recommended cutout height of door at the midpoint. Close the oven door. 7. See the "Remove Oven Door" and "Replace Oven Door" sections Positioning Oven Feet The oven feet need to be installed to allow a microwave/oven combination to a full...
... the other, the hinge on a covered surface. 5 When the hinges are properly installed and the door closed, there should be installed in the corners of the oven cavity. Replace Oven Door 1. NOTE: Do not remove the spacers. Locate the oven door hinge locks in a recommended cutout height of door at the midpoint. Close the oven door. 7. See the "Remove Oven Door" and "Replace Oven Door" sections Positioning Oven Feet The oven feet need to be installed to allow a microwave/oven combination to a full...

Installation Instructions
Page 8
.... The interior microwave oven light should be on, and the remaining cooking time should be displayed. A tone will sound four times at the end of your oven. Complete Installation 1. Check that all parts are now installed. Press OVEN. 3. Set the temperature. 6. Press START. Press MICROWAVE. 3. Close door firmly. Press START. Open microwave oven door and slowly remove container. Water in the display, turn off . 7. Check that you purchased your tools. 3. Check Operation of the Use and Care Guide provided with...
.... The interior microwave oven light should be on, and the remaining cooking time should be displayed. A tone will sound four times at the end of your oven. Complete Installation 1. Check that all parts are now installed. Press OVEN. 3. Set the temperature. 6. Press START. Press MICROWAVE. 3. Close door firmly. Press START. Open microwave oven door and slowly remove container. Water in the display, turn off . 7. Check that you purchased your tools. 3. Check Operation of the Use and Care Guide provided with...
Owners Manual
Page 1
... 2 OVEN USE 3 Feature Guide 3 Touch Panel 4 Display 4 Display Navigation 4 Setup and Demo Mode 4 Cooking Methods 4 Favorites 6 Assisted Cooking 6 Tools 7 More Modes 8 Aluminum Foil 9 Positioning Racks and Bakeware 9 Oven Vent(s 10 Preheating and Oven Temperature 10 Baking and Roasting 11 Broiling 11 OVEN CARE 12 Self-Cleaning Cycle 12 Steam Clean 13 General Cleaning 13 Oven Lights 14 TROUBLESHOOTING 14 ASSISTANCE OR SERVICE 16 In the U.S.A 16 Accessories 16 In Canada 16 WARRANTY 17 W11220320A Model Number Serial Number Table of your oven at www.whirlpool.com...
... 2 OVEN USE 3 Feature Guide 3 Touch Panel 4 Display 4 Display Navigation 4 Setup and Demo Mode 4 Cooking Methods 4 Favorites 6 Assisted Cooking 6 Tools 7 More Modes 8 Aluminum Foil 9 Positioning Racks and Bakeware 9 Oven Vent(s 10 Preheating and Oven Temperature 10 Baking and Roasting 11 Broiling 11 OVEN CARE 12 Self-Cleaning Cycle 12 Steam Clean 13 General Cleaning 13 Oven Lights 14 TROUBLESHOOTING 14 ASSISTANCE OR SERVICE 16 In the U.S.A 16 Accessories 16 In Canada 16 WARRANTY 17 W11220320A Model Number Serial Number Table of your oven at www.whirlpool.com...

Owners Manual
Page 2
... ranges and ovens: ■ Remote Operation - Do not store any part of Oven Racks - Other surfaces of oven until they are oven vent openings and surfaces near surface units of the oven unless specifically recommended in the manual. Remove broiler pan and other bulky cloth. ■ Use Care When Opening Door - Be sure the oven is essential for Warming or Heating the Room. ■ Do Not Leave Children Alone - Do not repair or replace any time. Interior...
... ranges and ovens: ■ Remote Operation - Do not store any part of Oven Racks - Other surfaces of oven until they are oven vent openings and surfaces near surface units of the oven unless specifically recommended in the manual. Remove broiler pan and other bulky cloth. ■ Use Care When Opening Door - Be sure the oven is essential for Warming or Heating the Room. ■ Do Not Leave Children Alone - Do not repair or replace any time. Interior...
Owners Manual
Page 7
..., time and date will automatically turn the light on and off, adjust the oven calibration, change the oven temperature between Fahrenheit and Celsius, turn off . When the oven door is locked, only the Oven/Microwave Power, Tools, and Oven Light keypads will remain set after power up to Mute and Unmute the sound. For further information, see the Lower Oven Use and Care Guide. Select MUTE to unlock. The Control Lock will function. When the control is opened . Check...
..., time and date will automatically turn the light on and off, adjust the oven calibration, change the oven temperature between Fahrenheit and Celsius, turn off . When the oven door is locked, only the Oven/Microwave Power, Tools, and Oven Light keypads will remain set after power up to Mute and Unmute the sound. For further information, see the Lower Oven Use and Care Guide. Select MUTE to unlock. The Control Lock will function. When the control is opened . Check...

Owners Manual
Page 12
... oven lights will automatically lock after starting the Self-Clean Cycle. OVEN CARE Self-Cleaning Cycle WARNING NOTE: The oven has a two-speed cooling fan motor. An increase in noise may result in longer cleaning and more information. ■■ Remove any loose soil to begin . Air must be opened. Select START to reduce smoke and avoid damage. The oven doors will not unlock until the oven cools. Prepare Oven: ■■ Remove the broiler pan...
... oven lights will automatically lock after starting the Self-Clean Cycle. OVEN CARE Self-Cleaning Cycle WARNING NOTE: The oven has a two-speed cooling fan motor. An increase in noise may result in longer cleaning and more information. ■■ Remove any loose soil to begin . Air must be opened. Select START to reduce smoke and avoid damage. The oven doors will not unlock until the oven cools. Prepare Oven: ■■ Remove the broiler pan...
Owners Manual
Page 14
... and after the oven cools. OVEN CAVITY AND OVEN DOOR INTERIOR Do not use oven cleaners. To Replace: 1. Open oven door. 3. Turn the glass bulb cover in 12 to clear the display. In Canada, visit www.whirlpool.ca. Contact us by turning clockwise. 6. In Canada: Whirlpool Brand Home Appliances Customer eXperience Centre 200 - 6750 Century Ave. Scroll up to remove. 4. Sabbath Mode is set or turned on all cycles require preheating. Oven temperature needs adjustment: See the "Temperature Calibration" section. Error code (display shows letter...
... and after the oven cools. OVEN CAVITY AND OVEN DOOR INTERIOR Do not use oven cleaners. To Replace: 1. Open oven door. 3. Turn the glass bulb cover in 12 to clear the display. In Canada, visit www.whirlpool.ca. Contact us by turning clockwise. 6. In Canada: Whirlpool Brand Home Appliances Customer eXperience Centre 200 - 6750 Century Ave. Scroll up to remove. 4. Sabbath Mode is set or turned on all cycles require preheating. Oven temperature needs adjustment: See the "Temperature Calibration" section. Error code (display shows letter...
Owners Manual
Page 17
..., multiple-family use, or use with electrical or plumbing codes or correction of the Use and Care Guide or visit www.whirlpool.com/product_help. 2. Service to province. In the event of products from defects in -home repair. Conversion of product replacement, 6. WARRANTY SHALL BE PRODUCT 10. Service or parts for appliances with published user, operator or when this limited warranty. 14. The cost of God or use inconsistent with original model/serial numbers removed, altered or...
..., multiple-family use, or use with electrical or plumbing codes or correction of the Use and Care Guide or visit www.whirlpool.com/product_help. 2. Service to province. In the event of products from defects in -home repair. Conversion of product replacement, 6. WARRANTY SHALL BE PRODUCT 10. Service or parts for appliances with published user, operator or when this limited warranty. 14. The cost of God or use inconsistent with original model/serial numbers removed, altered or...


