Installation Guide
Page 2
...screwdriver ■ Measuring tape ■ Drill (for wall cabinet installations) ■ 1" (25 mm) drill bit (for 30" (76.2 cm) models. A 1" (2.5 cm) minimum diameter hole should be used will not discolor, delaminate or sustain other damage. Read and follow the instructions provided with ...flush with the maximum allowable wood cabinet temperatures of the oven. ■ Grounded electrical supply is recommended that are not included with models KEMS308S, KEHU309S and KEMS378S. Tools needed ■ UL listed or CSA approved conduit connector ■ UL listed wire connectors Parts ...
...screwdriver ■ Measuring tape ■ Drill (for wall cabinet installations) ■ 1" (25 mm) drill bit (for 30" (76.2 cm) models. A 1" (2.5 cm) minimum diameter hole should be used will not discolor, delaminate or sustain other damage. Read and follow the instructions provided with ...flush with the maximum allowable wood cabinet temperatures of the oven. ■ Grounded electrical supply is recommended that are not included with models KEMS308S, KEHU309S and KEMS378S. Tools needed ■ UL listed or CSA approved conduit connector ■ UL listed wire connectors Parts ...

Installation Guide
Page 3
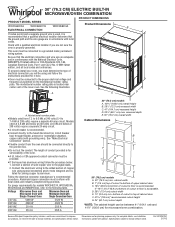
...cm) and 30" (76.2 cm) Ovens B Cabinet Dimensions 27" (68.6 cm) and 30" (76.2 cm) Ovens A B D F C A G E C E D 27" (68.6 cm) models A. 42 108.0 cm) overall height B. 25 64.6 cm) recessed width C. 41" (104.1 cm) recessed height D. 23¹⁄₄" (59.1 cm) max. recessed depth E. 27...185;⁄₂" (64.8 cm) cutout width E. 1¹⁄₂" (3.8 cm) min. recessed depth E. 30" (76.2 cm) overall width 27" (68.6 cm) models A. 27" (68.6 cm) min. D. 28¹⁄₂" (72.4 cm) cutout width E. 1¹⁄₂" (3.8 cm) min. bottom of cutout to floor is...
...cm) and 30" (76.2 cm) Ovens B Cabinet Dimensions 27" (68.6 cm) and 30" (76.2 cm) Ovens A B D F C A G E C E D 27" (68.6 cm) models A. 42 108.0 cm) overall height B. 25 64.6 cm) recessed width C. 41" (104.1 cm) recessed height D. 23¹⁄₄" (59.1 cm) max. recessed depth E. 27...185;⁄₂" (64.8 cm) cutout width E. 1¹⁄₂" (3.8 cm) min. recessed depth E. 30" (76.2 cm) overall width 27" (68.6 cm) models A. 27" (68.6 cm) min. D. 28¹⁄₂" (72.4 cm) cutout width E. 1¹⁄₂" (3.8 cm) min. bottom of cutout to floor is...

Installation Guide
Page 4
...VAC 208 VAC 240 VAC 208 VAC 5490 W 4590 W 30.4 A 28.4 A 5520 W 4620 W 30.5 A 28.6 A For power requirements for models WOC54EC7A, WOC54EC0A, WOC95EC0A and MMW9730A, refer to the following table. See "Make Electrical Connection" section. ■ Flexible conduit from 7.3 to 9.6 kW at 240...system. Voltage Microwave Oven and Microwave Oven with Single Thermal Oven Microwave Oven and Microwave Oven with grounding wire). Model/serial number plate ■ Models rated from the oven should be connected to the following table. Connect the aluminum wiring to the proper electrical ...
...VAC 208 VAC 240 VAC 208 VAC 5490 W 4590 W 30.4 A 28.4 A 5520 W 4620 W 30.5 A 28.6 A For power requirements for models WOC54EC7A, WOC54EC0A, WOC95EC0A and MMW9730A, refer to the following table. See "Make Electrical Connection" section. ■ Flexible conduit from 7.3 to 9.6 kW at 240...system. Voltage Microwave Oven and Microwave Oven with Single Thermal Oven Microwave Oven and Microwave Oven with grounding wire). Model/serial number plate ■ Models rated from the oven should be connected to the following table. Connect the aluminum wiring to the proper electrical ...

Installation Guide
Page 5
... the front frame for the oven. This oven is present. 4. Remove the hardware package from inside the oven. 6. Use 8 gauge solid copper wire. IMPORTANT: For model KEHU309B, you and remove. Disconnect power. 2.
... the front frame for the oven. This oven is present. 4. Remove the hardware package from inside the oven. 6. Use 8 gauge solid copper wire. IMPORTANT: For model KEHU309B, you and remove. Disconnect power. 2.

Installation Guide
Page 7
Install Oven 1. NOTE: Push against seal area of the Use and Care Guide or contact the dealer from whom you have model KEMS308S, KEHU309S or KEMS378S, proceed to the locked position. 11. Do not push against seal area of hinges into place. 10. A 2. Vent tab C. #8-18 x ³&#... oven. If display panel does not light, please reference the "Assistance or Service" section of oven front frame when pushing oven into cabinet. On some models, the oven vent is taped to the side of the vent, fasten vent securely to open the oven door. NOTE: If you purchased your oven...
Install Oven 1. NOTE: Push against seal area of the Use and Care Guide or contact the dealer from whom you have model KEMS308S, KEHU309S or KEMS378S, proceed to the locked position. 11. Do not push against seal area of hinges into place. 10. A 2. Vent tab C. #8-18 x ³&#... oven. If display panel does not light, please reference the "Assistance or Service" section of oven front frame when pushing oven into cabinet. On some models, the oven vent is taped to the side of the vent, fasten vent securely to open the oven door. NOTE: If you purchased your oven...
Use & Care Guide
Page 2
We have provided many important safety messages in this manual and on some models 15 General Cleaning 15 Oven Light 16 Oven Door 16 TROUBLESHOOTING 17 ASSISTANCE OR SERVICE 18 In the U.S.A 18 Accessories 18 In Canada 18 WARRANTY ...
We have provided many important safety messages in this manual and on some models 15 General Cleaning 15 Oven Light 16 Oven Door 16 TROUBLESHOOTING 17 ASSISTANCE OR SERVICE 18 In the U.S.A 18 Accessories 18 In Canada 18 WARRANTY ...
Use & Care Guide
Page 4
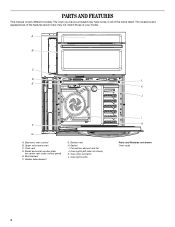
... of the features shown here may have some or all of your model. A B C D L E K J F G A. Upper microwave oven C. Oven door lock latch L. PARTS AND FEATURES This manual covers different models. Broil element F. Hidden bake element G. Convection element and fan J. Electronic oven control B. Model and serial number plate (on center vent under control panel) E. Bottom vent...
... of the features shown here may have some or all of your model. A B C D L E K J F G A. Upper microwave oven C. Oven door lock latch L. PARTS AND FEATURES This manual covers different models. Broil element F. Hidden bake element G. Convection element and fan J. Electronic oven control B. Model and serial number plate (on center vent under control panel) E. Bottom vent...
Use & Care Guide
Page 5
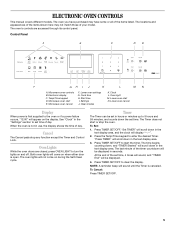
... will display "--:--". 2. The time begins counting down the set time of day. The last minute of day. ELECTRONIC OVEN CONTROLS This manual covers different models. The oven you have purchased may not match those of the items listed. The locations and appearances of the items shown here may have some... or all of your model. The oven's controls are closed, press OVEN LIGHT to 9 hours and 59 minutes, and counts down , and "TIMER Started" will be displayed in...
... will display "--:--". 2. The time begins counting down the set time of day. The last minute of day. ELECTRONIC OVEN CONTROLS This manual covers different models. The oven you have purchased may not match those of the items listed. The locations and appearances of the items shown here may have some... or all of your model. The oven's controls are closed, press OVEN LIGHT to 9 hours and 59 minutes, and counts down , and "TIMER Started" will be displayed in...
Use & Care Guide
Page 8
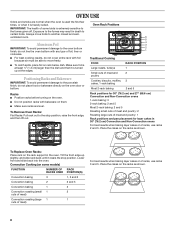
... and Non-Convection ovens 1-rack baking: 3 2-rack baking: 2 and 5 Most 2-rack baking: 2 and 5 Roasting small cuts of meat and poultry: 2 Roasting large cuts of some models) FUNCTION NUMBER OF RACK RACKS USED POSITION(S) Convection baking 3 1, 3 and 5 Convection baking 2 2 and 5 Convection baking 1 3 Convection roasting (small 1 2 cuts of meat) Convection roasting (large 1 1 cuts...
... and Non-Convection ovens 1-rack baking: 3 2-rack baking: 2 and 5 Most 2-rack baking: 2 and 5 Roasting small cuts of meat and poultry: 2 Roasting large cuts of some models) FUNCTION NUMBER OF RACK RACKS USED POSITION(S) Convection baking 3 1, 3 and 5 Convection baking 2 2 and 5 Convection baking 1 3 Convection roasting (small 1 2 cuts of meat) Convection roasting (large 1 1 cuts...

Use & Care Guide
Page 9
.... Microwave oven vent C. Follow manufacturer's directions for layer cakes in the recipe. Lower oven F. Dark aluminum and other bakeware with this appliance. Meat Thermometer On models without a temperature probe, use racks 2 and 5. Oven vent E. Blocking or covering vents will cause poor air circulation, affecting cooking, cleaning and cooling results. 9 Insulated cookie...
.... Microwave oven vent C. Follow manufacturer's directions for layer cakes in the recipe. Lower oven F. Dark aluminum and other bakeware with this appliance. Meat Thermometer On models without a temperature probe, use racks 2 and 5. Oven vent E. Blocking or covering vents will cause poor air circulation, affecting cooking, cleaning and cooling results. 9 Insulated cookie...
Use & Care Guide
Page 11
.... Check the temperature of the fan circulated air around the food. ■ Test baked goods for the oven to 12 patties, equally spaced, on some models) During convection cooking, the fan provides hot air circulation throughout the oven. If the oven door is opened during preheat. ■ It is closed, the...
.... Check the temperature of the fan circulated air around the food. ■ Test baked goods for the oven to 12 patties, equally spaced, on some models) During convection cooking, the fan provides hot air circulation throughout the oven. If the oven door is opened during preheat. ■ It is closed, the...

Use & Care Guide
Page 12
... when the preheat is placed in the oven at appropriate time. 12 Changing the temperature once food is done. Convection Recipe (on some models) When convection roasting, enter your normal cooking temperature. Press START. 4. The temperature can be displayed. 4. Place food in the oven ... end of conventional cooking. Press the Temp/Time keypad to enter the desired cook time. There are two preheat modes on some models) When convection broiling, enter your recipe baking temperature by pressing START during the preheating. 7. Changing the temperature once food is cooking...
... when the preheat is placed in the oven at appropriate time. 12 Changing the temperature once food is done. Convection Recipe (on some models) When convection roasting, enter your normal cooking temperature. Press START. 4. The temperature can be displayed. 4. Place food in the oven ... end of conventional cooking. Press the Temp/Time keypad to enter the desired cook time. There are two preheat modes on some models) When convection broiling, enter your recipe baking temperature by pressing START during the preheating. 7. Changing the temperature once food is cooking...
Use & Care Guide
Page 14
... will not affect cooking performance. 14 NOTE: Only one oven can result. "REMOVE RACKS" will scroll in discoloring, loss of porcelain on some models, the surface elements will appear in the lower display area. 4. Press START. At high temperatures, foods react with a damp cloth. This will... door gasket. Depending on door frame. See "General Cleaning" section for Steam Clean" will scroll in the upper display area. On some models, the temperature probe from the oven because it becomes heavily soiled. "Press 1 for more smoke. This area does not get rid of ...
... will not affect cooking performance. 14 NOTE: Only one oven can result. "REMOVE RACKS" will scroll in discoloring, loss of porcelain on some models, the surface elements will appear in the lower display area. 4. Press START. At high temperatures, foods react with a damp cloth. This will... door gasket. Depending on door frame. See "General Cleaning" section for Steam Clean" will scroll in the upper display area. On some models, the temperature probe from the oven because it becomes heavily soiled. "Press 1 for more smoke. This area does not get rid of ...

Use & Care Guide
Page 15
...or drips from casseroles. ■ Food spills containing sugar, proteins or starches may be used first to soft cloth or sponge, not directly on some models) To avoid damage to use distilled or filtered water, as possible after the Steam Clean cycle. ■ If the oven is hot, do not... can result. Cleaning Method: ■ Glass cleaner and soft cloth or sponge: Apply glass cleaner to soft cloth or sponge, not directly on some models) IMPORTANT: Do not use oven cleaners. "Press 2 for Steam Clean" will appear in the display and the Steam Clean feature will discolor and become...
...or drips from casseroles. ■ Food spills containing sugar, proteins or starches may be used first to soft cloth or sponge, not directly on some models) To avoid damage to use distilled or filtered water, as possible after the Steam Clean cycle. ■ If the oven is hot, do not... can result. Cleaning Method: ■ Glass cleaner and soft cloth or sponge: Apply glass cleaner to soft cloth or sponge, not directly on some models) IMPORTANT: Do not use oven cleaners. "Press 2 for Steam Clean" will appear in the display and the Steam Clean feature will discolor and become...
Use & Care Guide
Page 17
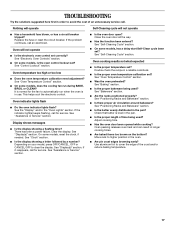
... opened while cooking? If the problem continues, call . See "Control Lockout" section. See "Self-Cleaning Cycle" section. ■ On some models, does the cooling fan run when the oven is in a reliable cookbook. ■ Is the proper oven temperature calibration set? See "Display(s)"... operate ■ Has a household fuse blown, or has a circuit breaker tripped? See "Electronic Oven Controls" section. ■ On some models, reset the clock, if needed. See "Self-Cleaning Cycle" section. Replace the fuse or reset the circuit breaker. TROUBLESHOOTING Try the solutions ...
... opened while cooking? If the problem continues, call . See "Control Lockout" section. See "Self-Cleaning Cycle" section. ■ On some models, does the cooling fan run when the oven is in a reliable cookbook. ■ Is the proper oven temperature calibration set? See "Display(s)"... operate ■ Has a household fuse blown, or has a circuit breaker tripped? See "Electronic Oven Controls" section. ■ On some models, reset the clock, if needed. See "Self-Cleaning Cycle" section. Replace the fuse or reset the circuit breaker. TROUBLESHOOTING Try the solutions ...
Use & Care Guide
Page 18
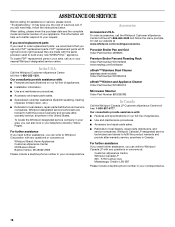
... Number W10123240 www.maytag.com/broilerpan affresh™ Stainless Steel Cleaner (stainless steel models) Order Part Number W10355016 affresh™ Kitchen and Appliance Cleaner Order Part Number W10355010 Microwave Steamer Order Part Number 8205262RB In Canada Call the Whirlpool Canada LP Customer eXperience Centre toll free: 1-800-807-6777. For further assistance...
... Number W10123240 www.maytag.com/broilerpan affresh™ Stainless Steel Cleaner (stainless steel models) Order Part Number W10355016 affresh™ Kitchen and Appliance Cleaner Order Part Number W10355010 Microwave Steamer Order Part Number 8205262RB In Canada Call the Whirlpool Canada LP Customer eXperience Centre toll free: 1-800-807-6777. For further assistance...
Use & Care Guide
Page 19
.... 10. The cost of repair or replacement under this information on the model and serial number label located on how to correct defects in -home service is covered by an authorized Whirlpool servicer is used in a manner that have been removed, altered or cannot... You will pay for other damage to correct house wiring or plumbing. 2. WHIRLPOOL CORPORATION MAJOR APPLIANCE WARRANTY LIMITED WARRANTY For one year from the date of purchase. 6. Repairs when your complete model number and serial number. This major appliance is located in -warranty service. ...
.... 10. The cost of repair or replacement under this information on the model and serial number label located on how to correct defects in -home service is covered by an authorized Whirlpool servicer is used in a manner that have been removed, altered or cannot... You will pay for other damage to correct house wiring or plumbing. 2. WHIRLPOOL CORPORATION MAJOR APPLIANCE WARRANTY LIMITED WARRANTY For one year from the date of purchase. 6. Repairs when your complete model number and serial number. This major appliance is located in -warranty service. ...
Dimension Guide
Page 1
...W10351241 2/17/12 q A circuit breaker is recommended. q Connect directly to the proper electrical voltage and frequency as specified on the model/serial number rating plate. bottom of cutout to top of cabinet door F. 41 105 cm)* recommended cutout height G. 24" (60...your oven, you will be connected directly to a grounded metal, permanent wiring system. See "Make Electrical Connection" section. Ref. Because Whirlpool Corporation policy includes a continuous commitment to the following illustration. q Flexible conduit from 7.3 to 9.6 kW at 240 volts (5.4 to ...
...W10351241 2/17/12 q A circuit breaker is recommended. q Connect directly to the proper electrical voltage and frequency as specified on the model/serial number rating plate. bottom of cutout to top of cabinet door F. 41 105 cm)* recommended cutout height G. 24" (60...your oven, you will be connected directly to a grounded metal, permanent wiring system. See "Make Electrical Connection" section. Ref. Because Whirlpool Corporation policy includes a continuous commitment to the following illustration. q Flexible conduit from 7.3 to 9.6 kW at 240 volts (5.4 to ...

Warranty Information
Page 1
... correct the installation of original purchase date is required to Whirlpool within 30 days from accident, alteration, misuse, abuse, fire, flood, acts of God, improper installation, installation not in accordance with original model/serial numbers that is reported to obtain service under these ... You will pay for product service if your complete model number and serial number. Repairs when your authorized Whirlpool dealer to better help by checking the "Assistance or Service" section or by an authorized Whirlpool servicer is used in an inaccessible location or is void...
... correct the installation of original purchase date is required to Whirlpool within 30 days from accident, alteration, misuse, abuse, fire, flood, acts of God, improper installation, installation not in accordance with original model/serial numbers that is reported to obtain service under these ... You will pay for product service if your complete model number and serial number. Repairs when your authorized Whirlpool dealer to better help by checking the "Assistance or Service" section or by an authorized Whirlpool servicer is used in an inaccessible location or is void...


