Bump Out Kit Installation Instructions
Page 1
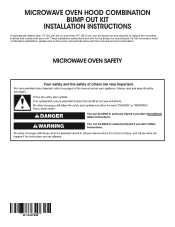
MICROWAVE OVEN SAFETY W11646788B MICROWAVE OVEN HOOD COMBINATION BUMP OUT KIT INSTALLATION INSTRUCTIONS If cabinets are only for the Bump out mounting kit, for full microwave hood combination installation, please refer to replace the mounting bracket that came with your unit. These installation instructions are deeper than 13" (33 cm) but no more than 16" (40.6 cm), use the bump out mounting kit to the owner manual that comes with the microwave hood combination.
MICROWAVE OVEN SAFETY W11646788B MICROWAVE OVEN HOOD COMBINATION BUMP OUT KIT INSTALLATION INSTRUCTIONS If cabinets are only for the Bump out mounting kit, for full microwave hood combination installation, please refer to replace the mounting bracket that came with your unit. These installation instructions are deeper than 13" (33 cm) but no more than 16" (40.6 cm), use the bump out mounting kit to the owner manual that comes with the microwave hood combination.

Bump Out Kit Installation Instructions
Page 2
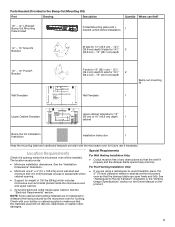
... in the cavity 3/16" toggle nuts 2 1/4" x 2" lag screws 4 #6 x 3/8" Sheet metal screws 2 Power supply cord bushing 1 Damper for wall or roof venting. Inner Foam in the Microwave Oven) Part Drawing Description Quantity Where can find? 3/16 - 24 x 3" round-head bolts 2 Screw Pack Damper Spacer 2 1/4 - 20 x 3" flat-head bolts 2 Washers 2 A A. INSTALLATION INSTRUCTIONS REQUIREMENTS Tools and Parts Tools Needed ■ Measuring tape ■ 3/16" (5 mm), 3/8" (10 mm), 5/8" (16 mm) drill...
... in the cavity 3/16" toggle nuts 2 1/4" x 2" lag screws 4 #6 x 3/8" Sheet metal screws 2 Power supply cord bushing 1 Damper for wall or roof venting. Inner Foam in the Microwave Oven) Part Drawing Description Quantity Where can find? 3/16 - 24 x 3" round-head bolts 2 Screw Pack Damper Spacer 2 1/4 - 20 x 3" flat-head bolts 2 Washers 2 A A. INSTALLATION INSTRUCTIONS REQUIREMENTS Tools and Parts Tools Needed ■ Measuring tape ■ 3/16" (5 mm), 3/8" (10 mm), 5/8" (16 mm) drill...
Bump Out Kit Installation Instructions
Page 3
... Out Kit Installation Instruction Installation Instruction 1 Keep the mounting plate and cardboard template provided with your builder or cabinet supplier to withstand the heat produced by the microwave oven for weight of any obstructions so that the materials used will be free of 150 lbs (68 kg) which includes microwave oven and items placed inside the microwave oven and upper cabinet. ■ Grounded electrical outlet inside upper cabinet. Parts Needed (Provided in the "Venting Design Specifications" section on the Owner Manual...
... Out Kit Installation Instruction Installation Instruction 1 Keep the mounting plate and cardboard template provided with your builder or cabinet supplier to withstand the heat produced by the microwave oven for weight of any obstructions so that the materials used will be free of 150 lbs (68 kg) which includes microwave oven and items placed inside the microwave oven and upper cabinet. ■ Grounded electrical outlet inside upper cabinet. Parts Needed (Provided in the "Venting Design Specifications" section on the Owner Manual...

Bump Out Kit Installation Instructions
Page 5
....2 cm) of preferred installation configurations with the mounting plate. Using a stud finer, locate the edges of each stud, and draw a plumb line down each stud center. Support tabs F. Find the Wall Stud(s) NOTE: If no wall studs exist within the cabinet opening . 2. Mounting plate center markers A,D A,D E E C C F A. Mark the center of the wall stud(s) within the opening , do not install the microwave oven. Mounting plate center markers Wall Stud at End...
....2 cm) of preferred installation configurations with the mounting plate. Using a stud finer, locate the edges of each stud, and draw a plumb line down each stud center. Support tabs F. Find the Wall Stud(s) NOTE: If no wall studs exist within the cabinet opening . 2. Mounting plate center markers A,D A,D E E C C F A. Mark the center of the wall stud(s) within the opening , do not install the microwave oven. Mounting plate center markers Wall Stud at End...

Bump Out Kit Installation Instructions
Page 6
....7 cm) 12 1/2'' (31,8 cm) 6 1/4'' (15,9 cm) (Rear alignment) (Alineación trasera) (Alignement arrière) 4 3/4'' F (12,1 cm) 8 7/16'' (21.4 cm) 7 15/16'' (20.1 cm) 7 7/16'' (18.9 cm) 6 15/16'' (17.6 cm) 6 7/16'' (16.3 cm) Microwave oven door Bump Out Mounting Plate A. See the following steps. 2. Center Marks on Upper Cabinet Template D. Cabinet B A 10 15/16 '' (27.7 cm) 11 7/16...
....7 cm) 12 1/2'' (31,8 cm) 6 1/4'' (15,9 cm) (Rear alignment) (Alineación trasera) (Alignement arrière) 4 3/4'' F (12,1 cm) 8 7/16'' (21.4 cm) 7 15/16'' (20.1 cm) 7 7/16'' (18.9 cm) 6 15/16'' (17.6 cm) 6 7/16'' (16.3 cm) Microwave oven door Bump Out Mounting Plate A. See the following steps. 2. Center Marks on Upper Cabinet Template D. Cabinet B A 10 15/16 '' (27.7 cm) 11 7/16...
Owners Manual
Page 2
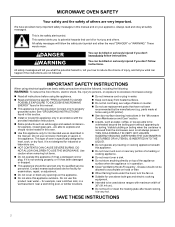
... allowed to accumulate on hood or filter. � When flaming foods under the hood, turn the fan on your appliance. parts made at home using the appliance. � Read and follow instructions. are very important. This is not designed for use . � HOT CONTENTS CAN CAUSE SEVERE BURNS. Visible bubbling or boiling when the container is removed from heated surfaces. � Do not...
... allowed to accumulate on hood or filter. � When flaming foods under the hood, turn the fan on your appliance. parts made at home using the appliance. � Read and follow instructions. are very important. This is not designed for use . � HOT CONTENTS CAN CAUSE SEVERE BURNS. Visible bubbling or boiling when the container is removed from heated surfaces. � Do not...
Owners Manual
Page 3
... may apply. You Will Need: � A home wireless router supporting Wi-Fi, 2.4 Ghz with Part 15 of the FCC Rules. Operation is subject to facilitate cooking. • Remove wire twist-ties from paper or plastic bags before placing bag in use. � Do not cover racks or any other part of the oven with metal scouring pads. Corrosive cleaning agents, such as they...
... may apply. You Will Need: � A home wireless router supporting Wi-Fi, 2.4 Ghz with Part 15 of the FCC Rules. Operation is subject to facilitate cooking. • Remove wire twist-ties from paper or plastic bags before placing bag in use. � Do not cover racks or any other part of the oven with metal scouring pads. Corrosive cleaning agents, such as they...

Owners Manual
Page 4
...times and must be labelled in the user manual of a type and maximum (or lesser) gain approved for the transmitter by OEM integrators under the following information in a prominent location Instruction: "To comply with FCC RF radiation exposure limits for general population, the antenna(s) used in conjunction with the instructions, may only operate using...must only use the approved antenna(s), which have been certified for integration into an outlet on a circuit different from that to which can radiate radio frequency energy and, if not installed and used for help . Part 15B ...
...times and must be labelled in the user manual of a type and maximum (or lesser) gain approved for the transmitter by OEM integrators under the following information in a prominent location Instruction: "To comply with FCC RF radiation exposure limits for general population, the antenna(s) used in conjunction with the instructions, may only operate using...must only use the approved antenna(s), which have been certified for integration into an outlet on a circuit different from that to which can radiate radio frequency energy and, if not installed and used for help . Part 15B ...

Owners Manual
Page 5
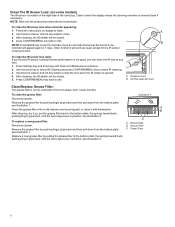
... Cleaning Wipes Part Number W1055049 (not included): See the Quick Start Guide for ordering information. � Vinegar for more Heating Plate details). MICROWAVE OVEN MAINTENANCE AND CARE General Cleaning IMPORTANT: Before cleaning, make sure all controls are suggested first, unless otherwise noted. Rinse and dry well before storing. Embedded (see "Online control guide" for hard water spots. Damage may occur to the microwave oven cavity, do not use . Always follow label instructions...
... Cleaning Wipes Part Number W1055049 (not included): See the Quick Start Guide for ordering information. � Vinegar for more Heating Plate details). MICROWAVE OVEN MAINTENANCE AND CARE General Cleaning IMPORTANT: Before cleaning, make sure all controls are suggested first, unless otherwise noted. Rinse and dry well before storing. Embedded (see "Online control guide" for hard water spots. Damage may occur to the microwave oven cavity, do not use . Always follow label instructions...
Owners Manual
Page 6
... instructions on display to idle. After cleaning, the IR shelter will work as usual, except for the IR sensor cooking function. NOTE: Wait until Clean and Maintenance submenu. 2. A 2. Use the lens cleaner and lint-free swab to clean the lens when the IR shelter is opened. 4. Other functions will be closed . 5. Use the lens cleaner and lint-free swab to clean. 3. A. IR Sensor Lens B. Remove the grease filter...
... instructions on display to idle. After cleaning, the IR shelter will work as usual, except for the IR sensor cooking function. NOTE: Wait until Clean and Maintenance submenu. 2. A 2. Use the lens cleaner and lint-free swab to clean the lens when the IR shelter is opened. 4. Other functions will be closed . 5. Use the lens cleaner and lint-free swab to clean. 3. A. IR Sensor Lens B. Remove the grease filter...
Owners Manual
Page 7
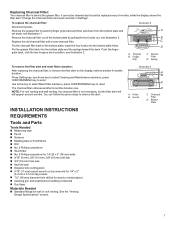
.... NOTE: For roof venting and wall venting, the charcoal filter is behind the grease filter. You can follow the above steps to enter. Put the grease filter back into the bottom plate holes. Press Setting key, use Arrow key to select Cleaning and Maintenance submenu, press CONFIRM/MENU key to remove the alert. Materials Needed � Standard fittings for wood or metal cabinet � Caulking gun...
.... NOTE: For roof venting and wall venting, the charcoal filter is behind the grease filter. You can follow the above steps to enter. Put the grease filter back into the bottom plate holes. Press Setting key, use Arrow key to select Cleaning and Maintenance submenu, press CONFIRM/MENU key to remove the alert. Materials Needed � Standard fittings for wood or metal cabinet � Caulking gun...
Owners Manual
Page 9
... needs to make sure there is recommended that the materials used will be made by the microwave oven for weight of the Quick Start Guide. If installing the microwave near a right side wall, make sure that all electrical connections be installed. See "Electrical Requirements". See the "Installation Dimensions" illustration. Location Requirements Product Dimensions Check the opening . � Support for cooking. Outer Form in the "Venting Design Specifications" section. 9 Cardboard Plate Literature Pack Upper cabinet template and Wall template Literature...
... needs to make sure there is recommended that the materials used will be made by the microwave oven for weight of the Quick Start Guide. If installing the microwave near a right side wall, make sure that all electrical connections be installed. See "Electrical Requirements". See the "Installation Dimensions" illustration. Location Requirements Product Dimensions Check the opening . � Support for cooking. Outer Form in the "Venting Design Specifications" section. 9 Cardboard Plate Literature Pack Upper cabinet template and Wall template Literature...

Owners Manual
Page 10
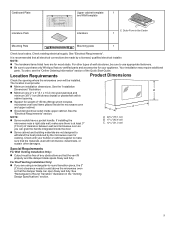
... Exact dimensions may be inside the upper cabinet. See "Attach Mounting Plate to where the front bottom surface of the Quick Start Guide. Electrical Requirements WARNING B A B C D D A. (Flush) 123/4" to 13" (32.3 cm to 40.6 cm) deep B. Cabinet C. A B C G E D F A. 2" x 4" (5.1 cm x 10.2 cm) wall stud B. Upper cabinet depth (with the product. The bump out mounting kit (part#- Bump out mounting bracket To order, see the "Online Ordering Information" section of the microwave oven needs...
... Exact dimensions may be inside the upper cabinet. See "Attach Mounting Plate to where the front bottom surface of the Quick Start Guide. Electrical Requirements WARNING B A B C D D A. (Flush) 123/4" to 13" (32.3 cm to 40.6 cm) deep B. Cabinet C. A B C G E D F A. 2" x 4" (5.1 cm x 10.2 cm) wall stud B. Upper cabinet depth (with the product. The bump out mounting kit (part#- Bump out mounting bracket To order, see the "Online Ordering Information" section of the microwave oven needs...
Owners Manual
Page 11
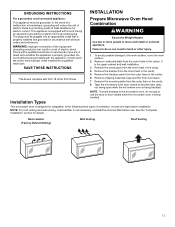
... designed for electric current. Remove the mounting plate from the outer foam in a risk of ventilation, choose one type before use the door or door handle while the microwave oven is for details. Installation Types This microwave oven is properly grounded. NOTE: To avoid damage to the following three types of electric shock. See the "Complete Installation" section for upper-cabinet and wall installation. 3. GROUNDING INSTRUCTIONS INSTALLATION For a grounded, cord-connected...
... designed for electric current. Remove the mounting plate from the outer foam in a risk of ventilation, choose one type before use the door or door handle while the microwave oven is for details. Installation Types This microwave oven is properly grounded. NOTE: To avoid damage to the following three types of electric shock. See the "Complete Installation" section for upper-cabinet and wall installation. 3. GROUNDING INSTRUCTIONS INSTALLATION For a grounded, cord-connected...
Owners Manual
Page 12
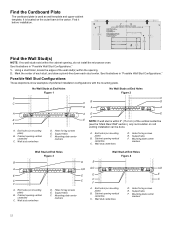
... the cabinet opening vertical centerline C. Mounting plate center markers AE E F E NOTE: If wall stud is used as wall template and upper-cabinet template. Mounting plate center markers Wall Stud at End Holes Figure 2 B C C CB D DA A A E F A. Find the Cardboard Plate The cardboard plate is within 6" (15.2 cm) of the vertical centerline (see the "Mark Rear Wall" section), only recirculation or roof venting installation can be done. It is located on mounting plate) B. Find it before installation...
... the cabinet opening vertical centerline C. Mounting plate center markers AE E F E NOTE: If wall stud is used as wall template and upper-cabinet template. Mounting plate center markers Wall Stud at End Holes Figure 2 B C C CB D DA A A E F A. Find the Cardboard Plate The cardboard plate is within 6" (15.2 cm) of the vertical centerline (see the "Mark Rear Wall" section), only recirculation or roof venting installation can be done. It is located on mounting plate) B. Find it before installation...

Owners Manual
Page 13
...A. Microwave oven door A. Microwave oven door A. Cabinet door B. Cabinet B. Cabinet B. B A A. Microwave oven door A. Using a tape, measure clearly and mark the vertical centerline of 12" to 13" (30.5 cm to 33.02 cm) cabinet installation, but need some adjustment for depth of the opening. Make sure it will automatically open 30° when the microwave oven uses the ventilation and cooking function. Upper Cabinet Centerline B. The bump out mounting kit (part#- B B A. Cabinet C. A Cabinet A A 30o B B A. Wall Centerline NOTE: The cardboard plate...
...A. Microwave oven door A. Microwave oven door A. Cabinet door B. Cabinet B. Cabinet B. B A A. Microwave oven door A. Using a tape, measure clearly and mark the vertical centerline of 12" to 13" (30.5 cm to 33.02 cm) cabinet installation, but need some adjustment for depth of the opening. Make sure it will automatically open 30° when the microwave oven uses the ventilation and cooking function. Upper Cabinet Centerline B. The bump out mounting kit (part#- B B A. Cabinet C. A Cabinet A A 30o B B A. Wall Centerline NOTE: The cardboard plate...
Owners Manual
Page 17
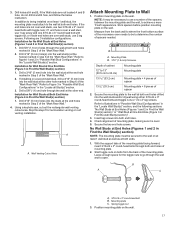
... 3/16" (5 mm) holes into the wall studs and/or drywall using either 3/16-24 x 3" round-head bolts and toggle nuts or 1/4 x 2" lag screws. Secure the mounting plate to open. With the support tabs of the "Mark Rear Wall." 2. If the end holes are not located A and B hole, do not drill A and B hole, and follow the below instruction. Drill 5/8" (1.6 cm) holes through...
... 3/16" (5 mm) holes into the wall studs and/or drywall using either 3/16-24 x 3" round-head bolts and toggle nuts or 1/4 x 2" lag screws. Secure the mounting plate to open. With the support tabs of the "Mark Rear Wall." 2. If the end holes are not located A and B hole, do not drill A and B hole, and follow the below instruction. Drill 5/8" (1.6 cm) holes through...
Owners Manual
Page 18
... include wall and roof venting installation, both venting installation need to make sure toggle nut has opened against drywall. 5. A B A. A A. Damper plate 3. Remove 2 blower screws attaching blower motor to rotate the blower motor. Mounting plate C. Check alignment of "Installation for Wall Stud at End Holes" in the "Drill Holes in Find the Wall Stud(s) section) 1. With the support tabs of "Installation for Wall Stud at One End Hole (Figure 3 in Rear Wall" section. 6. Start a toggle...
... include wall and roof venting installation, both venting installation need to make sure toggle nut has opened against drywall. 5. A B A. A A. Damper plate 3. Remove 2 blower screws attaching blower motor to rotate the blower motor. Mounting plate C. Check alignment of "Installation for Wall Stud at End Holes" in the "Drill Holes in Find the Wall Stud(s) section) 1. With the support tabs of "Installation for Wall Stud at One End Hole (Figure 3 in Rear Wall" section. 6. Start a toggle...
Owners Manual
Page 22
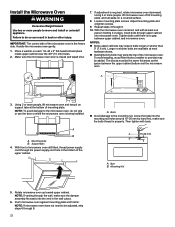
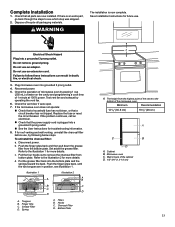
.... Install the Microwave Oven WARNING Excessive Weight Hazard Use two or more people, lift microwave oven off of mounting plate, and set aside on a covered surface. 8. Failure to move and install or uninstall appliance. IMPORTANT: The control side of the upper cabinet. Loosen mounting plate screws. Repeat steps 3 through the power supply cord hole in properly. Tighten bolts until there is the heavy side. To avoid warping, wood filter blocks (installer...
.... Install the Microwave Oven WARNING Excessive Weight Hazard Use two or more people, lift microwave oven off of mounting plate, and set aside on a covered surface. 8. Failure to move and install or uninstall appliance. IMPORTANT: The control side of the upper cabinet. Loosen mounting plate screws. Repeat steps 3 through the power supply cord hole in properly. Tighten bolts until there is the heavy side. To avoid warping, wood filter blocks (installer...
Owners Manual
Page 23
... auto open. 7. Set aside the grease filter. Refer to remove the charcoal filter from the bottom plate. Pull the four hooks out to the illustration 1 for more details. Minimum Recommendation 121/8" (30.8 cm) 181/8" (46 cm) A C B D A. Wall or back of the microwave oven. Dispose of 1 minute at 100% power. Reconnect power. 5. Test vent fan and exhaust by placing 1 cup (250 mL) of water on the cavity and programming a cook time...
... auto open. 7. Set aside the grease filter. Refer to remove the charcoal filter from the bottom plate. Pull the four hooks out to the illustration 1 for more details. Minimum Recommendation 121/8" (30.8 cm) 181/8" (46 cm) A C B D A. Wall or back of the microwave oven. Dispose of 1 minute at 100% power. Reconnect power. 5. Test vent fan and exhaust by placing 1 cup (250 mL) of water on the cavity and programming a cook time...


