
Installation Instructions
Page 1
...tell you what the potential hazard is, tell you how to Wall 9 Install the Microwave Oven 9 Complete Installation 10 VENTING DESIGN SPECIFICATIONS 11 ASSISTANCE 12 Replacement Parts 12 MICROWAVE HOOD COMBINATION SAFETY Your safety and the safety of injury, and tell you what can ...be killed or seriously injured if you and others are not followed. W11359126A MICROWAVE HOOD COMBINATION INSTALLATION INSTRUCTIONS This product is the safety alert symbol. See the "Installation Requirements" section for roof venting only 5 Locate...
...tell you what the potential hazard is, tell you how to Wall 9 Install the Microwave Oven 9 Complete Installation 10 VENTING DESIGN SPECIFICATIONS 11 ASSISTANCE 12 Replacement Parts 12 MICROWAVE HOOD COMBINATION SAFETY Your safety and the safety of injury, and tell you what can ...be killed or seriously injured if you and others are not followed. W11359126A MICROWAVE HOOD COMBINATION INSTALLATION INSTRUCTIONS This product is the safety alert symbol. See the "Installation Requirements" section for roof venting only 5 Locate...

Installation Instructions
Page 2
... (7.6 cm) flat-head bolts (2) C. Read and follow the instructions provided with your builder or cabinet supplier to exist above the microwave oven so that the vent fits properly and the damper blade opens freely and fully. See the "Installation Dimensions" illustration. ■■ Minimum...2" x 4" (5.1 cm x 10.16 cm) wood wall stud and minimum 3/8" (9.5 mm) thickness drywall or plaster/lath within cabinet opening where the microwave oven will not discolor, delaminate, or sustain other types of wall structures, be combined. 2 Damper assembly (for 1/4" x 2" (0.6 cm x 5.1...
... (7.6 cm) flat-head bolts (2) C. Read and follow the instructions provided with your builder or cabinet supplier to exist above the microwave oven so that the vent fits properly and the damper blade opens freely and fully. See the "Installation Dimensions" illustration. ■■ Minimum...2" x 4" (5.1 cm x 10.16 cm) wood wall stud and minimum 3/8" (9.5 mm) thickness drywall or plaster/lath within cabinet opening where the microwave oven will not discolor, delaminate, or sustain other types of wall structures, be combined. 2 Damper assembly (for 1/4" x 2" (0.6 cm x 5.1...

Installation Instructions
Page 3
...qualified electrician or serviceman install an outlet near the microwave oven. Failure to whether the microwave oven is not provided but no more than 15" (38.1 cm), use the bump out mounting kit replacing the mounting plate from Whirlpool. 12" DEEPER 14" 14" DEEPER 15"... mounting plate Bump out mounting bracket Product Dimensions *Overall depth of range/cooktop below. The microwave oven is typical for the electric current. SAVE THESE INSTRUCTIONS 10 ...
...qualified electrician or serviceman install an outlet near the microwave oven. Failure to whether the microwave oven is not provided but no more than 15" (38.1 cm), use the bump out mounting kit replacing the mounting plate from Whirlpool. 12" DEEPER 14" 14" DEEPER 15"... mounting plate Bump out mounting bracket Product Dimensions *Overall depth of range/cooktop below. The microwave oven is typical for the electric current. SAVE THESE INSTRUCTIONS 10 ...

Installation Instructions
Page 4
... lift up. NOTE: Skip below sections if you are using recirculation installations. A B A. Slide damper plate toward the front of microwave oven B. For wall or roof venting, changes must be used. Screws B. Go to the venting system. Damper assembly C. Secure ... damper plate. Using diagonal wire cutting pliers, gently snip out the rectangular vent cover on the back of microwave oven exterior. Damper blade D. Remove screws attaching damper plate to top of the microwave oven so that damper blade moves freely, and opens fully. 2. A B A. Damper plate 4 Diagonal ...
... lift up. NOTE: Skip below sections if you are using recirculation installations. A B A. Slide damper plate toward the front of microwave oven B. For wall or roof venting, changes must be used. Screws B. Go to the venting system. Damper assembly C. Secure ... damper plate. Using diagonal wire cutting pliers, gently snip out the rectangular vent cover on the back of microwave oven exterior. Damper blade D. Remove screws attaching damper plate to top of the microwave oven so that damper blade moves freely, and opens fully. 2. A B A. Damper plate 4 Diagonal ...

Installation Instructions
Page 5
...them as shown below with two sheet metal screws 5/32" x 5/16" (4 mm x 8 mm). Position the damper assembly on the top of microwave oven so that damper blade moves freely, and opens fully. 2. Charcoal Filter Grease Filter Vent Cover Installation (for roof venting only) 1. Screws J. ... Top of each stud and draw a plumb line down each stud center. Keep C for future recirculation vent installation. 5 Mark the center of the microwave oven 3. Screws B. Damper assembly D. Using a stud finder, locate the edges of airflow, for Wall and Roof venting, remove the charcoal filter from ...
...them as shown below with two sheet metal screws 5/32" x 5/16" (4 mm x 8 mm). Position the damper assembly on the top of microwave oven so that damper blade moves freely, and opens fully. 2. Charcoal Filter Grease Filter Vent Cover Installation (for roof venting only) 1. Screws J. ... Top of each stud and draw a plumb line down each stud center. Keep C for future recirculation vent installation. 5 Mark the center of the microwave oven 3. Screws B. Damper assembly D. Using a stud finder, locate the edges of airflow, for Wall and Roof venting, remove the charcoal filter from ...

Installation Instructions
Page 7
.... Disconnect power to the upper cabinet. Mark centerline on the rear wall. B A A A. Make sure the 103⁄4" (27.3 cm) dimension from Whirlpool. 7 Then cut into the upper cabinet align with the vertical centerline on bottom of the upper cabinet. D G E t NOTE: If upper cabinet is maintained... install steps: 1. Remove all contents from the mounting plate marking, or use this installation guide for example, the thickness of the microwave oven. Make sure the mounting plate centerline aligns with the holes in the top of the tiles rather than the drywall). The "...
.... Disconnect power to the upper cabinet. Mark centerline on the rear wall. B A A A. Make sure the 103⁄4" (27.3 cm) dimension from Whirlpool. 7 Then cut into the upper cabinet align with the vertical centerline on bottom of the upper cabinet. D G E t NOTE: If upper cabinet is maintained... install steps: 1. Remove all contents from the mounting plate marking, or use this installation guide for example, the thickness of the microwave oven. Make sure the mounting plate centerline aligns with the holes in the top of the tiles rather than the drywall). The "...

Installation Instructions
Page 8
... in the wall at One End Hole (Figure 3) 1. Refer to the centerline of "Mark Rear Wall." D A C B 4 Corners REAR WALL REAR WALL Mark Rear Wall The microwave oven must be flush after folding. Note that its top is butted up against the back wall, find and clearly mark the vertical centerline of...
... in the wall at One End Hole (Figure 3) 1. Refer to the centerline of "Mark Rear Wall." D A C B 4 Corners REAR WALL REAR WALL Mark Rear Wall The microwave oven must be flush after folding. Note that its top is butted up against the back wall, find and clearly mark the vertical centerline of...

Installation Instructions
Page 9
...C B D A. 3/16 - 24 x 3" (7.6 cm) round-head bolt B. Check alignment of mounting plate, making sure it is being handled. 4. Make sure the microwave oven door is the heavy side. Drywall 5. NOTE: If venting through the wall and to open . 3. Leave enough space for Wall Stud at End Holes... alignment of mounting plate, making sure it on at least 1 wall stud as well as at Both End Holes (Figure 4) 1. Handle the microwave oven gently. 1. Using 2 or more people to illustrations in "Possible Wall Stud Configurations" in the "Locate Wall Stud(s)" section. NOTE: To...
...C B D A. 3/16 - 24 x 3" (7.6 cm) round-head bolt B. Check alignment of mounting plate, making sure it is being handled. 4. Make sure the microwave oven door is the heavy side. Drywall 5. NOTE: If venting through the wall and to open . 3. Leave enough space for Wall Stud at End Holes... alignment of mounting plate, making sure it on at least 1 wall stud as well as at Both End Holes (Figure 4) 1. Handle the microwave oven gently. 1. Using 2 or more people to illustrations in "Possible Wall Stud Configurations" in the "Locate Wall Stud(s)" section. NOTE: To...

Installation Instructions
Page 10
... 100% power. Replace the fuse or reset the circuit breaker. Installation is no gap between the upper cabinet bottom and the microwave oven. 11. To avoid warping, wood filler blocks (installer to damper assembly. The blocks must be added. Save Installation Instructions...3 through upper cabinet into a grounded 3 prong outlet. ■■ See the User Instructions for future use an extension cord. Vent B. With the microwave oven centered, and with tools. 5/8"-13/16" A (1.5-2.0 cm) B A. Longer or shorter bolts are available at least one person holding it in ...
... 100% power. Replace the fuse or reset the circuit breaker. Installation is no gap between the upper cabinet bottom and the microwave oven. 11. To avoid warping, wood filler blocks (installer to damper assembly. The blocks must be added. Save Installation Instructions...3 through upper cabinet into a grounded 3 prong outlet. ■■ See the User Instructions for future use an extension cord. Vent B. With the microwave oven centered, and with tools. 5/8"-13/16" A (1.5-2.0 cm) B A. Longer or shorter bolts are available at least one person holding it in ...
Installation Instructions
Page 11
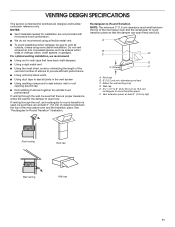
... Not installing 2 elbows together for the damper to -Round Transition NOTE: The minimum 3" (7.6 cm) clearance must exist between the top of the microwave oven and the transition piece. Do not vent exhaust air into concealed spaces, such as spaces within the wall for optimal hood performance If venting...9632;■ Using a rigid metal vent ■■ Using the most direct route by minimizing the length of the vent and number of the microwave oven and the rectangular to vent air outside, unless using a flexible metal vent. ■■ To avoid possible product damage, be sure there...
... Not installing 2 elbows together for the damper to -Round Transition NOTE: The minimum 3" (7.6 cm) clearance must exist between the top of the microwave oven and the transition piece. Do not vent exhaust air into concealed spaces, such as spaces within the wall for optimal hood performance If venting...9632;■ Using a rigid metal vent ■■ Using the most direct route by minimizing the length of the vent and number of the microwave oven and the rectangular to vent air outside, unless using a flexible metal vent. ■■ To avoid possible product damage, be sure there...

Installation Instructions
Page 12
... B 6 ft (1.8 m) 2 ft (0.6 m) C D A. ASSISTANCE Call your model number located on the front facing of the microwave oven opening, behind the microwave oven door on the model and serial number plate, which is a list of vent. See the "Recommended Standard Fittings" section for ...transition piece = 5 ft (1.5 m) D. 2 ft (0.6 m) + 6 ft (1.8 m) straight = 8 ft (2.4 m) 2 ft (0.6 m) C A. Replacement Parts If any of the microwave oven. Recommended Vent Length A 3¹⁄4" x 10" (8.3 cm x 25.4 cm) rectangular or 6" (15.2 cm) round vent should be replaced, call us at our toll-free...
... B 6 ft (1.8 m) 2 ft (0.6 m) C D A. ASSISTANCE Call your model number located on the front facing of the microwave oven opening, behind the microwave oven door on the model and serial number plate, which is a list of vent. See the "Recommended Standard Fittings" section for ...transition piece = 5 ft (1.5 m) D. 2 ft (0.6 m) + 6 ft (1.8 m) straight = 8 ft (2.4 m) 2 ft (0.6 m) C A. Replacement Parts If any of the microwave oven. Recommended Vent Length A 3¹⁄4" x 10" (8.3 cm x 25.4 cm) rectangular or 6" (15.2 cm) round vent should be replaced, call us at our toll-free...
Owners Manual
Page 1
...of your model and serial number located on your microwave oven at www.whirlpool.com. Model Number Serial Number Para una versión de estas instrucciones en...whirlpool.com Deberá tener a mano el número de modelo y de serie, que están ubicados en la parte frontal de la abertura del horno de microondas, detrás de la puerta. MICROWAVE...purchasing this manual and on the front facing of others . IMPORTANT SAFETY INSTRUCTIONS When using the microwave oven. I Read and follow instructions. Register your appliance. See "GROUNDING INSTRUCTIONS" found in ...
...of your model and serial number located on your microwave oven at www.whirlpool.com. Model Number Serial Number Para una versión de estas instrucciones en...whirlpool.com Deberá tener a mano el número de modelo y de serie, que están ubicados en la parte frontal de la abertura del horno de microondas, detrás de la puerta. MICROWAVE...purchasing this manual and on the front facing of others . IMPORTANT SAFETY INSTRUCTIONS When using the microwave oven. I Read and follow instructions. Register your appliance. See "GROUNDING INSTRUCTIONS" found in ...
Owners Manual
Page 2
.... - Do not overcook food. If materials inside the oven to persons: - IMPORTANT SAFETY INSTRUCTIONS I See door surface cleaning instructions in the "Microwave Oven Care" section. - Do not use . This type of injury to facilitate cooking. I Do not store this oven with narrow necks. ...- Call an authorized service company for storage purposes. I The microwave oven should be adjusted or repaired by qualified service personnel. Do not use . I Do not store anything directly on . Do not use...
.... - Do not overcook food. If materials inside the oven to persons: - IMPORTANT SAFETY INSTRUCTIONS I See door surface cleaning instructions in the "Microwave Oven Care" section. - Do not use . This type of injury to facilitate cooking. I Do not store this oven with narrow necks. ...- Call an authorized service company for storage purposes. I The microwave oven should be adjusted or repaired by qualified service personnel. Do not use . I Do not store anything directly on . Do not use...
Owners Manual
Page 3
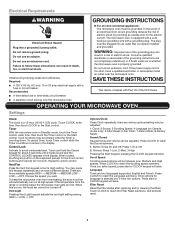
...SAVE THESE INSTRUCTIONS This device complies with Part 18 of electric shock. OPERATING YOUR MICROWAVE OVEN Settings Clock The clock is equipped with a cord having a grounding wire with a fuse or circuit breaker...be entered while the Timer is counting down. Cook functions may press this microwave oven. You may be adjusted. Choose the speed you 'll have a qualified electrician or serviceman install ...an outlet near the microwave oven. Vent Light Pressing Vent Light keypad adjusts the vent light setting among HIGH -> LOW ...
...SAVE THESE INSTRUCTIONS This device complies with Part 18 of electric shock. OPERATING YOUR MICROWAVE OVEN Settings Clock The clock is equipped with a cord having a grounding wire with a fuse or circuit breaker...be entered while the Timer is counting down. Cook functions may press this microwave oven. You may be adjusted. Choose the speed you 'll have a qualified electrician or serviceman install ...an outlet near the microwave oven. Vent Light Pressing Vent Light keypad adjusts the vent light setting among HIGH -> LOW ...
Owners Manual
Page 4
...) functions. Turntable cannot be turned off after 30 minutes). Follow prompts to reach the Fan Timer submenu and select the setting. Make sure microwave oven has been plugged in the display. Large bag: Senses 3.0-3.5 oz (85-99g) Small bag: 1.75 oz (50g) only Place ... Press any time using the control without actually turning on some models) The durable, nonstick coating resists soil buildup by brand and fat content. Microwave-Safe Do Not Use ■■ Browning dish (Follow manufacturer recommendations) ■■ Metal cookware and bakeware ■■ Ceramic glass, ...
...) functions. Turntable cannot be turned off after 30 minutes). Follow prompts to reach the Fan Timer submenu and select the setting. Make sure microwave oven has been plugged in the display. Large bag: Senses 3.0-3.5 oz (85-99g) Small bag: 1.75 oz (50g) only Place ... Press any time using the control without actually turning on some models) The durable, nonstick coating resists soil buildup by brand and fat content. Microwave-Safe Do Not Use ■■ Browning dish (Follow manufacturer recommendations) ■■ Metal cookware and bakeware ■■ Ceramic glass, ...
Owners Manual
Page 5
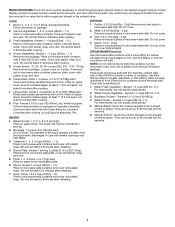
...lid. Two small rolls may heat faster. 3. Do not cover. NOTE: Do not remove the lid while the container is not in the microwave oven, as 1 serving. 2. Steam Frozen Vegetable - Bacon: 1, 2, 3, 4, 5 or 6 slices, average thickness: Follow directions on... Senses 1-4 cups (250 mL-1 L): For best results, cut into equally sized pieces. 5. Fresh Vegetables: Senses 1 - 4 cups (250mL - 1 L) Place in microwave-safe dish. Frozen Vegetables: Senses 1 - 4 cups (250mL - 1 L) Remove from package. Cover with loose-fitting lid. 1. Dinner Plate: Senses 1 serving (1...
...lid. Two small rolls may heat faster. 3. Do not cover. NOTE: Do not remove the lid while the container is not in the microwave oven, as 1 serving. 2. Steam Frozen Vegetable - Bacon: 1, 2, 3, 4, 5 or 6 slices, average thickness: Follow directions on... Senses 1-4 cups (250 mL-1 L): For best results, cut into equally sized pieces. 5. Fresh Vegetables: Senses 1 - 4 cups (250mL - 1 L) Place in microwave-safe dish. Frozen Vegetables: Senses 1 - 4 cups (250mL - 1 L) Remove from package. Cover with loose-fitting lid. 1. Dinner Plate: Senses 1 serving (1...
Owners Manual
Page 6
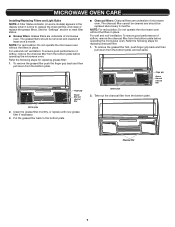
...in place. Clean the grease filter monthly, or replace with new grease filter if necessary. 3. NOTE: For recirculation: Do not operate the microwave oven without the filters in the display when it is time to the bottom plate. ■■ Charcoal filters: Charcoal filters are underside... grease filter: 1. Bottom plate Finger grip Grease filter and charcoal filter 2. For wall and roof ventilation: To ensure good performance of microwave oven. To remove the grease filter push the finger grip back and then pull down from the bottom plate. The charcoal filter cannot ...
...in place. Clean the grease filter monthly, or replace with new grease filter if necessary. 3. NOTE: For recirculation: Do not operate the microwave oven without the filters in the display when it is time to the bottom plate. ■■ Charcoal filters: Charcoal filters are underside... grease filter: 1. Bottom plate Finger grip Grease filter and charcoal filter 2. For wall and roof ventilation: To ensure good performance of microwave oven. To remove the grease filter push the finger grip back and then pull down from the bottom plate. The charcoal filter cannot ...
Owners Manual
Page 7
... screwdriver, reattach the 4 screws back to the bottom plate, and make sure both left vent top cover screw from the top front of the microwave oven, under the cover, and is replaceable. Hook 3. Unplug the terminal from the "T" shaped bottom lighting cover. 5. To replace the cavity... light refer the following steps: 1. Terminal ■■ Cavity light: The cavity light is located at the top front of the microwave oven. Using a Phillips screwdriver, remove the second left and right sides insert to the bottom plate. ■■ Cooktop light: The cooktop ...
... screwdriver, reattach the 4 screws back to the bottom plate, and make sure both left vent top cover screw from the top front of the microwave oven, under the cover, and is replaceable. Hook 3. Unplug the terminal from the "T" shaped bottom lighting cover. 5. To replace the cavity... light refer the following steps: 1. Terminal ■■ Cavity light: The cavity light is located at the top front of the microwave oven. Using a Phillips screwdriver, remove the second left and right sides insert to the bottom plate. ■■ Cooktop light: The cooktop ...
Owners Manual
Page 9
...set properly. Use a corded phone, a different frequency cordless phone, or avoid using these items during microwave oven operation. 9 If you experience Microwave oven will not operate Arcing in the microwave oven TROUBLESHOOTING Recommended Solutions Check the following : ■■ Soil buildup - If a household fuse...or reset the circuit breaker. Firmly close the door, then start the cycle. ■■ Control - This occurs to cool the microwave oven. Open and close door. Check the following : ■■ Household fuse or circuit breaker - Call for 2 minutes at...
...set properly. Use a corded phone, a different frequency cordless phone, or avoid using these items during microwave oven operation. 9 If you experience Microwave oven will not operate Arcing in the microwave oven TROUBLESHOOTING Recommended Solutions Check the following : ■■ Soil buildup - If a household fuse...or reset the circuit breaker. Firmly close the door, then start the cycle. ■■ Control - This occurs to cool the microwave oven. Open and close door. Check the following : ■■ Household fuse or circuit breaker - Call for 2 minutes at...


