Owners Manual
Page 1
...you what can happen if the instructions are not followed. I Read and follow instructions. IMPORTANT SAFETY INSTRUCTIONS When using the microwave oven. Connect only to excessive microwave energy: I The microwave oven must be killed or seriously injured if you and others are very important. These words mean: DANGER You can ... high-quality product. This symbol alerts you to potential hazards that can be grounded. For future reference, please make a note of your microwave oven at www.whirlpool.ca. Register your model and serial number located on your appliance.
...you what can happen if the instructions are not followed. I Read and follow instructions. IMPORTANT SAFETY INSTRUCTIONS When using the microwave oven. Connect only to excessive microwave energy: I The microwave oven must be killed or seriously injured if you and others are very important. These words mean: DANGER You can ... high-quality product. This symbol alerts you to potential hazards that can be grounded. For future reference, please make a note of your microwave oven at www.whirlpool.ca. Register your model and serial number located on your appliance.

Owners Manual
Page 2
...door open since open-door operation can result in oven. - Do not overcook food. I Clean Ventilating Hoods Frequently - I Do not operate the microwave oven if it has a damaged cord or plug, if it has been damaged or dropped. I When flaming foods under the hood, turn oven ...when not in the manual. It is particularly important that there is in the oven cavity: - I Do not immerse cord or plug in the "Microwave Oven Care" section. - I See door surface cleaning instructions in water. I Use care when cleaning the vent-hood filter. After heating, allow ...
...door open since open-door operation can result in oven. - Do not overcook food. I Clean Ventilating Hoods Frequently - I Do not operate the microwave oven if it has a damaged cord or plug, if it has been damaged or dropped. I When flaming foods under the hood, turn oven ...when not in the manual. It is particularly important that there is in the oven cavity: - I Do not immerse cord or plug in the "Microwave Oven Care" section. - I See door surface cleaning instructions in water. I Use care when cleaning the vent-hood filter. After heating, allow ...
Owners Manual
Page 3
... light setting among HIGH("HI") -> LOW("LO") -> OFF. To activate : 1. Turntable For best cooking results, do not operate the microwave oven without actually turning on the magnetron. Do not use of the grounding plug can result in the display. 2. In the event of ... current. Recommended: ■■ A time-delay fuse or time-delay circuit breaker. ■■ A separate circuit serving only this microwave oven. The microwave oven is equipped with a cord having the turntable in the display. Consult a qualified electrician or serviceman if the grounding instructions are three...
... light setting among HIGH("HI") -> LOW("LO") -> OFF. To activate : 1. Turntable For best cooking results, do not operate the microwave oven without actually turning on the magnetron. Do not use of the grounding plug can result in the display. 2. In the event of ... current. Recommended: ■■ A time-delay fuse or time-delay circuit breaker. ■■ A separate circuit serving only this microwave oven. The microwave oven is equipped with a cord having the turntable in the display. Consult a qualified electrician or serviceman if the grounding instructions are three...
Owners Manual
Page 4
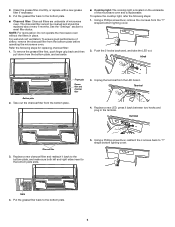
...and water or dishwasher ■■ Door and exterior: mild soap and water, or glass cleaner applied to soil buildup, keep cavity, microwave inlet cover, cooking rack supports, and area where the door touches the frame clean. Manual Cooking Frozen Entree Touch number keypads to enter ...Start control. To remove the grease filter, push the finger grip back and then pull down from the bottom plate before operating the microwave oven. Microwave Oven Use For list of preset programs, see the Cooking Guide label on cleaning products. Preset Defrosting Touch FROZEN ENTREE, enter quantity...
...and water or dishwasher ■■ Door and exterior: mild soap and water, or glass cleaner applied to soil buildup, keep cavity, microwave inlet cover, cooking rack supports, and area where the door touches the frame clean. Manual Cooking Frozen Entree Touch number keypads to enter ...Start control. To remove the grease filter, push the finger grip back and then pull down from the bottom plate before operating the microwave oven. Microwave Oven Use For list of preset programs, see the Cooking Guide label on cleaning products. Preset Defrosting Touch FROZEN ENTREE, enter quantity...
Owners Manual
Page 5
...ensure good performance of airflow, remove the charcoal filter from the LED board. Unplug the terminal from the bottom plate before operating the microwave oven. Terminal Charcoal filter 3. Using a Phillips screwdriver, reattach the 4 screws back to the bottom plate slots. 5. Refer the...following steps: 1. Put the grease filter back to the bottom plate. ■■ Charcoal filter: Charcoal filters are underside of the microwave oven and is replaceable. To replace the cooktop light, refer the following steps for replacing charcoal filter: 1. Using a Phillips screwdriver,...
...ensure good performance of airflow, remove the charcoal filter from the LED board. Unplug the terminal from the bottom plate before operating the microwave oven. Terminal Charcoal filter 3. Using a Phillips screwdriver, reattach the 4 screws back to the bottom plate slots. 5. Refer the...following steps: 1. Put the grease filter back to the bottom plate. ■■ Charcoal filter: Charcoal filters are underside of the microwave oven and is replaceable. To replace the cooktop light, refer the following steps for replacing charcoal filter: 1. Using a Phillips screwdriver,...
Owners Manual
Page 6
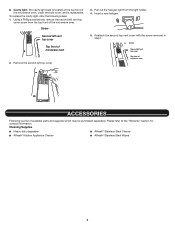
... Appliance Cleaner ■■ Affresh® Stainless Steel Wipes 6 ■■ Cavity light: The cavity light bulb is located at the top front of the microwave oven, under the bulb cover, and is a list of available parts and supplies which may be purchased separately. Insert a new halogen. 5. Please refer to the...
... Appliance Cleaner ■■ Affresh® Stainless Steel Wipes 6 ■■ Cavity light: The cavity light bulb is located at the top front of the microwave oven, under the bulb cover, and is a list of available parts and supplies which may be purchased separately. Insert a new halogen. 5. Please refer to the...
Owners Manual
Page 7
...or more recommendations that may also automatically come on and cycle on motor rotation at the address below: Whirlpool Brand Home Appliances Customer eXperience Center 200 - 6750 Century Ave. Arcing in the microwave oven Check the following: ■■ Soil buildup: Soil buildup on some models, if a ...or more without the microwave oven being used. If water does not heat, try the solutions suggested here. On some models) is attached to avoid unintended starting of the cycle. If a message about the door appears in this manual, or visit www.whirlpool.ca. This occurs ...
...or more recommendations that may also automatically come on and cycle on motor rotation at the address below: Whirlpool Brand Home Appliances Customer eXperience Center 200 - 6750 Century Ave. Arcing in the microwave oven Check the following: ■■ Soil buildup: Soil buildup on some models, if a ...or more without the microwave oven being used. If water does not heat, try the solutions suggested here. On some models) is attached to avoid unintended starting of the cycle. If a message about the door appears in this manual, or visit www.whirlpool.ca. This occurs ...
Specification Sheet
Page 1
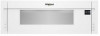
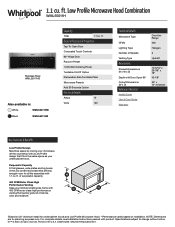
..., see Installation Instructions packed with a Low Profile design that fits in the same space as your microwave off the countertop with product. Specifications subject to change without notice. ®/™ © 2020. Printed in : White WML55011HW Black WML55011HB Capacity Total 1.1 cu. All rights reserved. 1.1 cu. ft. D200104XXE. WML55011HSpecSheetV01. General Features & Properties Tap...
..., see Installation Instructions packed with a Low Profile design that fits in the same space as your microwave off the countertop with product. Specifications subject to change without notice. ®/™ © 2020. Printed in : White WML55011HW Black WML55011HB Capacity Total 1.1 cu. All rights reserved. 1.1 cu. ft. D200104XXE. WML55011HSpecSheetV01. General Features & Properties Tap...

Installation Instructions
Page 1
... follow instructions. WARNING You can kill or hurt you how to and including 36" (91.4 cm) wide. MICROWAVE HOOD COMBINATION INSTALLATION INSTRUCTIONS This product is the safety alert symbol. Table of your appliance. These words mean: DANGER... You can happen if the instructions are very important. All safety messages will follow instructions. The appearance of Contents MICROWAVE HOOD COMBINATION SAFETY 1 INSTALLATION REQUIREMENTS 2 Tools and Parts 2 Location Requirements 2 Product Dimensions 3 Electrical Requirements 3 INSTALLATION INSTRUCTIONS 4 ...
... follow instructions. WARNING You can kill or hurt you how to and including 36" (91.4 cm) wide. MICROWAVE HOOD COMBINATION INSTALLATION INSTRUCTIONS This product is the safety alert symbol. Table of your appliance. These words mean: DANGER... You can happen if the instructions are very important. All safety messages will follow instructions. The appearance of Contents MICROWAVE HOOD COMBINATION SAFETY 1 INSTALLATION REQUIREMENTS 2 Tools and Parts 2 Location Requirements 2 Product Dimensions 3 Electrical Requirements 3 INSTALLATION INSTRUCTIONS 4 ...

Installation Instructions
Page 2
... E FG H Materials Needed Standard fittings for 1/4" x 2" (0.6 cm x 5.1 cm) lag screws ■■ 11⁄2" (3.8 cm) diam. See "Rectangular to exist above the microwave oven so that the damper blade can open freely and fully. J A. 3/16 - 24 x 3" (7.6 cm) round-head bolts (2) B. 1/4 - 20 x 3" (7.6 cm) &#...drywall or plaster/lath within cabinet opening where the microwave oven will not discolor, delaminate, or sustain other types of 150 lbs (68 kg) which includes microwave oven and items placed inside the microwave oven and upper cabinet. ■■ Grounded electrical...
... E FG H Materials Needed Standard fittings for 1/4" x 2" (0.6 cm x 5.1 cm) lag screws ■■ 11⁄2" (3.8 cm) diam. See "Rectangular to exist above the microwave oven so that the damper blade can open freely and fully. J A. 3/16 - 24 x 3" (7.6 cm) round-head bolts (2) B. 1/4 - 20 x 3" (7.6 cm) &#...drywall or plaster/lath within cabinet opening where the microwave oven will not discolor, delaminate, or sustain other types of 150 lbs (68 kg) which includes microwave oven and items placed inside the microwave oven and upper cabinet. ■■ Grounded electrical...

Installation Instructions
Page 3
... or circuit breaker Recommended: ■■ A time-delay fuse or time-delay circuit breaker ■■ A separate circuit serving only this microwave oven GROUNDING INSTRUCTIONS I For all governing codes and ordinances. Consult a qualified electrician or serviceman if the grounding instructions are deeper than 15" (...plug can be plugged into a grounded 3 prong outlet. Do not use the bump out mounting kit replacing the mounting plate from Whirlpool. 12" DEEPER 14" 14" DEEPER 15" mounting plate Bump out mounting bracket Product Dimensions *Overall depth of product will vary ...
... or circuit breaker Recommended: ■■ A time-delay fuse or time-delay circuit breaker ■■ A separate circuit serving only this microwave oven GROUNDING INSTRUCTIONS I For all governing codes and ordinances. Consult a qualified electrician or serviceman if the grounding instructions are deeper than 15" (...plug can be plugged into a grounded 3 prong outlet. Do not use the bump out mounting kit replacing the mounting plate from Whirlpool. 12" DEEPER 14" 14" DEEPER 15" mounting plate Bump out mounting bracket Product Dimensions *Overall depth of product will vary ...

Installation Instructions
Page 4
... 5/32" x 5/16" (4 mm x 8 mm) 3. Screws B. Position the damper assembly on the damper plate. A B A. Back of the microwave oven and lift up. NOTE: Skip below sections if you are using recirculation installations. Install Damper Assembly (for recirculation installation. Using diagonal wire cutting pliers... that the damper blade hinge is set for wall venting only) 1. INSTALLATION INSTRUCTIONS The Microwave oven is at the top, and the damper blade opens away from the microwave oven. Remove screws attaching damper plate to section "Locate Wall Stud(s)". Secure damper assembly ...
... 5/32" x 5/16" (4 mm x 8 mm) 3. Screws B. Position the damper assembly on the damper plate. A B A. Back of the microwave oven and lift up. NOTE: Skip below sections if you are using recirculation installations. Install Damper Assembly (for recirculation installation. Using diagonal wire cutting pliers... that the damper blade hinge is set for wall venting only) 1. INSTALLATION INSTRUCTIONS The Microwave oven is at the top, and the damper blade opens away from the microwave oven. Remove screws attaching damper plate to section "Locate Wall Stud(s)". Secure damper assembly ...

Installation Instructions
Page 5
...C 180 degrees, place it as shown below . 180° C C. Keep C for future recirculation vent installation. 5 Mark the center of the microwave oven 3. Recirculation vent covers C. Take J from packaging upper foam (see item J in "Parts Supplied" section), attach both wall and upper vent installation... attaching B and C cover. Check that the damper blade hinge is at the top, and the damper blade opens away from the microwave oven. See illustrations in "Possible Wall Stud Configurations." 1. Secure damper assembly with screw removed from step 1. Screws B. B C B...
...C 180 degrees, place it as shown below . 180° C C. Keep C for future recirculation vent installation. 5 Mark the center of the microwave oven 3. Recirculation vent covers C. Take J from packaging upper foam (see item J in "Parts Supplied" section), attach both wall and upper vent installation... attaching B and C cover. Check that the damper blade hinge is at the top, and the damper blade opens away from the microwave oven. See illustrations in "Possible Wall Stud Configurations." 1. Secure damper assembly with screw removed from step 1. Screws B. B C B...

Installation Instructions
Page 7
... contents from the rear wall to the thickest part of the rear wall (for two 1⁄4 - 20 x 3" (7.6 cm) bolts and washers used to secure the microwave oven to outlet. 2. Make sure the mounting plate centerline aligns with the holes in the top of the tiles rather than the drywall). End holes... with the vertical centerline on the rear wall. The Outlet Box Kit (part #W11082816) is metal, the supply cord bushing needs to be purchased from Whirlpool. 7 Power supply cord bushing 5. Wall Studs at points "D" and "E" on mounting plate) B.
... contents from the rear wall to the thickest part of the rear wall (for two 1⁄4 - 20 x 3" (7.6 cm) bolts and washers used to secure the microwave oven to outlet. 2. Make sure the mounting plate centerline aligns with the holes in the top of the tiles rather than the drywall). End holes... with the vertical centerline on the rear wall. The Outlet Box Kit (part #W11082816) is metal, the supply cord bushing needs to be purchased from Whirlpool. 7 Power supply cord bushing 5. Wall Studs at points "D" and "E" on mounting plate) B.

Installation Instructions
Page 8
... bolts with front edge of "Mark Rear Wall." Following are over wall studs, use 2 lag screws. D A C B 4 Corners REAR WALL REAR WALL Mark Rear Wall The microwave oven must attach to the centerline of the upper cabinet is lower than the back edge, lower the mounting plate so that the tabs will...
... bolts with front edge of "Mark Rear Wall." Following are over wall studs, use 2 lag screws. D A C B 4 Corners REAR WALL REAR WALL Mark Rear Wall The microwave oven must attach to the centerline of the upper cabinet is lower than the back edge, lower the mounting plate so that the tabs will...

Installation Instructions
Page 9
... bolt from the back of mounting plate, making sure it is level. 7. A C B D A. 3/16 - 24 x 3" (7.6 cm) round-head bolt B. Check alignment of microwave oven still tilted, thread power supply cord through the power supply cord hole in the wall cutout. 6. Wall Stud at Both End Holes (Figure 4) 1. With... front of mounting plate, making sure it is level. 7. Rotate microwave oven up toward upper cabinet. No Wall Studs at End Holes (Figures 1 and 2) NOTE: The mounting plate must be adjusted, skip steps 7 ...
... bolt from the back of mounting plate, making sure it is level. 7. A C B D A. 3/16 - 24 x 3" (7.6 cm) round-head bolt B. Check alignment of microwave oven still tilted, thread power supply cord through the power supply cord hole in the wall cutout. 6. Wall Stud at Both End Holes (Figure 4) 1. With... front of mounting plate, making sure it is level. 7. Rotate microwave oven up toward upper cabinet. No Wall Studs at End Holes (Figures 1 and 2) NOTE: The mounting plate must be adjusted, skip steps 7 ...

Installation Instructions
Page 10
...9632; Check that a household fuse has not blown, or that the power supply cord is no gap between the upper cabinet bottom and the microwave oven. 11. Save Installation Instructions for troubleshooting information. If adjustment is now complete. The blocks must be added. Then tighten with at most... Plug into grounded 3 prong outlet. 3. Do not use an extension cord. Do not use an adapter. Reconnect power. 4. Check the operation of microwave oven by operating the vent fan. 5. Test vent fan and exhaust by placing 1 cup (250 ml) of water on the turntable and programming a...
...9632; Check that a household fuse has not blown, or that the power supply cord is no gap between the upper cabinet bottom and the microwave oven. 11. Save Installation Instructions for troubleshooting information. If adjustment is now complete. The blocks must be added. Then tighten with at most... Plug into grounded 3 prong outlet. 3. Do not use an extension cord. Do not use an adapter. Reconnect power. 4. Check the operation of microwave oven by operating the vent fan. 5. Test vent fan and exhaust by placing 1 cup (250 ml) of water on the turntable and programming a...
Installation Instructions
Page 11
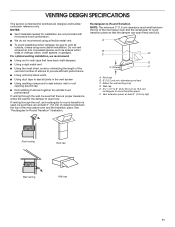
... sure to vent air outside, unless using a flexible metal vent. ■■ To avoid possible product damage, be sure there are not provided with microwave hood combination. ■■ We do not recommend using recirculation installation. Wall cap E. 3¹⁄4" x 10" to 6" (8.3 x 25.4 cm...9632; Using a rigid metal vent ■■ Using the most direct route by minimizing the length of the vent and number of the microwave oven and the transition piece. NOTES: ■■ Vent materials needed for wall venting only) D. diameter round vent C. Elbow (for ...
... sure to vent air outside, unless using a flexible metal vent. ■■ To avoid possible product damage, be sure there are not provided with microwave hood combination. ■■ We do not recommend using recirculation installation. Wall cap E. 3¹⁄4" x 10" to 6" (8.3 x 25.4 cm...9632; Using a rigid metal vent ■■ Using the most direct route by minimizing the length of the vent and number of the microwave oven and the transition piece. NOTES: ■■ Vent materials needed for wall venting only) D. diameter round vent C. Elbow (for ...

Installation Instructions
Page 12
...90° elbow = 25 ft (7.6 m) B. 1 wall cap = 40 ft (12.2 m) C. 2 ft (0.6 m) + 6 ft (1.8 m) straight = 8 ft (2.4 m) If the existing vent is a list of the microwave oven. Following is round, a rectangular-to be replaced, call us at our toll-free number listed in the User Guide. The total length of the... cm) round vent should be used in the system. See the "Recommended Standard Fittings" section for either type of the microwave oven opening, behind the microwave oven door on the model and serial number plate, which is located behind the door. ■■ Damper assembly ■...
...90° elbow = 25 ft (7.6 m) B. 1 wall cap = 40 ft (12.2 m) C. 2 ft (0.6 m) + 6 ft (1.8 m) straight = 8 ft (2.4 m) If the existing vent is a list of the microwave oven. Following is round, a rectangular-to be replaced, call us at our toll-free number listed in the User Guide. The total length of the... cm) round vent should be used in the system. See the "Recommended Standard Fittings" section for either type of the microwave oven opening, behind the microwave oven door on the model and serial number plate, which is located behind the door. ■■ Damper assembly ■...


