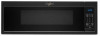
Owners Manual
Page 1
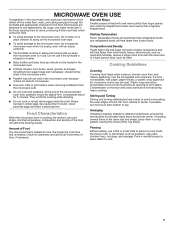
... Mode 8 Auto Vent Fan 8 Control Lock 8 MICROWAVE OVEN USE 9 Food Characteristics 9 Cooking Guidelines 9 Cookware and Dinnerware 10 Aluminum Foil and Metal 10 Microwave Cooking Power 10 Defrost 11 Reheat 11 Cook 12 Popcorn 12 Soften/Melt 12 MICROWAVE OVEN CARE 13 General Cleaning 13 Installing / Replacing Grease Filter or Charcoal Filter 13 Replacing The Grease Filter For Recirculation Ventilation ........14 Replacing The Charcoal Filter For Recirculation Ventilation .....14 Replacing The Grease Filter For Wall and Roof Ventilation ......14 Replacing The Cooktop Light 15...
... Mode 8 Auto Vent Fan 8 Control Lock 8 MICROWAVE OVEN USE 9 Food Characteristics 9 Cooking Guidelines 9 Cookware and Dinnerware 10 Aluminum Foil and Metal 10 Microwave Cooking Power 10 Defrost 11 Reheat 11 Cook 12 Popcorn 12 Soften/Melt 12 MICROWAVE OVEN CARE 13 General Cleaning 13 Installing / Replacing Grease Filter or Charcoal Filter 13 Replacing The Grease Filter For Recirculation Ventilation ........14 Replacing The Charcoal Filter For Recirculation Ventilation .....14 Replacing The Grease Filter For Wall and Roof Ventilation ......14 Replacing The Cooktop Light 15...

Owners Manual
Page 2
... in this section and in the provided Installation Instructions. ■ Install or locate the microwave oven only in accordance with the provided Installation Instructions. ■ Some products such as whole eggs in the microwave oven. SAVE THESE INSTRUCTIONS 2 for example, closed glass jars are able to excessive microwave energy: ■ Read all instructions before using electrical appliances basic safety precautions should be followed, including the following...
... in this section and in the provided Installation Instructions. ■ Install or locate the microwave oven only in accordance with the provided Installation Instructions. ■ Some products such as whole eggs in the microwave oven. SAVE THESE INSTRUCTIONS 2 for example, closed glass jars are able to excessive microwave energy: ■ Read all instructions before using electrical appliances basic safety precautions should be followed, including the following...
Owners Manual
Page 3
... materials inside the oven to microwave energy. Do not use straight-sided containers with the door open since open-door operation can result in harmful exposure to facilitate cooking. ■ Suitable for use above ranges with maximum width of table or counter. ■ See door surface cleaning instructions in oven. - Do not use . SAVE THESE INSTRUCTIONS PRECAUTIONS TO AVOID POSSIBLE EXPOSURE TO EXCESSIVE MICROWAVE ENERGY (a) Do not attempt to be serviced only...
... materials inside the oven to microwave energy. Do not use straight-sided containers with the door open since open-door operation can result in harmful exposure to facilitate cooking. ■ Suitable for use above ranges with maximum width of table or counter. ■ See door surface cleaning instructions in oven. - Do not use . SAVE THESE INSTRUCTIONS PRECAUTIONS TO AVOID POSSIBLE EXPOSURE TO EXCESSIVE MICROWAVE ENERGY (a) Do not attempt to be serviced only...
Owners Manual
Page 4
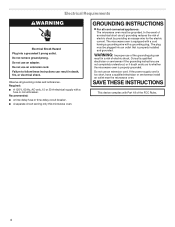
... not remove ground prong. Required: ■ A 120 V, 60 Hz, AC-only, 15 or 20 A electrical supply with Part 18 of the FCC Rules. 4 Failure to whether the microwave oven is properly installed and grounded. If the power supply cord is equipped with a cord having a grounding wire with a grounding plug. In the event of an electrical short circuit, grounding reduces the risk of electric...
... not remove ground prong. Required: ■ A 120 V, 60 Hz, AC-only, 15 or 20 A electrical supply with Part 18 of the FCC Rules. 4 Failure to whether the microwave oven is properly installed and grounded. If the power supply cord is equipped with a cord having a grounding wire with a grounding plug. In the event of an electrical short circuit, grounding reduces the risk of electric...
Owners Manual
Page 5
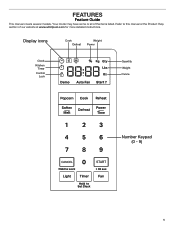
FEATURES Feature Guide This manual covers several models. Display icons Cook Defrost Weight Power Clock Kitchen Timer Control Lock Quantity Weight Ounce CANCEL Number Keypad (0 - 9) START 5 Your model may have some or all of our website at www.whirlpool.com for more detailed instructions. Refer to this manual or the Product Help section of the items listed.
FEATURES Feature Guide This manual covers several models. Display icons Cook Defrost Weight Power Clock Kitchen Timer Control Lock Quantity Weight Ounce CANCEL Number Keypad (0 - 9) START 5 Your model may have some or all of our website at www.whirlpool.com for more detailed instructions. Refer to this manual or the Product Help section of the items listed.
Owners Manual
Page 6
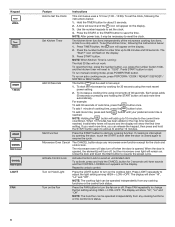
... the CONTROL LOCKED icon appears on the display. 3. Turn on Hood Light Press the LIGHT button to avoid an unintended start . The display will not work. Hold the TIMER button for 3 seconds until your preferred cook time is opened . To reset the timer, press the number button, e.g. To run manual cooking mode, press POWER/TIME button. Activate Control Lock Activate Control Lock to turn on or off. The display will show "Hi", "Lo" and "Off". NOTE: The cooktop light can be operated independently from any microwave oven...
... the CONTROL LOCKED icon appears on the display. 3. Turn on Hood Light Press the LIGHT button to avoid an unintended start . The display will not work. Hold the TIMER button for 3 seconds until your preferred cook time is opened . To reset the timer, press the number button, e.g. To run manual cooking mode, press POWER/TIME button. Activate Control Lock Activate Control Lock to turn on or off. The display will show "Hi", "Lo" and "Off". NOTE: The cooktop light can be operated independently from any microwave oven...
Owners Manual
Page 7
...% power level. 1. press and hold number key "4" for the food category or reference the sticker on the display. 5. Demo mode shows the display and controls, including lights and fans, without using preset functions, follow the instructions below: 1. Press POWER/TIME to enter the cooking time length 2:30. Use the number keypads to set manual power and cooking time. The defrost function helps thaw frozen food. Use the number keypads to select a food category. Use the number keypads to select a food category. Press START button...
...% power level. 1. press and hold number key "4" for the food category or reference the sticker on the display. 5. Demo mode shows the display and controls, including lights and fans, without using preset functions, follow the instructions below: 1. Press POWER/TIME to enter the cooking time length 2:30. Use the number keypads to set manual power and cooking time. The defrost function helps thaw frozen food. Use the number keypads to select a food category. Use the number keypads to select a food category. Press START button...
Owners Manual
Page 8
... the microwave oven cools. A tone will sound and the icon will be changed. Use the number keypads to the normal brightness. Press START button. "AUTO FAN" will stay lit until a tone sounds and a icon appears on the display. 2. "Start?" Use the number keypads to select a food category. The icon will show on the display. "Start?" Press COOK. Use the number keypads to enter the quantity. Press Start button. To Lock Control: Touch CANCEL for the food category...
... the microwave oven cools. A tone will sound and the icon will be changed. Use the number keypads to the normal brightness. Press START button. "AUTO FAN" will stay lit until a tone sounds and a icon appears on the display. 2. "Start?" Use the number keypads to select a food category. The icon will show on the display. "Start?" Press COOK. Use the number keypads to enter the quantity. Press Start button. To Lock Control: Touch CANCEL for the food category...
Owners Manual
Page 9
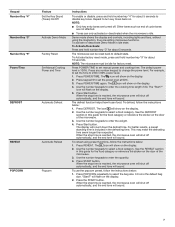
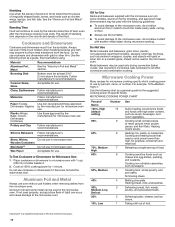
...; The turntable must be used. If a lid is not available, wax paper, paper towels, or plastic wrap approved for 5 minutes. MICROWAVE OVEN USE A magnetron in use. Starting Temperature Room temperature foods will heat faster than refrigerated foods, and refrigerated foods will heat faster than the same size of Food The more evenly than frozen foods. Heavy, dense foods, such as potatoes, egg yolks, chicken livers, hot dogs, and...
...; The turntable must be used. If a lid is not available, wax paper, paper towels, or plastic wrap approved for 5 minutes. MICROWAVE OVEN USE A magnetron in use. Starting Temperature Room temperature foods will heat faster than refrigerated foods, and refrigerated foods will heat faster than the same size of Food The more evenly than frozen foods. Heavy, dense foods, such as potatoes, egg yolks, chicken livers, hot dogs, and...
Owners Manual
Page 10
... a general guide for the suggested cooking power of standing time depends on some metal can occur and cause damage to cook by the manufacturer for microwave oven use . MICROWAVE COOKING POWER CHART Percent/ Name 100%, High (default setting) 90% Number 10 9 80% 8 70%, Medum- 7 High 60% 6 50%, Medium 5 40% 4 30%, 3 Medium-Low, Defrost 20% 2 10%, Low 1 Use Quick-heating convenience foods and foods with gold or silver trim. Heating cream soups. Cooking and heating foods that need a cook power...
... a general guide for the suggested cooking power of standing time depends on some metal can occur and cause damage to cook by the manufacturer for microwave oven use . MICROWAVE COOKING POWER CHART Percent/ Name 100%, High (default setting) 90% Number 10 9 80% 8 70%, Medum- 7 High 60% 6 50%, Medium 5 40% 4 30%, 3 Medium-Low, Defrost 20% 2 10%, Low 1 Use Quick-heating convenience foods and foods with gold or silver trim. Heating cream soups. Cooking and heating foods that need a cook power...
Owners Manual
Page 11
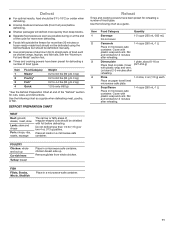
... first. ■ Times and cooking powers have been preset for reheating a number of the cycle for more even defrosting. ■ Foods left outside the freezer for cuts, sizes, and instructions. Use the following chart as a guide. POULTRY Chicken: whole and cut up . Use the following chart as a guide when defrosting meat, poultry, or fish. Item 1 2 3 4 5 Food Category Quantity Beverage Do not cover. 1-2 cups (250 mL-500...
... first. ■ Times and cooking powers have been preset for reheating a number of the cycle for more even defrosting. ■ Foods left outside the freezer for cuts, sizes, and instructions. Use the following chart as a guide. POULTRY Chicken: whole and cut up . Use the following chart as a guide when defrosting meat, poultry, or fish. Item 1 2 3 4 5 Food Category Quantity Beverage Do not cover. 1-2 cups (250 mL-500...
Owners Manual
Page 12
... the instructions provided by brand and fat content. Times and cooking powers have been preset for ingredient amounts. Marshmallows (142 or safe container. 283Þg) 12 Let stand 5Þminutes after cooking, or until liquid is absorbed. Place rice and liquid in microwave-safe container. 4 Soften Frozen 12 oz (340 g) Remove lid. Cover with plastic wrap and vent. Stir...
... the instructions provided by brand and fat content. Times and cooking powers have been preset for ingredient amounts. Marshmallows (142 or safe container. 283Þg) 12 Let stand 5Þminutes after cooking, or until liquid is absorbed. Place rice and liquid in microwave-safe container. 4 Soften Frozen 12 oz (340 g) Remove lid. Cover with plastic wrap and vent. Stir...
Owners Manual
Page 13
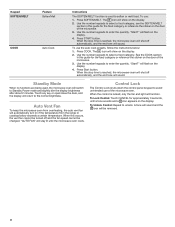
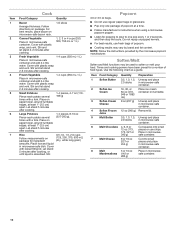
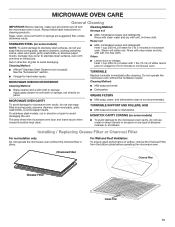
...-free cloth. Heavy soil ■ Mild, nonabrasive soaps and detergents: Heat 1 cup (250 mL) of either lemon juice or vinegar for 2 to stainless steel surfaces, do not use . Charcoal Filter Charcoal Filter Grease Filter Grease Filter 13 MICROWAVE OVEN DOOR EXTERIOR Cleaning Method: ■ Glass cleaner and a soft cloth or sponge: Apply glass cleaner to 5 minutes in direction of airflow, remove the Charcoal Filter from the bottom plate before operating the microwave oven. TURNTABLE Replace turntable...
...-free cloth. Heavy soil ■ Mild, nonabrasive soaps and detergents: Heat 1 cup (250 mL) of either lemon juice or vinegar for 2 to stainless steel surfaces, do not use . Charcoal Filter Charcoal Filter Grease Filter Grease Filter 13 MICROWAVE OVEN DOOR EXTERIOR Cleaning Method: ■ Glass cleaner and a soft cloth or sponge: Apply glass cleaner to 5 minutes in direction of airflow, remove the Charcoal Filter from the bottom plate before operating the microwave oven. TURNTABLE Replace turntable...
Owners Manual
Page 14
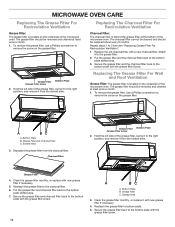
... Plate B. Replacing The Grease Filter For Wall and Roof Ventilation Grease Filter: The grease filter is located on the underside of the microwave oven. Grease Filter C. Replacing The Charcoal Filter For Recirculation Ventilation Charcoal Filter: The charcoal filter is behind the grease filter at the bottom of the grease filter, swing it to the right position, and remove it to the bottom plate with a new charcoal filter. Bottom Plate B. MICROWAVE OVEN CARE Replacing The Grease Filter...
... Plate B. Replacing The Grease Filter For Wall and Roof Ventilation Grease Filter: The grease filter is located on the underside of the microwave oven. Grease Filter C. Replacing The Charcoal Filter For Recirculation Ventilation Charcoal Filter: The charcoal filter is behind the grease filter at the bottom of the grease filter, swing it to the right position, and remove it to the bottom plate with a new charcoal filter. Bottom Plate B. MICROWAVE OVEN CARE Replacing The Grease Filter...
Owners Manual
Page 15
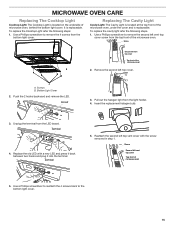
... screwdriver to the bottom light cover. 15 Screws B. Screw Second left top cover. MICROWAVE OVEN CARE Replacing The Cooktop Light Cooktop Light: The Cooktop Light is located on the underside of the microwave oven, under the cover and is replaceable. Screw Second left vent top cover screw from the bottom light cover. It is replaceable. To replace the Cooktop Light refer the following steps. 1. Use a Phillips screwdriver to remove the second left vent top cover Top front of the microwave oven. Bottom Light Cover 2. Hook 3. Pull out the...
... screwdriver to the bottom light cover. 15 Screws B. Screw Second left top cover. MICROWAVE OVEN CARE Replacing The Cooktop Light Cooktop Light: The Cooktop Light is located on the underside of the microwave oven, under the cover and is replaceable. Screw Second left vent top cover screw from the bottom light cover. It is replaceable. To replace the Cooktop Light refer the following steps. 1. Use a Phillips screwdriver to remove the second left vent top cover Top front of the microwave oven. Bottom Light Cover 2. Hook 3. Pull out the...

Owners Manual
Page 16
...; Charcoal Filter Order Part Number W11330263 ■ Grease Filter Order Part Number W11371546 ■ Replacement Cooktop Light Order Part Number W11384716 ■ Replacement Cavity Light Order Part Number W10709921 16 Arcing in the bullets below. If you experience Recommended Solutions Microwave oven will not Check the following: operate ■ Household fuse or circuit breaker: If a household fuse has blown or a circuit breaker has tripped, replace the fuse or reset the circuit breaker. In Canada, visit https://www.whirlpool.ca/owners. Make sure Control Lock...
...; Charcoal Filter Order Part Number W11330263 ■ Grease Filter Order Part Number W11371546 ■ Replacement Cooktop Light Order Part Number W11384716 ■ Replacement Cavity Light Order Part Number W10709921 16 Arcing in the bullets below. If you experience Recommended Solutions Microwave oven will not Check the following: operate ■ Household fuse or circuit breaker: If a household fuse has blown or a circuit breaker has tripped, replace the fuse or reset the circuit breaker. In Canada, visit https://www.whirlpool.ca/owners. Make sure Control Lock...


