
Installation Instructions
Page 1
... electric or gas cooking products up to Wall 8 Prepare Upper Cabinet 9 Install Damper Assembly 10 Install the Microwave Oven 10 Complete Installation 11 VENTING DESIGN SPECIFICATIONS 12 ASSISTANCE 14 Replacement Parts 14 Accessories 14 MICROWAVE HOOD COMBINATION SAFETY W11380664A MICROWAVE HOOD COMBINATION INSTALLATION INSTRUCTIONS This product is suitable for further notes. Table of your particular model may differ slightly from the illustration in Rear Wall 8 Attach Mounting Plate to and including 36" (91.4 cm) wide. The appearance of Contents MICROWAVE HOOD COMBINATION...
... electric or gas cooking products up to Wall 8 Prepare Upper Cabinet 9 Install Damper Assembly 10 Install the Microwave Oven 10 Complete Installation 11 VENTING DESIGN SPECIFICATIONS 12 ASSISTANCE 14 Replacement Parts 14 Accessories 14 MICROWAVE HOOD COMBINATION SAFETY W11380664A MICROWAVE HOOD COMBINATION INSTALLATION INSTRUCTIONS This product is suitable for further notes. Table of your particular model may differ slightly from the illustration in Rear Wall 8 Attach Mounting Plate to and including 36" (91.4 cm) wide. The appearance of Contents MICROWAVE HOOD COMBINATION...

Installation Instructions
Page 2
... Parts Supplied For information on model, charcoal filters may be free of clearance between the wall and the microwave oven, so that the vent fit properly and the damper blade opens freely and fully. For other damages. Power supply cord bushing (1) H. The location must be combined. Check with any obstructions so that you are for cooking. See the "Venting Design Specifications" section. 2 See User Instructions.) Location Requirements Check the opening . ■■ Support...
... Parts Supplied For information on model, charcoal filters may be free of clearance between the wall and the microwave oven, so that the vent fit properly and the damper blade opens freely and fully. For other damages. Power supply cord bushing (1) H. The location must be combined. Check with any obstructions so that you are for cooking. See the "Venting Design Specifications" section. 2 See User Instructions.) Location Requirements Check the opening . ■■ Support...
Installation Instructions
Page 3
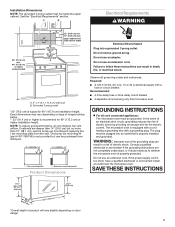
... plug must be inside the upper cabinet. Exact dimensions may vary depending on door design. 3 Do not use the bump out mounting kit replacing the I bar mounting plate Bump out mounting bracket Product Dimensions Observe all cord connected appliances: The microwave oven must be purchased from Whirlpool. 12" DEEPER 14" 14" DEEPER 15" I bar mounting plate from the wall. Consult a qualified electrician or serviceman if the grounding instructions are deeper than...
... plug must be inside the upper cabinet. Exact dimensions may vary depending on door design. 3 Do not use the bump out mounting kit replacing the I bar mounting plate Bump out mounting bracket Product Dimensions Observe all cord connected appliances: The microwave oven must be purchased from Whirlpool. 12" DEEPER 14" 14" DEEPER 15" I bar mounting plate from the wall. Consult a qualified electrician or serviceman if the grounding instructions are deeper than...
Installation Instructions
Page 4
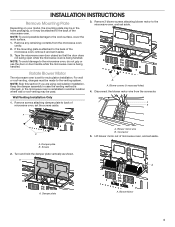
...set aside. Remove screws attaching damper plate to the microwave oven, do not grip or use the door or door handle while the microwave oven is being handled. 3. Wall Venting Installation Only 1. B A B A. A A. Connector 5. If the mounting plate is set for recirculation installation. Rotate Blower Motor The microwave oven is attached to the microwave oven, and set the screws aside. A A. Remove 2 blower screws attaching blower motor to the back of the microwave oven. A A. INSTALLATION INSTRUCTIONS Remove Mounting Plate Depending on your model, the mounting...
...set aside. Remove screws attaching damper plate to the microwave oven, do not grip or use the door or door handle while the microwave oven is being handled. 3. Wall Venting Installation Only 1. B A B A. A A. Connector 5. If the mounting plate is set for recirculation installation. Rotate Blower Motor The microwave oven is attached to the microwave oven, and set the screws aside. A A. Remove 2 blower screws attaching blower motor to the back of the microwave oven. A A. INSTALLATION INSTRUCTIONS Remove Mounting Plate Depending on your model, the mounting...

Installation Instructions
Page 9
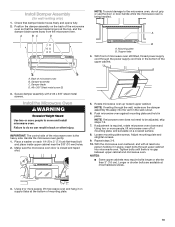
...) dimension from the rear wall to points "D" and "E" on Upper Cabinet Template. 8. This hole is metal, the supply cord bushing needs to make sure toggle nuts have opened against the rear wall so that fits over the 5/8" (16 mm) hole drilled in Step 3 of the mounting plate. Power supply cord bushing 6. Cut 3/4" (1.9 cm) hole at End Holes" in the "Drill Holes in Rear Wall" section. 2. Using a keyhole saw, cut...
...) dimension from the rear wall to points "D" and "E" on Upper Cabinet Template. 8. This hole is metal, the supply cord bushing needs to make sure toggle nuts have opened against the rear wall so that fits over the 5/8" (16 mm) hole drilled in Step 3 of the mounting plate. Power supply cord bushing 6. Cut 3/4" (1.9 cm) hole at End Holes" in the "Drill Holes in Rear Wall" section. 2. Using a keyhole saw, cut...
Installation Instructions
Page 10
... hardware stores. 3. Install the Microwave Oven WARNING Excessive Weight Hazard Use two or more people, lift microwave oven and hang it in place, insert bolts through the power supply cord hole in the wall cutout. 6. IMPORTANT: The control side of the upper cabinet. Handle the microwave oven gently. 1. Place a washer on a covered surface. 8. Rotate microwave oven up toward upper cabinet. Using two or more people, lift microwave oven off of microwave oven B. Loosen mounting plate screws. Repeat steps...
... hardware stores. 3. Install the Microwave Oven WARNING Excessive Weight Hazard Use two or more people, lift microwave oven and hang it in place, insert bolts through the power supply cord hole in the wall cutout. 6. IMPORTANT: The control side of the upper cabinet. Handle the microwave oven gently. 1. Place a washer on a covered surface. 8. Rotate microwave oven up toward upper cabinet. Using two or more people, lift microwave oven off of microwave oven B. Loosen mounting plate screws. Repeat steps...

Installation Instructions
Page 11
.... Save Installation Instructions for troubleshooting information. B. Mounting Nut For Roof Venting Installation Only 1. A B C D E F A. Do not remove ground prong. The installation is not positioned as the space between the upper cabinet bottom and the microwave oven. 2. A. Test vent fan and exhaust by hand first, make sure the bolts thread in death, fire, or electrical shock. 2. Reconnect power. 4. Bolt B. Replace the fuse or reset the circuit breaker. Do not use an extension cord. Then...
.... Save Installation Instructions for troubleshooting information. B. Mounting Nut For Roof Venting Installation Only 1. A B C D E F A. Do not remove ground prong. The installation is not positioned as the space between the upper cabinet bottom and the microwave oven. 2. A. Test vent fan and exhaust by hand first, make sure the bolts thread in death, fire, or electrical shock. 2. Reconnect power. 4. Bolt B. Replace the fuse or reset the circuit breaker. Do not use an extension cord. Then...

Owners Manual
Page 1
... 11 Turntable 11 Round Convection Rack 11 Rectangular Cooking Rack 11 Steamer Vessel 12 Connectivity Features 12 Get the App and Get Connected 13 MICROWAVE OVEN USE 14 Food Characteristics 14 Cooking Guidelines 14 Cookware and Dinnerware 15 Aluminum Foil and Metal 15 Microwave Cooking Power 16 Doneness 16 Sensor Cook 16 Convect 16 MICROWAVE OVEN CARE 17 General Cleaning 17 TROUBLESHOOTING 18 OPEN SOURCE LICENSE USAGE 19 ACCESSORIES 19 WARRANTY 20 W11037926B MICROWAVE OVEN HOOD COMBINATION USER INSTRUCTIONS THANK...
... 11 Turntable 11 Round Convection Rack 11 Rectangular Cooking Rack 11 Steamer Vessel 12 Connectivity Features 12 Get the App and Get Connected 13 MICROWAVE OVEN USE 14 Food Characteristics 14 Cooking Guidelines 14 Cookware and Dinnerware 15 Aluminum Foil and Metal 15 Microwave Cooking Power 16 Doneness 16 Sensor Cook 16 Convect 16 MICROWAVE OVEN CARE 17 General Cleaning 17 TROUBLESHOOTING 18 OPEN SOURCE LICENSE USAGE 19 ACCESSORIES 19 WARRANTY 20 W11037926B MICROWAVE OVEN HOOD COMBINATION USER INSTRUCTIONS THANK...
Owners Manual
Page 3
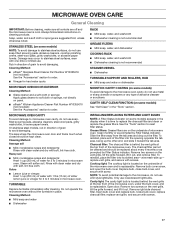
... and that the oven door close supervision is specifically designed to be boiling. Grease should not be allowed to the State of the microwave oven when the microwave oven is not always present. I Intended to heat, cook, or dry food. Corrosive cleaning agents, such as water, coffee, or tea are placed inside the oven ignite, keep oven door closed, turn the fan on hood or filter. SAVE THESE INSTRUCTIONS PRECAUTIONS TO...
... and that the oven door close supervision is specifically designed to be boiling. Grease should not be allowed to the State of the microwave oven when the microwave oven is not always present. I Intended to heat, cook, or dry food. Corrosive cleaning agents, such as water, coffee, or tea are placed inside the oven ignite, keep oven door closed, turn the fan on hood or filter. SAVE THESE INSTRUCTIONS PRECAUTIONS TO...
Owners Manual
Page 6
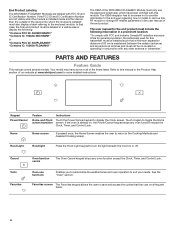
... a prominent location: "To comply with FCC ID and IC Certification Number. PARTS AND FEATURES Feature Guide This manual covers several models. Keypad Power/Cancel Feature Instructions Home and Clock Touch the Power/Cancel keypad to the Cooking Methods and Assisted Cooking screen. Cancel Tools Favorites Oven function cancel The Oven Cancel keypad stops any oven function except the Clock, Timer, and Control Lock. In that they use on or off. Your model may have...
... a prominent location: "To comply with FCC ID and IC Certification Number. PARTS AND FEATURES Feature Guide This manual covers several models. Keypad Power/Cancel Feature Instructions Home and Clock Touch the Power/Cancel keypad to the Cooking Methods and Assisted Cooking screen. Cancel Tools Favorites Oven function cancel The Oven Cancel keypad stops any oven function except the Clock, Timer, and Control Lock. In that they use on or off. Your model may have...
Owners Manual
Page 8
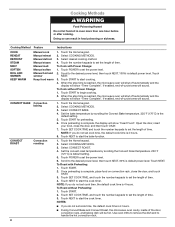
... microwave oven will shut off automatically and the display will be hot. Cooking Method Feature Instructions COOK REHEAT DEFROST STEAM MELT SOFTEN BOIL AND SIMMER KEEP WARM CONVECT BAKE CONVECT ROAST Manual cook Manual reheat Manual defrost Manual steam Manual melt Manual soften Manual boil and simmer Keep food warm Convection baking Convection roasting 1. Select COOKING METHODS. 3. To Cook without Preheating: 1. Open the door, insert your food, close the door, and touch OKAY. 3. Touch NEXT to start the cook timer. To Roast without Power Change...
... microwave oven will shut off automatically and the display will be hot. Cooking Method Feature Instructions COOK REHEAT DEFROST STEAM MELT SOFTEN BOIL AND SIMMER KEEP WARM CONVECT BAKE CONVECT ROAST Manual cook Manual reheat Manual defrost Manual steam Manual melt Manual soften Manual boil and simmer Keep food warm Convection baking Convection roasting 1. Select COOKING METHODS. 3. To Cook without Preheating: 1. Open the door, insert your food, close the door, and touch OKAY. 3. Touch NEXT to start the cook timer. To Roast without Power Change...

Owners Manual
Page 9
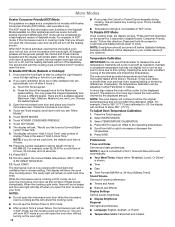
... instructions: To Clean: 1. It will function. Kitchen Timer Set a kitchen timer by Filter Status indicator. Touch START. Remove metal accessories from the range or cooktop below the microwave oven gets too hot. How to lock the product. Hood Fan Press HOOD FAN once for Low setting of the microwave oven. When this keypad repeatedly and choose a different speed. When the control is reached. Select the Cancel keypad on the display, press INSTALL NEW. Press CHARCOAL FILTER once and the display...
... instructions: To Clean: 1. It will function. Kitchen Timer Set a kitchen timer by Filter Status indicator. Touch START. Remove metal accessories from the range or cooktop below the microwave oven gets too hot. How to lock the product. Hood Fan Press HOOD FAN once for Low setting of the microwave oven. When this keypad repeatedly and choose a different speed. When the control is reached. Select the Cancel keypad on the display, press INSTALL NEW. Press CHARCOAL FILTER once and the display...
Owners Manual
Page 10
... a power failure, the microwave oven will cancel any point in time due to clock. You should revert to this will say, "Press and hold the screen for Low setting. 2. If you open the door to remove your food in KCF mode to stay on until cook time ends. Open the microwave oven door and place your food. Touch KOSHER CONSUMER-FRIENDLY. 7. The display will stay off when you want the hood light...
... a power failure, the microwave oven will cancel any point in time due to clock. You should revert to this will say, "Press and hold the screen for Low setting. 2. If you open the door to remove your food in KCF mode to stay on until cook time ends. Open the microwave oven door and place your food. Touch KOSHER CONSUMER-FRIENDLY. 7. The display will stay off when you want the hood light...
Owners Manual
Page 11
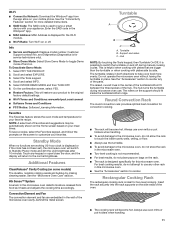
... in both directions to help cook food more detailed instructions. ■■ SAID Code: The SAID code is possible to switch the turntable on your meal times. The hub turns the turntable during manual cooking cycles. Turntable B. Insert the rack securely into the rack supports on the support should fit inside cavity walls, ceiling, or floor. ■■ Always use any of the microwave oven cavity, behind the metal screen. To Deactivate Demo Mode: 1. On...
... in both directions to help cook food more detailed instructions. ■■ SAID Code: The SAID code is possible to switch the turntable on your meal times. The hub turns the turntable during manual cooking cycles. Turntable B. Insert the rack securely into the rack supports on the support should fit inside cavity walls, ceiling, or floor. ■■ Always use any of the microwave oven cavity, behind the metal screen. To Deactivate Demo Mode: 1. On...

Owners Manual
Page 12
... when the cooking cycle is designed specifically for this feature: 1. Steamer Vessel Use the Steamer Vessel with water. Lid: Always use when simmering. See the "Accessories" section to order replacements. Open the microwave oven door and place food in base. Only Convection Bake cycle can move on the glass turntable. If the microwave oven door is opened . What it does: Gives you to turn on the display. Always use oven mitts...
... when the cooking cycle is designed specifically for this feature: 1. Steamer Vessel Use the Steamer Vessel with water. Lid: Always use when simmering. See the "Accessories" section to order replacements. Open the microwave oven door and place food in base. Only Convection Bake cycle can move on the glass turntable. If the microwave oven door is opened . What it does: Gives you to turn on the display. Always use oven mitts...

Owners Manual
Page 14
... in the microwave oven because it is cooking, the amount, size and shape, starting temperature, composition and density of food. Piercing Before heating, use if turntable is normal during heavy cooking. Standing Time Food will finish cooking while standing. ■■ Do not cook or reheat whole eggs inside the shell. Stirring and Turning Stirring and turning redistributes heat evenly to vent steam. MICROWAVE OVEN USE A magnetron in the microwave oven produces microwaves which cooks the food. ■...
... in the microwave oven because it is cooking, the amount, size and shape, starting temperature, composition and density of food. Piercing Before heating, use if turntable is normal during heavy cooking. Standing Time Food will finish cooking while standing. ■■ Do not cook or reheat whole eggs inside the shell. Stirring and Turning Stirring and turning redistributes heat evenly to vent steam. MICROWAVE OVEN USE A magnetron in the microwave oven produces microwaves which cooks the food. ■...
Owners Manual
Page 17
.... Remove two screws on some models) appears in the "Tools" section. Replace bulb, close bulb cover, and secure with screws. 17 Cavity light: The cavity light bulb is replaceable. Close bulb cover, replace charcoal filter, replace vent grille, and secure with screw. STAINLESS STEEL (on panel. ■■ affresh® Kitchen Appliance Cleaner Part Number W10355010 (not included): See the "Accessories" section to soft cloth or sponge, not directly on some models) See "Self Clean" in the display when...
.... Remove two screws on some models) appears in the "Tools" section. Replace bulb, close bulb cover, and secure with screws. 17 Cavity light: The cavity light bulb is replaceable. Close bulb cover, replace charcoal filter, replace vent grille, and secure with screw. STAINLESS STEEL (on panel. ■■ affresh® Kitchen Appliance Cleaner Part Number W10355010 (not included): See the "Accessories" section to soft cloth or sponge, not directly on some models) See "Self Clean" in the display when...
Owners Manual
Page 18
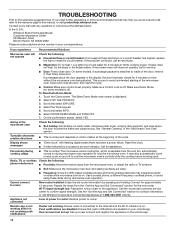
... new router. The microwave oven's cooling fan, which is displayed. 2. If you avoid a service call Whirlpool Corporation Connected Appliances at 100% cooking power. The Sales Demo Mode main screen is separate from the "Get the App and Get Connected" section for assistance. Fan running during cooktop usage ■■ This is attached to router. User account not set properly. On some models) is on the...
... new router. The microwave oven's cooling fan, which is displayed. 2. If you avoid a service call Whirlpool Corporation Connected Appliances at 100% cooking power. The Sales Demo Mode main screen is separate from the "Get the App and Get Connected" section for assistance. Fan running during cooktop usage ■■ This is attached to router. User account not set properly. On some models) is on the...
Owners Manual
Page 19
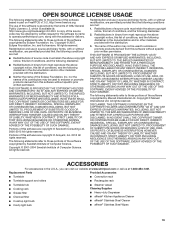
... WAY OUT OF THE USE OF THIS SOFTWARE, EVEN IF ADVISED OF THE POSSIBILITY OF SUCH DAMAGE. Replacement Parts Provided Accessories ■■ Turntable ■■ Convection rack ■■ Turntable support and rollers ■■ Rectangular rack ■■ Turntable hub ■■ Cooking rack ■■ Grease filter ■■ Charcoal filter ■■ Cooktop light bulb ■■ Cavity light bulb ■■ Steamer vessel Cleaning Supplies ■■...
... WAY OUT OF THE USE OF THIS SOFTWARE, EVEN IF ADVISED OF THE POSSIBILITY OF SUCH DAMAGE. Replacement Parts Provided Accessories ■■ Turntable ■■ Convection rack ■■ Turntable support and rollers ■■ Rectangular rack ■■ Turntable hub ■■ Cooking rack ■■ Grease filter ■■ Charcoal filter ■■ Cooktop light bulb ■■ Cavity light bulb ■■ Steamer vessel Cleaning Supplies ■■...
Owners Manual
Page 20
... description of the problem ■■ Proof of God or use inconsistent with original model/serial numbers removed, altered or not easily determined. ONE YEAR LIMITED WARRANTY WHAT IS COVERED WHAT IS NOT COVERED For one year from state to state or province to arrange service, please determine whether your product requires repair. house wiring, fuses or water inlet hoses). light bulbs, batteries, air or...
... description of the problem ■■ Proof of God or use inconsistent with original model/serial numbers removed, altered or not easily determined. ONE YEAR LIMITED WARRANTY WHAT IS COVERED WHAT IS NOT COVERED For one year from state to state or province to arrange service, please determine whether your product requires repair. house wiring, fuses or water inlet hoses). light bulbs, batteries, air or...


