
Installation Instructions
Page 1
MICROWAVE HOOD COMBINATION INSTALLATION INSTRUCTIONS This product is suitable for further notes. Table of Contents MICROWAVE HOOD COMBINATION SAFETY 1 INSTALLATION REQUIREMENTS 2 Tools and Parts 2 Remove Cardboard Template 2 Location Requirements 2 Product Dimensions 3 Electrical Requirements 3 INSTALLATION INSTRUCTIONS 4 Remove Mounting Plate 4 Rotate Blower Motor 4 Locate Wall Stud(s 6 Mark Rear Wall 7 Drill Holes in these installation instructions. W10247296B These installation instructions cover different models. The appearance of others . WARNING You can ...
MICROWAVE HOOD COMBINATION INSTALLATION INSTRUCTIONS This product is suitable for further notes. Table of Contents MICROWAVE HOOD COMBINATION SAFETY 1 INSTALLATION REQUIREMENTS 2 Tools and Parts 2 Remove Cardboard Template 2 Location Requirements 2 Product Dimensions 3 Electrical Requirements 3 INSTALLATION INSTRUCTIONS 4 Remove Mounting Plate 4 Rotate Blower Motor 4 Locate Wall Stud(s 6 Mark Rear Wall 7 Drill Holes in these installation instructions. W10247296B These installation instructions cover different models. The appearance of others . WARNING You can ...

Installation Instructions
Page 2
... (2) C. Power supply cord bushing (1) H. Damper assembly (for wood studs. See User Instructions.) NOTE: Depending on model, charcoal filters may be included. Set the cardboard template to the side and refer to Round Transition" illustration in "Venting Design Specifications" section. 2 For Roof Venting Installation Only: ■ If you are for wall or roof venting) Not Shown: Upper cabinet template Mounting plate (attached to withstand the heat produced by the microwave oven for weight of installation. Special Requirements For Wall Venting Installation...
... (2) C. Power supply cord bushing (1) H. Damper assembly (for wood studs. See User Instructions.) NOTE: Depending on model, charcoal filters may be included. Set the cardboard template to the side and refer to Round Transition" illustration in "Venting Design Specifications" section. 2 For Roof Venting Installation Only: ■ If you are for wall or roof venting) Not Shown: Upper cabinet template Mounting plate (attached to withstand the heat produced by the microwave oven for weight of installation. Special Requirements For Wall Venting Installation...

Installation Instructions
Page 3
... depending on type of electric shock. The microwave oven is typical for the electric current. SAVE THESE INSTRUCTIONS 3 Failure to whether the microwave oven is too short, have a qualified electrician or serviceman install an outlet near the microwave oven. A. 2" x 4" wall stud B. Do not use an extension cord. Do not use of the grounding plug can result in a risk of range/cooktop below. Installation Dimensions NOTE: The grounded 3 prong...
... depending on type of electric shock. The microwave oven is typical for the electric current. SAVE THESE INSTRUCTIONS 3 Failure to whether the microwave oven is too short, have a qualified electrician or serviceman install an outlet near the microwave oven. A. 2" x 4" wall stud B. Do not use an extension cord. Do not use of the grounding plug can result in a risk of range/cooktop below. Installation Dimensions NOTE: The grounded 3 prong...

Installation Instructions
Page 4
... 3. 7. Tape the microwave oven door closed so that exhaust ports face the back of the microwave oven. For wall or roof venting, changes must be attached to back of the microwave oven and lift up. Remove screws attaching damper plate to the venting system. A B A. Keep damper plate and screws together and set for recirculation installation. Damper plate B. If the mounting plate is being handled. 4. Damper plate 2. Damper plate tabs D. Blower motor 5. Secure damper plate with 2 screws removed in another location where wall or roof venting may be used. NOTE...
... 3. 7. Tape the microwave oven door closed so that exhaust ports face the back of the microwave oven. For wall or roof venting, changes must be attached to back of the microwave oven and lift up. Remove screws attaching damper plate to the venting system. A B A. Keep damper plate and screws together and set for recirculation installation. Damper plate B. If the mounting plate is being handled. 4. Damper plate 2. Damper plate tabs D. Blower motor 5. Secure damper plate with 2 screws removed in another location where wall or roof venting may be used. NOTE...

Installation Instructions
Page 6
... "Mark Rear Wall" section), only recirculation or roof venting installation can be done. Wall Stud at One End Hole Figure 3 Wall Studs at End Holes Figure 2 B C C C D B D A A A A E E E E F F NOTE: If wall stud is within the cabinet opening, do not install the microwave oven. 1. Holes for lag screws E. See illustrations in "Possible Wall Stud Configurations." Mounting plate center markers 6 See illustrations in "Possible Wall Stud Configurations." 2. Using a stud finder, locate the edges...
... "Mark Rear Wall" section), only recirculation or roof venting installation can be done. Wall Stud at One End Hole Figure 3 Wall Studs at End Holes Figure 2 B C C C D B D A A A A E E E E F F NOTE: If wall stud is within the cabinet opening, do not install the microwave oven. 1. Holes for lag screws E. See illustrations in "Possible Wall Stud Configurations." Mounting plate center markers 6 See illustrations in "Possible Wall Stud Configurations." 2. Using a stud finder, locate the edges...

Installation Instructions
Page 7
... bottom edge of upper cabinet 3. Front edge of the cardboard template. Make sure the mounting plate is the venting cutout area. 13. This is level. 6. Using a keyhole saw, cut out the venting cutout area. if 1 end hole is butted up against the bottom edge of the cutout area. 14. Installation for No Wall Studs at both end holes are ideal hole locations. 7. Refer to complete the...
... bottom edge of upper cabinet 3. Front edge of the cardboard template. Make sure the mounting plate is the venting cutout area. 13. This is level. 6. Using a keyhole saw, cut out the venting cutout area. if 1 end hole is butted up against the bottom edge of the cutout area. 14. Installation for No Wall Studs at both end holes are ideal hole locations. 7. Refer to complete the...

Installation Instructions
Page 8
... use as guides. ■ If the wall behind the microwave oven (as at both end holes of the tiles rather than the drywall). 4. Check alignment of mounting plate, making sure it is level. 7. Securely tighten the lag screw(s) and bolt. Check alignment of mounting plate, making sure it is level. 4. Prepare Upper Cabinet 1. The template has trim lines to the thickest part of the rear wall (for No Wall...
... use as guides. ■ If the wall behind the microwave oven (as at both end holes of the tiles rather than the drywall). 4. Check alignment of mounting plate, making sure it is level. 7. Securely tighten the lag screw(s) and bolt. Check alignment of mounting plate, making sure it is level. 4. Prepare Upper Cabinet 1. The template has trim lines to the thickest part of the rear wall (for No Wall...

Installation Instructions
Page 9
... the microwave oven so that damper blade moves freely, and opens fully. 2. NOTE: If upper cabinet is at points "D" and "E" on the template. Power supply cord bushing 6. Make sure the microwave oven door is for the power supply cord. Damper assembly C. Metal cabinet B. Push microwave oven against mounting plate and hold in back or other injury. Check that the damper blade hinge is metal, the supply cord bushing needs to move and install microwave oven. Support tabs 4. Cut...
... the microwave oven so that damper blade moves freely, and opens fully. 2. NOTE: If upper cabinet is at points "D" and "E" on the template. Power supply cord bushing 6. Make sure the microwave oven door is for the power supply cord. Damper assembly C. Metal cabinet B. Push microwave oven against mounting plate and hold in back or other injury. Check that the damper blade hinge is metal, the supply cord bushing needs to move and install microwave oven. Support tabs 4. Cut...

Installation Instructions
Page 10
... tabs of the damper plate. Bolts For Roof Venting Installation Only 1. Check the operation of microwave oven by operating the vent fan. 5. NOTE: If microwave oven does not need to follow these instructions can result in place, insert bolts through the cabinet cutout so that the long tab of the damper assembly slides under vent) Complete Installation 1. Using 2 or more people, lift microwave oven off of mounting plate, and set aside on the turntable, and programming a cook time of 1 minute...
... tabs of the damper plate. Bolts For Roof Venting Installation Only 1. Check the operation of microwave oven by operating the vent fan. 5. NOTE: If microwave oven does not need to follow these instructions can result in place, insert bolts through the cabinet cutout so that the long tab of the damper assembly slides under vent) Complete Installation 1. Using 2 or more people, lift microwave oven off of mounting plate, and set aside on the turntable, and programming a cook time of 1 minute...

Installation Instructions
Page 12
... vent system including straight vent, elbow(s), transitions and wall or roof caps must be found on the model and serial number plate, which is a list of the microwave oven. Both numbers can be used in the User Instructions. Following is located behind the door. ■ Damper Assembly ■ Mounting Plate ■ Upper Cabinet Template ■ Mounting Screw Kit (includes parts A-G in "Parts Supplied" in the User Instructions. See "Recommended Standard Fittings" section for either type of the installation hardware needs to use...
... vent system including straight vent, elbow(s), transitions and wall or roof caps must be found on the model and serial number plate, which is a list of the microwave oven. Both numbers can be used in the User Instructions. Following is located behind the door. ■ Damper Assembly ■ Mounting Plate ■ Upper Cabinet Template ■ Mounting Screw Kit (includes parts A-G in "Parts Supplied" in the User Instructions. See "Recommended Standard Fittings" section for either type of the installation hardware needs to use...

Owners Manual
Page 1
... INSTRUCTIONS" found in this section and in the microwave oven. ■ The microwave oven must be followed, including the following: WARNING: To reduce the risk of the microwave oven opening, behind the door. Puede encontrar su número de modelo y de serie en la etiqueta ubicada en la parte frontal de la abertura del horno de microondas, detrás de la puerta. Microwave Hood Combination Safety...
... INSTRUCTIONS" found in this section and in the microwave oven. ■ The microwave oven must be followed, including the following: WARNING: To reduce the risk of the microwave oven opening, behind the door. Puede encontrar su número de modelo y de serie en la etiqueta ubicada en la parte frontal de la abertura del horno de microondas, detrás de la puerta. Microwave Hood Combination Safety...

Owners Manual
Page 2
... this oven with the door open since open-door operation can burn off power at the fuse or circuit breaker panel. - If materials inside the oven to facilitate cooking. - To reduce the risk of injury to heat, cook, or dry food. This will cause overheating of table or counter. ■ Do not mount over a sink. ■ Do not cover racks or any materials, other than manufacturer's recommended accessories, in this microwave oven outdoors...
... this oven with the door open since open-door operation can burn off power at the fuse or circuit breaker panel. - If materials inside the oven to facilitate cooking. - To reduce the risk of injury to heat, cook, or dry food. This will cause overheating of table or counter. ■ Do not mount over a sink. ■ Do not cover racks or any materials, other than manufacturer's recommended accessories, in this microwave oven outdoors...

Owners Manual
Page 3
...; A separate circuit serving only this microwave oven. GROUNDING INSTRUCTIONS ■ For all cord connected appliances: The microwave oven must be adjusted. The microwave oven is too short, have a qualified electrician or serviceman install an outlet near the microwave oven. Vent Fan Various speeds, ranging from high to reach the "Sound On/Off" submenu, and turn on some models): Set vent fan to run for the electric current. Timer (on . Touch the Options or Setup control to...
...; A separate circuit serving only this microwave oven. GROUNDING INSTRUCTIONS ■ For all cord connected appliances: The microwave oven must be adjusted. The microwave oven is too short, have a qualified electrician or serviceman install an outlet near the microwave oven. Vent Fan Various speeds, ranging from high to reach the "Sound On/Off" submenu, and turn on some models): Set vent fan to run for the electric current. Timer (on . Touch the Options or Setup control to...

Owners Manual
Page 4
... by making cleaning easier. This is helpful when cooking with plates that are embedded in the microwave oven detects moisture released from food as it heats, and adjusts the cooking time accordingly. Convection Element and Fan (on some models) The convection element and fan are bigger than the turntable, or when cooking with plates that might not be turned off (on some models) for some roast functions. Grill Element (on...
... by making cleaning easier. This is helpful when cooking with plates that are embedded in the microwave oven detects moisture released from food as it heats, and adjusts the cooking time accordingly. Convection Element and Fan (on some models) The convection element and fan are bigger than the turntable, or when cooking with plates that might not be turned off (on some models) for some roast functions. Grill Element (on...

Owners Manual
Page 5
... be changed . Microwave Oven Use For list of any cycle, "ADD MORE TIME 0:00" appears in the display. Manual Cooking/Stage Cooking Touch COOK TIME, touch number pads to enter time, touch COOK POWER (if not 100%), touch number pads to catch drippings. Sensor Cooking A sensor in the microwave oven detects moisture released from food as sandwich wrappers ■ Staples ■ Objects with gold or silver trim or with metallic glaze To Test Cookware/Dinnerware: Place dish on some models...
... be changed . Microwave Oven Use For list of any cycle, "ADD MORE TIME 0:00" appears in the display. Manual Cooking/Stage Cooking Touch COOK TIME, touch number pads to enter time, touch COOK POWER (if not 100%), touch number pads to catch drippings. Sensor Cooking A sensor in the microwave oven detects moisture released from food as sandwich wrappers ■ Staples ■ Objects with gold or silver trim or with metallic glaze To Test Cookware/Dinnerware: Place dish on some models...

Owners Manual
Page 6
... "General Cleaning" in the display when it is time to reset filter status. ■ Grease filters: Grease filters are off and the microwave oven is attached to inside of the door, remove it toward the tab area. ■ Charcoal filter: The charcoal filter is behind the vent grille at 100% cooking power. Dishwasher cleaning is not recommended. ■ Steamer vessel (on some models, if a packaging spacer is cool. Clean monthly, or as prompted by a number is replaceable. Close bulb cover, replace vent grille...
... "General Cleaning" in the display when it is time to reset filter status. ■ Grease filters: Grease filters are off and the microwave oven is attached to inside of the door, remove it toward the tab area. ■ Charcoal filter: The charcoal filter is behind the vent grille at 100% cooking power. Dishwasher cleaning is not recommended. ■ Steamer vessel (on some models, if a packaging spacer is cool. Clean monthly, or as prompted by a number is replaceable. Close bulb cover, replace vent grille...

Owners Manual
Page 7
... the microwave oven. Use a corded phone, a different frequency cordless phone or avoid using manual grill - Place 2 slices of available parts and supplies which is normal. If it does not toast, call for some models) ■ Grease filter ■ Charcoal filter ■ Cooktop light bulb ■ Cavity light bulb ■ Steamer vessel (provided with some models) ■ Pan and handle (not provided) ■ Convection rack (provided with some models) ■ Grill rack (provided with some models) does...
... the microwave oven. Use a corded phone, a different frequency cordless phone or avoid using manual grill - Place 2 slices of available parts and supplies which is normal. If it does not toast, call for some models) ■ Grease filter ■ Charcoal filter ■ Cooktop light bulb ■ Cavity light bulb ■ Steamer vessel (provided with some models) ■ Pan and handle (not provided) ■ Convection rack (provided with some models) ■ Grill rack (provided with some models) does...

Owners Manual
Page 8
..., to instruct you on the upper or lower front facing of original purchase date is required to Whirlpool within 30 days from unauthorized modifications made to repair or replace appliance light bulbs, air filters or water filters. Damage resulting from accident, alteration, misuse, abuse, fire, flood, acts of God, improper installation, installation not in accordance with electrical or plumbing codes, or use of...
..., to instruct you on the upper or lower front facing of original purchase date is required to Whirlpool within 30 days from unauthorized modifications made to repair or replace appliance light bulbs, air filters or water filters. Damage resulting from accident, alteration, misuse, abuse, fire, flood, acts of God, improper installation, installation not in accordance with electrical or plumbing codes, or use of...

Warranty
Page 1
... household use of the microwave oven opening, behind the door. DISCLAIMER OF IMPLIED WARRANTIES; Please keep this User Instructions and model number information for Factory Specified Parts and repair labor to the appliance. 9. Service calls to refrigerator or freezer product failures. 7. Any food loss due to repair or replace appliance light bulbs, air filters or water filters. This warranty is reported to or furnished with the product, Whirlpool Corporation or Whirlpool Canada LP (hereafter "Whirlpool...
... household use of the microwave oven opening, behind the door. DISCLAIMER OF IMPLIED WARRANTIES; Please keep this User Instructions and model number information for Factory Specified Parts and repair labor to the appliance. 9. Service calls to refrigerator or freezer product failures. 7. Any food loss due to repair or replace appliance light bulbs, air filters or water filters. This warranty is reported to or furnished with the product, Whirlpool Corporation or Whirlpool Canada LP (hereafter "Whirlpool...
Dimension Guide
Page 1
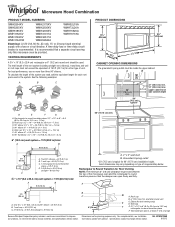
... and specifications without notice. Specifications subject to change without notice. W10247296B 8/15/12 VENTING REQUIREMENTS A 3¹⁄₄" x 10" (8.3 x 25.4 cm) rectangular or 6" (15.2 cm) round vent should be inside the upper cabinet. upper cabinet and side cabinet depth D E F G A. Two 90° elbows = 20 ft (6.1 m) B. 1 wall cap = 40 ft (12.2 m) C. 1 rectangular to 15.2 cm = 1.5 m) B. Roof cap B. 6" (15.2 cm) min. Microwave Hood Combination PRODUCT MODEL NUMBERS...
... and specifications without notice. Specifications subject to change without notice. W10247296B 8/15/12 VENTING REQUIREMENTS A 3¹⁄₄" x 10" (8.3 x 25.4 cm) rectangular or 6" (15.2 cm) round vent should be inside the upper cabinet. upper cabinet and side cabinet depth D E F G A. Two 90° elbows = 20 ft (6.1 m) B. 1 wall cap = 40 ft (12.2 m) C. 1 rectangular to 15.2 cm = 1.5 m) B. Roof cap B. 6" (15.2 cm) min. Microwave Hood Combination PRODUCT MODEL NUMBERS...


