Dimension Guide
Page 1
... and rectangular to open fully. Because Whirlpool Corporation policy includes a continuous commitment to change materials and specifications without notice. Specifications subject to improve Dimensions are not provided with microwave hood combination. upper cabinet and side cabinet...through the wall, be sure that a separate circuit serving only this microwave oven be sure to change without notice. Exact dimensions may vary depending on type of 2 Ref. Microwave Hood Combination PRODUCT MODEL NUMBER WMH73521C WMH76719C Electrical: A 120-Volt, 60-Hz, AC-only, 15-...
... and rectangular to open fully. Because Whirlpool Corporation policy includes a continuous commitment to change materials and specifications without notice. Specifications subject to improve Dimensions are not provided with microwave hood combination. upper cabinet and side cabinet...through the wall, be sure that a separate circuit serving only this microwave oven be sure to change without notice. Exact dimensions may vary depending on type of 2 Ref. Microwave Hood Combination PRODUCT MODEL NUMBER WMH73521C WMH76719C Electrical: A 120-Volt, 60-Hz, AC-only, 15-...
Dimension Guide
Page 2
... (12.2 m) C. 1 rectangular to round transition piece must be installed to round transition piece F. To calculate the length of the microwave oven and the rectangular to Round Transition for wall venting only) D. Because Whirlpool Corporation policy includes a continuous commitment to improve Dimensions are for either type of the vent system including straight vent...
... (12.2 m) C. 1 rectangular to round transition piece must be installed to round transition piece F. To calculate the length of the microwave oven and the rectangular to Round Transition for wall venting only) D. Because Whirlpool Corporation policy includes a continuous commitment to improve Dimensions are for either type of the vent system including straight vent...

Installation Guide
Page 1
...Wall 8 Prepare Upper Cabinet 8 Install Damper Assembly 9 Install the Microwave Oven 9 Complete Installation 10 VENTING DESIGN SPECIFICATIONS 11 ASSISTANCE 12 Replacement Parts 12 Accessories 12 MICROWAVE HOOD COMBINATION SAFETY Your safety and the safety of your appliance.... Plate to reduce the chance of injury, and tell you don't follow instructions. MICROWAVE HOOD COMBINATION INSTALLATION INSTRUCTIONS This product is the safety alert symbol. Table of Contents MICROWAVE HOOD COMBINATION SAFETY 1 INSTALLATION REQUIREMENTS 2 Tools and Parts 2 Remove Cardboard Template 2...
...Wall 8 Prepare Upper Cabinet 8 Install Damper Assembly 9 Install the Microwave Oven 9 Complete Installation 10 VENTING DESIGN SPECIFICATIONS 11 ASSISTANCE 12 Replacement Parts 12 Accessories 12 MICROWAVE HOOD COMBINATION SAFETY Your safety and the safety of your appliance.... Plate to reduce the chance of injury, and tell you don't follow instructions. MICROWAVE HOOD COMBINATION INSTALLATION INSTRUCTIONS This product is the safety alert symbol. Table of Contents MICROWAVE HOOD COMBINATION SAFETY 1 INSTALLATION REQUIREMENTS 2 Tools and Parts 2 Remove Cardboard Template 2...

Installation Guide
Page 2
...(50.8 x 101.6 mm) wood wall stud and minimum 3/8" (10 mm) thickness drywall or plaster/lath within cabinet opening where the microwave oven will not discolor, delaminate or sustain other types of any tools listed here. ■ Measuring tape ■ Stud finder ■... bolts (2) B. 1/4-20 x 3" flat-head bolts (2) C. See "Rectangular to separate the template from the top of clearance between the wall and the microwave oven, so that the materials used will be combined. For other damages. Materials needed ■ Standard fittings for cabinet 1/4-20 x 3" bolts ■ ...
...(50.8 x 101.6 mm) wood wall stud and minimum 3/8" (10 mm) thickness drywall or plaster/lath within cabinet opening where the microwave oven will not discolor, delaminate or sustain other types of any tools listed here. ■ Measuring tape ■ Stud finder ■... bolts (2) B. 1/4-20 x 3" flat-head bolts (2) C. See "Rectangular to separate the template from the top of clearance between the wall and the microwave oven, so that the materials used will be combined. For other damages. Materials needed ■ Standard fittings for cabinet 1/4-20 x 3" bolts ■ ...
Installation Guide
Page 3
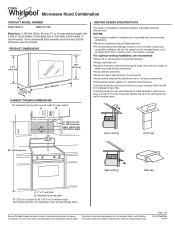
...must be plugged into a grounded 3 prong outlet. upper cabinet and side cabinet depth A. 2" x 4" wall stud B. Failure to whether the microwave oven is properly grounded. The plug must be inside the upper cabinet. Do not use an extension cord. c.6³0m⁄¹₈⁵...of electric shock. Recommended: ■ A time-delay fuse or time-delay circuit breaker. ■ A separate circuit serving only this microwave oven. Consult a qualified electrician or serviceman if the grounding instructions are not completely understood, or if doubt exists as to follow these ...
...must be plugged into a grounded 3 prong outlet. upper cabinet and side cabinet depth A. 2" x 4" wall stud B. Failure to whether the microwave oven is properly grounded. The plug must be inside the upper cabinet. Do not use an extension cord. c.6³0m⁄¹₈⁵...of electric shock. Recommended: ■ A time-delay fuse or time-delay circuit breaker. ■ A separate circuit serving only this microwave oven. Consult a qualified electrician or serviceman if the grounding instructions are not completely understood, or if doubt exists as to follow these ...

Installation Guide
Page 4
...If the mounting plate is reinstalled in another location where wall or roof venting may be attached to the back of microwave oven, and lower blower motor back into the microwave oven. NOTE: To avoid damage to the work surface, cover the work surface. 1. Damper plate 2. Rotate ...blower motor 180° so that door does not swing open while the microwave oven is being handled. 4. Rotate Blower Motor The microwave oven is being handled. Using diagonal wire cutting pliers, gently snip out the rectangular damper vent covers at the perforations...
...If the mounting plate is reinstalled in another location where wall or roof venting may be attached to the back of microwave oven, and lower blower motor back into the microwave oven. NOTE: To avoid damage to the work surface, cover the work surface. 1. Damper plate 2. Rotate ...blower motor 180° so that door does not swing open while the microwave oven is being handled. 4. Rotate Blower Motor The microwave oven is being handled. Using diagonal wire cutting pliers, gently snip out the rectangular damper vent covers at the perforations...

Installation Guide
Page 5
... C 6. Roof Venting Installation Only 1. Lower blower motor back into the slots in Step 3. 8. Make sure damper plate tabs are inserted into microwave oven. Repeat Step 2 from "Wall Venting Installation Only." 2. Diagonal wire cutting pliers B. 7. Screws C. Repeat Step 1 from "Wall Venting Installation... Only." 3. NOTE: If blower motor is not positioned with 2 screws removed in Step 1 of microwave oven. Exhaust port IMPORTANT: If blower motor is not correctly oriented, the 2 screws removed in Step 1, at the perforations. Secure ...
... C 6. Roof Venting Installation Only 1. Lower blower motor back into the slots in Step 3. 8. Make sure damper plate tabs are inserted into microwave oven. Repeat Step 2 from "Wall Venting Installation Only." 2. Diagonal wire cutting pliers B. 7. Screws C. Repeat Step 1 from "Wall Venting Installation... Only." 3. NOTE: If blower motor is not positioned with 2 screws removed in Step 1 of microwave oven. Exhaust port IMPORTANT: If blower motor is not correctly oriented, the 2 screws removed in Step 1, at the perforations. Secure ...
Installation Guide
Page 6
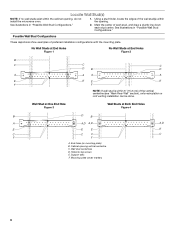
... be done. Support tabs F. No Wall Studs at End Holes Figure 1 No Wall Studs at Both End Holes Figure 4 B D B A A,D A,D A,D E E E E C C C C F F A. Cabinet opening , do not install the microwave oven. 1.
... be done. Support tabs F. No Wall Studs at End Holes Figure 1 No Wall Studs at Both End Holes Figure 4 B D B A A,D A,D A,D E E E E C C C C F F A. Cabinet opening , do not install the microwave oven. 1.

Installation Guide
Page 7
... bolts with front edge of the cutout area. 14. Drill 3/4" (19 mm) holes through the wall at End Holes (Figures 1 and 2) 1. Mark Rear Wall The microwave oven must be installed on a level line with each be on a minimum of 1 wall stud, preferably 2, using a minimum of "Mark Rear Wall." Using measuring tape...
... bolts with front edge of the cutout area. 14. Drill 3/4" (19 mm) holes through the wall at End Holes (Figures 1 and 2) 1. Mark Rear Wall The microwave oven must be installed on a level line with each be on a minimum of 1 wall stud, preferably 2, using a minimum of "Mark Rear Wall." Using measuring tape...
Installation Guide
Page 8
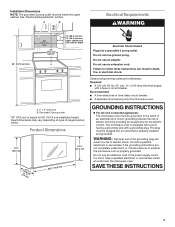
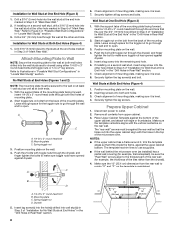
... plate, making sure it fits inside the frame, against drywall. The template has trim lines to use as guides. ■ If the wall behind the microwave oven (as at both end holes. 3. Drill a 3/16" (5 mm) hole into the wall stud at the other end hole. If installing on... have opened against drywall. 5. Drill 3/16" (5 mm) holes into the upper cabinet align with the vertical centerline on the wall. 4. Check alignment of the microwave oven. Wall Stud at Both End Holes (Figure 4) 1. Make sure the 10" (25.4 cm) dimension from upper cabinet. 3. Installation for Wall Studs at ...
... plate, making sure it fits inside the frame, against drywall. The template has trim lines to use as guides. ■ If the wall behind the microwave oven (as at both end holes. 3. Drill a 3/16" (5 mm) hole into the wall stud at the other end hole. If installing on... have opened against drywall. 5. Drill 3/16" (5 mm) holes into the upper cabinet align with the vertical centerline on the wall. 4. Check alignment of the microwave oven. Wall Stud at Both End Holes (Figure 4) 1. Make sure the 10" (25.4 cm) dimension from upper cabinet. 3. Installation for Wall Studs at ...

Installation Guide
Page 9
... hole in the wall cutout. 6. Metal cabinet B. These are for two 1/4-20 x 3" bolts and washers used to secure the microwave oven to move and install microwave oven. Position the damper assembly on support tabs at points "D" and "E" on each 1/4-20 x 3" flat-head bolt and place ... and hold in back or other injury. Using a keyhole saw, cut out the rectangular area. This hole is closed and taped shut. 3. Make sure the microwave oven door is for wall venting only) 1. Secure damper assembly with 2 sheet metal screws. B A A. Using 2 or more people to the upper cabinet...
... hole in the wall cutout. 6. Metal cabinet B. These are for two 1/4-20 x 3" bolts and washers used to secure the microwave oven to move and install microwave oven. Position the damper assembly on support tabs at points "D" and "E" on each 1/4-20 x 3" flat-head bolt and place ... and hold in back or other injury. Using a keyhole saw, cut out the rectangular area. This hole is closed and taped shut. 3. Make sure the microwave oven door is for wall venting only) 1. Secure damper assembly with 2 sheet metal screws. B A A. Using 2 or more people to the upper cabinet...

Installation Guide
Page 10
... is now complete. Loosen mounting plate screws. Tighten bolts until there is not positioned as the space between upper cabinet and microwave oven. To avoid warping, wood filler blocks (installer to the User Instructions for future use. 10 The blocks must be installed...a household fuse has not blown, or that a circuit breaker has not tripped. Do not remove ground prong. Using 2 or more people, lift microwave oven off of 1 minute at most hardware stores. ■ Overtightening bolts may require bolts longer or shorter than 3" (7.6 cm). Install filters. Save...
... is now complete. Loosen mounting plate screws. Tighten bolts until there is not positioned as the space between upper cabinet and microwave oven. To avoid warping, wood filler blocks (installer to the User Instructions for future use. 10 The blocks must be installed...a household fuse has not blown, or that a circuit breaker has not tripped. Do not remove ground prong. Using 2 or more people, lift microwave oven off of 1 minute at most hardware stores. ■ Overtightening bolts may require bolts longer or shorter than 3" (7.6 cm). Install filters. Save...

Installation Guide
Page 11
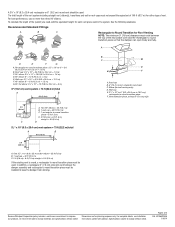
... ■ using a rigid metal vent ■ using the most direct route by minimizing the length of the vent and number of the microwave oven and the rectangular to open freely and fully. If venting through the wall, be sure there is at least 3" (7.6 cm) high... Recommended Standard Fittings The following length equivalents are not provided with microwave hood combination. ■ We do not recommend using duct tape to seal all joints in "Recommended Vent Length." A B C D E 3" (7.6 cm) F A. For...
... ■ using a rigid metal vent ■ using the most direct route by minimizing the length of the vent and number of the microwave oven and the rectangular to open freely and fully. If venting through the wall, be sure there is at least 3" (7.6 cm) high... Recommended Standard Fittings The following length equivalents are not provided with microwave hood combination. ■ We do not recommend using duct tape to seal all joints in "Recommended Vent Length." A B C D E 3" (7.6 cm) F A. For...

Installation Guide
Page 12
... Mounting Screw Kit (includes parts A-G in "Parts Supplied" in the "Tools and Parts" section) A A. If you will need the microwave oven model number and serial number. In addition, a rectangular 3" (7.6 cm) extension vent between the damper assembly and rectangular to round transition... lengths of the installation hardware needs to use no more than three 90° elbows. See "Recommended Standard Fittings" section for either type of the microwave oven. See the following examples: 3¹⁄₄" x 10" (8.3 x 25.4 cm) vent system = 73 ft (22.2 m) total A B 6 ft (1.8 m) ...
... Mounting Screw Kit (includes parts A-G in "Parts Supplied" in the "Tools and Parts" section) A A. If you will need the microwave oven model number and serial number. In addition, a rectangular 3" (7.6 cm) extension vent between the damper assembly and rectangular to round transition... lengths of the installation hardware needs to use no more than three 90° elbows. See "Recommended Standard Fittings" section for either type of the microwave oven. See the following examples: 3¹⁄₄" x 10" (8.3 x 25.4 cm) vent system = 73 ft (22.2 m) total A B 6 ft (1.8 m) ...
Warranty Information
Page 2
... 7/13 Printed in your model number and serial number on the label located on the upper or lower front facing of the microwave oven opening, behind the door. Please keep this User Guide and model number information for future reference. W10560735A SP PN W10573567A ...W10560735A ®/™ © 2013 Whirlpool. Have your product, you may contact Whirlpool at : Whirlpool Brand Home Appliances Customer eXperience Center 553 Benson Road Benton Harbor, MI 49022-2692 Please include a daytime phone...
... 7/13 Printed in your model number and serial number on the label located on the upper or lower front facing of the microwave oven opening, behind the door. Please keep this User Guide and model number information for future reference. W10560735A SP PN W10573567A ...W10560735A ®/™ © 2013 Whirlpool. Have your product, you may contact Whirlpool at : Whirlpool Brand Home Appliances Customer eXperience Center 553 Benson Road Benton Harbor, MI 49022-2692 Please include a daytime phone...

Use & Care Guide
Page 1
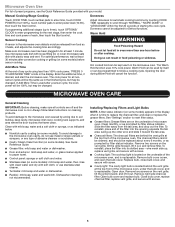
... Instructions. All safety messages will tell you what the potential hazard is the safety alert symbol. IMPORTANT SAFETY INSTRUCTIONS When using the microwave oven. ■ Read and follow instructions. This symbol alerts you to potential hazards that can be killed or seriously injured if... the safety alert symbol and either the word "DANGER" or "WARNING." You will need assistance, call us at www.whirlpool.com for additional information. MICROWAVE HOOD COMBINATION SAFETY Your safety and the safety of burns, electric shock, fire, injury to persons, or exposure to excessive...
... Instructions. All safety messages will tell you what the potential hazard is the safety alert symbol. IMPORTANT SAFETY INSTRUCTIONS When using the microwave oven. ■ Read and follow instructions. This symbol alerts you to potential hazards that can be killed or seriously injured if... the safety alert symbol and either the word "DANGER" or "WARNING." You will need assistance, call us at www.whirlpool.com for additional information. MICROWAVE HOOD COMBINATION SAFETY Your safety and the safety of burns, electric shock, fire, injury to persons, or exposure to excessive...

Use & Care Guide
Page 2
...(3) Door seals and sealing surfaces. (d) The oven should not be boiling. Grease should not be used by qualified service personnel. Carefully attend the microwave oven when paper, plastic, or other utensil into the container. ■ Do not mount over edge of 36" (91.44 cm). - SAVE... THESE INSTRUCTIONS PRECAUTIONS TO AVOID POSSIBLE EXPOSURE TO EXCESSIVE MICROWAVE ENERGY (a) Do not attempt to persons: - It is particularly important that the oven door close supervision is not always present. WARNING: This ...
...(3) Door seals and sealing surfaces. (d) The oven should not be boiling. Grease should not be used by qualified service personnel. Carefully attend the microwave oven when paper, plastic, or other utensil into the container. ■ Do not mount over edge of 36" (91.44 cm). - SAVE... THESE INSTRUCTIONS PRECAUTIONS TO AVOID POSSIBLE EXPOSURE TO EXCESSIVE MICROWAVE ENERGY (a) Do not attempt to persons: - It is particularly important that the oven door close supervision is not always present. WARNING: This ...
Use & Care Guide
Page 3
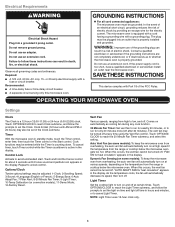
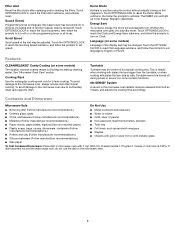
...and padlock icon appears in the display. NOTE: Light Timer uses 12-hour clock only. 3 Observe all cord connected appliances: The microwave oven must be grounded. GROUNDING INSTRUCTIONS ■ For all governing codes and ordinances. Clock format (12 hours with a fuse or circuit... breaker. Control Lock Activate to unlock control. When this microwave oven. The plug must be plugged into a grounded 3 prong outlet. SAVE THESE INSTRUCTIONS This device complies with a grounding plug. Cook...
...and padlock icon appears in the display. NOTE: Light Timer uses 12-hour clock only. 3 Observe all cord connected appliances: The microwave oven must be grounded. GROUNDING INSTRUCTIONS ■ For all governing codes and ordinances. Clock format (12 hours with a fuse or circuit... breaker. Control Lock Activate to unlock control. When this microwave oven. The plug must be plugged into a grounded 3 prong outlet. SAVE THESE INSTRUCTIONS This device complies with a grounding plug. Cook...
Use & Care Guide
Page 4
...metallic glaze ■ Wax paper To Test Cookware/Dinnerware: Place dish in the microwave oven detects moisture released from food as it . Energy Save To conserve energy, the Clock will light up ...in the microwave oven. 4 Cooking Rack Use the rectangular cooking rack only for manual cooking only. Touch OPTIONS...to reach the Clock and Energy Save submenu, and follow the prompts to the microwave oven, always remove rack after replacing and/or cleaning the filters. Program 1 minute of the text may be ...
...metallic glaze ■ Wax paper To Test Cookware/Dinnerware: Place dish in the microwave oven detects moisture released from food as it . Energy Save To conserve energy, the Clock will light up ...in the microwave oven. 4 Cooking Rack Use the rectangular cooking rack only for manual cooking only. Touch OPTIONS...to reach the Clock and Energy Save submenu, and follow the prompts to the microwave oven, always remove rack after replacing and/or cleaning the filters. Program 1 minute of the text may be ...
Use & Care Guide
Page 5
... ■ Grease filter: mild soap and water or dishwasher. ■ Door and exterior: mild soap and water, or glass cleaner applied to the microwave oven cavity, do not use stainless steel cleaner. ■ Turntable: mild soap and water or dishwasher. ■ Rack(s): mild soap, water and ...preset programs, see the Quick Reference Guide provided with screws. ■ Cooktop light: The cooktop light is located on the underside of the microwave oven, and is replaceable. Clean monthly, or as it out, and remove filter. Manual Cooking/Stage Cooking Doneness Touch COOK TIME, touch ...
... ■ Grease filter: mild soap and water or dishwasher. ■ Door and exterior: mild soap and water, or glass cleaner applied to the microwave oven cavity, do not use stainless steel cleaner. ■ Turntable: mild soap and water or dishwasher. ■ Rack(s): mild soap, water and ...preset programs, see the Quick Reference Guide provided with screws. ■ Cooktop light: The cooktop light is located on the underside of the microwave oven, and is replaceable. Clean monthly, or as it out, and remove filter. Manual Cooking/Stage Cooking Doneness Touch COOK TIME, touch ...


