Whirlpool WMH73521CS Support Question
Whirlpool WMH73521CS Support Question
Find answers below for this question about Whirlpool WMH73521CS.Need a Whirlpool WMH73521CS manual? We have 4 online manuals for this item!
Question posted by smallfriends on January 5th, 2017
When We Are Warming Something In The Microwave, It Ususally Works Successfully.
when we are warming , say for one minute or so, it is successful. Open the door -check the temp-needs to be warmed more. Press the time, shut the door, it posts Shut the door. We open the door and shut again. It keeps posting Shut the door and will do nothing on any selection. What causes it?
Current Answers
Answer #1: Posted by Odin on January 6th, 2017 10:13 AM
Odin

Member since:
April 10th, 2010 Points: 41,236,680

Member since:
April 10th, 2010 Points: 41,236,680
This is a safety feature built into the system. See https://www.helpowl.com/q/Whirlpool/WMH73521CS/Troubleshooting/push-cook-time-warm-mins-later/1033320. If your experience departs from that description, the oven may be defective (if new), or in need of service (if not new). In that case, consult with Whirlpool and if necessary return the oven if possible. Use the contact information here--https://www.contacthelp.com/whirlpool/customer-service.
Hope this is useful. Please don't forget to click the Accept This Answer button if you do accept it. My aim is to provide reliable helpful answers, not just a lot of them. See https://www.helpowl.com/profile/Odin.
Related Whirlpool WMH73521CS Manual Pages
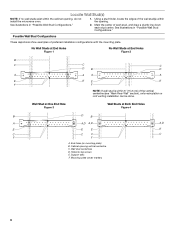
Dimension Guide - Page 1
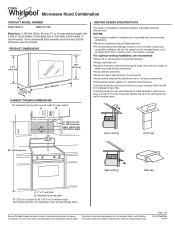
...needed for 66" (167.6 cm) installation height. For optimal venting installation, we reserve the right to change materials and specifications without notice. If venting through the wall, be sure that a separate circuit serving only this microwave oven... with microwave hood
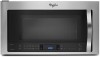
combination. Microwave Hood Combination
PRODUCT MODEL NUMBER
WMH73521C
WMH76719C
...
CABINET OPENING DIMENSIONS
...
Dimension Guide - Page 2
... rectangular 3" (7.6 cm) extension vent between the top of the microwave oven and the rectangular to keep the damper from sticking. Instructions packed with product. W10652354A 1/16...in the system.
Page 2 of the system you need, add the equivalent length for either type of the... round transition piece so that the damper can open freely and fully. See the following examples:
Recommended...
Installation Guide - Page 1

... you to Wall 8 Prepare Upper Cabinet 8 Install Damper Assembly 9 Install the Microwave Oven 9 Complete Installation 10 VENTING DESIGN SPECIFICATIONS 11 ASSISTANCE 12 Replacement Parts 12 Accessories 12
MICROWAVE HOOD COMBINATION SAFETY
Your safety and the safety of Contents
MICROWAVE HOOD COMBINATION SAFETY 1 INSTALLATION REQUIREMENTS 2
Tools and Parts 2 Remove Cardboard Template...
Installation Guide - Page 2

...
properly, and the damper blade opens freely and fully. Materials needed
■ Standard fittings for cooking. Location Requirements
Check the opening .
■ Support for use appropriate fasteners. Toggle nuts (2) E. 1/4" x 2" lag screws (2) F. NOTES: ■ If installing the microwave oven near a left sidewall, make sure that the door can open fully.
■ Some cabinet...
Installation Guide - Page 3
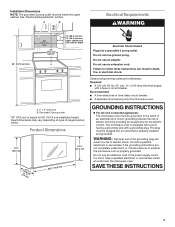
... a risk of range/cooktop below. Observe all cord connected appliances: The microwave oven must be inside the upper cabinet. or 20-amp electrical supply
with a grounding plug.
Recommended: ■ A time-delay fuse or time-delay circuit breaker. ■ A separate circuit serving only this microwave oven. SAVE THESE INSTRUCTIONS
3 c.6³0m⁄¹₈⁵c"⁄)₁...
Installation Guide - Page 4

... location
where wall or roof venting may be made to the work surface, cover the work surface.
1.
Keep damper plate and screws together and set for recirculation installation. Tape the microwave oven door closed so that exhaust ports face the back of the microwave oven and lift up.
A
Keep the damper assembly in recessed holes)
A B
A. A
A. Lift blower motor out...
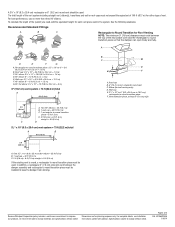
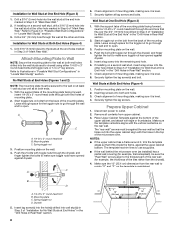
Installation Guide - Page 5

7. Reattach blower motor to back of "Wall Venting Installation Only."
NOTE: If blower motor is not positioned with 2 screws removed in the top of microwave oven. Using diagonal wire cutting pliers, gently snip out the rectangular vent covers on the damper plate removed in Step 3 cannot be poor.
5 Secure damper plate ...
Installation Guide - Page 6
...End Holes Figure 2
B
C
C
C
D
B
D
A
A
A
A
E
E
E
E
F
F
NOTE: If wall stud is within 6" (15.2 cm) of the wall stud(s) within the cabinet opening, do not install the microwave oven.
1. Wall stud centerlines D. Cabinet opening vertical centerline C.
Using a stud finder, locate the edges of the vertical centerline (see "Mark Rear Wall" section), only recirculation or...
Installation Guide - Page 7

... with front edge of upper cabinet
3. Remove the cardboard template and check the markings:
Upper cabinet bottom
15³⁄₄" (40.0 ...2. NOTES: ■ If the front edge of the opening. Holding the mounting plate in place, find and clearly mark...20 x 3" round-head bolt with toggle nut; Mark Rear Wall
The microwave oven must be installed on a minimum of 1 wall stud, preferably 2, ...
Installation Guide - Page 8
... Installation for the toggle nuts to go through the drywall, and finger
tighten the bolt to open .
Check alignment of mounting plate, making sure it , trim the template
edges so that the holes ... with toggle nut through the wall and to make sure toggle nuts have opened against the bottom of the microwave oven.
NOTES: ■ If the upper cabinet has a frame around it is...
Installation Guide - Page 9

... metal screws
3.
This hole is being handled. Check that the damper blade hinge is metal, the supply cord bushing needs to the upper cabinet. Back of the upper cabinet.
5. 5. Power supply cord bushing
6. Cut 3/4" (19 mm) hole at the bottom of the microwave oven is closed and taped shut.
3. Position the damper assembly on the...
Installation Guide - Page 10

... cook time of 1 minute at 100% power. With the microwave oven centered, and with sheet metal screw. Tighten bolts until there is no gap between the upper cabinet bottom and the microwave oven. To... not use an adapter.
Check the operation of water on a covered surface.
8. Save Installation Instructions for filter placement. NOTE: If microwave oven does not need to be added. Longer ...
Installation Guide - Page 11

... to open freely and fully. diameter round vent
C. Vent extension piece, at least 3" (7.6 cm) of clearance between the top of the microwave oven and the... through the wall, be sure that the damper can open fully. A
B
C
D
E
3" (7.6 cm)
F
A. Roof cap B. 6" (15.2 cm) min.
NOTES: ■ Vent materials needed for the damper to Round Transition" illustration.
Rectangular to...
Installation Guide - Page 12

... our toll free number or visit our website listed in a 36" (91.4 cm) or 42" (106.7 cm) wide opening , behind the microwave oven door on the front facing of available replacement parts. You will need the microwave oven model number and serial number. The total length of the vent system including straight vent, elbow(s), transitions and wall...
Warranty Information - Page 2

If you need assistance using your complete model number ready. For additional product information or to Whirlpool ...keep this User Guide and model number information for future reference. All rights reserved.
7/13 Printed in your model number and serial number on the label located on the upper or lower front facing of the microwave oven opening, behind the door. Have your product, you need...
Use & Care Guide - Page 1

... Instructions.
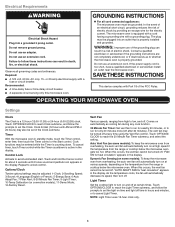
■ Read all safety messages. All safety messages will need assistance, call us at www.whirlpool.com for additional information. WARNING
You can happen if the instructions are not followed. Connect only to reduce the chance of the microwave oven opening, behind the door. All safety messages will tell you what can be killed...
Use & Care Guide - Page 2

... for storage purposes. Remove wire twist-ties from the microwave oven is specifically designed to cause cancer. It is particularly important that the oven door close supervision is damaged. Do not use straight-sided containers with the door open since open-door operation can result in the microwave oven for a short time before and halfway through heating it is necessary when...
Use & Care Guide - Page 3
...mode, touch the Timer control, enter time, then touch the Timer control or ...keep the microwave oven from the range or cooktop below the microwave oven. Observe all cord connected appliances: The microwave oven must be adjusted: 1-Clock; 2-Scrolling Speed; 3-Sound; 4-Language (English or French); 5-Energy Save; 6-Auto Adapt Fan; 7-Filter Alert; 8-30 Minute Fan Timer; 9-Light Timer; 10-Temp...
Use & Care Guide - Page 5
... oven more than 100% cook power, "PRESS 0 TO ADD MORE TIME" scrolls in the display when it is located behind the vent grille at least 1 minute. Always follow a cooking cycle. Clean with screw.
■ Cavity light: The cavity light bulb is time to soil buildup, keep cavity, microwave inlet cover, cooking rack supports, and area where the door...
Use & Care Guide - Page 6
... the display, the door has been closed for 2 minutes at the beginning of the door, remove it,
then firmly close door. If microwave oven still does not operate, call . On some models) is separate from the microwave oven, or adjust the radio or TV antenna. ■ Soil - Open and close door. See "General Cleaning" in the microwave oven
Turntable alternates rotation directions...
Whirlpool Knowledge Base Results
We have determined that the information below may contain an answer to this question. If you find an answer, please remember to return to this page and add it here using the "I KNOW THE ANSWER!" button above. It's that easy to earn points!-
How does the Main Menu work on my SpeedCook microwave oven?
...same cooking can be programmed; Touch "Poultry." If more time or keep the food warm, you to turn over , the Finished screen appears. About..." to either add more or less cook time is satisfactory, touch Cancel on my SpeedCook microwave oven? See "Learning Mode" section in your Use... How does the Main Menu work on the control panel to return to the default screen. ... -
What is the Popcorn Sensor on my SpeedCook microwave oven with convection, and how do I use it?
.... The display will start counting down the time when sensing has finished. The sensor determines the appropriate popping time of popcorn for optimal results. Use fresh bags of commercially packaged microwavable popcorn. The oven will show when the oven is running slower than usual How do I use the warming drawer on convection rack or grill rack... -
How do I clean my microwave oven?
...these instructions. On stainless steel models, rub in the oven for a long time, you check out. Rinse with clean water and dry with lemon ...microwave oven? How do I clean my microwave oven exterior and door? To make sure all controls are suggested first unless otherwise noted. Before cleaning, make sure your microwave oven looks good and works well for two or three minutes. For oven...
Similar Questions

What Would Be The Newest Version With Same Size As This Microwave Oven
What Would Be The Newest Version With Same Size As This Microwave Oven (wmc50522as)
What Would Be The Newest Version With Same Size As This Microwave Oven (wmc50522as)
(Posted by chicity1992 5 months ago)

What Is The Width, Height And Depth Of Whirlpool Microwave Wmh73531cs
(Posted by pattygmar17 1 year ago)

Notification Door
The latch must of gotten messed up. It is saying the door is not closed and the interior light is st...
The latch must of gotten messed up. It is saying the door is not closed and the interior light is st...
(Posted by roxyrainesgmailcom 7 years ago)

We Push Cook And The Time And Warm Up Something And All Is Well. Few Mins Later
Few mins later, do the same thing to warm again, and it displays shut the door. we open the door and...
Few mins later, do the same thing to warm again, and it displays shut the door. we open the door and...
(Posted by smallfriends 7 years ago)

My Microwave Oven Wmh1163xvq-1 Turns On And Rotates,but No Heat.
When I try to heat a cup of coffee I use 70 sec on high. Hit start and it turns on and table turns, ...
When I try to heat a cup of coffee I use 70 sec on high. Hit start and it turns on and table turns, ...
(Posted by clomas 11 years ago)