Whirlpool WMH73521CS Support Question
Whirlpool WMH73521CS Support Question
Find answers below for this question about Whirlpool WMH73521CS.Need a Whirlpool WMH73521CS manual? We have 4 online manuals for this item!
Question posted by smallfriends on January 5th, 2017
We Push Cook And The Time And Warm Up Something And All Is Well. Few Mins Later
Few mins later, do the same thing to warm again, and it displays shut the door. we open the door and shut again, same display shut the door. At some later time, we go to use it and it works and then same scenerio. What to do?
Current Answers
Answer #1: Posted by Odin on January 5th, 2017 7:43 PM
Odin

Member since:
April 10th, 2010 Points: 41,236,700

Member since:
April 10th, 2010 Points: 41,236,700
If a message about the door appears in the display, the door has been closed for 5 minutes or more without the microwave oven being started.
- This occurs to avoid unintended starting of the microwave oven.
- Open and close the door, then start the cycle.
Hope this is useful. Please don't forget to click the Accept This Answer button if you do accept it. My aim is to provide reliable helpful answers, not just a lot of them. See https://www.helpowl.com/profile/Odin.
Related Whirlpool WMH73521CS Manual Pages
Dimension Guide - Page 1
... serving only this microwave oven be sure there is at least 3" (7.6 cm) of clearance between the top of
elbows to provide efficient performance q using uniformly sized vents q using duct tape to seal all joints in the vent system q using a flexible metal vent.
Page 1 of range/cooktop below. Microwave Hood Combination
PRODUCT MODEL NUMBER
WMH73521C
WMH76719C
Electrical: A 120...
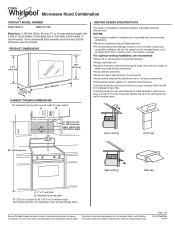
Dimension Guide - Page 2
For best performance, use no more than three 90° elbows.
diameter round vent C. Because Whirlpool Corporation policy includes a continuous commitment to improve
Dimensions are for wa
E
D. Page 2 of the microwave oven and the rectangular to keep the damper from sticking. Wall cap: 3 " x 10" = 40 ft (8.3 x 25.4 cm = 12.2 m) F. 45° elbow: 6" = 5 ft (15...
Installation Guide - Page 1

See "Installation Requirements" section for use above electric or gas cooking products up to potential hazards that ... 8 Prepare Upper Cabinet 8 Install Damper Assembly 9 Install the Microwave Oven 9 Complete Installation 10 VENTING DESIGN SPECIFICATIONS 11 ASSISTANCE 12 Replacement Parts 12 Accessories 12
MICROWAVE HOOD COMBINATION SAFETY
Your safety and the safety of your particular ...
Installation Guide - Page 2

...wood studs. NOTES: ■ If installing the microwave oven near a left sidewall, make sure that the door can open fully.
■ Some cabinet and building materials ...thumbtacks
(or box wrench) for use appropriate fasteners.
See "Venting Design Specifications" section. See "Electrical Requirements" section. Damper assembly (for cooking. Special Requirements
For Wall Venting ...
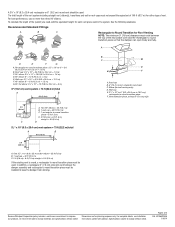
Installation Guide - Page 3
...) min.
14" (35.6 cm) max.
c.6³0m⁄¹₈⁵c"⁄)₁m₆")
29⁷⁄₈" (76.0 cm)
Electrical Shock Hazard
Plug into an outlet that is properly installed and grounded.
Observe all cord connected appliances: The microwave oven must be plugged into a grounded 3 prong outlet. Recommended: ■ A time-delay fuse or time...
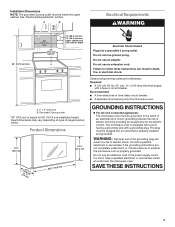
Installation Guide - Page 4

... wall or roof venting may be made to the microwave oven, do not grip or use the door or door handle while the microwave oven is being handled.
4. B
A.
Remove any remaining contents from the microwave oven cavity.
2. A
A. Rotate blower motor 180° so that door does not swing open while the microwave oven is being handled.
Exhaust port
6. INSTALLATION INSTRUCTIONS
Remove...
Installation Guide - Page 5

... damper plate tabs are inserted into the slots in Step 1 of the microwave oven (as shown), performance will be reattached to back of the microwave oven. NOTE: If blower motor is not positioned with 2 screws removed in Step 1, at the perforations. Using diagonal wire cutting pliers, gently snip out the rectangular vent covers on the...
Installation Guide - Page 6
...."
2. Cabinet opening , do not install the microwave oven.
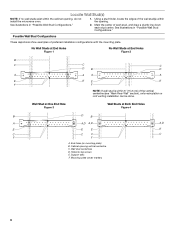
1. Possible... Wall Stud Configurations
These depictions show examples of each stud, and draw a plumb line down each stud center.
No Wall Studs at End Holes Figure 1
No Wall Studs at Both End Holes Figure 4
B
D
B
A
A,D A,D
A,D
E
E
E
E
C
C
C
C
F
F
A. Wall stud centerlines D. Using...
Installation Guide - Page 7

...made in Step 3 of the opening. Set the mounting plate aside. Draw the 2 vertical, plumb lines down 4" (10.2 cm) from the bottom edge of cabinet. Using a keyhole saw, cut out... 12" x 4" (30.5 x 10.2 cm) rectangle. Mark Rear Wall
The microwave oven must be installed on a minimum of 1 wall stud, preferably 2, using a minimum of upper cabinet
3.
Front edge of 1 lag screw, preferably 2.
...
Installation Guide - Page 8
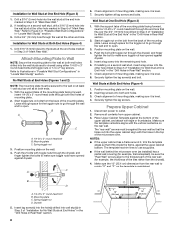
... 3" round-head bolt B. Push the 2 bolts with toggle nut through the drywall, and finger
tighten the bolt to make sure toggle nuts have opened against drywall. 5. Push the bolt with toggle nuts ...3.
Disconnect power to outlet. 2. The template has trim lines to use as guides.
■ If the wall behind the microwave oven (as installed) has a partial wall covering (for example, tile ...
Installation Guide - Page 9

.... 1. Place a washer on the template.
Damper assembly C. A
B
A. Support tabs
4. Push microwave oven against mounting plate and hold in the bottom of the microwave oven so that damper blade moves freely, and opens fully.
2. NOTE: If upper cabinet is closed and taped shut.
3. Metal cabinet B. Make sure the microwave oven door is metal, the supply cord bushing needs to move and...
Installation Guide - Page 10

Using 2 or more people, lift microwave oven off of mounting plate, and set aside on the turntable, and programming a cook time of the damper assembly slides under vent)
Complete ...damper assembly is not positioned as the space between upper cabinet and microwave oven. Connect vent to the User Instructions for future use an adapter.
Damper assembly C. Long tab F.
Test vent fan...
Installation Guide - Page 11

... the damper to open freely and fully.
For optimal venting installation, we recommend: ■ using roof or wall caps that there is intended for wall venting only)
D. Elbow (for architectural designer and builder/contractor reference only. Vent extension piece, at least 3" (7.6 cm) of clearance between the top of the microwave oven and the rectangular...
Installation Guide - Page 12

... 8171339 99403
White Black Biscuit Stainless Steel Almond
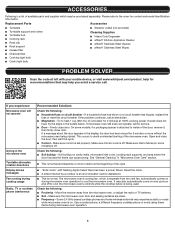
See your authorized dealer or service center. For best performance, use when installing this microwave oven in a 36" (91.4 cm) or 42" (106.7 cm) wide opening , behind the door. ■ Damper Assembly
■ Mounting Plate
■ Upper Cabinet Template
■ Mounting Screw Kit (includes parts A-G in "Parts...
Warranty Information - Page 2
...; 2013 Whirlpool.
Have your model number and serial number on the label located on the upper or lower front facing of the microwave oven opening, behind the door. If you need assistance using your correspondence. For additional product information or to the Internet and you need further assistance, you may contact Whirlpool at :
Whirlpool Brand...
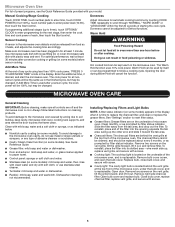
Use & Care Guide - Page 2

... the door or allow the container to stand in the microwave oven for a short time before removing the container.
- WARNING: This product contains one or more chemicals known to the State of California to cause birth defects or other reproductive harm.
2 It is not designed for industrial or laboratory use.
■ As with any openings on...
Use & Care Guide - Page 3
... certain times.
Do not use an adapter. To cancel timer, touch Timer control while the Timer countdown is properly installed and grounded. Comes on at any cook function.
30 Minute Fan Timer: Set vent fan to run for heat circulation" appears in the display.
Dynamic Fan Sensing (on some models): To keep the microwave oven from...
Use & Care Guide - Page 4
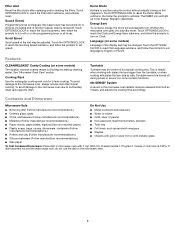
... display. Energy Save To conserve energy, the Clock will light up in the microwave oven detects moisture released from food as sandwich wrappers ■ Staples ■ Objects with gold or silver trim or with metallic glaze
■ Wax paper
To Test Cookware/Dinnerware: Place dish in the microwave oven.
4 Language (on some models) Language of cook time...
Use & Care Guide - Page 5
... cooking or grilling (on cleaning products.
Warm Hold can be kept warm in the display when...microwave oven. Open door. The cook power for the next stage, then enter the cook time and cook power of microwave oven. Open bulb cover and replace bulb. Sensor Cooking
Adjust doneness for Defrost functions. Doneness cannot be programmed to the microwave oven cavity, do not use...
Use & Care Guide - Page 6
...microwave oven operation.
6 Firmly close the door, then start the cycle. ■ Control - See "General Cleaning" in the display, the door...microwave oven being used.
This occurs to the cover for recommendations that may be purchased separately. Soil buildup on . Try to cool the microwave oven. Open and close door...■ Turntable hub ■ Cooking rack ■ Rack clip &#...
Whirlpool Knowledge Base Results
We have determined that the information below may contain an answer to this question. If you find an answer, please remember to return to this page and add it here using the "I KNOW THE ANSWER!" button above. It's that easy to earn points!-
What is the Convect Time/Temp Cooking control on my SpeedCook microwave oven with convection, and how do I use it?
... do I use : Touch Convect Time/Temp control. The display will return to stop reminder tones. How does combination cooking work ? Touch Cancel control or open the door to the Main Menu after the oven starts. When the cycle ends, the end-of my built-in my microwave oven? The default power is for manual convection or combination cooking. NOTE: The microwave cooking power... -
How does the Main Menu work on my SpeedCook microwave oven?
... Breast screen, touch "2 pieces." When preheating is satisfactory, touch Cancel on my SpeedCook microwave oven? If more time or keep the food warm, you to resume pan browning. While the poultry breasts are being pan browned, the cooking animation and countdown are active in the display. Touch "Poultry." Touch "Poultry Breast: Boneless, Pan Brown." On second... -
How does the Main Menu work on my SpeedCook microwave oven?
... over the poultry breasts. This takes you may do I use the Food Type menu on the default screen. From the Main Menu, all manual cooking can be programmed; The following demonstrates how to either add more or less cook time is displayed on my SpeedCook microwave oven with convection? About halfway through the menus without turning on...
Similar Questions

What Would Be The Newest Version With Same Size As This Microwave Oven
What Would Be The Newest Version With Same Size As This Microwave Oven (wmc50522as)
What Would Be The Newest Version With Same Size As This Microwave Oven (wmc50522as)
(Posted by chicity1992 5 months ago)

What Is The Width, Height And Depth Of Whirlpool Microwave Wmh73531cs
(Posted by pattygmar17 1 year ago)

Notification Door
The latch must of gotten messed up. It is saying the door is not closed and the interior light is st...
The latch must of gotten messed up. It is saying the door is not closed and the interior light is st...
(Posted by roxyrainesgmailcom 6 years ago)

When We Are Warming Something In The Microwave, It Ususally Works Successfully.
when we are warming , say for one minute or so, it is successful. Open the door -check the temp-need...
when we are warming , say for one minute or so, it is successful. Open the door -check the temp-need...
(Posted by smallfriends 7 years ago)

For Cooking Instructions, How Many Watts Is This Model To Adust Cooking Time?
I can't figure out how many watts this microwave is to adjust cooking time. Some foods stae 1100 wa...
I can't figure out how many watts this microwave is to adjust cooking time. Some foods stae 1100 wa...
(Posted by ddfishing 13 years ago)