Dimension Guide
Page 1
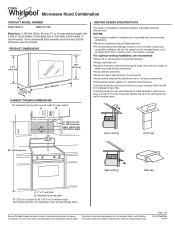
.... PRODUCT DIMENSIONS 17¹⁄₈" (43.5 cm) 16¹⁄₄" (41.3 cm) (1(+.40/31- Microwave Hood Combination PRODUCT MODEL NUMBER WMH73521C WMH76719C Electrical: A 120-Volt, 60-Hz, AC-only, 15- Instructions packed with a fuse or circuit breaker. Specifications... only. Exact dimensions may vary depending on type of 2 Ref. A B VENTING DESIGN SPECIFICATIONS This section is recommended. Because Whirlpool Corporation policy includes a continuous commitment to vent air outside, unless using a flexible metal vent. q To avoid possible product damage...
.... PRODUCT DIMENSIONS 17¹⁄₈" (43.5 cm) 16¹⁄₄" (41.3 cm) (1(+.40/31- Microwave Hood Combination PRODUCT MODEL NUMBER WMH73521C WMH76719C Electrical: A 120-Volt, 60-Hz, AC-only, 15- Instructions packed with a fuse or circuit breaker. Specifications... only. Exact dimensions may vary depending on type of 2 Ref. A B VENTING DESIGN SPECIFICATIONS This section is recommended. Because Whirlpool Corporation policy includes a continuous commitment to vent air outside, unless using a flexible metal vent. q To avoid possible product damage...
Dimension Guide
Page 2
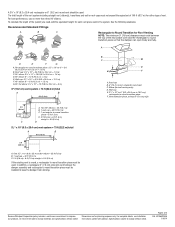
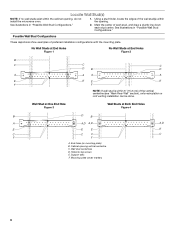
... cm) m C. Vent extensio A. Wall cap E. 3 " x 10" to 6" (8.3 x 25.4 cm to 15.2 cm) rectangular to 15.2 cm = 1.5 m) B. Because Whirlpool Corporation policy includes a continuous commitment to keep the damper from sticking. A 3¹⁄₄" x 10" (8.3 x 25.4 cm) rectangular or 6" (15.2 cm) round vent should ...the following examples: Recommended Standard Fittings A B C Rectangular to Round Transition for either type of the microwave oven and the rectangular to change materials and specifications without notice. For complete details, see Installation our...
... cm) m C. Vent extensio A. Wall cap E. 3 " x 10" to 6" (8.3 x 25.4 cm to 15.2 cm) rectangular to 15.2 cm = 1.5 m) B. Because Whirlpool Corporation policy includes a continuous commitment to keep the damper from sticking. A 3¹⁄₄" x 10" (8.3 x 25.4 cm) rectangular or 6" (15.2 cm) round vent should ...the following examples: Recommended Standard Fittings A B C Rectangular to Round Transition for either type of the microwave oven and the rectangular to change materials and specifications without notice. For complete details, see Installation our...

Installation Guide
Page 1
... safety alert symbol and either the word "DANGER" or "WARNING." All safety messages will follow instructions. Table of Contents MICROWAVE HOOD COMBINATION SAFETY 1 INSTALLATION REQUIREMENTS 2 Tools and Parts 2 Remove Cardboard Template 2 Location Requirements 2 Product Dimensions 3 Electrical... in these installation instructions. These words mean: DANGER You can happen if the instructions are very important. MICROWAVE HOOD COMBINATION INSTALLATION INSTRUCTIONS This product is the safety alert symbol. These installation instructions cover different models. Always...
... safety alert symbol and either the word "DANGER" or "WARNING." All safety messages will follow instructions. Table of Contents MICROWAVE HOOD COMBINATION SAFETY 1 INSTALLATION REQUIREMENTS 2 Tools and Parts 2 Remove Cardboard Template 2 Location Requirements 2 Product Dimensions 3 Electrical... in these installation instructions. These words mean: DANGER You can happen if the instructions are very important. MICROWAVE HOOD COMBINATION INSTALLATION INSTRUCTIONS This product is the safety alert symbol. These installation instructions cover different models. Always...

Installation Guide
Page 2
...screws (2) F. Damper assembly (for cooking. Sheet metal screws (2) G. Set the cardboard template to the side and refer to back of microwave oven) Cardboard template (part of packaging) Aluminum grease filters Charcoal filters (Depending on model, aluminum grease filter and charcoal filter may not be... free of the microwave oven packaging is perforated. Special Requirements For Wall Venting Installation Only: ■ Cutout must provide: ■ Minimum installation ...
...screws (2) F. Damper assembly (for cooking. Sheet metal screws (2) G. Set the cardboard template to the side and refer to back of microwave oven) Cardboard template (part of packaging) Aluminum grease filters Charcoal filters (Depending on model, aluminum grease filter and charcoal filter may not be... free of the microwave oven packaging is perforated. Special Requirements For Wall Venting Installation Only: ■ Cutout must provide: ■ Minimum installation ...
Installation Guide
Page 3
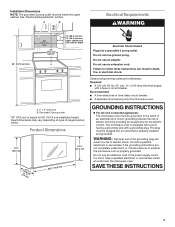
...;₈" (76.0 cm) Electrical Shock Hazard Plug into an outlet that is properly grounded. Do not use an extension cord. Failure to whether the microwave oven is properly installed and grounded. Required: ■ A 120 volt, 60 Hz, AC only, 15- Do not remove ground prong. The plug...;⁄₄" (41.3 cm) (1(+.40/31- Recommended: ■ A time-delay fuse or time-delay circuit breaker. ■ A separate circuit serving only this microwave oven. Do not use of the grounding plug can result in a risk of electric shock by providing an escape wire for 66" (167.6 cm) installation...
...;₈" (76.0 cm) Electrical Shock Hazard Plug into an outlet that is properly grounded. Do not use an extension cord. Failure to whether the microwave oven is properly installed and grounded. Required: ■ A 120 volt, 60 Hz, AC only, 15- Do not remove ground prong. The plug...;⁄₄" (41.3 cm) (1(+.40/31- Recommended: ■ A time-delay fuse or time-delay circuit breaker. ■ A separate circuit serving only this microwave oven. Do not use of the grounding plug can result in a risk of electric shock by providing an escape wire for 66" (167.6 cm) installation...

Installation Guide
Page 4
...Only 1. A A. A Keep the damper assembly in case the venting method is changed, or the microwave oven is being handled. 4. Diagonal wire cutting pliers B. Remove any remaining contents from the microwave oven cavity. 2. B A. Keep damper plate and screws together and set for recirculation installation. NOTE...: To avoid possible damage to back of microwave oven. Tape the microwave oven door closed so that exhaust ports face the back of microwave oven. NOTE: To avoid damage to top of the microwave oven and lift up. Rotate blower motor 180°...
...Only 1. A A. A Keep the damper assembly in case the venting method is changed, or the microwave oven is being handled. 4. Diagonal wire cutting pliers B. Remove any remaining contents from the microwave oven cavity. 2. B A. Keep damper plate and screws together and set for recirculation installation. NOTE...: To avoid possible damage to back of microwave oven. Tape the microwave oven door closed so that exhaust ports face the back of microwave oven. NOTE: To avoid damage to top of the microwave oven and lift up. Rotate blower motor 180°...

Installation Guide
Page 5
... removed in Step 3. 8. Securely tighten screws. Secure damper plate with 2 screws removed in the top of microwave oven. A B C D A. A. 7. Reattach damper plate. A B C 6. Reattach blower motor to the microwave oven. 7. Damper plate B. Screws C. Slots 9. Repeat Step 1 from "Wall Venting Installation Only." 5. Repeat... Only." A AB A. Diagonal wire cutting pliers B. Make sure damper plate tabs are inserted into microwave oven. Damper plate tabs D. Exhaust port IMPORTANT: If blower motor is not correctly oriented, the 2 screws removed in Step...
... removed in Step 3. 8. Securely tighten screws. Secure damper plate with 2 screws removed in the top of microwave oven. A B C D A. A. 7. Reattach damper plate. A B C 6. Reattach blower motor to the microwave oven. 7. Damper plate B. Screws C. Slots 9. Repeat Step 1 from "Wall Venting Installation Only." 5. Repeat... Only." A AB A. Diagonal wire cutting pliers B. Make sure damper plate tabs are inserted into microwave oven. Damper plate tabs D. Exhaust port IMPORTANT: If blower motor is not correctly oriented, the 2 screws removed in Step...
Installation Guide
Page 6
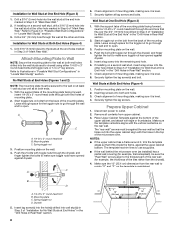
... C. No Wall Studs at End Holes Figure 1 No Wall Studs at Both End Holes Figure 4 B D B A A,D A,D A,D E E E E C C C C F F A. Holes for lag screws E. Cabinet opening , do not install the microwave oven. 1. Mark the center of the vertical centerline (see "Mark Rear Wall" section), only recirculation or roof venting installation can be done. Mounting plate center...
... C. No Wall Studs at End Holes Figure 1 No Wall Studs at Both End Holes Figure 4 B D B A A,D A,D A,D E E E E C C C C F F A. Holes for lag screws E. Cabinet opening , do not install the microwave oven. 1. Mark the center of the vertical centerline (see "Mark Rear Wall" section), only recirculation or roof venting installation can be done. Mounting plate center...

Installation Guide
Page 7
...) 8. Draw the 2 vertical, plumb lines down 4" (10.2 cm) from the bottom edge of the opening. Front edge of "Mark Rear Wall." Mark Rear Wall The microwave oven must be 14¹⁄₈" (35.9 cm) from the centerline. 5. Centerline 2. Make sure the mounting plate is the venting cutout area. 13. Measure...
...) 8. Draw the 2 vertical, plumb lines down 4" (10.2 cm) from the bottom edge of the opening. Front edge of "Mark Rear Wall." Mark Rear Wall The microwave oven must be 14¹⁄₈" (35.9 cm) from the centerline. 5. Centerline 2. Make sure the mounting plate is the venting cutout area. 13. Measure...
Installation Guide
Page 8
...Make sure the template centerline aligns with toggle nuts through both end holes. 3. Refer to use as guides. ■ If the wall behind the microwave oven (as at both ends. 1. Start toggle nuts on the wall. 4. Disconnect power to make sure toggle nuts have opened against the rear wall... rear wall (for the toggle nut to go through the drywall, and finger tighten the bolt to outlet. 2. With the support tabs of the microwave oven. Mounting plate C. Spring toggle nut 3. Push the 2 bolts with the vertical centerline on a second wall stud, insert a lag screw into...
...Make sure the template centerline aligns with toggle nuts through both end holes. 3. Refer to use as guides. ■ If the wall behind the microwave oven (as at both ends. 1. Start toggle nuts on the wall. 4. Disconnect power to make sure toggle nuts have opened against the rear wall... rear wall (for the toggle nut to go through the drywall, and finger tighten the bolt to outlet. 2. With the support tabs of the microwave oven. Mounting plate C. Spring toggle nut 3. Push the 2 bolts with the vertical centerline on a second wall stud, insert a lag screw into...

Installation Guide
Page 9
... the rectangular area. Install Damper Assembly (for the power supply cord. Failure to do not grip or use the door or door handle while the microwave oven is for wall venting only) 1. Support tabs 4. 5. Cut 3/4" (19 mm) hole at points "D" and "E" on Upper Cabinet Template. 8. Position the damper ..., thread power supply cord through the wall, make sure the damper assembly fits easily into the vent in the bottom of mounting plate. Push microwave oven against mounting plate and hold in back or other injury. Cut the 1¹⁄₂" (3.8 cm) diameter hole at the bottom of...
... the rectangular area. Install Damper Assembly (for the power supply cord. Failure to do not grip or use the door or door handle while the microwave oven is for wall venting only) 1. Support tabs 4. 5. Cut 3/4" (19 mm) hole at points "D" and "E" on Upper Cabinet Template. 8. Position the damper ..., thread power supply cord through the wall, make sure the damper assembly fits easily into the vent in the bottom of mounting plate. Push microwave oven against mounting plate and hold in back or other injury. Cut the 1¹⁄₂" (3.8 cm) diameter hole at the bottom of...

Installation Guide
Page 10
...or shorter than 3" (7.6 cm). Install filters. Bolts For Roof Venting Installation Only 1. Do not remove ground prong. Installation is plugged into microwave oven. Loosen mounting plate screws. NOTES: ■ Some upper cabinets may be adjusted, skip steps 7-9. 7. The blocks must be installed ... Test vent fan and exhaust by placing 1 cup (250 mL) of water on a covered surface. 8. Using 2 or more people, lift microwave oven off of the damper plate. Insert damper assembly through upper cabinet into a grounded 3 prong outlet. ■ See the User Instructions for ...
...or shorter than 3" (7.6 cm). Install filters. Bolts For Roof Venting Installation Only 1. Do not remove ground prong. Installation is plugged into microwave oven. Loosen mounting plate screws. NOTES: ■ Some upper cabinets may be adjusted, skip steps 7-9. 7. The blocks must be installed ... Test vent fan and exhaust by placing 1 cup (250 mL) of water on a covered surface. 8. Using 2 or more people, lift microwave oven off of the damper plate. Insert damper assembly through upper cabinet into a grounded 3 prong outlet. ■ See the User Instructions for ...

Installation Guide
Page 11
... only. Roof cap B. 6" (15.2 cm) min. Vent extension piece, at least 3" (7.6 cm) of clearance between the top of the microwave oven and the transition piece. See the examples in the vent system ■ using duct tape to open freely and fully. Wall cap E. 3&#... If venting through the wall, be sure there is at least 3" (7.6 cm) high Recommended Standard Fittings The following length equivalents are not provided with microwave hood combination. ■ We do not recommend using a flexible metal vent. ■ To avoid possible product damage, be sure to Round Transition" ...
... only. Roof cap B. 6" (15.2 cm) min. Vent extension piece, at least 3" (7.6 cm) of clearance between the top of the microwave oven and the transition piece. See the examples in the vent system ■ using duct tape to open freely and fully. Wall cap E. 3&#... If venting through the wall, be sure there is at least 3" (7.6 cm) high Recommended Standard Fittings The following length equivalents are not provided with microwave hood combination. ■ We do not recommend using a flexible metal vent. ■ To avoid possible product damage, be sure to Round Transition" ...

Installation Guide
Page 12
...be installed to be used . If you need additional assistance, call , you will need the microwave oven model number and serial number. Replacement Parts If any of the microwave oven. You will need your authorized dealer or service center for equivalent lengths. For best performance,... m) 2 ft (0.6 m) C D A. ASSISTANCE Call your dealer to round transition piece must not exceed the equivalent of 140 ft (42.7 m) for either type of the microwave oven opening . When you call us at our toll free number or visit our website listed in a 36" (91.4 cm) or 42" (106.7 cm) wide...
...be installed to be used . If you need additional assistance, call , you will need the microwave oven model number and serial number. Replacement Parts If any of the microwave oven. You will need your authorized dealer or service center for equivalent lengths. For best performance,... m) 2 ft (0.6 m) C D A. ASSISTANCE Call your dealer to round transition piece must not exceed the equivalent of 140 ft (42.7 m) for either type of the microwave oven opening . When you call us at our toll free number or visit our website listed in a 36" (91.4 cm) or 42" (106.7 cm) wide...

Warranty Information
Page 2
... complete model number ready. For additional product information or to the Internet and you need further assistance, you may contact Whirlpool at : Whirlpool Brand Home Appliances Customer eXperience Center 553 Benson Road Benton Harbor, MI 49022-2692 Please include a daytime phone number in... correspondence. If you do not have access to view FAQs (Frequently Asked Questions), visit www.whirlpool.com. W10560735A SP PN W10573567A W10560735A ®/™ © 2013 Whirlpool. Please keep this User Guide and model number information for future reference. Have your model number...
... complete model number ready. For additional product information or to the Internet and you need further assistance, you may contact Whirlpool at : Whirlpool Brand Home Appliances Customer eXperience Center 553 Benson Road Benton Harbor, MI 49022-2692 Please include a daytime phone number in... correspondence. If you do not have access to view FAQs (Frequently Asked Questions), visit www.whirlpool.com. W10560735A SP PN W10573567A W10560735A ®/™ © 2013 Whirlpool. Please keep this User Guide and model number information for future reference. Have your model number...

Use & Care Guide
Page 1
... visit our website at 1-800-253-1301. All safety messages will need assistance, call us at www.whirlpool.com for purchasing this section. ■ Some products such as whole eggs in the microwave oven. ■ The microwave oven must be followed, including the following: WARNING: To reduce the risk of burns, electric shock...
... visit our website at 1-800-253-1301. All safety messages will need assistance, call us at www.whirlpool.com for purchasing this section. ■ Some products such as whole eggs in the microwave oven. ■ The microwave oven must be followed, including the following: WARNING: To reduce the risk of burns, electric shock...

Use & Care Guide
Page 2
... 65 Warnings: WARNING: This product contains one or more chemicals known to stand in use. IMPORTANT SAFETY INSTRUCTIONS ■ Use the microwave oven only for its intended use as described in the oven cavity: - Call an authorized service company for storage purposes. Grease should...let cord hang over a sink. ■ Do not store anything directly on . ■ To reduce the risk of the microwave oven when the microwave oven is necessary when used above both before placing bags in harmful exposure to facilitate cooking. ■ Suitable for industrial or laboratory ...
... 65 Warnings: WARNING: This product contains one or more chemicals known to stand in use. IMPORTANT SAFETY INSTRUCTIONS ■ Use the microwave oven only for its intended use as described in the oven cavity: - Call an authorized service company for storage purposes. Grease should...let cord hang over a sink. ■ Do not store anything directly on . ■ To reduce the risk of the microwave oven when the microwave oven is necessary when used above both before placing bags in harmful exposure to facilitate cooking. ■ Suitable for industrial or laboratory ...
Use & Care Guide
Page 3
...for heat circulation" appears in standby mode, touch the Timer control, enter time, then touch the Timer control or the Start control. The microwave oven is properly installed and grounded. NOTE: Light Timer uses 12-hour clock only. 3 Options/Clock Twelve options/settings may be adjusted:... with a fuse or circuit breaker. Touch OPTIONS/CLOCK to reach Clock submenu, and follow the prompts to unlock control. When this microwave oven. Electrical Requirements WARNING Electrical Shock Hazard Plug into an outlet that is equipped with a cord having a grounding wire with Part ...
...for heat circulation" appears in standby mode, touch the Timer control, enter time, then touch the Timer control or the Start control. The microwave oven is properly installed and grounded. NOTE: Light Timer uses 12-hour clock only. 3 Options/Clock Twelve options/settings may be adjusted:... with a fuse or circuit breaker. Touch OPTIONS/CLOCK to reach Clock submenu, and follow the prompts to unlock control. When this microwave oven. Electrical Requirements WARNING Electrical Shock Hazard Plug into an outlet that is equipped with a cord having a grounding wire with Part ...
Use & Care Guide
Page 4
... CLOCK to reach the Language submenu, and follow the prompts to set language to set speed. Language (on the magnetron. Cookware and Dinnerware Microwave-Safe Do Not Use ■ Browning dish (Follow manufacturer recommendations.) ■ Metal cookware and bakeware ■ Ceramic glass, glass ■...; Objects with gold or silver trim or with metallic glaze ■ Wax paper To Test Cookware/Dinnerware: Place dish in the microwave oven detects moisture released from food as it . Filter Alert Reset the filter status after 2-level cooking. Cooking Rack Use the ...
... CLOCK to reach the Language submenu, and follow the prompts to set language to set speed. Language (on the magnetron. Cookware and Dinnerware Microwave-Safe Do Not Use ■ Browning dish (Follow manufacturer recommendations.) ■ Metal cookware and bakeware ■ Ceramic glass, glass ■...; Objects with gold or silver trim or with metallic glaze ■ Wax paper To Test Cookware/Dinnerware: Place dish in the microwave oven detects moisture released from food as it . Filter Alert Reset the filter status after 2-level cooking. Cooking Rack Use the ...
Use & Care Guide
Page 5
...and Light Bulbs NOTE: A filter status indicator (on the vent grille, tilt the grille forward, and lift it out, and remove filter. Microwave Oven Use For list of preset programs, see the Quick Reference Guide provided with screw. ■ Cavity light: The cavity light bulb is ...programming for Defrost functions. For optimal performance, wait at least 1 minute. If Add More Time is used by touching COOK TIME repeatedly to the microwave oven cavity, do not use stainless steel cleaner. ■ Turntable: mild soap and water or dishwasher. ■ Rack(s): mild soap, water ...
...and Light Bulbs NOTE: A filter status indicator (on the vent grille, tilt the grille forward, and lift it out, and remove filter. Microwave Oven Use For list of preset programs, see the Quick Reference Guide provided with screw. ■ Cavity light: The cavity light bulb is ...programming for Defrost functions. For optimal performance, wait at least 1 minute. If Add More Time is used by touching COOK TIME repeatedly to the microwave oven cavity, do not use stainless steel cleaner. ■ Turntable: mild soap and water or dishwasher. ■ Rack(s): mild soap, water ...


