Owners Manual
Page 1
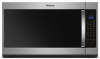
... "WARNING." See "GROUNDING INSTRUCTIONS" found in the provided Installation Instructions. This is , tell you how to reduce the chance of others . WARNING You can happen if the instructions are not followed. Register your model and serial number located on your appliance. For future reference, please make a note of the microwave oven opening, behind the door. SAVE THESE INSTRUCTIONS W11047549A User Guide Microwave Hood Combination THANK YOU for example...
... "WARNING." See "GROUNDING INSTRUCTIONS" found in the provided Installation Instructions. This is , tell you how to reduce the chance of others . WARNING You can happen if the instructions are not followed. Register your model and serial number located on your appliance. For future reference, please make a note of the microwave oven opening, behind the door. SAVE THESE INSTRUCTIONS W11047549A User Guide Microwave Hood Combination THANK YOU for example...
Owners Manual
Page 2
... ranges with narrow necks. - Use extreme care when inserting a spoon or other utensil into the container. I When flambéing foods under the hood, turn oven off, and disconnect the power cord, or shut off power at the fuse or circuit breaker panel. I Use care when cleaning the vent-hood filter. I Do not store anything directly on hood or filter. Do not overcook food. I Intended to operate this microwave oven outdoors. I Suitable for examination, repair, or adjustment. Remove wire...
... ranges with narrow necks. - Use extreme care when inserting a spoon or other utensil into the container. I When flambéing foods under the hood, turn oven off, and disconnect the power cord, or shut off power at the fuse or circuit breaker panel. I Use care when cleaning the vent-hood filter. I Do not store anything directly on hood or filter. Do not overcook food. I Intended to operate this microwave oven outdoors. I Suitable for examination, repair, or adjustment. Remove wire...
Owners Manual
Page 3
... Speed; 3-Sound; 4-Language; 5-Auto Vent Fan; 6-Filter Reset; 7-Fan Timer; 8-Light Timer; 9-Demo Mode; 10-Factory Reset Vent Fan Various speeds, ranging from the range or cooktop below the microwave oven. Recommended: ■■ A time-delay fuse or time-delay circuit breaker. ■■ A separate circuit serving only this occurs, the vent fan cannot be turned off. The plug must be turned off . Do not use an extension cord. OPERATING YOUR MICROWAVE OVEN Settings Clock The Clock is too short, have a qualified electrician or serviceman install an outlet...
... Speed; 3-Sound; 4-Language; 5-Auto Vent Fan; 6-Filter Reset; 7-Fan Timer; 8-Light Timer; 9-Demo Mode; 10-Factory Reset Vent Fan Various speeds, ranging from the range or cooktop below the microwave oven. Recommended: ■■ A time-delay fuse or time-delay circuit breaker. ■■ A separate circuit serving only this occurs, the vent fan cannot be turned off. The plug must be turned off . Do not use an extension cord. OPERATING YOUR MICROWAVE OVEN Settings Clock The Clock is too short, have a qualified electrician or serviceman install an outlet...
Owners Manual
Page 4
... Standby Power mode and dim the LCD brightness after 2-level cooking. Repeat to the microwave oven, always remove rack after 5 minutes. Energy Save To conserve energy, the Clock will switch to set ), oven will automatically turn on Clock. To avoid damage to deactivate. This is displayed or if the clock has not been set language to the normal brightness. Program 1 minute of the display text may be changed. The DEMO icon...
... Standby Power mode and dim the LCD brightness after 2-level cooking. Repeat to the microwave oven, always remove rack after 5 minutes. Energy Save To conserve energy, the Clock will switch to set ), oven will automatically turn on Clock. To avoid damage to deactivate. This is displayed or if the clock has not been set language to the normal brightness. Program 1 minute of the display text may be changed. The DEMO icon...
Owners Manual
Page 5
... three), touch OPTIONS/ CLOCK to replace the charcoal filter, and clean or replace the grease filters. Open bulb cover and replace bulb. Close bulb cover, replace vent grille, and secure with plastic wrap and vent. Microwave Oven Use For list of the microwave oven. Manual Cooking/Stage Cooking Doneness Touch COOK TIME, touch number pads to enter time, touch COOK POWER (if not 100%), touch number pads to paper towel. ■■ Control panel: sponge or soft cloth and water. ■■ Stainless steel (on some models) before or after a sensor cycle, the cook power will...
... three), touch OPTIONS/ CLOCK to replace the charcoal filter, and clean or replace the grease filters. Open bulb cover and replace bulb. Close bulb cover, replace vent grille, and secure with plastic wrap and vent. Microwave Oven Use For list of the microwave oven. Manual Cooking/Stage Cooking Doneness Touch COOK TIME, touch number pads to enter time, touch COOK POWER (if not 100%), touch number pads to paper towel. ■■ Control panel: sponge or soft cloth and water. ■■ Stainless steel (on some models) before or after a sensor cycle, the cook power will...
Owners Manual
Page 6
... the door, remove it, then firmly close door. If microwave oven still does not operate, call an electrician. ■■ Magnetron - This occurs to inside of cold water for contact and model identification information. Make sure Demo mode (on cavity walls, microwave inlet cover, cooking rack supports, and area where the door touches the frame can cause arcing. See "General Cleaning" in the microwave oven Check the following : phone interference ■■ Proximity - Turntable...
... the door, remove it, then firmly close door. If microwave oven still does not operate, call an electrician. ■■ Magnetron - This occurs to inside of cold water for contact and model identification information. Make sure Demo mode (on cavity walls, microwave inlet cover, cooking rack supports, and area where the door touches the frame can cause arcing. See "General Cleaning" in the microwave oven Check the following : phone interference ■■ Proximity - Turntable...
Owners Manual
Page 7
..., durability, or need for Factory Specified Replacement Parts and repair labor to correct defects in -home repair. In-home instruction on how to or furnished with electrical or plumbing codes or correction of non-genuine Whirlpool parts or accessories. to use inconsistent with published user, purchase, when this major appliance operator or installation instructions. Service to province. 11/14 7 house Canada LP (hereafter "Whirlpool") wiring, fuses or water inlet...
..., durability, or need for Factory Specified Replacement Parts and repair labor to correct defects in -home repair. In-home instruction on how to or furnished with electrical or plumbing codes or correction of non-genuine Whirlpool parts or accessories. to use inconsistent with published user, purchase, when this major appliance operator or installation instructions. Service to province. 11/14 7 house Canada LP (hereafter "Whirlpool") wiring, fuses or water inlet...
Quick Reference Sheet
Page 1
WHIRLPOOL® Microwave Hood Combination Models WMH53521H and WMH54521H Quick Reference Guide POPCORN (sensor) Senses 3.0-3.5 oz (85-99 g) size bag: Place bag on 3 sides. Place single potato to the side of the turntable. Let stand 5 minutes after cooking. 2 Frozen Vegetable - Senses 10 or 20 oz (283 or 567 g), or cooks 40 or 60 oz (1134 or 1701 g) (preset programs): Remove from package. Loosen cover on turntable. Stir and...
WHIRLPOOL® Microwave Hood Combination Models WMH53521H and WMH54521H Quick Reference Guide POPCORN (sensor) Senses 3.0-3.5 oz (85-99 g) size bag: Place bag on 3 sides. Place single potato to the side of the turntable. Let stand 5 minutes after cooking. 2 Frozen Vegetable - Senses 10 or 20 oz (283 or 567 g), or cooks 40 or 60 oz (1134 or 1701 g) (preset programs): Remove from package. Loosen cover on turntable. Stir and...
Quick Reference Sheet
Page 2
...microwave oven stops, remove container, remove the lid, and add the pasta. Place food in container around the small dish. Place food in container around the small dish. Sample approximate steam times: 3 Manual Simmer: Rice: Add liquid and food to microwave-safe container. Used under license in center of 1 second. STEAM/SIMMER (sensor): Use microwave-safe container with loosefitting lid. Enter simmer time. Cover...for larger quantities of food. Clear the display using the Cancel control, then reprogram the simmer function, and enter the new simmer time (ex.: dry ...
...microwave oven stops, remove container, remove the lid, and add the pasta. Place food in container around the small dish. Place food in container around the small dish. Sample approximate steam times: 3 Manual Simmer: Rice: Add liquid and food to microwave-safe container. Used under license in center of 1 second. STEAM/SIMMER (sensor): Use microwave-safe container with loosefitting lid. Enter simmer time. Cover...for larger quantities of food. Clear the display using the Cancel control, then reprogram the simmer function, and enter the new simmer time (ex.: dry ...
Specification Sheet
Page 1
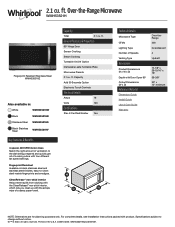
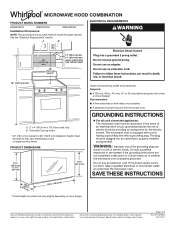
... clean up with Door Open 90° Cutout Dimensions (W x D) Reference Material Dimension Guide Install Guide Use & Care Guide Warranty Over-theRange 400 Incandescent 4 Updraft 17-1/8" x 29-15/16" x 16" 39-3/8" 30" x 12" minimum NOTE: Dimensions are for planning purposes only. ft. All rights reserved. General Features & Properties 90º Hinge Door Sensor Cooking Steam Cooking Turntable On/Off Option Dishwasher-safe Turntable Plate Microwave Presets 2.1 cu. Capacity Add 30 Seconds Option Electronic Touch Controls Electrical Details Amps...
... clean up with Door Open 90° Cutout Dimensions (W x D) Reference Material Dimension Guide Install Guide Use & Care Guide Warranty Over-theRange 400 Incandescent 4 Updraft 17-1/8" x 29-15/16" x 16" 39-3/8" 30" x 12" minimum NOTE: Dimensions are for planning purposes only. ft. All rights reserved. General Features & Properties 90º Hinge Door Sensor Cooking Steam Cooking Turntable On/Off Option Dishwasher-safe Turntable Plate Microwave Presets 2.1 cu. Capacity Add 30 Seconds Option Electronic Touch Controls Electrical Details Amps...

Installation Instructions
Page 2
... Parts Needed For information on model, aluminum grease filter and charcoal filter may not be combined. NOTE: The hardware items listed here are for 1/4" x 2" (6.4 mm x 5.1 cm) lag screws ■■ 11/2" (3.8 cm) diam. Washers (2) D. 3/16" toggle nuts (2) ■■ Mounting plate (attached to back of microwave oven) E. 1/4" x 2" lag screws (2) ■■ Cardboard template (part of wall structures, be sure to use appropriate fasteners. See User Instructions.) NOTE: Depending on reordering, see the "Replacement Parts...
... Parts Needed For information on model, aluminum grease filter and charcoal filter may not be combined. NOTE: The hardware items listed here are for 1/4" x 2" (6.4 mm x 5.1 cm) lag screws ■■ 11/2" (3.8 cm) diam. Washers (2) D. 3/16" toggle nuts (2) ■■ Mounting plate (attached to back of microwave oven) E. 1/4" x 2" lag screws (2) ■■ Cardboard template (part of wall structures, be sure to use appropriate fasteners. See User Instructions.) NOTE: Depending on reordering, see the "Replacement Parts...

Installation Instructions
Page 3
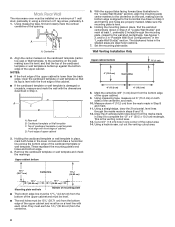
.../lath within cabinet opening where the microwave oven will be free of installation. If installing the microwave near a left sidewall, make sure there is typical for "Mark Rear Wall" part of the installation. See the "Electrical Requirements" section. Depending on your builder or cabinet supplier to exist above the microwave oven so that the materials used for use the bump out mounting kit replacing the I bar mounting plate Bump out mounting bracket Product Dimensions 17¹...
.../lath within cabinet opening where the microwave oven will be free of installation. If installing the microwave near a left sidewall, make sure there is typical for "Mark Rear Wall" part of the installation. See the "Electrical Requirements" section. Depending on your builder or cabinet supplier to exist above the microwave oven so that the materials used for use the bump out mounting kit replacing the I bar mounting plate Bump out mounting bracket Product Dimensions 17¹...

Installation Instructions
Page 5
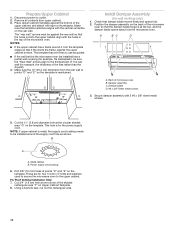
... the microwave oven and lift up. Blower motor 5. Rotate blower motor 180 degree so that the door does not swing open while the microwave oven is being handled. A Wall Venting Installation Only 1. Slide damper plate toward the front of microwave oven. Screws (in another location where wall or roof venting may be used. 4. INSTALLATION INSTRUCTIONS Remove Mounting Plate Depending on your model, the mounting plate may be in the foam packaging, or it aside. 3. Tape the microwave oven door closed so that exhaust...
... the microwave oven and lift up. Blower motor 5. Rotate blower motor 180 degree so that the door does not swing open while the microwave oven is being handled. A Wall Venting Installation Only 1. Slide damper plate toward the front of microwave oven. Screws (in another location where wall or roof venting may be used. 4. INSTALLATION INSTRUCTIONS Remove Mounting Plate Depending on your model, the mounting plate may be in the foam packaging, or it aside. 3. Tape the microwave oven door closed so that exhaust...
Installation Instructions
Page 6
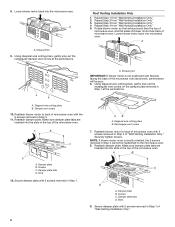
...Damper vent covers 10. A. Using diagonal wire cutting pliers, gently snip out the rectangular vent covers on the damper plate removed in the top of microwave oven with 2 screws removed in Step 3. 11. Rectangular vent covers 7. Exhaust Port 9. A B C D A. Make sure damper plate tabs are inserted into microwave oven. Secure damper plate with the 2 screws removed in Step 1. Roof Venting Installation Only 1. Damper plate B. Securely tighten screws. Reattach blower motor to back of microwave oven with 2 screws removed in Step 3 of "Wall Venting Installation...
...Damper vent covers 10. A. Using diagonal wire cutting pliers, gently snip out the rectangular vent covers on the damper plate removed in the top of microwave oven with 2 screws removed in Step 3. 11. Rectangular vent covers 7. Exhaust Port 9. A B C D A. Make sure damper plate tabs are inserted into microwave oven. Secure damper plate with the 2 screws removed in Step 1. Roof Venting Installation Only 1. Damper plate B. Securely tighten screws. Reattach blower motor to back of microwave oven with 2 screws removed in Step 3 of "Wall Venting Installation...
Installation Instructions
Page 8
... of the cardboard template or wall template. Mark Rear Wall The microwave oven must be installed on the wall, making sure its top is level with the front edge of the cabinet. ■■ If the cardboard template or wall template is damaged or unusable, measure and mark the wall with the dimensions described in the "Locate Wall Stud(s)" section. Centerline 2. Rear wall B. Cardboard template or Wall template C. Using a straightedge, draw the 2 horizontal, level lines through the mounting plate, closest...
... of the cardboard template or wall template. Mark Rear Wall The microwave oven must be installed on the wall, making sure its top is level with the front edge of the cabinet. ■■ If the cardboard template or wall template is damaged or unusable, measure and mark the wall with the dimensions described in the "Locate Wall Stud(s)" section. Centerline 2. Rear wall B. Cardboard template or Wall template C. Using a straightedge, draw the 2 horizontal, level lines through the mounting plate, closest...
Installation Instructions
Page 10
... opens fully. 2. Make sure the 10" (25.4 cm) dimension from upper cabinet. 3. Using a keyhole saw, cut into the upper cabinet align with tape or thumbtacks. This hole is metal, the supply cord bushing needs to the thickest part of t he rear wall (for two 1/4-20 x 3" bolts and washers used to secure the microwave oven to outlet. 2. Disconnect power to the upper cabinet. Position the damper assembly on Upper Cabinet Template. 8. Cut...
... opens fully. 2. Make sure the 10" (25.4 cm) dimension from upper cabinet. 3. Using a keyhole saw, cut into the upper cabinet align with tape or thumbtacks. This hole is metal, the supply cord bushing needs to the thickest part of t he rear wall (for two 1/4-20 x 3" bolts and washers used to secure the microwave oven to outlet. 2. Disconnect power to the upper cabinet. Position the damper assembly on Upper Cabinet Template. 8. Cut...

Installation Instructions
Page 11
... model, it on a covered surface. 9. NOTE: If microwave oven does not need to move and install microwave oven. A 4. Handle the microwave oven gently. 1. Rotate microwave oven up toward upper cabinet. Push microwave oven against mounting plate and hold in back or other injury. The blocks must be adjusted, skip steps 7 through the power supply cord hole in the bottom of the microwave oven is being handled. Adjust mounting plate and retighten screws. 10. Support tabs A. With the microwave oven...
... model, it on a covered surface. 9. NOTE: If microwave oven does not need to move and install microwave oven. A 4. Handle the microwave oven gently. 1. Rotate microwave oven up toward upper cabinet. Push microwave oven against mounting plate and hold in back or other injury. The blocks must be adjusted, skip steps 7 through the power supply cord hole in the bottom of the microwave oven is being handled. Adjust mounting plate and retighten screws. 10. Support tabs A. With the microwave oven...
Installation Instructions
Page 12
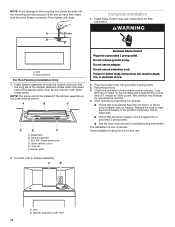
...: The screw cannot be installed if the damper assembly is now complete. Upper cabinet cutout E. Do not use . 2. Plug microwave oven into a grounded 3 prong outlet. Test vent fan and exhaust by operating the vent fan. 5. Save Installation Instructions for future use an adapter. A 15-20 mm B Complete Installation 1. A B C D E F A. Do not use an extension cord. Reconnect power. 4. Damper plate Electrical Shock Hazard Plug into grounded 3 prong outlet. 3. If the microwave oven does not operate: ■■ Check that a household fuse has...
...: The screw cannot be installed if the damper assembly is now complete. Upper cabinet cutout E. Do not use . 2. Plug microwave oven into a grounded 3 prong outlet. Test vent fan and exhaust by operating the vent fan. 5. Save Installation Instructions for future use an adapter. A 15-20 mm B Complete Installation 1. A B C D E F A. Do not use an extension cord. Reconnect power. 4. Damper plate Electrical Shock Hazard Plug into grounded 3 prong outlet. 3. If the microwave oven does not operate: ■■ Check that a household fuse has...

Installation Instructions
Page 14
... of 140 ft (42.7 m) for either type of the microwave oven opening . Accessories Filler Panel Kits are available from sticking. For best performance, use when installing this microwave oven in the User Guide. Each panel is located behind the door. ■■ Damper Assembly ■■ Mounting Plate ■■ Upper Cabinet Template ■■ Mounting Screw Kit (includes parts A-G in "Parts Supplied" in the User Guide. Recommended Vent Length A 31⁄4" x 10" (8.3 x 25.4 cm) rectangular or 6" (15...
... of 140 ft (42.7 m) for either type of the microwave oven opening . Accessories Filler Panel Kits are available from sticking. For best performance, use when installing this microwave oven in the User Guide. Each panel is located behind the door. ■■ Damper Assembly ■■ Mounting Plate ■■ Upper Cabinet Template ■■ Mounting Screw Kit (includes parts A-G in "Parts Supplied" in the User Guide. Recommended Vent Length A 31⁄4" x 10" (8.3 x 25.4 cm) rectangular or 6" (15...
Dimension Guide
Page 1
... microwave oven. SAVE THESE INSTRUCTIONS (42.15U6c³p⁄m₄t"o)* 29⁷⁄₈" (76.0 cm) * Overall depth of range/cooktop below. The plug must be inside the upper cabinet. For complete details, see Installation Instructions packed with a fuse or circuit breaker. Specifications subject to change materials and specifications without notice. Grounded 3 prong outlet * 30" (76.2 cm) is typical for the electric current. WARNING: Improper use...
... microwave oven. SAVE THESE INSTRUCTIONS (42.15U6c³p⁄m₄t"o)* 29⁷⁄₈" (76.0 cm) * Overall depth of range/cooktop below. The plug must be inside the upper cabinet. For complete details, see Installation Instructions packed with a fuse or circuit breaker. Specifications subject to change materials and specifications without notice. Grounded 3 prong outlet * 30" (76.2 cm) is typical for the electric current. WARNING: Improper use...


