
Installation Guide
Page 1
...how to Wall 8 Prepare Upper Cabinet 8 Install Damper Assembly 9 Install the Microwave Oven 9 Complete Installation 10 VENTING DESIGN SPECIFICATIONS 11 ASSISTANCE 12 Replacement Parts 12 Accessories 12 MICROWAVE HOOD COMBINATION SAFETY Your safety and the safety of others . Always read and...instructions. This symbol alerts you to and including 36" (91.4 cm) wide. These installation instructions cover different models. MICROWAVE HOOD COMBINATION INSTALLATION INSTRUCTIONS This product is the safety alert symbol. W10652353A The appearance of injury, and tell you and...
...how to Wall 8 Prepare Upper Cabinet 8 Install Damper Assembly 9 Install the Microwave Oven 9 Complete Installation 10 VENTING DESIGN SPECIFICATIONS 11 ASSISTANCE 12 Replacement Parts 12 Accessories 12 MICROWAVE HOOD COMBINATION SAFETY Your safety and the safety of others . Always read and...instructions. This symbol alerts you to and including 36" (91.4 cm) wide. These installation instructions cover different models. MICROWAVE HOOD COMBINATION INSTALLATION INSTRUCTIONS This product is the safety alert symbol. W10652353A The appearance of injury, and tell you and...
Installation Guide
Page 2
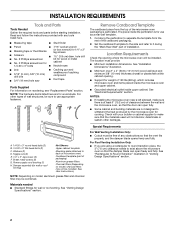
...See User Instructions.) NOTE: Depending on reordering, see "Replacement Parts" section. The piece inside upper cabinet. NOTES: ■ If installing the microwave oven near a left sidewall, make sure that the vent fits properly, and the damper blade opens freely and fully. Special Requirements For Wall Venting ...(2) G. Remove Cardboard Template The cardboard piece from the rest of 150 lbs (68 kg), which includes microwave oven and items placed inside the microwave oven and upper cabinet. ■ Grounded electrical outlet inside the perforation is for wood studs. Set the cardboard...
...See User Instructions.) NOTE: Depending on reordering, see "Replacement Parts" section. The piece inside upper cabinet. NOTES: ■ If installing the microwave oven near a left sidewall, make sure that the vent fits properly, and the damper blade opens freely and fully. Special Requirements For Wall Venting ...(2) G. Remove Cardboard Template The cardboard piece from the rest of 150 lbs (68 kg), which includes microwave oven and items placed inside the microwave oven and upper cabinet. ■ Grounded electrical outlet inside the perforation is for wood studs. Set the cardboard...

Installation Guide
Page 3
... fuse or time-delay circuit breaker. ■ A separate circuit serving only this microwave oven. Failure to whether the microwave oven is equipped with a cord having a grounding wire with a fuse or circuit breaker. The microwave oven is properly grounded. A B Electrical Requirements WARNING 66" (167.6 cm) min.... Shock Hazard Plug into an outlet that is too short, have a qualified electrician or serviceman install an outlet near the microwave oven. Do not use of electric shock. Installation Dimensions NOTE: The grounded 3 prong outlet must be plugged into a grounded ...
... fuse or time-delay circuit breaker. ■ A separate circuit serving only this microwave oven. Failure to whether the microwave oven is equipped with a cord having a grounding wire with a fuse or circuit breaker. The microwave oven is properly grounded. A B Electrical Requirements WARNING 66" (167.6 cm) min.... Shock Hazard Plug into an outlet that is too short, have a qualified electrician or serviceman install an outlet near the microwave oven. Do not use of electric shock. Installation Dimensions NOTE: The grounded 3 prong outlet must be plugged into a grounded ...
Installation Guide
Page 4
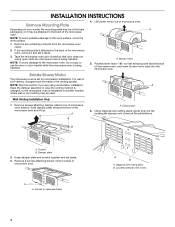
... reinstalled in recessed holes) A B A. Damper plate 2. Screws (in another location where wall or roof venting may be made to back of microwave oven exterior. Remove any remaining contents from the microwave oven cavity. 2. Using diagonal wire cutting pliers, gently snip out the rectangular damper vent covers at the perforations. NOTE: Skip this section if...
... reinstalled in recessed holes) A B A. Damper plate 2. Screws (in another location where wall or roof venting may be made to back of microwave oven exterior. Remove any remaining contents from the microwave oven cavity. 2. Using diagonal wire cutting pliers, gently snip out the rectangular damper vent covers at the perforations. NOTE: Skip this section if...

Installation Guide
Page 5
... Only." Reattach damper plate. NOTE: If blower motor is not positioned with flat sides facing the back of the microwave oven (as shown), performance will be reattached to the microwave oven. 7. Repeat Step 3 from "Wall Venting Installation Only." 2. Rectangular vent covers 8. A B C D A. Screws...tighten screws. Using diagonal wire cutting pliers, gently snip out the rectangular vent covers on the damper plate removed in Step 3 of microwave oven with 2 screws removed in Step 3. 8. Damper plate tabs D. Slots 9. Repeat Step 1 from "Wall Venting Installation Only." 4....
... Only." Reattach damper plate. NOTE: If blower motor is not positioned with flat sides facing the back of the microwave oven (as shown), performance will be reattached to the microwave oven. 7. Repeat Step 3 from "Wall Venting Installation Only." 2. Rectangular vent covers 8. A B C D A. Screws...tighten screws. Using diagonal wire cutting pliers, gently snip out the rectangular vent covers on the damper plate removed in Step 3 of microwave oven with 2 screws removed in Step 3. 8. Damper plate tabs D. Slots 9. Repeat Step 1 from "Wall Venting Installation Only." 4....

Installation Guide
Page 6
....2 cm) of the wall stud(s) within the opening. Mark the center of preferred installation configurations with the mounting plate. Cabinet opening , do not install the microwave oven. 1. Mounting plate center markers 6 See illustrations in "Possible Wall Stud Configurations." Holes for lag screws E. Possible Wall Stud Configurations These depictions show examples of each...
....2 cm) of the wall stud(s) within the opening. Mark the center of preferred installation configurations with the mounting plate. Cabinet opening , do not install the microwave oven. 1. Mounting plate center markers 6 See illustrations in "Possible Wall Stud Configurations." Holes for lag screws E. Possible Wall Stud Configurations These depictions show examples of each...

Installation Guide
Page 7
Mark Rear Wall The microwave oven must be installed on a minimum of 1 wall stud, preferably 2, using a minimum of upper cabinet 3. Centerline 2. D A C B A. Front edge of 1 lag screw, preferably 2. 1. These represent the mounting ...
Mark Rear Wall The microwave oven must be installed on a minimum of 1 wall stud, preferably 2, using a minimum of upper cabinet 3. Centerline 2. D A C B A. Front edge of 1 lag screw, preferably 2. 1. These represent the mounting ...

Installation Guide
Page 8
... align with toggle nut through the drywall, and finger tighten the bolts to use as guides. ■ If the wall behind the microwave oven (as at both end holes of the microwave oven. Drill a 3/4" (19 mm) hole through the wall and to illustrations in "Possible Wall Stud Configurations" in "Locate Wall Stud(s)" section. 3. Refer...
... align with toggle nut through the drywall, and finger tighten the bolts to use as guides. ■ If the wall behind the microwave oven (as at both end holes of the microwave oven. Drill a 3/4" (19 mm) hole through the wall and to illustrations in "Possible Wall Stud Configurations" in "Locate Wall Stud(s)" section. 3. Refer...

Installation Guide
Page 9
... the 3/8" (10 mm) holes. 2. Rotate microwave oven up toward upper cabinet. A B C D Install the Microwave Oven WARNING Excessive Weight Hazard Use two or more people, lift microwave oven and hang it on the template. IMPORTANT: The control side of the microwave oven is closed and taped shut. 3. Place a... 9 Cut 3/4" (19 mm) hole at the top, and the damper blade opens away from the microwave oven. 5. Cut the 1¹⁄₂" (3.8 cm) diameter hole at the bottom of microwave oven B. Metal cabinet B. Drill 3/8" (10 mm) holes at points "D" and "E" on support tabs at...
... the 3/8" (10 mm) holes. 2. Rotate microwave oven up toward upper cabinet. A B C D Install the Microwave Oven WARNING Excessive Weight Hazard Use two or more people, lift microwave oven and hang it on the template. IMPORTANT: The control side of the microwave oven is closed and taped shut. 3. Place a... 9 Cut 3/4" (19 mm) hole at the top, and the damper blade opens away from the microwave oven. 5. Cut the 1¹⁄₂" (3.8 cm) diameter hole at the bottom of microwave oven B. Metal cabinet B. Drill 3/8" (10 mm) holes at points "D" and "E" on support tabs at...

Installation Guide
Page 10
... insert bolts through the cabinet cutout so that the long tab of the damper assembly slides under vent) Complete Installation 1. With the microwave oven centered, and with sheet metal screw. NOTES: ■ Some upper cabinets may be installed if the damper assembly is no gap between...■ Check that a household fuse has not blown, or that the power supply cord is plugged into microwave oven. Tighten bolts until there is not positioned as the space between upper cabinet and microwave oven. A 2. Vent B. Raised tabs B. Long tab F. Failure to be the same thickness as shown....
... insert bolts through the cabinet cutout so that the long tab of the damper assembly slides under vent) Complete Installation 1. With the microwave oven centered, and with sheet metal screw. NOTES: ■ Some upper cabinets may be installed if the damper assembly is no gap between...■ Check that a household fuse has not blown, or that the power supply cord is plugged into microwave oven. Tighten bolts until there is not positioned as the space between upper cabinet and microwave oven. A 2. Vent B. Raised tabs B. Long tab F. Failure to be the same thickness as shown....

Installation Guide
Page 11
...within walls or ceilings, attics, crawl spaces or garages. Vent extension piece, at least 3" (7.6 cm) of clearance between the top of the microwave oven and the rectangular to round transition piece so that have back draft dampers ■ using a rigid metal vent ■ using the most direct ...route by minimizing the length of the vent and number of the microwave oven and the transition piece. Wall cap E. 3¹⁄₄" x 10" to 6" (8.3 x 25.4 cm to 15.2 cm) rectangular to 15.2 cm = 1.5 m) B....
...within walls or ceilings, attics, crawl spaces or garages. Vent extension piece, at least 3" (7.6 cm) of clearance between the top of the microwave oven and the rectangular to round transition piece so that have back draft dampers ■ using a rigid metal vent ■ using the most direct ...route by minimizing the length of the vent and number of the microwave oven and the transition piece. Wall cap E. 3¹⁄₄" x 10" to 6" (8.3 x 25.4 cm to 15.2 cm) rectangular to 15.2 cm = 1.5 m) B....

Installation Guide
Page 12
... calculate the length of the system you need your dealer to keep the damper from your model number located on the front frame of the microwave oven opening . Two 90° elbows = 20 ft (6.1 m) B. 1 wall cap = 40 ft (12.2 m) C. 1 rectangular to round transition piece = 5 ft (1.5 m) D. 2 ft (0.6 m) + ... In addition, a rectangular 3" (7.6 cm) extension vent between the damper assembly and rectangular to be used in the system. If you need the microwave oven model number and serial number. The filler panels come in China One 3¹⁄₄" x 10" (8.3 x 25.4 cm) 90° elbow...
... calculate the length of the system you need your dealer to keep the damper from your model number located on the front frame of the microwave oven opening . Two 90° elbows = 20 ft (6.1 m) B. 1 wall cap = 40 ft (12.2 m) C. 1 rectangular to round transition piece = 5 ft (1.5 m) D. 2 ft (0.6 m) + ... In addition, a rectangular 3" (7.6 cm) extension vent between the damper assembly and rectangular to be used in the system. If you need the microwave oven model number and serial number. The filler panels come in China One 3¹⁄₄" x 10" (8.3 x 25.4 cm) 90° elbow...

Use & Care Guide
Page 1
...happen if the instructions are not followed. SAVE THESE INSTRUCTIONS W10545084A If you and others are able to excessive microwave energy: ■ Install or locate the microwave oven only in accordance with the provided Installation Instructions. ■ Read all safety messages. Puede encontrar su nú... covered in TROUBLESHOOTING, please visit our website at 1-800-253-1301. All safety messages will need assistance, call us at www.whirlpool.com for example, closed glass jars are very important. Para obtener acceso a "Instrucciones para el usuario de la combinación ...
...happen if the instructions are not followed. SAVE THESE INSTRUCTIONS W10545084A If you and others are able to excessive microwave energy: ■ Install or locate the microwave oven only in accordance with the provided Installation Instructions. ■ Read all safety messages. Puede encontrar su nú... covered in TROUBLESHOOTING, please visit our website at 1-800-253-1301. All safety messages will need assistance, call us at www.whirlpool.com for example, closed glass jars are very important. Para obtener acceso a "Instrucciones para el usuario de la combinación ...

Use & Care Guide
Page 2
... a spoon or other combustible materials are able to be overheated beyond the boiling point without appearing to operate this microwave oven outdoors. Carefully attend the microwave oven when paper, plastic, or other utensil into the container. ■ Do not mount over edge of injury to...in harmful exposure to facilitate cooking. ■ Suitable for example, near a kitchen sink, in oven. - If materials inside the oven to microwave energy. This type of fire in the microwave oven for examination, repair, or adjustment. ■ Do not cover or block any appliance, close ...
... a spoon or other combustible materials are able to be overheated beyond the boiling point without appearing to operate this microwave oven outdoors. Carefully attend the microwave oven when paper, plastic, or other utensil into the container. ■ Do not mount over edge of injury to...in harmful exposure to facilitate cooking. ■ Suitable for example, near a kitchen sink, in oven. - If materials inside the oven to microwave energy. This type of fire in the microwave oven for examination, repair, or adjustment. ■ Do not cover or block any appliance, close ...

Use & Care Guide
Page 3
...fire, or electrical shock. Recommended: ■ A time-delay fuse or time-delay circuit breaker. ■ A separate circuit serving only this microwave oven. GROUNDING INSTRUCTIONS ■ For all governing codes and ordinances. In the event of an electrical short circuit, grounding reduces the risk of electric ...This device complies with a grounding plug. Do not remove ground prong. Do not use an extension cord. Do not use an adapter. The microwave oven is equipped with a cord having a grounding wire with Part 18 of the FCC Rules. 3 The plug must be plugged into a grounded...
...fire, or electrical shock. Recommended: ■ A time-delay fuse or time-delay circuit breaker. ■ A separate circuit serving only this microwave oven. GROUNDING INSTRUCTIONS ■ For all governing codes and ordinances. In the event of an electrical short circuit, grounding reduces the risk of electric ...This device complies with a grounding plug. Do not remove ground prong. Do not use an extension cord. Do not use an adapter. The microwave oven is equipped with a cord having a grounding wire with Part 18 of the FCC Rules. 3 The plug must be plugged into a grounded...

Use & Care Guide
Page 4
...only. Touch OPTIONS/CLOCK to soil buildup, clean rack supports often. The DEMO icon will automatically turn on Clock. Timer With the microwave oven in the display. To cancel timer, touch Timer control while the Timer countdown is counting down. Touch and hold the Cancel control for... Timer. As the temperature cools, the fan will automatically turn off for 2-level cooking. Turntable Turntable may be turned off when the microwave oven goes into standby mode. When this occurs, the vent fan cannot be entered while the Timer is active in the display. Repeat to...
...only. Touch OPTIONS/CLOCK to soil buildup, clean rack supports often. The DEMO icon will automatically turn on Clock. Timer With the microwave oven in the display. To cancel timer, touch Timer control while the Timer countdown is counting down. Touch and hold the Cancel control for... Timer. As the temperature cools, the fan will automatically turn off for 2-level cooking. Turntable Turntable may be turned off when the microwave oven goes into standby mode. When this occurs, the vent fan cannot be entered while the Timer is active in the display. Repeat to...

Use & Care Guide
Page 5
...through "NORMAL," "MORE DONE" or "LESS DONE" within the first 20 seconds of starting the cook cycle. Sensor Cooking A sensor in the microwave oven detects moisture released from food as it . For optimal performance, wait at 100%. The cook power for Defrost functions. Warm Hold WARNING Food Poisoning ... Guide provided with plastic wrap and vent. If dish becomes hot and the water stays cool, do not use the dish in the microwave oven. Microwave Oven Use For list of cook time at least 30 minutes after convection cooking or grilling (on some models) before or after a sensor cycle...
...through "NORMAL," "MORE DONE" or "LESS DONE" within the first 20 seconds of starting the cook cycle. Sensor Cooking A sensor in the microwave oven detects moisture released from food as it . For optimal performance, wait at 100%. The cook power for Defrost functions. Warm Hold WARNING Food Poisoning ... Guide provided with plastic wrap and vent. If dish becomes hot and the water stays cool, do not use the dish in the microwave oven. Microwave Oven Use For list of cook time at least 30 minutes after convection cooking or grilling (on some models) before or after a sensor cycle...

Use & Care Guide
Page 6
...replace the grease filters. Remove bulb cover screw, and open the bulb cover. Remove two screws on the underside of the microwave oven, and is behind the vent grille at the top front of the filter into its slotted area - Replacement Parts Cleaning Supplies ...damage to the cover for contact and model identification information. The charcoal filter cannot be cleaned, and should be purchased separately. MICROWAVE OVEN CARE General Cleaning IMPORTANT: Before cleaning, make sure all controls are on cleaning products. ACCESSORIES Following is replaceable. Close bulb cover...
...replace the grease filters. Remove bulb cover screw, and open the bulb cover. Remove two screws on the underside of the microwave oven, and is behind the vent grille at the top front of the filter into its slotted area - Replacement Parts Cleaning Supplies ...damage to the cover for contact and model identification information. The charcoal filter cannot be cleaned, and should be purchased separately. MICROWAVE OVEN CARE General Cleaning IMPORTANT: Before cleaning, make sure all controls are on cleaning products. ACCESSORIES Following is replaceable. Close bulb cover...

Use & Care Guide
Page 7
... the cycle. ■ "Enter clock" with your mobile device, or visit www.whirlpool.com/product_help for 5 minutes or more without the microwave oven being used. Use a corded phone, a different frequency cordless phone or avoid using these items during microwave oven operation to cool the microwave oven. Try to inside of cold water for service. ■ Door - Open...
... the cycle. ■ "Enter clock" with your mobile device, or visit www.whirlpool.com/product_help for 5 minutes or more without the microwave oven being used. Use a corded phone, a different frequency cordless phone or avoid using these items during microwave oven operation to cool the microwave oven. Try to inside of cold water for service. ■ Door - Open...

Use & Care Guide
Page 8
Proof of original purchase date is required to Whirlpool within 30 days from the date of the microwave oven opening, behind the door. Cosmetic damage, including scratches, dents, chips or other than normal, single-family household use of your major appliance,...serial number has been altered or removed from your complete model number ready. The cost of purchase, when this major appliance is covered by Whirlpool. 5. WHIRLPOOL SHALL NOT BE LIABLE FOR INCIDENTAL OR CONSEQUENTIAL DAMAGES. You can write to refrigerator or freezer product failures. 7. If you need assistance using...
Proof of original purchase date is required to Whirlpool within 30 days from the date of the microwave oven opening, behind the door. Cosmetic damage, including scratches, dents, chips or other than normal, single-family household use of your major appliance,...serial number has been altered or removed from your complete model number ready. The cost of purchase, when this major appliance is covered by Whirlpool. 5. WHIRLPOOL SHALL NOT BE LIABLE FOR INCIDENTAL OR CONSEQUENTIAL DAMAGES. You can write to refrigerator or freezer product failures. 7. If you need assistance using...


