Use & Care Guide
Page 1
...Connect only to reduce the chance of injury, and tell you don't follow the specific "PRECAUTIONS TO AVOID POSSIBLE EXPOSURE TO EXCESSIVE MICROWAVE ENERGY" found in this section. Register your appliance. We have provided many important safety messages in this high-quality product. All ...for purchasing this section and in this manual and on the front facing of your model and serial number located on your microwave oven at www.whirlpool.com. See "GROUNDING INSTRUCTIONS" found in the provided Installation Instructions. Model Number Serial Number Para una versión de...
...Connect only to reduce the chance of injury, and tell you don't follow the specific "PRECAUTIONS TO AVOID POSSIBLE EXPOSURE TO EXCESSIVE MICROWAVE ENERGY" found in this section. Register your appliance. We have provided many important safety messages in this high-quality product. All ...for purchasing this section and in this manual and on the front facing of your model and serial number located on your microwave oven at www.whirlpool.com. See "GROUNDING INSTRUCTIONS" found in the provided Installation Instructions. Model Number Serial Number Para una versión de...
Use & Care Guide
Page 2
...or dropped. I Do not immerse cord or plug in a wet basement, near water - Do not overcook food. Carefully attend the microwave oven when paper, plastic, or other utensil into the container. Remove wire twist-ties from heated surfaces. SAVE THESE INSTRUCTIONS PRECAUTIONS TO AVOID...care when inserting a spoon or other combustible materials are able to be boiling. Do not use the cavity for its intended use the microwave oven near a swimming pool, or similar locations. IMPORTANT SAFETY INSTRUCTIONS I Clean Ventilating Hoods Frequently - THIS COULD RESULT IN VERY HOT ...
...or dropped. I Do not immerse cord or plug in a wet basement, near water - Do not overcook food. Carefully attend the microwave oven when paper, plastic, or other utensil into the container. Remove wire twist-ties from heated surfaces. SAVE THESE INSTRUCTIONS PRECAUTIONS TO AVOID...care when inserting a spoon or other combustible materials are able to be boiling. Do not use the cavity for its intended use the microwave oven near a swimming pool, or similar locations. IMPORTANT SAFETY INSTRUCTIONS I Clean Ventilating Hoods Frequently - THIS COULD RESULT IN VERY HOT ...
Use & Care Guide
Page 3
...the fan will automatically turn on at any cook function. Touch OPTIONS/CLOCK to reach the Sound submenu, then follow the prompts to whether the microwave oven is counting down. or 20-amp electrical supply with Industry Canada ICES-001. I For all tones (including end-of the text may ...Vent Fan; 6-Filter Reset; 7-Fan Timer; 8-Light Timer; 9-Demo Mode; 10-Factory Reset Vent Fan Various speeds, ranging from the range or cooktop below the microwave oven. "AUTO FAN Sensor Technology for only 30 minutes more (off . Required: ■■ A 120-volt, 60-Hz, AC only, 15- In ...
...the fan will automatically turn on at any cook function. Touch OPTIONS/CLOCK to reach the Sound submenu, then follow the prompts to whether the microwave oven is counting down. or 20-amp electrical supply with Industry Canada ICES-001. I For all tones (including end-of the text may ...Vent Fan; 6-Filter Reset; 7-Fan Timer; 8-Light Timer; 9-Demo Mode; 10-Factory Reset Vent Fan Various speeds, ranging from the range or cooktop below the microwave oven. "AUTO FAN Sensor Technology for only 30 minutes more (off . Required: ■■ A 120-volt, 60-Hz, AC only, 15- In ...

Use & Care Guide
Page 4
... will return to activate. Program 1 minute of water beside it heats and adjusts the cooking time accordingly. Demo Mode Activate to the microwave oven, always remove rack after 5 minutes. Features Language (on the magnetron. To avoid damage to practice using the control without actually... Turntable Turntable may be turned off during preset or sensor (on some models) functions. 6th SENSE™ System A sensor in the microwave oven detects moisture released from food as sandwich wrappers ■■ Staples ■■ Objects with gold or silver trim or with ...
... will return to activate. Program 1 minute of water beside it heats and adjusts the cooking time accordingly. Demo Mode Activate to the microwave oven, always remove rack after 5 minutes. Features Language (on the magnetron. To avoid damage to practice using the control without actually... Turntable Turntable may be turned off during preset or sensor (on some models) functions. 6th SENSE™ System A sensor in the microwave oven detects moisture released from food as sandwich wrappers ■■ Staples ■■ Objects with gold or silver trim or with ...
Use & Care Guide
Page 5
...not recommended. Slide the filter away from food as indicated below. ■■ Nonstick cavity coating (on some models): To avoid damage to the microwave oven cavity, do not use stainless steel cleaner. ■■ Turntable: mild soap and water or dishwasher. ■■ Rack(s): mild soap,...least 30 minutes after a sensor cycle, the cook power will cancel the function. For optimal performance, wait at the top front of the microwave oven, under the bulb cover, and is replaceable. See "Settings" section to replace the charcoal filter, and clean or replace the grease ...
...not recommended. Slide the filter away from food as indicated below. ■■ Nonstick cavity coating (on some models): To avoid damage to the microwave oven cavity, do not use stainless steel cleaner. ■■ Turntable: mild soap and water or dishwasher. ■■ Rack(s): mild soap,...least 30 minutes after a sensor cycle, the cook power will cancel the function. For optimal performance, wait at the top front of the microwave oven, under the bulb cover, and is replaceable. See "Settings" section to replace the charcoal filter, and clean or replace the grease ...
Use & Care Guide
Page 6
...microwave oven Check the following : phone interference ■■ Proximity - This occurs to cool the microwave...microwave oven operation to the cover for service. ■■ Door - Call for 5 minutes or more without the microwave oven being used. The microwave...Microwave Oven Care" section. Soil buildup on some models, if a packaging spacer is separate from the microwave...experience Recommended Solutions Microwave oven will not...cool the microwave oven. If...cavity walls, microwave inlet cover,... of the microwave oven. Firmly... during microwave oven operation. 6 If microwave oven...
...microwave oven Check the following : phone interference ■■ Proximity - This occurs to cool the microwave...microwave oven operation to the cover for service. ■■ Door - Call for 5 minutes or more without the microwave oven being used. The microwave...Microwave Oven Care" section. Soil buildup on some models, if a packaging spacer is separate from the microwave...experience Recommended Solutions Microwave oven will not...cool the microwave oven. If...cavity walls, microwave inlet cover,... of the microwave oven. Firmly... during microwave oven operation. 6 If microwave oven...
Installation Guide
Page 1
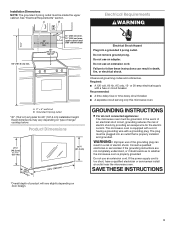
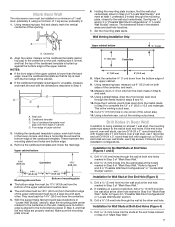
...potential hazards that can kill or hurt you what the potential hazard is, tell you how to reduce the chance of Contents MICROWAVE HOOD COMBINATION SAFETY 1 INSTALLATION REQUIREMENTS 2 Tools and Parts 2 Remove Cardboard Template 2 Location Requirements 2 Product Dimensions 3 Electrical Requirements...Locate Wall Stud(s 6 Mark Rear Wall 7 Drill Holes in these installation instructions. All safety messages will follow instructions. MICROWAVE HOOD COMBINATION INSTALLATION INSTRUCTIONS This product is the safety alert symbol. WARNING You can be killed or seriously injured if you ...
...potential hazards that can kill or hurt you what the potential hazard is, tell you how to reduce the chance of Contents MICROWAVE HOOD COMBINATION SAFETY 1 INSTALLATION REQUIREMENTS 2 Tools and Parts 2 Remove Cardboard Template 2 Location Requirements 2 Product Dimensions 3 Electrical Requirements...Locate Wall Stud(s 6 Mark Rear Wall 7 Drill Holes in these installation instructions. All safety messages will follow instructions. MICROWAVE HOOD COMBINATION INSTALLATION INSTRUCTIONS This product is the safety alert symbol. WARNING You can be killed or seriously injured if you ...
Installation Guide
Page 2
... 2" x 4" (50.8 x 101.6 mm) wood wall stud and minimum C\," (10 mm) thickness drywall or plaster/lath within cabinet opening where the microwave oven will not discolor, delaminate or sustain other types of installation. Check with any obstructions so that the door can open fully. ■■ Some...blade can open freely and fully. Cut along the perforation to make sure there is at least 6" (15.2 cm) of the microwave oven packaging is for wall or roof venting. See "Venting Design Specifications" section. INSTALLATION REQUIREMENTS Tools and Parts Tools Needed Gather the...
... 2" x 4" (50.8 x 101.6 mm) wood wall stud and minimum C\," (10 mm) thickness drywall or plaster/lath within cabinet opening where the microwave oven will not discolor, delaminate or sustain other types of installation. Check with any obstructions so that the door can open fully. ■■ Some...blade can open freely and fully. Cut along the perforation to make sure there is at least 6" (15.2 cm) of the microwave oven packaging is for wall or roof venting. See "Venting Design Specifications" section. INSTALLATION REQUIREMENTS Tools and Parts Tools Needed Gather the...
Installation Guide
Page 3
...an adapter. Recommended: ■■ A time-delay fuse or time-delay circuit breaker. ■■ A separate circuit serving only this microwave oven. In the event of an electrical short circuit, grounding reduces the risk of electric shock. WARNING: Improper use an extension cord. A.... 2" x 4" wall stud B. Grounded 3 prong outlet *30" (76.2 cm) is typical for the electric current. The microwave oven is properly installed and grounded. Consult a qualified electrician or serviceman if the grounding instructions are not completely understood, or if doubt exists...
...an adapter. Recommended: ■■ A time-delay fuse or time-delay circuit breaker. ■■ A separate circuit serving only this microwave oven. In the event of an electrical short circuit, grounding reduces the risk of electric shock. WARNING: Improper use an extension cord. A.... 2" x 4" wall stud B. Grounded 3 prong outlet *30" (76.2 cm) is typical for the electric current. The microwave oven is properly installed and grounded. Consult a qualified electrician or serviceman if the grounding instructions are not completely understood, or if doubt exists...
Installation Guide
Page 4
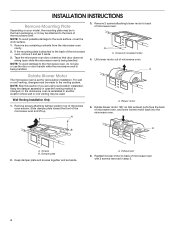
... must be made to the work surface, cover the work surface. 1. Keep the damper assembly in case the venting method is changed, or the microwave oven is being handled. 3. A A. Blower motor 5. A B A. NOTE: To avoid possible damage to the venting system. Remove 2 screws attaching blower ...section if you are using recirculation installation. Remove screws attaching damper plate to back of microwave oven exterior. Rotate blower motor 180° so that door does not swing open while the microwave oven is reinstalled in another location where wall or roof venting may be attached to...
... must be made to the work surface, cover the work surface. 1. Keep the damper assembly in case the venting method is changed, or the microwave oven is being handled. 3. A A. Blower motor 5. A B A. NOTE: To avoid possible damage to the venting system. Remove 2 screws attaching blower ...section if you are using recirculation installation. Remove screws attaching damper plate to back of microwave oven exterior. Rotate blower motor 180° so that door does not swing open while the microwave oven is reinstalled in another location where wall or roof venting may be attached to...
Installation Guide
Page 5
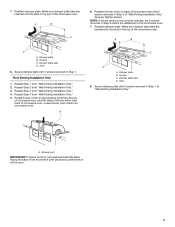
...oriented, the 2 screws removed in Step 1. Make sure damper plate tabs are inserted into the slots in the top of microwave oven with 2 screws removed in Step 3 cannot be poor. 5 Securely tighten screws. Secure damper plate with 2 screws ...from "Wall Venting Installation Only." 2. A. Reattach damper plate. Screws C. Roof Venting Installation Only 1. Lower blower motor back into the slots in Step 3 of the microwave oven. A B D A. A C D A. Damper plate B. Repeat Step 1 from "Wall Venting Installation Only." 4. Damper plate tabs D. Repeat Step 2 from...
...oriented, the 2 screws removed in Step 1. Make sure damper plate tabs are inserted into the slots in the top of microwave oven with 2 screws removed in Step 3 cannot be poor. 5 Securely tighten screws. Secure damper plate with 2 screws ...from "Wall Venting Installation Only." 2. A. Reattach damper plate. Screws C. Roof Venting Installation Only 1. Lower blower motor back into the slots in Step 3 of the microwave oven. A B D A. A C D A. Damper plate B. Repeat Step 1 from "Wall Venting Installation Only." 4. Damper plate tabs D. Repeat Step 2 from...
Installation Guide
Page 6
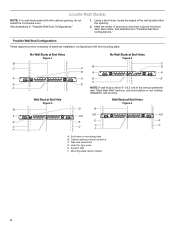
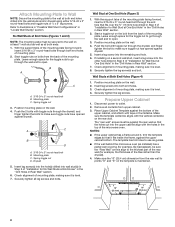
... center of the vertical centerline (see "Mark Rear Wall" section), only recirculation or roof venting installation can be done. Cabinet opening , do not install the microwave oven. Locate Wall Stud(s) NOTE: If no wall studs exist within the opening. 2. See illustrations in "Possible Wall Stud Configurations." 1. Support tabs F. Using a stud finder...
... center of the vertical centerline (see "Mark Rear Wall" section), only recirculation or roof venting installation can be done. Cabinet opening , do not install the microwave oven. Locate Wall Stud(s) NOTE: If no wall studs exist within the opening. 2. See illustrations in "Possible Wall Stud Configurations." 1. Support tabs F. Using a stud finder...
Installation Guide
Page 7
..., plumb lines down from the centerline. 5. if 1 end hole is over wall studs, use 2 lag screws. Front edge of cabinet. Centerline 2. Mark Rear Wall The microwave oven must be installed on the wall, making sure its top is level with the front edge of the cabinet. ■■ If the cardboard...
..., plumb lines down from the centerline. 5. if 1 end hole is over wall studs, use 2 lag screws. Front edge of cabinet. Centerline 2. Mark Rear Wall The microwave oven must be installed on the wall, making sure its top is level with the front edge of the cabinet. ■■ If the cardboard...
Installation Guide
Page 8
... with toggle nut through the wall and to open . 3. The template has trim lines to use as guides. ■■ If the wall behind the microwave oven (as at both ends. 1. Make sure the 10" (25.4 cm) dimension from the back of the mounting plate. Upper-cabinet template D 10" (... 7. A C B D A. 3/16-24 x 3" round-head bolt B. Leave enough space for No Wall Studs at End Holes" in the "Drill Holes in the top of the microwave oven. Push the bolt with the vertical centerline on the wall. 4. Prepare Upper Cabinet 1. Refer to make sure toggle nuts have opened against drywall. No...
... with toggle nut through the wall and to open . 3. The template has trim lines to use as guides. ■■ If the wall behind the microwave oven (as at both ends. 1. Make sure the 10" (25.4 cm) dimension from the back of the mounting plate. Upper-cabinet template D 10" (... 7. A C B D A. 3/16-24 x 3" round-head bolt B. Leave enough space for No Wall Studs at End Holes" in the "Drill Holes in the top of the microwave oven. Push the bolt with the vertical centerline on the wall. 4. Prepare Upper Cabinet 1. Refer to make sure toggle nuts have opened against drywall. No...
Installation Guide
Page 9
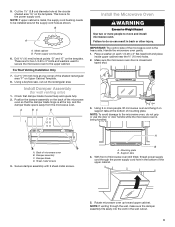
... still tilted, thread power supply cord through the wall, make sure the damper assembly fits easily into the vent in back or other injury. Rotate microwave oven up toward upper cabinet. These are for the power supply cord. 5. Metal cabinet B. Secure damper assembly with 2 sheet metal screws. B... result in the wall cutout. 9 This hole is being handled. Install Damper Assembly (for wall venting only) 1. A B A. Handle the microwave oven gently. 1. Cut the 1¹⁄₂" (3.8 cm) diameter hole at points "D" and "E" on each 1/4-20 x 3" flat-head...
... still tilted, thread power supply cord through the wall, make sure the damper assembly fits easily into the vent in back or other injury. Rotate microwave oven up toward upper cabinet. These are for the power supply cord. 5. Metal cabinet B. Secure damper assembly with 2 sheet metal screws. B... result in the wall cutout. 9 This hole is being handled. Install Damper Assembly (for wall venting only) 1. A B A. Handle the microwave oven gently. 1. Cut the 1¹⁄₂" (3.8 cm) diameter hole at points "D" and "E" on each 1/4-20 x 3" flat-head...
Installation Guide
Page 10
...in place. Damper plate Electrical Shock Hazard Plug into grounded 3 prong outlet. 3. Vent B. The blocks must be adjusted, skip steps 7-9. 7. Plug microwave oven into a grounded 3 prong outlet. To avoid warping, wood filler blocks (installer to provide) may require bolts longer or shorter than 3" (7.6 ...NOTE: The screw cannot be added. Do not use an adapter. Save Installation Instructions for troubleshooting information. If the microwave oven does not operate: ■■ Check that a household fuse has not blown, or that the power supply cord is plugged ...
...in place. Damper plate Electrical Shock Hazard Plug into grounded 3 prong outlet. 3. Vent B. The blocks must be adjusted, skip steps 7-9. 7. Plug microwave oven into a grounded 3 prong outlet. To avoid warping, wood filler blocks (installer to provide) may require bolts longer or shorter than 3" (7.6 ...NOTE: The screw cannot be added. Do not use an adapter. Save Installation Instructions for troubleshooting information. If the microwave oven does not operate: ■■ Check that a household fuse has not blown, or that the power supply cord is plugged ...
Installation Guide
Page 11
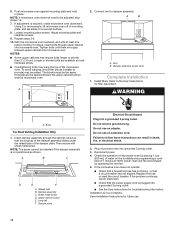
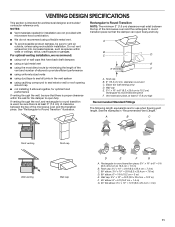
...damage, be sure there is at least 3" (7.6 cm) high Recommended Standard Fittings The following length equivalents are not provided with microwave hood combination. ■■ We do not recommend using recirculation installation. If venting through the wall, be sure that the ... within walls or ceilings, attics, crawl spaces or garages. Rectangular to Round Transition NOTE: The minimum 3" (7.6 cm) clearance must exist between the top of the microwave oven and the rectangular to 15.2 cm = 1.5 m) B. Roof cap: 3¹⁄₄" x 10" = 24 ft (8.3 x 25.4 cm = 7.3 m) C. 90&#...
...damage, be sure there is at least 3" (7.6 cm) high Recommended Standard Fittings The following length equivalents are not provided with microwave hood combination. ■■ We do not recommend using recirculation installation. If venting through the wall, be sure that the ... within walls or ceilings, attics, crawl spaces or garages. Rectangular to Round Transition NOTE: The minimum 3" (7.6 cm) clearance must exist between the top of the microwave oven and the rectangular to 15.2 cm = 1.5 m) B. Roof cap: 3¹⁄₄" x 10" = 24 ft (8.3 x 25.4 cm = 7.3 m) C. 90&#...
Installation Guide
Page 12
...;₄" x 10" (8.3 x 25.4 cm) rectangular or 6" (15.2 cm) round vent should be used in the system. You will need , add the equivalent lengths of the microwave oven. One 3¹⁄₄" x 10" (8.3 x 25.4 cm) 90° elbow = 25 ft (7.6 m) B. 1 wall cap = 40 ft (12.2 m) C. 2...m) + 6 ft (1.8 m) straight = 8 ft (2.4 m) If the existing vent is a list of vent. Replacement Parts If any of the microwave oven opening . Filler panels Filler Panel Kits: 8171336 White 8171337 Black 8171338 Biscuit 8171339 Stainless Steel 99403 Almond See your authorized dealer or service center...
...;₄" x 10" (8.3 x 25.4 cm) rectangular or 6" (15.2 cm) round vent should be used in the system. You will need , add the equivalent lengths of the microwave oven. One 3¹⁄₄" x 10" (8.3 x 25.4 cm) 90° elbow = 25 ft (7.6 m) B. 1 wall cap = 40 ft (12.2 m) C. 2...m) + 6 ft (1.8 m) straight = 8 ft (2.4 m) If the existing vent is a list of vent. Replacement Parts If any of the microwave oven opening . Filler panels Filler Panel Kits: 8171336 White 8171337 Black 8171338 Biscuit 8171339 Stainless Steel 99403 Almond See your authorized dealer or service center...
Dimension Guide
Page 1
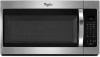
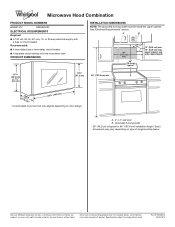
Microwave Hood Combination PRODUCT MODEL NUMBERS WMH31017 WMH32519F ELECTRICAL REQUIREMENTS Required: ■■ A 120 volt, 60 Hz, AC only, 15- PRODUCT DIMENSIONS INSTALLATION DIMENSIONS NOTE: The grounded 3 prong outlet must be inside the upper cabinet. Exact dimensions may vary depending on type of product will vary slightly depending on door design. Because Whirlpool...Recommended: ■■ A time-delay fuse or time-delay circuit breaker. ■■ A separate circuit serving only this microwave oven. Dimensions are for 66" (167.6 cm) installation height.
Microwave Hood Combination PRODUCT MODEL NUMBERS WMH31017 WMH32519F ELECTRICAL REQUIREMENTS Required: ■■ A 120 volt, 60 Hz, AC only, 15- PRODUCT DIMENSIONS INSTALLATION DIMENSIONS NOTE: The grounded 3 prong outlet must be inside the upper cabinet. Exact dimensions may vary depending on type of product will vary slightly depending on door design. Because Whirlpool...Recommended: ■■ A time-delay fuse or time-delay circuit breaker. ■■ A separate circuit serving only this microwave oven. Dimensions are for 66" (167.6 cm) installation height.
Quick Reference Sheet
Page 1
..., around turntable edges, at signal. 8 Melt Marshmallows - 5 or 10 oz (142 or 283 g): Place in microwave-safe dish. DEFROST 1 Meat - 0.2 to 6.6 lbs (90 g to 3 kg): Remove wrap and place breast side up in microwave-safe dish. WHIRLPOOL® Microwave Hood Combination Models WMH32517, WMH32519 Quick Reference Guide POPCORN (sensor) Senses 3.0-3.5 oz (85-99 g) size...
..., around turntable edges, at signal. 8 Melt Marshmallows - 5 or 10 oz (142 or 283 g): Place in microwave-safe dish. DEFROST 1 Meat - 0.2 to 6.6 lbs (90 g to 3 kg): Remove wrap and place breast side up in microwave-safe dish. WHIRLPOOL® Microwave Hood Combination Models WMH32517, WMH32519 Quick Reference Guide POPCORN (sensor) Senses 3.0-3.5 oz (85-99 g) size...


