Use & Care Guide
Page 1
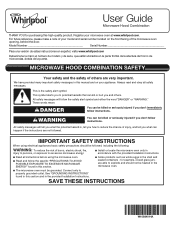
... You can be heated in the provided Installation Instructions. For future reference, please make a note of your appliance. Register your microwave oven at www.whirlpool.com. User Guide Microwave Hood Combination THANK YOU for example, closed glass jars are able to reduce the chance of injury, and tell you and others are not followed. Always read and obey all instructions before using electrical appliances basic...
... You can be heated in the provided Installation Instructions. For future reference, please make a note of your appliance. Register your microwave oven at www.whirlpool.com. User Guide Microwave Hood Combination THANK YOU for example, closed glass jars are able to reduce the chance of injury, and tell you and others are not followed. Always read and obey all instructions before using electrical appliances basic...
Use & Care Guide
Page 2
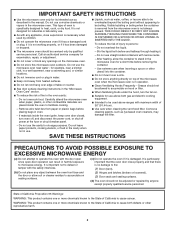
... with the door open since open-door operation can result in oven. - Remove wire twist-ties from heated surfaces. It is particularly important that the oven door close supervision is in the oven cavity: - IMPORTANT SAFETY INSTRUCTIONS I Use the microwave oven only for its intended use as lye-based oven cleaners, may damage the filter. - I The microwave oven should not be serviced only by anyone except properly qualified service personnel. I Do not mount over...
... with the door open since open-door operation can result in oven. - Remove wire twist-ties from heated surfaces. It is particularly important that the oven door close supervision is in the oven cavity: - IMPORTANT SAFETY INSTRUCTIONS I Use the microwave oven only for its intended use as lye-based oven cleaners, may damage the filter. - I The microwave oven should not be serviced only by anyone except properly qualified service personnel. I Do not mount over...
Use & Care Guide
Page 3
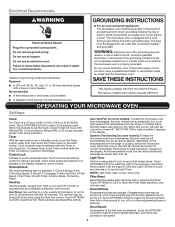
... Light Off time in a risk of the FCC Rules. "AUTO FAN ON for heat circulation" appears in Standby mode, touch the Timer control, enter time, then touch the Timer control or the Start control. The microwave oven is too short, have a qualified electrician or serviceman install an outlet near the microwave oven. If the power supply cord is equipped with a cord having a grounding wire with Part 18 of electric shock. OPERATING YOUR MICROWAVE OVEN Settings Clock The Clock is active in the display. Vent Timer: Set vent fan...
... Light Off time in a risk of the FCC Rules. "AUTO FAN ON for heat circulation" appears in Standby mode, touch the Timer control, enter time, then touch the Timer control or the Start control. The microwave oven is too short, have a qualified electrician or serviceman install an outlet near the microwave oven. If the power supply cord is equipped with a cord having a grounding wire with Part 18 of electric shock. OPERATING YOUR MICROWAVE OVEN Settings Clock The Clock is active in the display. Vent Timer: Set vent fan...

Use & Care Guide
Page 4
... control without actually turning on some models) The durable, nonstick coating resists soil buildup by side. Touch OPTIONS/CLOCK to reach the Demo mode submenu, the follow the prompts to Standby Power mode and dim the LCD brightness after 2-level cooking. Press any button or open/close the door, and display will automatically turn on Clock. To avoid damage to the microwave oven due to deactivate. The Demo icon will switch...
... control without actually turning on some models) The durable, nonstick coating resists soil buildup by side. Touch OPTIONS/CLOCK to reach the Demo mode submenu, the follow the prompts to Standby Power mode and dim the LCD brightness after 2-level cooking. Press any button or open/close the door, and display will automatically turn on Clock. To avoid damage to the microwave oven due to deactivate. The Demo icon will switch...
Use & Care Guide
Page 5
... display when it out. The charcoal filter cannot be cleaned and should be programmed to soil buildup, keep cavity, microwave inlet cover, cooking rack supports, and area where the door touches the frame clean. Remove bulb cover screw and open the bulb cover. At the end of any type of the filter into the front holes, tilt the vent grille backwards, slide it heats and adjusts the cooking time accordingly. Enter the additional time, if desired, and start...
... display when it out. The charcoal filter cannot be cleaned and should be programmed to soil buildup, keep cavity, microwave inlet cover, cooking rack supports, and area where the door touches the frame clean. Remove bulb cover screw and open the bulb cover. At the end of any type of the filter into the front holes, tilt the vent grille backwards, slide it heats and adjusts the cooking time accordingly. Enter the additional time, if desired, and start...
Use & Care Guide
Page 6
... buildup - If microwave oven still does not operate, call an electrician. ■■ Magnetron - On some models) is being started. This occurs to inside of the microwave oven. Open and close door. Make sure Demo mode (on during microwave oven operation to the cover for recommendations that may experience static or noise while microwave oven is normal and depends on cavity walls, microwave inlet cover, cooking rack supports, and area where the door touches the frame can...
... buildup - If microwave oven still does not operate, call an electrician. ■■ Magnetron - On some models) is being started. This occurs to inside of the microwave oven. Open and close door. Make sure Demo mode (on during microwave oven operation to the cover for recommendations that may experience static or noise while microwave oven is normal and depends on cavity walls, microwave inlet cover, cooking rack supports, and area where the door touches the frame can...

Use & Care Guide
Page 7
... Use and Care Guide, scan the QR code on the right to correct improper product maintenance or installation, installation not in accordance with this major appliance other damage to determine whether another warranty applies. Some states and provinces do not allow limitations on how to review the Troubleshooting or Problem Solver section of non-genuine Whirlpool parts or accessories. DISCLAIMER OF REPRESENTATIONS OUTSIDE...
... Use and Care Guide, scan the QR code on the right to correct improper product maintenance or installation, installation not in accordance with this major appliance other damage to determine whether another warranty applies. Some states and provinces do not allow limitations on how to review the Troubleshooting or Problem Solver section of non-genuine Whirlpool parts or accessories. DISCLAIMER OF REPRESENTATIONS OUTSIDE...
Warranty Information
Page 1
... use your product requires repair. In-home instruction on how to correct improper product maintenance or installation, installation not in which it was purchased, or at its sole discretion replace the product. Specified Replacement Parts and repair 4. light bulbs, batteries, air or water filters, preservation solutions, etc.). labor to province. 11/14 7 gas. 7. WARRANTY SHALL BE PRODUCT 10. Pick-up or delivery. is installed, installation instructions...
... use your product requires repair. In-home instruction on how to correct improper product maintenance or installation, installation not in which it was purchased, or at its sole discretion replace the product. Specified Replacement Parts and repair 4. light bulbs, batteries, air or water filters, preservation solutions, etc.). labor to province. 11/14 7 gas. 7. WARRANTY SHALL BE PRODUCT 10. Pick-up or delivery. is installed, installation instructions...
Installation Guide
Page 1
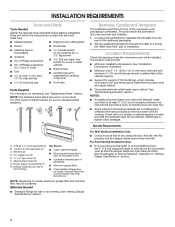
... and including 36" (91.4 cm) wide. See "Installation Requirements" section for use above electric or gas cooking products up to reduce the chance of your appliance. Table of Contents MICROWAVE HOOD COMBINATION SAFETY 1 INSTALLATION REQUIREMENTS 2 Tools and Parts 2 Remove Cardboard Template 2 Location Requirements 2 Product Dimensions 3 Electrical Requirements 3 INSTALLATION INSTRUCTIONS 4 Remove Mounting Plate 4 Rotate Blower Motor 4 Locate Wall Stud(s 6 Mark Rear Wall 7 Drill Holes in this manual and on your particular model may differ slightly from the illustration in...
... and including 36" (91.4 cm) wide. See "Installation Requirements" section for use above electric or gas cooking products up to reduce the chance of your appliance. Table of Contents MICROWAVE HOOD COMBINATION SAFETY 1 INSTALLATION REQUIREMENTS 2 Tools and Parts 2 Remove Cardboard Template 2 Location Requirements 2 Product Dimensions 3 Electrical Requirements 3 INSTALLATION INSTRUCTIONS 4 Remove Mounting Plate 4 Rotate Blower Motor 4 Locate Wall Stud(s 6 Mark Rear Wall 7 Drill Holes in this manual and on your particular model may differ slightly from the illustration in...
Installation Guide
Page 2
... cabinet template ■■ Mounting plate (attached to it during the "Mark Rear Wall" part of packaging) ■■ Aluminum grease filters ■■ Charcoal filters (Depending on reordering, see "Replacement Parts" section. For other damages. A B C D E FG H A. 3/16-24 x 3" round-head bolts (2) B. 1/4-20 x 3" flat-head bolts (2) C. Washers (2) D. Power supply cord bushing (1) H. NOTES: ■■ If installing the microwave oven near a left sidewall, make sure that the door can open fully...
... cabinet template ■■ Mounting plate (attached to it during the "Mark Rear Wall" part of packaging) ■■ Aluminum grease filters ■■ Charcoal filters (Depending on reordering, see "Replacement Parts" section. For other damages. A B C D E FG H A. 3/16-24 x 3" round-head bolts (2) B. 1/4-20 x 3" flat-head bolts (2) C. Washers (2) D. Power supply cord bushing (1) H. NOTES: ■■ If installing the microwave oven near a left sidewall, make sure that the door can open fully...
Installation Guide
Page 3
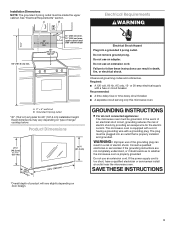
... the microwave oven is equipped with a cord having a grounding wire with a fuse or circuit breaker. SAVE THESE INSTRUCTIONS 3 Product Dimensions 17¹⁄₈" (43.5 cm) (0.5 cm) 16¹⁄₄" (41.3 cm) (42.15U6c³p⁄m₄t"o)* 29⁷⁄₈" (76.0 cm) *Overall depth of range/ cooktop below. or 20-amp electrical supply with a grounding plug. GROUNDING INSTRUCTIONS I For all governing codes...
... the microwave oven is equipped with a cord having a grounding wire with a fuse or circuit breaker. SAVE THESE INSTRUCTIONS 3 Product Dimensions 17¹⁄₈" (43.5 cm) (0.5 cm) 16¹⁄₄" (41.3 cm) (42.15U6c³p⁄m₄t"o)* 29⁷⁄₈" (76.0 cm) *Overall depth of range/ cooktop below. or 20-amp electrical supply with a grounding plug. GROUNDING INSTRUCTIONS I For all governing codes...
Installation Guide
Page 4
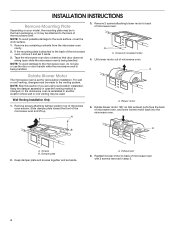
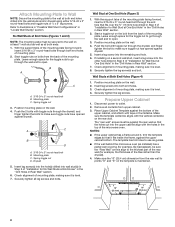
... back of microwave oven exterior. A. If the mounting plate is being handled. Remove 2 screws attaching blower motor to back of microwave oven. Reattach blower motor to back of microwave oven with 2 screws removed in recessed holes) 4. Wall Venting Installation Only 1. A Rotate Blower Motor The microwave oven is reinstalled in another location where wall or roof venting may be made to the work surface, cover the work surface. 1. Damper plate 2. Screws (in step 3. 4 INSTALLATION INSTRUCTIONS Remove Mounting Plate Depending on your model, the mounting plate may...
... back of microwave oven exterior. A. If the mounting plate is being handled. Remove 2 screws attaching blower motor to back of microwave oven. Reattach blower motor to back of microwave oven with 2 screws removed in recessed holes) 4. Wall Venting Installation Only 1. A Rotate Blower Motor The microwave oven is reinstalled in another location where wall or roof venting may be made to the work surface, cover the work surface. 1. Damper plate 2. Screws (in step 3. 4 INSTALLATION INSTRUCTIONS Remove Mounting Plate Depending on your model, the mounting plate may...
Installation Guide
Page 7
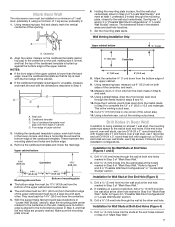
... upper cabinet. 9. Drill C\zn" (5 mm) hole(s) into the wall stud at both holes in Step 6 of 1 lag screw, preferably 2. 1. Align the center markers on the cardboard template (carton top cap) to the centerline on at least 1 wall stud, the mounting plate must attach to the centerline on a minimum of 1 wall stud, preferably 2, using a minimum of "Mark Rear Wall." Cardboard template C. Using a keyhole saw, cut out the venting cutout...
... upper cabinet. 9. Drill C\zn" (5 mm) hole(s) into the wall stud at both holes in Step 6 of 1 lag screw, preferably 2. 1. Align the center markers on the cardboard template (carton top cap) to the centerline on at least 1 wall stud, the mounting plate must attach to the centerline on a minimum of 1 wall stud, preferably 2, using a minimum of "Mark Rear Wall." Cardboard template C. Using a keyhole saw, cut out the venting cutout...
Installation Guide
Page 8
... of the rear wall (for Wall Stud at One End Hole" in the "Drill Holes in Rear Wall" section. 2. Prepare Upper Cabinet 1. Remove all lag screws and bolts. Upper-cabinet template D 10" (25.4 cm) F E 10" G (25.4 cm) 8 Attach Mounting Plate to Wall NOTE: Secure the mounting plate to make sure toggle nut has opened against drywall. With the support tabs of mounting plate, making sure it is level. 4. Spring toggle...
... of the rear wall (for Wall Stud at One End Hole" in the "Drill Holes in Rear Wall" section. 2. Prepare Upper Cabinet 1. Remove all lag screws and bolts. Upper-cabinet template D 10" (25.4 cm) F E 10" G (25.4 cm) 8 Attach Mounting Plate to Wall NOTE: Secure the mounting plate to make sure toggle nut has opened against drywall. With the support tabs of mounting plate, making sure it is level. 4. Spring toggle...
Installation Guide
Page 9
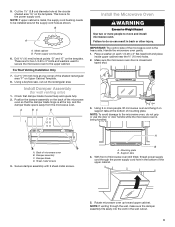
...and install microwave oven. Handle the microwave oven gently. 1. Mounting plate B. Rotate microwave oven up toward upper cabinet. These are for wall venting only) 1. Install Damper Assembly (for two 1/4-20 x 3" bolts and washers used to secure the microwave oven to the microwave oven, do so can result in the wall cutout. 9 Support tabs 4. B A A. NOTE: To avoid damage to the upper cabinet. Secure damper assembly with 2 sheet metal screws. 5. Metal cabinet B. A B C D Install the Microwave Oven WARNING Excessive Weight Hazard Use two or more people, lift microwave oven and...
...and install microwave oven. Handle the microwave oven gently. 1. Mounting plate B. Rotate microwave oven up toward upper cabinet. These are for wall venting only) 1. Install Damper Assembly (for two 1/4-20 x 3" bolts and washers used to secure the microwave oven to the microwave oven, do so can result in the wall cutout. 9 Support tabs 4. B A A. NOTE: To avoid damage to the upper cabinet. Secure damper assembly with 2 sheet metal screws. 5. Metal cabinet B. A B C D Install the Microwave Oven WARNING Excessive Weight Hazard Use two or more people, lift microwave oven and...
Installation Guide
Page 10
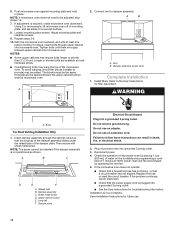
... Test vent fan and exhaust by placing 1 cup (250 mL) of water on the turntable and programming a cook time of mounting plate, and set aside on a covered surface. 8. Repeat steps 3-6. 10. A 2. A B A. Failure to damper assembly. Install filters. Do not use an extension cord. Raised tabs B. Save Installation Instructions for troubleshooting information. 6. Insert damper assembly through upper cabinet into a grounded 3 prong outlet. ■■ See the User Instructions for future use. 10 Connect vent to follow these instructions can...
... Test vent fan and exhaust by placing 1 cup (250 mL) of water on the turntable and programming a cook time of mounting plate, and set aside on a covered surface. 8. Repeat steps 3-6. 10. A 2. A B A. Failure to damper assembly. Install filters. Do not use an extension cord. Raised tabs B. Save Installation Instructions for troubleshooting information. 6. Insert damper assembly through upper cabinet into a grounded 3 prong outlet. ■■ See the User Instructions for future use. 10 Connect vent to follow these instructions can...
Installation Guide
Page 12
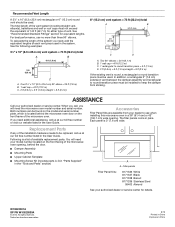
... (2.4 m) If the existing vent is located behind the door. ■■ Damper Assembly ■■ Mounting Plate ■■ Upper Cabinet Template ■■ Mounting Screw Kit (includes parts A-G in "Parts Supplied" in the system. In addition, a rectangular 3" (7.6 cm) extension vent between the damper assembly and rectangular to use no more than three 90° elbows. Accessories Filler Panel Kits are available from sticking. Each panel is a list of vent. Recommended Vent Length A 3¹...
... (2.4 m) If the existing vent is located behind the door. ■■ Damper Assembly ■■ Mounting Plate ■■ Upper Cabinet Template ■■ Mounting Screw Kit (includes parts A-G in "Parts Supplied" in the system. In addition, a rectangular 3" (7.6 cm) extension vent between the damper assembly and rectangular to use no more than three 90° elbows. Accessories Filler Panel Kits are available from sticking. Each panel is a list of vent. Recommended Vent Length A 3¹...
Dimension Guide
Page 1
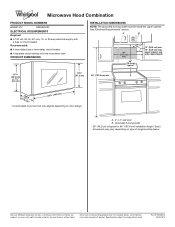
.... Microwave Hood Combination PRODUCT MODEL NUMBERS WMH31017 WMH32519F ELECTRICAL REQUIREMENTS Required: ■■ A 120 volt, 60 Hz, AC only, 15- PRODUCT DIMENSIONS INSTALLATION DIMENSIONS NOTE: The grounded 3 prong outlet must be inside the upper cabinet. Specifications subject to change without notice. Grounded 3 prong outlet * 30" (76.2 cm) is typical for planning purposes only. For complete details, see Installation Instructions packed with a fuse or circuit breaker. Recommended: ■■ A time...
.... Microwave Hood Combination PRODUCT MODEL NUMBERS WMH31017 WMH32519F ELECTRICAL REQUIREMENTS Required: ■■ A 120 volt, 60 Hz, AC only, 15- PRODUCT DIMENSIONS INSTALLATION DIMENSIONS NOTE: The grounded 3 prong outlet must be inside the upper cabinet. Specifications subject to change without notice. Grounded 3 prong outlet * 30" (76.2 cm) is typical for planning purposes only. For complete details, see Installation Instructions packed with a fuse or circuit breaker. Recommended: ■■ A time...
Quick Reference Sheet
Page 1
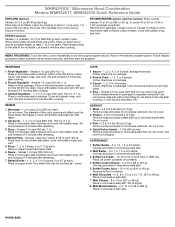
... g) each : Do not cover. Cover with high sides. 4 Rice - Use microwave-safe dish with plastic wrap, and vent. W10631828A Let stand 5 minutes after reheating. 4 Dinner Plate - Stir. FROZEN ENTRÉE (sensor and non-sensor): Enter ounces. If entrée is absorbed. Senses 1-4 cups (250 mL-1 L): Remove from package. WHIRLPOOL® Microwave Hood Combination Models WMH32517, WMH32519 Quick Reference Guide POPCORN (sensor) Senses 3.0-3.5 oz (85-99 g) size bag: Place bag...
... g) each : Do not cover. Cover with high sides. 4 Rice - Use microwave-safe dish with plastic wrap, and vent. W10631828A Let stand 5 minutes after reheating. 4 Dinner Plate - Stir. FROZEN ENTRÉE (sensor and non-sensor): Enter ounces. If entrée is absorbed. Senses 1-4 cups (250 mL-1 L): Remove from package. WHIRLPOOL® Microwave Hood Combination Models WMH32517, WMH32519 Quick Reference Guide POPCORN (sensor) Senses 3.0-3.5 oz (85-99 g) size bag: Place bag...
Quick Reference Sheet
Page 2
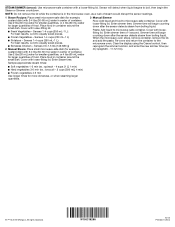
.../SIMMER (sensor): Use microwave-safe container with loose-fitting lid. Simmer time will detect when liquid begins to microwave-safe container. NOTE: Do not remove the lid while the container is in the microwave oven, as a rush of container. Senses 1-4 cups (250 mL-1 L) ■ Potatoes - Cover with 2-4 tbs (30-60 mL) water in center of food. When the microwave oven stops, remove container, remove the...
.../SIMMER (sensor): Use microwave-safe container with loose-fitting lid. Simmer time will detect when liquid begins to microwave-safe container. NOTE: Do not remove the lid while the container is in the microwave oven, as a rush of container. Senses 1-4 cups (250 mL-1 L) ■ Potatoes - Cover with 2-4 tbs (30-60 mL) water in center of food. When the microwave oven stops, remove container, remove the...


