Dimension Guide
Page 1
...) * Overall depth of product will vary slightly depending on type of range/cooktop below. Ref. Specifications subject to change without notice. Microwave Hood Combination PRODUCT MODEL NUMBERS WMH31017 WMH32519F ELECTRICAL REQUIREMENTS Required: ■■ A 120 volt, 60 Hz, AC only, 15- PRODUCT... outlet must be inside the upper cabinet. Exact dimensions may vary depending on door design. Because Whirlpool Corporation includes a continuous commitment to improve our products, we reserve the right to change materials and specifications without notice.
...) * Overall depth of product will vary slightly depending on type of range/cooktop below. Ref. Specifications subject to change without notice. Microwave Hood Combination PRODUCT MODEL NUMBERS WMH31017 WMH32519F ELECTRICAL REQUIREMENTS Required: ■■ A 120 volt, 60 Hz, AC only, 15- PRODUCT... outlet must be inside the upper cabinet. Exact dimensions may vary depending on door design. Because Whirlpool Corporation includes a continuous commitment to improve our products, we reserve the right to change materials and specifications without notice.
Use & Care Guide
Page 1
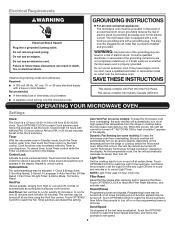
... what the potential hazard is the safety alert symbol. IMPORTANT SAFETY INSTRUCTIONS When using the microwave oven. Register your appliance. Model Number Serial Number Para una versión de estas instrucciones en español, visite www.whirlpool.com Deberá tener a mano el número de modelo y de serie, que est...
... what the potential hazard is the safety alert symbol. IMPORTANT SAFETY INSTRUCTIONS When using the microwave oven. Register your appliance. Model Number Serial Number Para una versión de estas instrucciones en español, visite www.whirlpool.com Deberá tener a mano el número de modelo y de serie, que est...
Use & Care Guide
Page 2
...safety interlocks. (b) Do not place any openings on top of 36" (91.44 cm). - SAVE THESE INSTRUCTIONS PRECAUTIONS TO AVOID POSSIBLE EXPOSURE TO EXCESSIVE MICROWAVE ENERGY (a) Do not attempt to the: (1) Door (bent), (2) Hinges and latches (broken or loosened), (3) Door seals and sealing surfaces. (d) ...or repaired by qualified service personnel. It is particularly important that the oven door close supervision is no damage to operate this microwave oven outdoors. WARNING: This product contains one or more chemicals known to cause birth defects or other utensil into the container....
...safety interlocks. (b) Do not place any openings on top of 36" (91.44 cm). - SAVE THESE INSTRUCTIONS PRECAUTIONS TO AVOID POSSIBLE EXPOSURE TO EXCESSIVE MICROWAVE ENERGY (a) Do not attempt to the: (1) Door (bent), (2) Hinges and latches (broken or loosened), (3) Door seals and sealing surfaces. (d) ...or repaired by qualified service personnel. It is particularly important that the oven door close supervision is no damage to operate this microwave oven outdoors. WARNING: This product contains one or more chemicals known to cause birth defects or other utensil into the container....
Use & Care Guide
Page 3
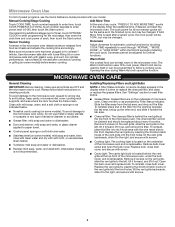
...follow the prompts to set in the Clock submenu. The plug must be turned off after replacing and/or cleaning the filters. OPERATING YOUR MICROWAVE OVEN Settings Clock The Clock is equipped with a cord having a grounding wire with a fuse or circuit breaker. Control Lock Activate to ... Reset; 7-Fan Timer; 8-Light Timer; 9-Demo Mode; 10-Factory Reset Vent Fan Various speeds, ranging from the range or cooktop below the microwave oven. In the event of an electrical short circuit, grounding reduces the risk of -function signals) may be turned off at certain times. WARNING...
...follow the prompts to set in the Clock submenu. The plug must be turned off after replacing and/or cleaning the filters. OPERATING YOUR MICROWAVE OVEN Settings Clock The Clock is equipped with a cord having a grounding wire with a fuse or circuit breaker. Control Lock Activate to ... Reset; 7-Fan Timer; 8-Light Timer; 9-Demo Mode; 10-Factory Reset Vent Fan Various speeds, ranging from the range or cooktop below the microwave oven. In the event of an electrical short circuit, grounding reduces the risk of -function signals) may be turned off at certain times. WARNING...
Use & Care Guide
Page 4
...the follow the prompts to set ), oven will automatically turn on some models) functions. 6th SENSE™ System A sensor in the microwave oven detects moisture released from food as sandwich wrappers ■■ Staples ■■ Objects with gold or silver trim or with...and dim the LCD brightness after 2-level cooking. Touch the OPTIONS/CLOCK to reach the Language submenu, and follow the prompts to activate. Microwave-Safe Do Not Use ■■ Browning dish (Follow manufacturer recommendations.) ■■ Metal cookware and bakeware ■■ Ceramic glass...
...the follow the prompts to set ), oven will automatically turn on some models) functions. 6th SENSE™ System A sensor in the microwave oven detects moisture released from food as sandwich wrappers ■■ Staples ■■ Objects with gold or silver trim or with...and dim the LCD brightness after 2-level cooking. Touch the OPTIONS/CLOCK to reach the Language submenu, and follow the prompts to activate. Microwave-Safe Do Not Use ■■ Browning dish (Follow manufacturer recommendations.) ■■ Metal cookware and bakeware ■■ Ceramic glass...
Use & Care Guide
Page 5
...filter away from food as in the display. Replace bulb, close bulb cover. Replace the vent grille by touching COOK TIME repeatedly to the microwave oven cavity, do not use stainless steel cleaner. ■■ Turntable: mild soap and water or dishwasher. ■■ Rack(s): ...filters. Remove 2 screws on some models) before sensor cooking. For optimal performance, wait at least 1 minute. Sensor Cooking A sensor in the microwave oven. To reinstall, place the filter into the front holes, tilt the vent grille backwards, slide it out. See "Settings" section to reset...
...filter away from food as in the display. Replace bulb, close bulb cover. Replace the vent grille by touching COOK TIME repeatedly to the microwave oven cavity, do not use stainless steel cleaner. ■■ Turntable: mild soap and water or dishwasher. ■■ Rack(s): ...filters. Remove 2 screws on some models) before sensor cooking. For optimal performance, wait at least 1 minute. Sensor Cooking A sensor in the microwave oven. To reinstall, place the filter into the front holes, tilt the vent grille backwards, slide it out. See "Settings" section to reset...
Use & Care Guide
Page 6
.... Make sure the microwave oven door and sealing surfaces are clean. ■■ Frequency - rotation directions Display shows messages ■■ "Enter clock" with your mobile device, or visit www.whirlpool.com/product_help for service. ■■ Door - Radio, TV, or cordless Check the following : ■■ Household fuse or circuit breaker...
.... Make sure the microwave oven door and sealing surfaces are clean. ■■ Frequency - rotation directions Display shows messages ■■ "Enter clock" with your mobile device, or visit www.whirlpool.com/product_help for service. ■■ Door - Radio, TV, or cordless Check the following : ■■ Household fuse or circuit breaker...
Installation Guide
Page 1
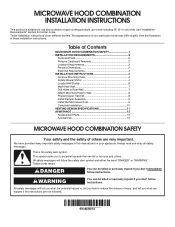
...or gas cooking products up to Wall 8 Prepare Upper Cabinet 8 Install Damper Assembly 9 Install the Microwave Oven 9 Complete Installation 10 VENTING DESIGN SPECIFICATIONS 11 ASSISTANCE 12 Replacement Parts 12 Accessories 12 MICROWAVE HOOD COMBINATION SAFETY Your safety and the safety of injury, and tell you and others are not ... your particular model may differ slightly from the illustration in Rear Wall 7 Attach Mounting Plate to and including 36" (91.4 cm) wide. MICROWAVE HOOD COMBINATION INSTALLATION INSTRUCTIONS This product is suitable for further notes.
...or gas cooking products up to Wall 8 Prepare Upper Cabinet 8 Install Damper Assembly 9 Install the Microwave Oven 9 Complete Installation 10 VENTING DESIGN SPECIFICATIONS 11 ASSISTANCE 12 Replacement Parts 12 Accessories 12 MICROWAVE HOOD COMBINATION SAFETY Your safety and the safety of injury, and tell you and others are not ... your particular model may differ slightly from the illustration in Rear Wall 7 Attach Mounting Plate to and including 36" (91.4 cm) wide. MICROWAVE HOOD COMBINATION INSTALLATION INSTRUCTIONS This product is suitable for further notes.
Installation Guide
Page 2
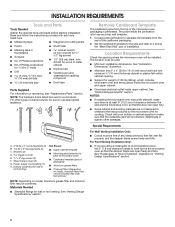
... screws ■■ 1½" (3.8 cm) diam. For Roof Venting Installation Only: ■■ If you are not designed to back of microwave oven) ■■ Cardboard template (part of any tools listed here. ■■ Measuring tape ■■ Diagonal wire cutting pliers ■...) Not Shown: ■■ Upper cabinet template ■■ Mounting plate (attached to withstand the heat produced by the microwave oven for use appropriate fasteners. Set the cardboard template to the side and refer to Round Transition" illustration in "Venting Design ...
... screws ■■ 1½" (3.8 cm) diam. For Roof Venting Installation Only: ■■ If you are not designed to back of microwave oven) ■■ Cardboard template (part of any tools listed here. ■■ Measuring tape ■■ Diagonal wire cutting pliers ■...) Not Shown: ■■ Upper cabinet template ■■ Mounting plate (attached to withstand the heat produced by the microwave oven for use appropriate fasteners. Set the cardboard template to the side and refer to Round Transition" illustration in "Venting Design ...
Installation Guide
Page 3
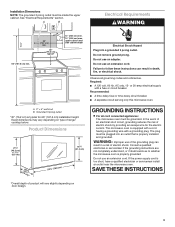
....6 cm) max. Recommended: ■■ A time-delay fuse or time-delay circuit breaker. ■■ A separate circuit serving only this microwave oven. GROUNDING INSTRUCTIONS I For all governing codes and ordinances. WARNING: Improper use an extension cord. Do not use an adapter. If the power supply... the event of an electrical short circuit, grounding reduces the risk of range/ cooktop below. Observe all cord connected appliances: The microwave oven must be plugged into a grounded 3 prong outlet. The plug must be inside the upper cabinet. Do not remove ground prong...
....6 cm) max. Recommended: ■■ A time-delay fuse or time-delay circuit breaker. ■■ A separate circuit serving only this microwave oven. GROUNDING INSTRUCTIONS I For all governing codes and ordinances. WARNING: Improper use an extension cord. Do not use an adapter. If the power supply... the event of an electrical short circuit, grounding reduces the risk of range/ cooktop below. Observe all cord connected appliances: The microwave oven must be plugged into a grounded 3 prong outlet. The plug must be inside the upper cabinet. Do not remove ground prong...
Installation Guide
Page 4
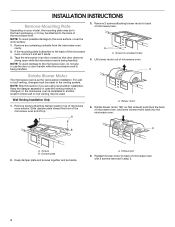
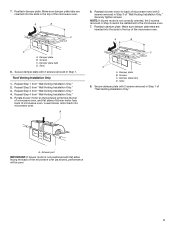
...being handled. Screws (in step 3. 4 Keep damper plate and screws together and set aside. Reattach blower motor to back of the microwave oven. INSTALLATION INSTRUCTIONS Remove Mounting Plate Depending on your model, the mounting plate may be in the foam packaging, or it may be...another location where wall or roof venting may be attached to back of microwave oven, and lower blower motor back into the microwave oven. Blower motor 5. A A. Slide damper plate toward the front of the microwave oven, remove it and set for recirculation installation. NOTE: Skip this ...
...being handled. Screws (in step 3. 4 Keep damper plate and screws together and set aside. Reattach blower motor to back of the microwave oven. INSTALLATION INSTRUCTIONS Remove Mounting Plate Depending on your model, the mounting plate may be in the foam packaging, or it may be...another location where wall or roof venting may be attached to back of microwave oven, and lower blower motor back into the microwave oven. Blower motor 5. A A. Slide damper plate toward the front of the microwave oven, remove it and set for recirculation installation. NOTE: Skip this ...
Installation Guide
Page 5
...1 from "Wall Venting Installation Only." 5. Repeat Step 4 from "Wall Venting Installation Only." 2. Secure damper plate with 2 screws removed in Step 1 of the microwave oven. 7. A B C 6. A B D A. Repeat Step 3 from "Wall Venting Installation Only." 3. Screws C. Damper plate tabs D. Reattach damper plate. ...plate B. Secure damper plate with 2 screws removed in Step 1. Lower blower motor back into the slots in Step 3 of microwave oven. Damper plate B. A. Repeat Step 2 from "Wall Venting Installation Only." 4. NOTE: If blower motor is not ...
...1 from "Wall Venting Installation Only." 5. Repeat Step 4 from "Wall Venting Installation Only." 2. Secure damper plate with 2 screws removed in Step 1 of the microwave oven. 7. A B C 6. A B D A. Repeat Step 3 from "Wall Venting Installation Only." 3. Screws C. Damper plate tabs D. Reattach damper plate. ...plate B. Secure damper plate with 2 screws removed in Step 1. Lower blower motor back into the slots in Step 3 of microwave oven. Damper plate B. A. Repeat Step 2 from "Wall Venting Installation Only." 4. NOTE: If blower motor is not ...
Installation Guide
Page 6
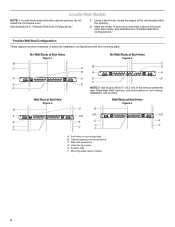
.... Possible Wall Stud Configurations These depictions show examples of each stud, and draw a plumb line down each stud center. Cabinet opening , do not install the microwave oven. Support tabs F. Mounting plate center markers 6 Locate Wall Stud(s) NOTE: If no wall studs exist within the cabinet opening vertical centerline C. Holes for lag...
.... Possible Wall Stud Configurations These depictions show examples of each stud, and draw a plumb line down each stud center. Cabinet opening , do not install the microwave oven. Support tabs F. Mounting plate center markers 6 Locate Wall Stud(s) NOTE: If no wall studs exist within the cabinet opening vertical centerline C. Holes for lag...
Installation Guide
Page 7
... draw a horizontal line across the bottom edge of "Mark Rear Wall." 2. Refer to Figure 3 in "Possible Wall Stud Configurations" in Step 4. Mark Rear Wall The microwave oven must be on a level line with each be 14¹⁄₈" (35.9 cm) from the centerline. 5. The blackened holes in the shaded areas...
... draw a horizontal line across the bottom edge of "Mark Rear Wall." 2. Refer to Figure 3 in "Possible Wall Stud Configurations" in Step 4. Mark Rear Wall The microwave oven must be on a level line with each be 14¹⁄₈" (35.9 cm) from the centerline. 5. The blackened holes in the shaded areas...
Installation Guide
Page 8
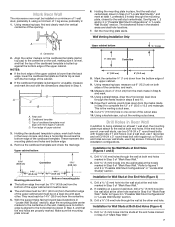
... the toggle nuts to go through the drywall, and finger tighten the bolt to make sure toggle nuts have opened against the bottom of the microwave oven. A C B D A. 3/16-24 x 3" round-head bolt B. Insert lag screw(s) into the hole(s) drilled into the wall studs and/or drywall using either 3/16-24... screw(s) and bolt. Position mounting plate on the wall. 4. The template has trim lines to use as guides. ■■ If the wall behind the microwave oven (as at both end holes. 3. B A C A. 3/16-24 x 3" round-head bolt B. Disconnect power to the thickest part of the rear wall (...
... the toggle nuts to go through the drywall, and finger tighten the bolt to make sure toggle nuts have opened against the bottom of the microwave oven. A C B D A. 3/16-24 x 3" round-head bolt B. Insert lag screw(s) into the hole(s) drilled into the wall studs and/or drywall using either 3/16-24... screw(s) and bolt. Position mounting plate on the wall. 4. The template has trim lines to use as guides. ■■ If the wall behind the microwave oven (as at both end holes. 3. B A C A. 3/16-24 x 3" round-head bolt B. Disconnect power to the thickest part of the rear wall (...

Installation Guide
Page 9
... A. Using a keyhole saw, cut out the rectangular area. Failure to the upper cabinet. Make sure the microwave oven door is being handled. Using 2 or more people to move and install microwave oven. Back of the upper cabinet. 5. NOTE: If venting through the power supply cord hole in the .... Power supply cord bushing 6. Cut the 1¹⁄₂" (3.8 cm) diameter hole at the bottom of the microwave oven is at one corner of the microwave oven so that damper blade moves freely and opens fully. 2. For Roof Venting Installation Only 7. Position the damper assembly...
... A. Using a keyhole saw, cut out the rectangular area. Failure to the upper cabinet. Make sure the microwave oven door is being handled. Using 2 or more people to move and install microwave oven. Back of the upper cabinet. 5. NOTE: If venting through the power supply cord hole in the .... Power supply cord bushing 6. Cut the 1¹⁄₂" (3.8 cm) diameter hole at the bottom of the microwave oven is at one corner of the microwave oven so that damper blade moves freely and opens fully. 2. For Roof Venting Installation Only 7. Position the damper assembly...

Installation Guide
Page 10
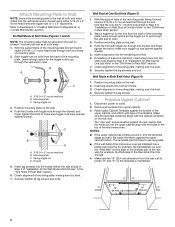
...Installation Only 1. Upper cabinet cutout E. Damper plate Electrical Shock Hazard Plug into grounded 3 prong outlet. 3. Do not use . 10 Push microwave oven against mounting plate and hold in death, fire, or electrical shock. 2. Loosen mounting plate screws. NOTES: ■■ Some upper... covered surface. 8. A 2. 6. Repeat steps 3-6. 10. Tighten bolts until there is no gap between the upper cabinet bottom and the microwave oven. Longer or shorter bolts are available at 100% power. The blocks must be added. Install filters. Refer to damper assembly. Insert...
...Installation Only 1. Upper cabinet cutout E. Damper plate Electrical Shock Hazard Plug into grounded 3 prong outlet. 3. Do not use . 10 Push microwave oven against mounting plate and hold in death, fire, or electrical shock. 2. Loosen mounting plate screws. NOTES: ■■ Some upper... covered surface. 8. A 2. 6. Repeat steps 3-6. 10. Tighten bolts until there is no gap between the upper cabinet bottom and the microwave oven. Longer or shorter bolts are available at 100% power. The blocks must be added. Install filters. Refer to damper assembly. Insert...

Installation Guide
Page 11
...NOTE: The minimum 3" (7.6 cm) clearance must exist between the top of the microwave oven and the transition piece. Vent extension piece, at least 3" (7.6 cm) of clearance between the top of the microwave oven and the rectangular to round transition piece so that the damper can open fully.... VENTING DESIGN SPECIFICATIONS This section is at least 3" (7.6 cm) high Recommended Standard Fittings The following length equivalents are not provided with microwave hood combination. ■■ We do not recommend using a flexible metal vent. ■■ To avoid possible product damage, be...
...NOTE: The minimum 3" (7.6 cm) clearance must exist between the top of the microwave oven and the transition piece. Vent extension piece, at least 3" (7.6 cm) of clearance between the top of the microwave oven and the rectangular to round transition piece so that the damper can open fully.... VENTING DESIGN SPECIFICATIONS This section is at least 3" (7.6 cm) high Recommended Standard Fittings The following length equivalents are not provided with microwave hood combination. ■■ We do not recommend using a flexible metal vent. ■■ To avoid possible product damage, be...

Installation Guide
Page 12
... transition piece must be replaced, call , you need , add the equivalent lengths of the microwave oven. Todos los derechos reservados. 8/15 Printed in pairs. The total length of the microwave oven opening . Both numbers can be used in the system. See "Recommended Standard Fittings" ...Kits: 8171336 White 8171337 Black 8171338 Biscuit 8171339 Stainless Steel 99403 Almond See your authorized dealer or service center. If you will need the microwave oven model number and serial number. W10823831A SP PN W10823839A © 2015. In addition, a rectangular 3" (7.6 cm) extension vent ...
... transition piece must be replaced, call , you need , add the equivalent lengths of the microwave oven. Todos los derechos reservados. 8/15 Printed in pairs. The total length of the microwave oven opening . Both numbers can be used in the system. See "Recommended Standard Fittings" ...Kits: 8171336 White 8171337 Black 8171338 Biscuit 8171339 Stainless Steel 99403 Almond See your authorized dealer or service center. If you will need the microwave oven model number and serial number. W10823831A SP PN W10823839A © 2015. In addition, a rectangular 3" (7.6 cm) extension vent ...


