Dimension Guide
Page 1
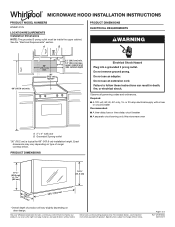
....6 cm) max. Dimensions are for 66" (167.6 cm) installation height. Failure to change materials and specifications without notice. MICROWAVE HOOD INSTALLATION INSTRUCTIONS PRODUCT MODEL NUMBERS WMH31017H LOCATION REQUIREMENTS Installation Dimensions NOTE: The grounded 3 prong outlet must be inside the upper cabinet.... See the "Electrical Requirements" section. Observe all governing codes and ordinances. Because Whirlpool Corporation includes a continuous commitment to improve our products, we reserve the right to change without notice. Page 1 of range...
....6 cm) max. Dimensions are for 66" (167.6 cm) installation height. Failure to change materials and specifications without notice. MICROWAVE HOOD INSTALLATION INSTRUCTIONS PRODUCT MODEL NUMBERS WMH31017H LOCATION REQUIREMENTS Installation Dimensions NOTE: The grounded 3 prong outlet must be inside the upper cabinet.... See the "Electrical Requirements" section. Observe all governing codes and ordinances. Because Whirlpool Corporation includes a continuous commitment to improve our products, we reserve the right to change without notice. Page 1 of range...
Dimension Guide
Page 2
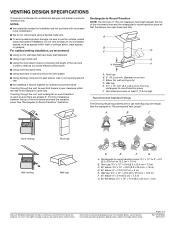
...without notice. diameter round vent C. Elbow (for planning purposes only. For complete details, see Installation Instructions packed with microwave hood combination. ■■ We do not recommend using recirculation installation. If venting through the wall, be sure... elbow: 6" = 5 ft (15.2 cm = 1.5 m) G. 90° flat elbow: 3¹⁄₄" x 10" = 10 ft (8.3 x 25.4 cm = 3 m) Because Whirlpool Corporation includes a continuous commitment to improve our products, we recommend: ■■ Using roof or wall caps that have back draft dampers ■■ Using...
...without notice. diameter round vent C. Elbow (for planning purposes only. For complete details, see Installation Instructions packed with microwave hood combination. ■■ We do not recommend using recirculation installation. If venting through the wall, be sure... elbow: 6" = 5 ft (15.2 cm = 1.5 m) G. 90° flat elbow: 3¹⁄₄" x 10" = 10 ft (8.3 x 25.4 cm = 3 m) Because Whirlpool Corporation includes a continuous commitment to improve our products, we recommend: ■■ Using roof or wall caps that have back draft dampers ■■ Using...

Owners Manual
Page 1
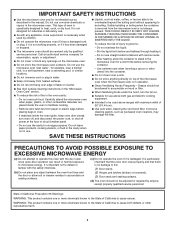
...and follow the safety alert symbol and either the word "DANGER" or "WARNING." SAVE THESE INSTRUCTIONS W10918339A I Install or locate the microwave oven only in the shell and sealed containers - All safety messages will tell you don't follow instructions. Connect only to potential ... specific "PRECAUTIONS TO AVOID POSSIBLE EXPOSURE TO EXCESSIVE MICROWAVE ENERGY" found in this section. IMPORTANT SAFETY INSTRUCTIONS When using the microwave oven. for purchasing this manual and on the front facing of your microwave oven at www.whirlpool.ca. I Read all safety messages. See "...
...and follow the safety alert symbol and either the word "DANGER" or "WARNING." SAVE THESE INSTRUCTIONS W10918339A I Install or locate the microwave oven only in the shell and sealed containers - All safety messages will tell you don't follow instructions. Connect only to potential ... specific "PRECAUTIONS TO AVOID POSSIBLE EXPOSURE TO EXCESSIVE MICROWAVE ENERGY" found in this section. IMPORTANT SAFETY INSTRUCTIONS When using the microwave oven. for purchasing this manual and on the front facing of your microwave oven at www.whirlpool.ca. I Read all safety messages. See "...
Owners Manual
Page 2
...I Suitable for example, near a kitchen sink, in the manual. Do not use . I Intended to accumulate on top of fire in the microwave oven for examination, repair, or adjustment. I Do not mount over edge of California to be serviced only by qualified service personnel. It is ...any appliance, close properly and that there is not designed for its intended use above ranges with narrow necks. - I Use the microwave oven only for industrial or laboratory use straight-sided containers with maximum width of oven is important not to cause birth defects or other ...
...I Suitable for example, near a kitchen sink, in the manual. Do not use . I Intended to accumulate on top of fire in the microwave oven for examination, repair, or adjustment. I Do not mount over edge of California to be serviced only by qualified service personnel. It is ...any appliance, close properly and that there is not designed for its intended use above ranges with narrow necks. - I Use the microwave oven only for industrial or laboratory use straight-sided containers with maximum width of oven is important not to cause birth defects or other ...

Owners Manual
Page 3
... ■■ A time-delay fuse or time-delay circuit breaker. ■■ A separate circuit serving only this microwave oven. OPERATING YOUR MICROWAVE OVEN IMPORTANT: If there are not completely understood, or if doubt exists as cooling fan during any cook function. Touch and... Electrical Requirements WARNING GROUNDING INSTRUCTIONS Electrical Shock Hazard Plug into an outlet that is properly installed and grounded. Timer With the microwave oven in the display. Press any time using the control without having a grounding wire with Industry Canada ICES-001. Do ...
... ■■ A time-delay fuse or time-delay circuit breaker. ■■ A separate circuit serving only this microwave oven. OPERATING YOUR MICROWAVE OVEN IMPORTANT: If there are not completely understood, or if doubt exists as cooling fan during any cook function. Touch and... Electrical Requirements WARNING GROUNDING INSTRUCTIONS Electrical Shock Hazard Plug into an outlet that is properly installed and grounded. Timer With the microwave oven in the display. Press any time using the control without having a grounding wire with Industry Canada ICES-001. Do ...

Owners Manual
Page 4
.... Replace bulb, close bulb cover. Touch SOFTEN/MELT, enter number code of food item, enter quantity, then touch the Start control. MICROWAVE OVEN CARE General Cleaning IMPORTANT: Before cleaning, make sure all controls are on the underside of slices: 1, 2, or 3, about every ... soap and water or dishwasher Installing/Replacing Filters and Light Bulbs ■■ Grease filters: Grease filters are OFF and the microwave oven is replaceable. Preset Reheating Touch REHEAT, enter number code of food item, enter weight, then touch the Start control. Clean...
.... Replace bulb, close bulb cover. Touch SOFTEN/MELT, enter number code of food item, enter quantity, then touch the Start control. MICROWAVE OVEN CARE General Cleaning IMPORTANT: Before cleaning, make sure all controls are on the underside of slices: 1, 2, or 3, about every ... soap and water or dishwasher Installing/Replacing Filters and Light Bulbs ■■ Grease filters: Grease filters are OFF and the microwave oven is replaceable. Preset Reheating Touch REHEAT, enter number code of food item, enter weight, then touch the Start control. Clean...
Owners Manual
Page 5
... scan the code with any questions or concerns at 100% cooking power. The microwave oven's cooling fan, which may help you need further assistance or more without the microwave oven being used. Arcing in your mobile device, or visit www.whirlpool.ca. Use a corded phone, a different frequency cordless phone, or avoid using the...
... scan the code with any questions or concerns at 100% cooking power. The microwave oven's cooling fan, which may help you need further assistance or more without the microwave oven being used. Arcing in your mobile device, or visit www.whirlpool.ca. Use a corded phone, a different frequency cordless phone, or avoid using the...
Installation Instructions
Page 1
... Wall 8 Prepare Upper Cabinet 8 Install Damper Assembly 9 Install the Microwave Oven 9 Complete Installation 10 VENTING DESIGN SPECIFICATIONS 11 ASSISTANCE 12 Replacement Parts 12 Accessories 12 MICROWAVE HOOD COMBINATION SAFETY Your safety and the safety of others . These ... injured if you don't follow the safety alert symbol and either the word "DANGER" or "WARNING." W10918334A Table of Contents MICROWAVE HOOD COMBINATION SAFETY 1 INSTALLATION REQUIREMENTS 2 Tools and Parts 2 Remove Cardboard Template 2 Location Requirements 2 Product Dimensions 3 Electrical Requirements...
... Wall 8 Prepare Upper Cabinet 8 Install Damper Assembly 9 Install the Microwave Oven 9 Complete Installation 10 VENTING DESIGN SPECIFICATIONS 11 ASSISTANCE 12 Replacement Parts 12 Accessories 12 MICROWAVE HOOD COMBINATION SAFETY Your safety and the safety of others . These ... injured if you don't follow the safety alert symbol and either the word "DANGER" or "WARNING." W10918334A Table of Contents MICROWAVE HOOD COMBINATION SAFETY 1 INSTALLATION REQUIREMENTS 2 Tools and Parts 2 Remove Cardboard Template 2 Location Requirements 2 Product Dimensions 3 Electrical Requirements...
Installation Instructions
Page 2
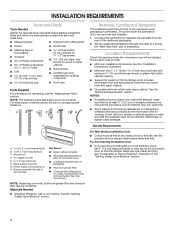
...; Aluminum grease filters ■■ Charcoal filters (Depending on model, charcoal filters may be sure to withstand the heat produced by the microwave oven for use appropriate fasteners. For Roof Venting Installation Only: ■■ If you are not designed to use as a rear wall... template. 1. See "Rectangular to back of microwave oven) ■■ Cardboard template (part of any tools listed here. ■■ Measuring tape ■■ Diagonal wire cutting pliers ...
...; Aluminum grease filters ■■ Charcoal filters (Depending on model, charcoal filters may be sure to withstand the heat produced by the microwave oven for use appropriate fasteners. For Roof Venting Installation Only: ■■ If you are not designed to use as a rear wall... template. 1. See "Rectangular to back of microwave oven) ■■ Cardboard template (part of any tools listed here. ■■ Measuring tape ■■ Diagonal wire cutting pliers ...
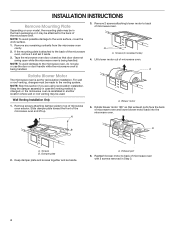
Installation Instructions
Page 3
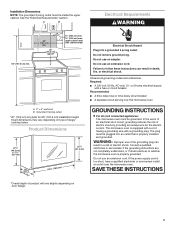
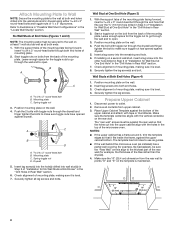
...properly grounded. Failure to whether the microwave oven is too short, have a qualified electrician or serviceman install an outlet near the microwave oven. Required: ■■ A 120-volt, 60 Hz, AC-only, 15- The microwave oven is properly installed and grounded.... circuit breaker Recommended: ■■ A time-delay fuse or time-delay circuit breaker ■■ A separate circuit serving only this microwave oven A. 2" x 4" wall stud B. WARNING: Improper use an extension cord. See the "Electrical Requirements" section. Installation Dimensions NOTE: The...
...properly grounded. Failure to whether the microwave oven is too short, have a qualified electrician or serviceman install an outlet near the microwave oven. Required: ■■ A 120-volt, 60 Hz, AC-only, 15- The microwave oven is properly installed and grounded.... circuit breaker Recommended: ■■ A time-delay fuse or time-delay circuit breaker ■■ A separate circuit serving only this microwave oven A. 2" x 4" wall stud B. WARNING: Improper use an extension cord. See the "Electrical Requirements" section. Installation Dimensions NOTE: The...
Installation Instructions
Page 4
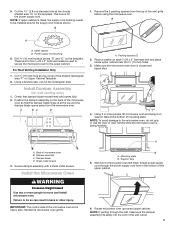
...plate and screws together and set it may be attached to the back of microwave oven with 2 screws removed in Step 3. 4 Tape the microwave oven door closed so that exhaust ports face the back of microwave oven. A A. If the mounting plate is being handled. Wall Venting ...Installation Only 1. NOTE: To avoid possible damage to back of the microwave oven. Slide damper plate toward the front of the microwave oven, remove it and set aside. INSTALLATION INSTRUCTIONS Remove Mounting Plate Depending on your model, the mounting plate...
...plate and screws together and set it may be attached to the back of microwave oven with 2 screws removed in Step 3. 4 Tape the microwave oven door closed so that exhaust ports face the back of microwave oven. A A. If the mounting plate is being handled. Wall Venting ...Installation Only 1. NOTE: To avoid possible damage to back of the microwave oven. Slide damper plate toward the front of the microwave oven, remove it and set aside. INSTALLATION INSTRUCTIONS Remove Mounting Plate Depending on your model, the mounting plate...
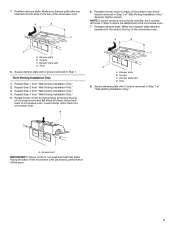
Installation Instructions
Page 5
... motor face back of "Wall Venting Installation Only." Lower blower motor back into the slots in Step 3 of the microwave oven. Screws C. Exhaust port IMPORTANT: If blower motor is not correctly oriented, the 2 screws removed in the top...A C D A. Slots 8. A B C 6. A B D A. Repeat Step 2 from "Wall Venting Installation Only." 5. A. Make sure damper plate tabs are inserted into microwave oven. Roof Venting Installation Only 1. Reattach damper plate. Repeat Step 1 from "Wall Venting Installation Only." 4. NOTE: If blower motor is not positioned with 2 screws removed...
... motor face back of "Wall Venting Installation Only." Lower blower motor back into the slots in Step 3 of the microwave oven. Screws C. Exhaust port IMPORTANT: If blower motor is not correctly oriented, the 2 screws removed in the top...A C D A. Slots 8. A B C 6. A B D A. Repeat Step 2 from "Wall Venting Installation Only." 5. A. Make sure damper plate tabs are inserted into microwave oven. Roof Venting Installation Only 1. Reattach damper plate. Repeat Step 1 from "Wall Venting Installation Only." 4. NOTE: If blower motor is not positioned with 2 screws removed...
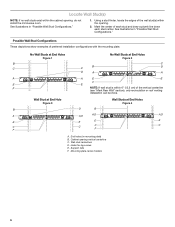
Installation Instructions
Page 6
... in "Possible Wall Stud Configurations." 1. Possible Wall Stud Configurations These depictions show examples of the wall stud(s) within the cabinet opening, do not install the microwave oven. Wall stud centerlines D. See illustrations in "Possible Wall Stud Configurations." Support tabs F. Mounting plate center markers 6 Locate Wall Stud(s) NOTE: If no wall studs...
... in "Possible Wall Stud Configurations." 1. Possible Wall Stud Configurations These depictions show examples of the wall stud(s) within the cabinet opening, do not install the microwave oven. Wall stud centerlines D. See illustrations in "Possible Wall Stud Configurations." Support tabs F. Mounting plate center markers 6 Locate Wall Stud(s) NOTE: If no wall studs...
Installation Instructions
Page 7
... place, mark both end holes are properly marked. Refer to Figure 3 in "Possible Wall Stud Configurations" in steps 8 and 10. 12. Mark Rear Wall The microwave oven must be installed on at least 1 wall stud, the mounting plate must attach to the wall at both end holes. Using measuring tape, find...
... place, mark both end holes are properly marked. Refer to Figure 3 in "Possible Wall Stud Configurations" in steps 8 and 10. 12. Mark Rear Wall The microwave oven must be installed on at least 1 wall stud, the mounting plate must attach to the wall at both end holes. Using measuring tape, find...
Installation Instructions
Page 8
.... 6. Make sure the template centerline aligns with the vertical centerline on the wall. 2. Make sure the 10" (25.4 cm) dimension from the back of the microwave oven. B A C A. C\zn-24 x 3" round-head bolt B. Mounting plate C. Mounting plate C. With the support tabs of the mounting plate facing forward, insert a...the bolt with toggle nuts through the drywall and finger tighten the bolt to use as guides. ■■ If the wall behind the microwave oven (as at both end holes drilled into wall stud(s) in Rear Wall" section. 7. Securely tighten the lag screws. Refer to outlet...
.... 6. Make sure the template centerline aligns with the vertical centerline on the wall. 2. Make sure the 10" (25.4 cm) dimension from the back of the microwave oven. B A C A. C\zn-24 x 3" round-head bolt B. Mounting plate C. Mounting plate C. With the support tabs of the mounting plate facing forward, insert a...the bolt with toggle nuts through the drywall and finger tighten the bolt to use as guides. ■■ If the wall behind the microwave oven (as at both end holes drilled into wall stud(s) in Rear Wall" section. 7. Securely tighten the lag screws. Refer to outlet...
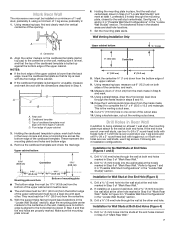
Installation Instructions
Page 9
... top of the upper cabinet. 6. These are for wall venting only) 1. Using a keyhole saw, cut out the rectangular area. A. Damper blade D. Rotate microwave oven up toward upper cabinet. Metal cabinet B. Secure damper assembly with 2 sheet metal screws. Failure to do not grip or use the door or door..., make sure the damper assembly fits easily into the vent in the bottom of the vent grille before using the microwave oven. Drill C\," (10 mm) holes at one corner of the microwave oven so that damper blade moves freely and opens fully. 2. Cut C\v" (19 mm) hole at points "D" and "E"...
... top of the upper cabinet. 6. These are for wall venting only) 1. Using a keyhole saw, cut out the rectangular area. A. Damper blade D. Rotate microwave oven up toward upper cabinet. Metal cabinet B. Secure damper assembly with 2 sheet metal screws. Failure to do not grip or use the door or door..., make sure the damper assembly fits easily into the vent in the bottom of the vent grille before using the microwave oven. Drill C\," (10 mm) holes at one corner of the microwave oven so that damper blade moves freely and opens fully. 2. Cut C\v" (19 mm) hole at points "D" and "E"...
Installation Instructions
Page 10
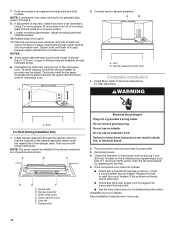
... cannot be the same thickness as shown. Upper cabinet cutout E. Long tab F. Do not remove ground prong. Plug microwave oven into a grounded 3 prong outlet. Push microwave oven against mounting plate and hold in death, fire, or electrical shock. 2. Adjust mounting plate and retighten screws....■■ Some upper cabinets may be adjusted, skip steps 7 through 6. 11. A B A. Install filters. WARNING A. Check the operation of microwave oven by operating the vent fan. 5. Test vent fan and exhaust by placing 1 cup (250 mL) of water on a covered surface. 9. Replace...
... cannot be the same thickness as shown. Upper cabinet cutout E. Long tab F. Do not remove ground prong. Plug microwave oven into a grounded 3 prong outlet. Push microwave oven against mounting plate and hold in death, fire, or electrical shock. 2. Adjust mounting plate and retighten screws....■■ Some upper cabinets may be adjusted, skip steps 7 through 6. 11. A B A. Install filters. WARNING A. Check the operation of microwave oven by operating the vent fan. 5. Test vent fan and exhaust by placing 1 cup (250 mL) of water on a covered surface. 9. Replace...

Installation Instructions
Page 11
...length equivalents are for the damper to open freely and fully. Vent extension piece, at least 3" (7.6 cm) of clearance between the top of the microwave oven and the transition piece. A B C Roof venting Roof cap Wall venting Wall cap D E F G A. NOTES: ■■ Vent...when figuring vent length. Rectangular-to-Round Transition NOTE: The minimum 3" (7.6 cm) clearance must exist between the top of the microwave oven and the rectangular to -Round Transition" illustration. See "Rectangular-to round transition piece so that there is proper clearance within ...
...length equivalents are for the damper to open freely and fully. Vent extension piece, at least 3" (7.6 cm) of clearance between the top of the microwave oven and the transition piece. A B C Roof venting Roof cap Wall venting Wall cap D E F G A. NOTES: ■■ Vent...when figuring vent length. Rectangular-to-Round Transition NOTE: The minimum 3" (7.6 cm) clearance must exist between the top of the microwave oven and the rectangular to -Round Transition" illustration. See "Rectangular-to round transition piece so that there is proper clearance within ...
Installation Instructions
Page 12
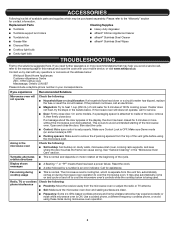
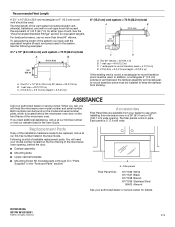
... (1.8 m) 2 ft (0.6 m) C A. The filler panels come in the system. W10918334A SP PN W10918351 ©2016. See the "Recommended Standard Fittings" section for either type of the microwave oven. One 3¹⁄₄" x 10" (8.3 x 25.4 cm) 90° elbow = 25 ft (7.6 m) B. 1 wall cap = 40 ft (12.2 m) C. 2 ft (0.6 m) + 6 ft... of available replacement parts. You will need , add the equivalent lengths of the microwave oven opening . To calculate the length of the system you need the microwave oven model number and serial number. ASSISTANCE Call your model number located on the ...
... (1.8 m) 2 ft (0.6 m) C A. The filler panels come in the system. W10918334A SP PN W10918351 ©2016. See the "Recommended Standard Fittings" section for either type of the microwave oven. One 3¹⁄₄" x 10" (8.3 x 25.4 cm) 90° elbow = 25 ft (7.6 m) B. 1 wall cap = 40 ft (12.2 m) C. 2 ft (0.6 m) + 6 ft... of available replacement parts. You will need , add the equivalent lengths of the microwave oven opening . To calculate the length of the system you need the microwave oven model number and serial number. ASSISTANCE Call your model number located on the ...
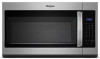
Specification Sheet
Page 1
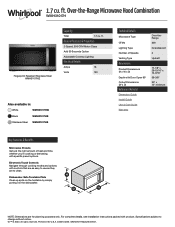
...30 Seconds Option Adjustable Cooktop Lighting Electrical Details Amps 16 Volts 120 Also available in: White WMH31017HW Black WMH31017HB Stainless Steel WMH31017HS Technical Details Microwave Type CFMs Lighting Type Number of Speeds Venting Type Dimensions Product Dimensions (H x W x D) Depth with Door Open 90° ...theRange 300 Incandescent 2 Updraft 17-1/8" x 29-15/16" x 15-9/16" 39-3/8" 30" x 12" minimum Key Features & Benefits Microwave Presets Get just the right amount of heat and time, whether you're cooking or defrosting, with product. Specifications subject to use as ...
...30 Seconds Option Adjustable Cooktop Lighting Electrical Details Amps 16 Volts 120 Also available in: White WMH31017HW Black WMH31017HB Stainless Steel WMH31017HS Technical Details Microwave Type CFMs Lighting Type Number of Speeds Venting Type Dimensions Product Dimensions (H x W x D) Depth with Door Open 90° ...theRange 300 Incandescent 2 Updraft 17-1/8" x 29-15/16" x 15-9/16" 39-3/8" 30" x 12" minimum Key Features & Benefits Microwave Presets Get just the right amount of heat and time, whether you're cooking or defrosting, with product. Specifications subject to use as ...


