Dimension Guide
Page 1
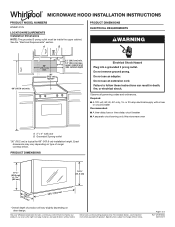
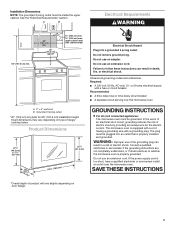
...; A time-delay fuse or time-delay circuit breaker ■■ A separate circuit serving only this microwave oven A. 2" x 4" wall stud B. W10918334 06/01/2017 Do not use an extension cord. Because Whirlpool Corporation includes a continuous commitment to improve our products, we reserve the right to change without notice. Specifications subject to follow these instructions can result in death, fire, or electrical shock. MICROWAVE HOOD INSTALLATION INSTRUCTIONS PRODUCT MODEL NUMBERS WMH31017H LOCATION REQUIREMENTS Installation Dimensions NOTE...
...; A time-delay fuse or time-delay circuit breaker ■■ A separate circuit serving only this microwave oven A. 2" x 4" wall stud B. W10918334 06/01/2017 Do not use an extension cord. Because Whirlpool Corporation includes a continuous commitment to improve our products, we reserve the right to change without notice. Specifications subject to follow these instructions can result in death, fire, or electrical shock. MICROWAVE HOOD INSTALLATION INSTRUCTIONS PRODUCT MODEL NUMBERS WMH31017H LOCATION REQUIREMENTS Installation Dimensions NOTE...
Dimension Guide
Page 2
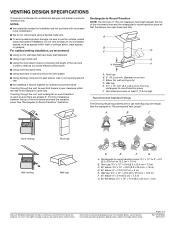
... Installation Instructions packed with microwave hood combination. ■■ We do not recommend using a flexible metal vent. ■■ To avoid possible product damage, be sure to vent air outside, unless using recirculation installation. Page 2 of the microwave oven and the transition piece. See the examples in the vent system ■■ Using caulking compound to seal exterior wall or roof opening around cap ■■ Not installing...
... Installation Instructions packed with microwave hood combination. ■■ We do not recommend using a flexible metal vent. ■■ To avoid possible product damage, be sure to vent air outside, unless using recirculation installation. Page 2 of the microwave oven and the transition piece. See the examples in the vent system ■■ Using caulking compound to seal exterior wall or roof opening around cap ■■ Not installing...

Owners Manual
Page 1
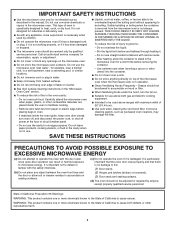
For future reference, please make a note of your model and serial number located on your microwave oven at www.whirlpool.ca. Model Number Serial Number MICROWAVE HOOD COMBINATION SAFETY Your safety and the safety of injury, and tell you what can be killed or seriously injured if you don't immediately follow instructions. We have provided many important safety messages in the shell and sealed containers - These...
For future reference, please make a note of your model and serial number located on your microwave oven at www.whirlpool.ca. Model Number Serial Number MICROWAVE HOOD COMBINATION SAFETY Your safety and the safety of injury, and tell you what can be killed or seriously injured if you don't immediately follow instructions. We have provided many important safety messages in the shell and sealed containers - These...
Owners Manual
Page 2
... as water, coffee, or tea are placed inside the oven ignite, keep oven door closed, turn the fan on top of oven is in water. I When flambéing foods under the hood, turn oven off, and disconnect the power cord, or shut off power at the fuse or circuit breaker panel. I Do not immerse cord or plug in operation. Carefully attend the microwave oven when paper, plastic, or other combustible materials...
... as water, coffee, or tea are placed inside the oven ignite, keep oven door closed, turn the fan on top of oven is in water. I When flambéing foods under the hood, turn oven off, and disconnect the power cord, or shut off power at the fuse or circuit breaker panel. I Do not immerse cord or plug in operation. Carefully attend the microwave oven when paper, plastic, or other combustible materials...

Owners Manual
Page 3
... vent grille, remove them before using the microwave oven. Recommended: ■■ A time-delay fuse or time-delay circuit breaker. ■■ A separate circuit serving only this microwave oven. Do not use an adapter. If the power supply cord is a 12-hour (12:00-11:59) clock. Repeat to avoid unintended start. Touch and hold number keypad "3" for about 3 seconds until a tone sounds and the vent fan turns on. Turntable For best cooking results, do not operate...
... vent grille, remove them before using the microwave oven. Recommended: ■■ A time-delay fuse or time-delay circuit breaker. ■■ A separate circuit serving only this microwave oven. Do not use an adapter. If the power supply cord is a 12-hour (12:00-11:59) clock. Repeat to avoid unintended start. Touch and hold number keypad "3" for about 3 seconds until a tone sounds and the vent fan turns on. Turntable For best cooking results, do not operate...

Owners Manual
Page 4
... Filters and Light Bulbs ■■ Grease filters: Grease filters are OFF and the microwave oven is located behind the vent grille at the top front of microwave oven. Enter bag size in ounces: 3.0 or 3.5 (85 or 99 g), then touch Start control. (Baked) Potato Touch (BAKED) POTATO. Preset Defrosting Pizza (reheat) Unwrap food. Touch DEFROST, enter number code of food item, enter quantity, then touch the Start control. Remove 2 screws on cleaning products. Open the bulb cover and replace bulb. Preset Cooking Touch COOK, enter number code of food item, enter weight...
... Filters and Light Bulbs ■■ Grease filters: Grease filters are OFF and the microwave oven is located behind the vent grille at the top front of microwave oven. Enter bag size in ounces: 3.0 or 3.5 (85 or 99 g), then touch Start control. (Baked) Potato Touch (BAKED) POTATO. Preset Defrosting Pizza (reheat) Unwrap food. Touch DEFROST, enter number code of food item, enter quantity, then touch the Start control. Remove 2 screws on cleaning products. Open the bulb cover and replace bulb. Preset Cooking Touch COOK, enter number code of food item, enter weight...
Owners Manual
Page 5
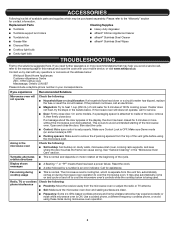
... using these items during microwave oven operation to avoid unintended starting of the door, remove it, then firmly close door. If water does not heat, try the solutions suggested here. Make sure Demo mode (on during microwave oven operation. 5 Reset the clock. ■■ A letter followed by mail with your correspondence. Please refer to inside of the microwave oven. Replacement Parts Cleaning Supplies ■■ Turntable ■■ Heavy-duty degreaser ■■ Turntable support...
... using these items during microwave oven operation to avoid unintended starting of the door, remove it, then firmly close door. If water does not heat, try the solutions suggested here. Make sure Demo mode (on during microwave oven operation. 5 Reset the clock. ■■ A letter followed by mail with your correspondence. Please refer to inside of the microwave oven. Replacement Parts Cleaning Supplies ■■ Turntable ■■ Heavy-duty degreaser ■■ Turntable support...
Owners Manual
Page 6
..., or need for warranty service to correct defects in remote locations where an authorized Whirlpool applies only when the major appliance servicer is installed, installation instructions. This warranty gives you specific legal rights, and you . Please take a few minutes to province. 11/14 6 In Canada, call 1-800-253-1301. Commercial, non-residential, multiple-family use, or use of merchantability or fitness, so this warranty. light bulbs...
..., or need for warranty service to correct defects in remote locations where an authorized Whirlpool applies only when the major appliance servicer is installed, installation instructions. This warranty gives you specific legal rights, and you . Please take a few minutes to province. 11/14 6 In Canada, call 1-800-253-1301. Commercial, non-residential, multiple-family use, or use of merchantability or fitness, so this warranty. light bulbs...
Installation Instructions
Page 1
... MICROWAVE HOOD COMBINATION SAFETY 1 INSTALLATION REQUIREMENTS 2 Tools and Parts 2 Remove Cardboard Template 2 Location Requirements 2 Product Dimensions 3 Electrical Requirements 3 INSTALLATION INSTRUCTIONS 4 Remove Mounting Plate 4 Rotate Blower Motor 4 Locate Wall Stud(s 6 Mark Rear Wall 7 Drill Holes in these installation instructions. W10918334A This symbol alerts you and others are not followed. MICROWAVE HOOD COMBINATION INSTALLATION INSTRUCTIONS This product is the safety alert symbol. These installation instructions cover different models...
... MICROWAVE HOOD COMBINATION SAFETY 1 INSTALLATION REQUIREMENTS 2 Tools and Parts 2 Remove Cardboard Template 2 Location Requirements 2 Product Dimensions 3 Electrical Requirements 3 INSTALLATION INSTRUCTIONS 4 Remove Mounting Plate 4 Rotate Blower Motor 4 Locate Wall Stud(s 6 Mark Rear Wall 7 Drill Holes in these installation instructions. W10918334A This symbol alerts you and others are not followed. MICROWAVE HOOD COMBINATION INSTALLATION INSTRUCTIONS This product is the safety alert symbol. These installation instructions cover different models...
Installation Instructions
Page 2
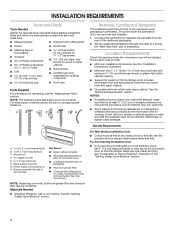
... door can open fully. ■■ Some cabinet and building materials are not designed to back of microwave oven) ■■ Cardboard template (part of packaging) ■■ Aluminum grease filters ■■ Charcoal filters (Depending on model, charcoal filters may be combined. Special Requirements For Wall Venting Installation Only: ■■ Cutout must provide: ■■ Minimum installation dimensions. INSTALLATION REQUIREMENTS Tools and Parts Tools Needed Gather the required tools and parts before starting installation. The piece inside...
... door can open fully. ■■ Some cabinet and building materials are not designed to back of microwave oven) ■■ Cardboard template (part of packaging) ■■ Aluminum grease filters ■■ Charcoal filters (Depending on model, charcoal filters may be combined. Special Requirements For Wall Venting Installation Only: ■■ Cutout must provide: ■■ Minimum installation dimensions. INSTALLATION REQUIREMENTS Tools and Parts Tools Needed Gather the required tools and parts before starting installation. The piece inside...
Installation Instructions
Page 3
... remove ground prong. Failure to whether the microwave oven is equipped with a cord having a grounding wire with a fuse or circuit breaker Recommended: ■■ A time-delay fuse or time-delay circuit breaker ■■ A separate circuit serving only this microwave oven A. 2" x 4" wall stud B. or 20-amp electrical supply with a grounding plug. GROUNDING INSTRUCTIONS I For all governing codes and ordinances. SAVE THESE INSTRUCTIONS 3 See the "Electrical Requirements" section. Do not use an extension cord...
... remove ground prong. Failure to whether the microwave oven is equipped with a cord having a grounding wire with a fuse or circuit breaker Recommended: ■■ A time-delay fuse or time-delay circuit breaker ■■ A separate circuit serving only this microwave oven A. 2" x 4" wall stud B. or 20-amp electrical supply with a grounding plug. GROUNDING INSTRUCTIONS I For all governing codes and ordinances. SAVE THESE INSTRUCTIONS 3 See the "Electrical Requirements" section. Do not use an extension cord...
Installation Instructions
Page 4
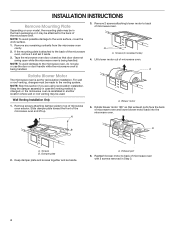
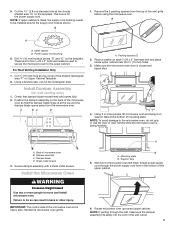
... are using recirculation installation. A A. A B A. A. If the mounting plate is being handled. Rotate blower motor 180° so that door does not swing open while the microwave oven is reinstalled in another location where wall or roof venting may be used. NOTE: To avoid damage to the microwave oven, do not grip or use the door or door handle while the microwave oven is attached to the back of the microwave oven, remove it and set it...
... are using recirculation installation. A A. A B A. A. If the mounting plate is being handled. Rotate blower motor 180° so that door does not swing open while the microwave oven is reinstalled in another location where wall or roof venting may be used. NOTE: To avoid damage to the microwave oven, do not grip or use the door or door handle while the microwave oven is attached to the back of the microwave oven, remove it and set it...
Installation Instructions
Page 6
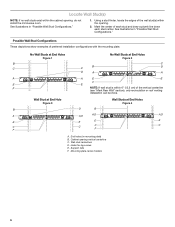
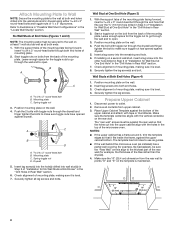
... center. Wall stud centerlines D. Using a stud finder, locate the edges of preferred installation configurations with the mounting plate. Mounting plate center markers 6 Possible Wall Stud Configurations These depictions show examples of the wall stud(s) within the cabinet opening vertical centerline C. Support tabs F. Holes for lag screws E. Cabinet opening , do not install the microwave oven. Mark the center of the vertical centerline (see "Mark Rear Wall" section), only recirculation or roof venting installation can...
... center. Wall stud centerlines D. Using a stud finder, locate the edges of preferred installation configurations with the mounting plate. Mounting plate center markers 6 Possible Wall Stud Configurations These depictions show examples of the wall stud(s) within the cabinet opening vertical centerline C. Support tabs F. Holes for lag screws E. Cabinet opening , do not install the microwave oven. Mark the center of the vertical centerline (see "Mark Rear Wall" section), only recirculation or roof venting installation can...
Installation Instructions
Page 7
... of the cardboard template is damaged or unusable, measure and mark the wall with each be 14¹⁄₈" (35.9 cm) from the marks made in Step 3 of "Mark Rear Wall." With the support tabs facing forward (see illustrations in the "Locate Wall Stud(s)" section), align the mounting plate center markers to the centerline on a level line with the dimensions described...
... of the cardboard template is damaged or unusable, measure and mark the wall with each be 14¹⁄₈" (35.9 cm) from the marks made in Step 3 of "Mark Rear Wall." With the support tabs facing forward (see illustrations in the "Locate Wall Stud(s)" section), align the mounting plate center markers to the centerline on a level line with the dimensions described...
Installation Instructions
Page 8
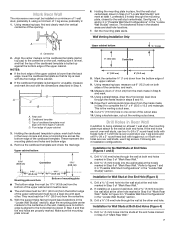
... Both End Holes (Figure 4) 1. Wall Studs at One End Hole (Figure 3) 1. The template has trim lines to use as guides. ■■ If the wall behind the microwave oven (as at One End Hole" in the "Drill Holes in Step 2 of the upper cabinet and attach with tape or thumbtacks. With the support tabs of the mounting plate facing forward, insert C\zn...
... Both End Holes (Figure 4) 1. Wall Studs at One End Hole (Figure 3) 1. The template has trim lines to use as guides. ■■ If the wall behind the microwave oven (as at One End Hole" in the "Drill Holes in Step 2 of the upper cabinet and attach with tape or thumbtacks. With the support tabs of the mounting plate facing forward, insert C\zn...
Installation Instructions
Page 9
... and the damper blade opens away from the top of microwave oven B. Place a washer on the template. Make sure the microwave oven door is at the bottom of the microwave oven is metal, the supply cord bushing needs to move and install microwave oven. A. IMPORTANT: The control side of mounting plate. Mounting plate B. NOTE: If upper cabinet is the heavy side. Remove the 2 packing spacers from the microwave oven. Damper assembly C. Rotate microwave oven up toward upper cabinet. Cut the...
... and the damper blade opens away from the top of microwave oven B. Place a washer on the template. Make sure the microwave oven door is at the bottom of the microwave oven is metal, the supply cord bushing needs to move and install microwave oven. A. IMPORTANT: The control side of mounting plate. Mounting plate B. NOTE: If upper cabinet is the heavy side. Remove the 2 packing spacers from the microwave oven. Damper assembly C. Rotate microwave oven up toward upper cabinet. Cut the...
Installation Instructions
Page 10
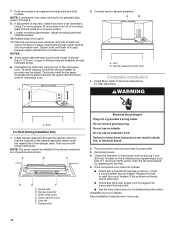
... cabinet bottom and the microwave oven. Loosen mounting plate screws. Adjust mounting plate and retighten screws. 10. Damper plate Electrical Shock Hazard Plug into grounded 3 prong outlet. 3. Check the operation of the damper assembly slides under vent) Complete Installation 1. Replace the fuse or reset the circuit breaker. 7. A B A. Install filters. Upper cabinet cutout E. If the problem continues, call an electrician. ■■ Check that a circuit breaker has not tripped. Using 2 or more people, lift microwave oven off of 1 minute at 100% power...
... cabinet bottom and the microwave oven. Loosen mounting plate screws. Adjust mounting plate and retighten screws. 10. Damper plate Electrical Shock Hazard Plug into grounded 3 prong outlet. 3. Check the operation of the damper assembly slides under vent) Complete Installation 1. Replace the fuse or reset the circuit breaker. 7. A B A. Install filters. Upper cabinet cutout E. If the problem continues, call an electrician. ■■ Check that a circuit breaker has not tripped. Using 2 or more people, lift microwave oven off of 1 minute at 100% power...

Installation Instructions
Page 11
... top of elbows to provide efficient performance ■■ Using uniformly sized vents ■■ Using duct tape to seal all joints in "Recommended Vent Length." Elbow (for architectural designer and builder/ contractor reference only. NOTES: ■■ Vent materials needed for the damper to vent air outside, unless using recirculation installation. diameter round vent C. Wall cap: 3¹⁄₄" x 10" = 40 ft (8.3 x 25.4 cm...
... top of elbows to provide efficient performance ■■ Using uniformly sized vents ■■ Using duct tape to seal all joints in "Recommended Vent Length." Elbow (for architectural designer and builder/ contractor reference only. NOTES: ■■ Vent materials needed for the damper to vent air outside, unless using recirculation installation. diameter round vent C. Wall cap: 3¹⁄₄" x 10" = 40 ft (8.3 x 25.4 cm...
Installation Instructions
Page 12
... microwave oven in a 36" (91.4 cm) or 42" (106.7 cm) wide opening , behind the door. ■■ Damper assembly ■■ Mounting plate ■■ Upper cabinet template ■■ Mounting Screw Kit (includes parts A through G in "Parts Supplied" in the system. If you will need , add the equivalent lengths of each vent piece used . Each panel is a list of the installation hardware needs to use no more than three 90° elbows. Replacement Parts...
... microwave oven in a 36" (91.4 cm) or 42" (106.7 cm) wide opening , behind the door. ■■ Damper assembly ■■ Mounting plate ■■ Upper cabinet template ■■ Mounting Screw Kit (includes parts A through G in "Parts Supplied" in the system. If you will need , add the equivalent lengths of each vent piece used . Each panel is a list of the installation hardware needs to use no more than three 90° elbows. Replacement Parts...
Specification Sheet
Page 1
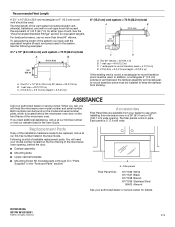
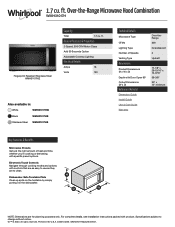
..., see Installation Instructions packed with specific preset options. WMH31017HSpecSheetV01. General Features & Properties 2-Speed, 300 CFM Motor Class Add 30 Seconds Option Adjustable Cooktop Lighting Electrical Details Amps 16 Volts 120 Also available in: White WMH31017HW Black WMH31017HB Stainless Steel WMH31017HS Technical Details Microwave Type CFMs Lighting Type Number of Speeds Venting Type Dimensions Product Dimensions (H x W x D) Depth with Door Open 90° Cutout Dimensions (W x D) Reference Material Dimension Guide Install Guide Use & Care Guide Warranty Over...
..., see Installation Instructions packed with specific preset options. WMH31017HSpecSheetV01. General Features & Properties 2-Speed, 300 CFM Motor Class Add 30 Seconds Option Adjustable Cooktop Lighting Electrical Details Amps 16 Volts 120 Also available in: White WMH31017HW Black WMH31017HB Stainless Steel WMH31017HS Technical Details Microwave Type CFMs Lighting Type Number of Speeds Venting Type Dimensions Product Dimensions (H x W x D) Depth with Door Open 90° Cutout Dimensions (W x D) Reference Material Dimension Guide Install Guide Use & Care Guide Warranty Over...


