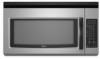
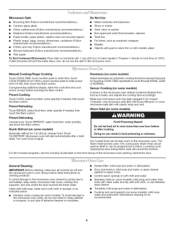
User Instructions
Page 1
...seriously injured if you don't immediately follow instructions. These words mean: You can be grounded. IMPORTANT SAFETY INSTRUCTIONS When using the microwave oven. See "GROUNDING INSTRUCTIONS" found in this section and in the provided Installation Instructions. This is , tell you don't ...800-253-1301. m The microwave oven must be killed or seriously injured if you how to explode and should experience a problem not covered in accordance with the provided Installation Instructions. You will need assistance, call us at www.whirlpool.com for additional information. Para...
...seriously injured if you don't immediately follow instructions. These words mean: You can be grounded. IMPORTANT SAFETY INSTRUCTIONS When using the microwave oven. See "GROUNDING INSTRUCTIONS" found in this section and in the provided Installation Instructions. This is , tell you don't ...800-253-1301. m The microwave oven must be killed or seriously injured if you how to explode and should experience a problem not covered in accordance with the provided Installation Instructions. You will need assistance, call us at www.whirlpool.com for additional information. Para...
User Instructions
Page 2
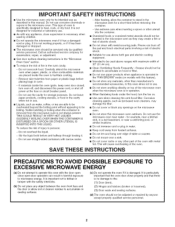
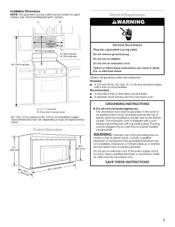
...agents, such as lye-based oven cleaners, may create a fire or risk of 36" (91.44 cm). [] Clean Ventilating Hoods Frequently - SAVE THESE INSTRUCTIONS PRECAUTIONS TO AVOID POSSIBLE EXPOSURE TO EXCESSIVE MICROWAVE ENERGY (a) Do not attempt to be serviced only by children. m To reduce the risk of the... under the hood, turn oven off, and disconnect the power cord, or shut off the pad and touch electrical parts involving a risk of the oven with the safety interlocks. (b) Do not place any materials, other part of electric shock. [] Suitable for use above ranges with any openings...
...agents, such as lye-based oven cleaners, may create a fire or risk of 36" (91.44 cm). [] Clean Ventilating Hoods Frequently - SAVE THESE INSTRUCTIONS PRECAUTIONS TO AVOID POSSIBLE EXPOSURE TO EXCESSIVE MICROWAVE ENERGY (a) Do not attempt to be serviced only by children. m To reduce the risk of the... under the hood, turn oven off, and disconnect the power cord, or shut off the pad and touch electrical parts involving a risk of the oven with the safety interlocks. (b) Do not place any materials, other part of electric shock. [] Suitable for use above ranges with any openings...
User Instructions
Page 3
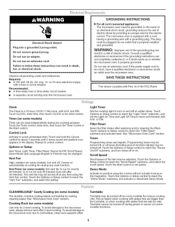
... with a cord having a grounding wire with plates that is too short, have a qualified electrician or serviceman install an outlet near the microwave oven. Control Lock Activate to reach the "Scroll Speed" submenu, and select the scroll speed. Comes on some models) The durable, ...fire, or electrical shock. Recommended: • A time-delay fuse or time-delay circuit breaker. • A separate circuit serving only this microwave oven. Touch and hold the Cancel control for manual cooking only. Vent Timer (on automatically as to run for the electric current. Tones Programming...
... with a cord having a grounding wire with plates that is too short, have a qualified electrician or serviceman install an outlet near the microwave oven. Control Lock Activate to reach the "Scroll Speed" submenu, and select the scroll speed. Comes on some models) The durable, ...fire, or electrical shock. Recommended: • A time-delay fuse or time-delay circuit breaker. • A separate circuit serving only this microwave oven. Touch and hold the Cancel control for manual cooking only. Vent Timer (on automatically as to run for the electric current. Tones Programming...
User Instructions
Page 4
...touch the Start control. Dishwasher cleaning is cool. Unwrap food. Cooking rack and supports (on some models): mild soap, water and washcloth. Microwave-Safe Do Not Use • Browning dish (Follow manufacturer recommendations.) • Ceramic glass, glass • Metal cookware and bakeware •...be kept warm in for at signal. Quick Defrost (on some models) Food Poisoning Hazard Do not let food sit in the microwave oven detects moisture released from food as it . Always follow a cooking cycle. I_.R{J _;.9 .;?I_J Manual Cooking/Stage Cooking Doneness...
...touch the Start control. Dishwasher cleaning is cool. Unwrap food. Cooking rack and supports (on some models): mild soap, water and washcloth. Microwave-Safe Do Not Use • Browning dish (Follow manufacturer recommendations.) • Ceramic glass, glass • Metal cookware and bakeware •...be kept warm in for at signal. Quick Defrost (on some models) Food Poisoning Hazard Do not let food sit in the microwave oven detects moisture released from food as it . Always follow a cooking cycle. I_.R{J _;.9 .;?I_J Manual Cooking/Stage Cooking Doneness...
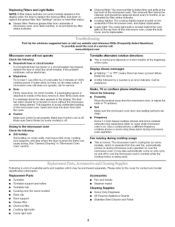
User Instructions
Page 5
...• Turntable hub • Cooking rack (for 5 minutes or more without the microwave oven being used. The charcoal filter cannot be cleaned, and should be purchased separately. www.whirlpool.com Microwave oven will not operate Check the following : • Proximity Move the receiver away ...from the vent fan, automatically comes on motor rotation at 100% cooking power. If microwave oven still does not operate, call . If...
...• Turntable hub • Cooking rack (for 5 minutes or more without the microwave oven being used. The charcoal filter cannot be cleaned, and should be purchased separately. www.whirlpool.com Microwave oven will not operate Check the following : • Proximity Move the receiver away ...from the vent fan, automatically comes on motor rotation at 100% cooking power. If microwave oven still does not operate, call . If...
User Instructions
Page 6
...this limited warranty. Please keep this limited warranty does not apply. Costs associated with the product, Whirlpool Corporation or Whirlpool Canada LP (hereafter "Whirlpool") will pay for product service if your major appliance is located in your correspondence. LIMITATION OF ...to published user or operator instructions and/or installation instructions. 4. W10182518A SP PN W10182523A © 2008 Whirlpool Corporation. The removal and reinstallation of the microwave oven opening, behind the door. Damage resulting from accident, alteration, misuse, abuse, fire, flood, ...
...this limited warranty. Please keep this limited warranty does not apply. Costs associated with the product, Whirlpool Corporation or Whirlpool Canada LP (hereafter "Whirlpool") will pay for product service if your major appliance is located in your correspondence. LIMITATION OF ...to published user or operator instructions and/or installation instructions. 4. W10182518A SP PN W10182523A © 2008 Whirlpool Corporation. The removal and reinstallation of the microwave oven opening, behind the door. Damage resulting from accident, alteration, misuse, abuse, fire, flood, ...
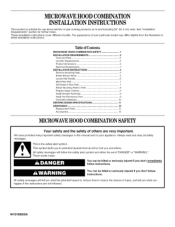
Installation Instructions
Page 1
... Replacement Parts 1..2 Accessories 1..2 MICROWAVEHOODCOMBINATIOSNAFETY Your safety and the safety of your appliance. Electrical Requirements 3.. Install the Microwave Oven 9. This is suitable for further notes. All safety messages will follow instructions. See "Installation Requirements" section...others . Always read and obey all safety messages. This symbol alerts you to Wall 8. W10189505A Tableof Contents MICROWAVE HOOD COMBINATION SAFETY 1 INSTALLATION REQUIREMENTS 2. Locate Wall Stud(s 6.. Prepare Upper Cabinet 8.. Product Dimensions 3.. Remove Mounting ...
... Replacement Parts 1..2 Accessories 1..2 MICROWAVEHOODCOMBINATIOSNAFETY Your safety and the safety of your appliance. Electrical Requirements 3.. Install the Microwave Oven 9. This is suitable for further notes. All safety messages will follow instructions. See "Installation Requirements" section...others . Always read and obey all safety messages. This symbol alerts you to Wall 8. W10189505A Tableof Contents MICROWAVE HOOD COMBINATION SAFETY 1 INSTALLATION REQUIREMENTS 2. Locate Wall Stud(s 6.. Prepare Upper Cabinet 8.. Product Dimensions 3.. Remove Mounting ...
Installation Instructions
Page 2
... • 11/2"(3.8 cm) diam. NOTE: The hardware items listed here are not designed to exist above the microwave oven so that the materials used will be combined. See "Venting Design Specifications" section. 2 Read and follow the instructions provided with your builder or cabinet supplier ...to use appropriate fasteners. See "Rectangular to back of microwave oven) Aluminum grease filters Charcoal filters (...
... • 11/2"(3.8 cm) diam. NOTE: The hardware items listed here are not designed to exist above the microwave oven so that the materials used will be combined. See "Venting Design Specifications" section. 2 Read and follow the instructions provided with your builder or cabinet supplier ...to use appropriate fasteners. See "Rectangular to back of microwave oven) Aluminum grease filters Charcoal filters (...
Installation Instructions
Page 3
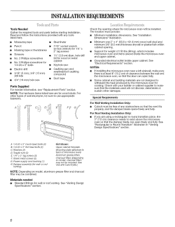
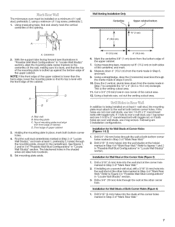
... installation height. In the event of an electrical short circuit, grounding reduces the risk of the grounding plug can result in a risk of range/cooktop below. T 171/4" (43 8 crn' T 16¼" 111.3 cm) GROUNDING iNSTRUCTiONS [] For all governing codes and ordinances. ...Exact dimensions may vary depending on type of electric shock. SAVETHESEINSTRUCTIONS The microwave oven is typical for the electric current. If the power supply cord is properly installed and grounded. Consult a qualified electrician or ...
... installation height. In the event of an electrical short circuit, grounding reduces the risk of the grounding plug can result in a risk of range/cooktop below. T 171/4" (43 8 crn' T 16¼" 111.3 cm) GROUNDING iNSTRUCTiONS [] For all governing codes and ordinances. ...Exact dimensions may vary depending on type of electric shock. SAVETHESEINSTRUCTIONS The microwave oven is typical for the electric current. If the power supply cord is properly installed and grounded. Consult a qualified electrician or ...
Installation Instructions
Page 4
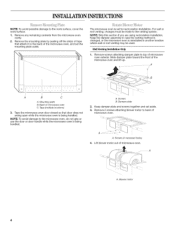
... roof venting, changes must be used. A. Keep the damper assembly in recessed holes) 4= Lift blower motor out of the microwave oven, and set aside. 3. A Screws B. INSTALLATIONINSTRUCTIONS NOTE: To avoid possible damage to the venting system. Remove any remaining contents from the...recirculation installation. Mounting plate B. Tape (multiple locations) 3. Remove 2 screws attaching blower motor to the microwave oven, do not grip or use the door or door handle while the microwave oven is set for recirculation installation. Screws (in case the venting method is changed, or the...
... roof venting, changes must be used. A. Keep the damper assembly in recessed holes) 4= Lift blower motor out of the microwave oven, and set aside. 3. A Screws B. INSTALLATIONINSTRUCTIONS NOTE: To avoid possible damage to the venting system. Remove any remaining contents from the...recirculation installation. Mounting plate B. Tape (multiple locations) 3. Remove 2 screws attaching blower motor to the microwave oven, do not grip or use the door or door handle while the microwave oven is set for recirculation installation. Screws (in case the venting method is changed, or the...
Installation Instructions
Page 5
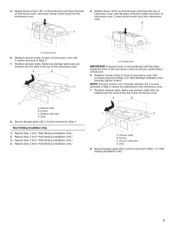
..."'-..... Make sure damper plate tabs are inserted into the slots in Step 1. Secure damper plate with 2 screws removed in the top of microwave oven and lower blower motor back into microwave oven. Reattach blower motor to back of "Wall Venting Installation Only." Screws C. A B \ I D A. Repeat Step 3 from ...Wall Venting Installation Only." 2. Make sure damper plate tabs are inserted into the slots in Step 3 of microwave oven with 2 screws removed in Step 3. 7. A. Damper plate tabs D. Slots 8= Secure damper plate with 2 screws removed in the top of...
..."'-..... Make sure damper plate tabs are inserted into the slots in Step 1. Secure damper plate with 2 screws removed in the top of microwave oven and lower blower motor back into microwave oven. Reattach blower motor to back of "Wall Venting Installation Only." Screws C. A B \ I D A. Repeat Step 3 from ...Wall Venting Installation Only." 2. Make sure damper plate tabs are inserted into the slots in Step 3 of microwave oven with 2 screws removed in Step 3. 7. A. Damper plate tabs D. Slots 8= Secure damper plate with 2 screws removed in the top of...
Installation Instructions
Page 7
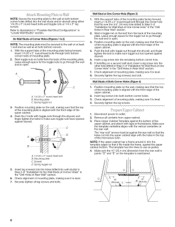
.... or if both holes are ideal hole locations. 5. Drill a 3/4" (19 mm) hole through the wall at the other hole marked in Step 6, and mark. 9. The microwave oven must attach to the wall at both bottom corner holes. Centerline 2. Holding the mounting plate in "Locate Wall Stud(s)" section. The blackened holes in...
.... or if both holes are ideal hole locations. 5. Drill a 3/4" (19 mm) hole through the wall at the other hole marked in Step 6, and mark. 9. The microwave oven must attach to the wall at both bottom corner holes. Centerline 2. Holding the mounting plate in "Locate Wall Stud(s)" section. The blackened holes in...
Installation Instructions
Page 8
..." in the "Drill Holes in the top of mounting plate, making sure that the top of the mounting plate is level. 7. Check alignment of the microwave oven. // // .// // A. 1/4-20 x 3" round-head bolt B. Remove all lag screws and bolts. Push the bolt with toggle nuts through both bottom corners. 1. Spring toggle nut 1. Disconnect...
..." in the "Drill Holes in the top of mounting plate, making sure that the top of the mounting plate is level. 7. Check alignment of the microwave oven. // // .// // A. 1/4-20 x 3" round-head bolt B. Remove all lag screws and bolts. Push the bolt with toggle nuts through both bottom corners. 1. Spring toggle nut 1. Disconnect...
Installation Instructions
Page 9
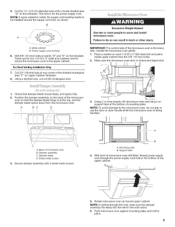
..."D" and "E" on the template. Place a washer on support tabs at the top, and the damper blade opens away from the microwave oven. Rotate microwave oven up toward upper cabinet. NOTE: If upper cabinet is the heavy side. Metal cabinet B. These are for the power supply... cord. IMPORTANT: The control side of the shaded rectangular area "F" on the back of microwave oven B. A BC D 3. A. Sheet metal screws 3. Power supply cord bushing 6. Using a keyhole saw, cut out the rectangular area. Secure ...
..."D" and "E" on the template. Place a washer on support tabs at the top, and the damper blade opens away from the microwave oven. Rotate microwave oven up toward upper cabinet. NOTE: If upper cabinet is the heavy side. Metal cabinet B. These are for the power supply... cord. IMPORTANT: The control side of the shaded rectangular area "F" on the back of microwave oven B. A BC D 3. A. Sheet metal screws 3. Power supply cord bushing 6. Using a keyhole saw, cut out the rectangular area. Secure ...
Installation Instructions
Page 10
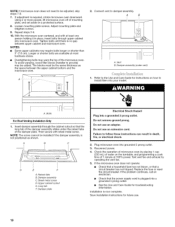
... Electrical Shock Hazard Plug into your model. [ lq A. Do not use . 10 Toavoidwarpingw,oodfillerblocks(installetorprovide) maybeaddedT.heblockms ustbethesamethicknesass tmhiecsrpoawcaebvoeevtewne.etnheuppecr abinebtottomandthe 2. Reconnect power. 4. If the microwave oven does not operate: • Check that a household fuse has not blown, or that the power supply cord is plugged into grounded 3 prong outlet. 3. NOTES...
... Electrical Shock Hazard Plug into your model. [ lq A. Do not use . 10 Toavoidwarpingw,oodfillerblocks(installetorprovide) maybeaddedT.heblockms ustbethesamethicknesass tmhiecsrpoawcaebvoeevtewne.etnheuppecr abinebtottomandthe 2. Reconnect power. 4. If the microwave oven does not operate: • Check that a household fuse has not blown, or that the power supply cord is plugged into grounded 3 prong outlet. 3. NOTES...
Installation Instructions
Page 11
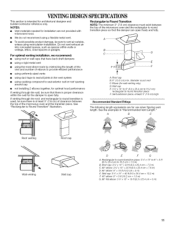
...Wall venting Wall cap D E F G A. Roof cap: 3 ¼" x 10" = 24 ft (8.3 x 25.4 cm = 7.3 m) C. 90 ° elbow: 3 ¼" x 10" = 25 ft (8.3 x 25.4 cm = 7.6 m) D. 90 ° elbow: 6" = 10 ft (15.2 cm = 3 m) E. If venting through the wall, be sure there is intended for ...min. VENTINGDESIGNSPECIFICATIONS This section is at least 3" (7.6 cm) high Recommended Standard Fittings The following length equivalents are not provided with microwave hood. NOTES: • Vent materials needed for wall venting only) D. For optimal venting installation, we recommend: • using ...
...Wall venting Wall cap D E F G A. Roof cap: 3 ¼" x 10" = 24 ft (8.3 x 25.4 cm = 7.3 m) C. 90 ° elbow: 3 ¼" x 10" = 25 ft (8.3 x 25.4 cm = 7.6 m) D. 90 ° elbow: 6" = 10 ft (15.2 cm = 3 m) E. If venting through the wall, be sure there is intended for ...min. VENTINGDESIGNSPECIFICATIONS This section is at least 3" (7.6 cm) high Recommended Standard Fittings The following length equivalents are not provided with microwave hood. NOTES: • Vent materials needed for wall venting only) D. For optimal venting installation, we recommend: • using ...
Installation Instructions
Page 12
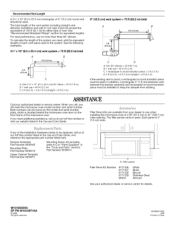
... performance, use when installing this microwave oven in pairs. One 3 ¼" x 10" (8.3 x 25.4 cm) 90 ° elbow = 25 ft (7.6 m) B. 1 waft cap = 40 ft (12.2 m) C. 2 ft (O.6 m) + 6 ft (1.8 m) straight = 8 ft (2.4 m) 6" (15.2 cm) vent system = 73 ft (22.2 m) total A B 4 6 ft (1.8 m) _..i.........2..f.t.......T (0.8m_ C D A. Two 90 ° elbows = 20 ft (6.1 m) B. 1 wall cap = 40 ft (12.2 m) C. 1 rectangular to round transition piece = 5 ft (1.5 m) D. 2 ft (0.6 m) + 6 ft (1.8 m) straight = 8 ft (2.4 m) If the existing vent is...
... performance, use when installing this microwave oven in pairs. One 3 ¼" x 10" (8.3 x 25.4 cm) 90 ° elbow = 25 ft (7.6 m) B. 1 waft cap = 40 ft (12.2 m) C. 2 ft (O.6 m) + 6 ft (1.8 m) straight = 8 ft (2.4 m) 6" (15.2 cm) vent system = 73 ft (22.2 m) total A B 4 6 ft (1.8 m) _..i.........2..f.t.......T (0.8m_ C D A. Two 90 ° elbows = 20 ft (6.1 m) B. 1 wall cap = 40 ft (12.2 m) C. 1 rectangular to round transition piece = 5 ft (1.5 m) D. 2 ft (0.6 m) + 6 ft (1.8 m) straight = 8 ft (2.4 m) If the existing vent is...


