User Instructions
Page 1
... found in the provided Installation Instructions. All safety messages will need assistance, call us at www.whirlpool.com for additional information. IMPORTANT SAFETY INSTRUCTIONS When using the microwave oven. m Some products such as whole eggs in this high-quality product. THANK YOU for example...para el usuario de la combinaci6n microondas campana" en espa_ol, o para obtener informaci6n adicional acerca de su producto, visite: www.whirlpool.com Tenga listo su nQmero de modelo completo. We have provided many important safety messages in the shell and sealed containers - SAVE...
... found in the provided Installation Instructions. All safety messages will need assistance, call us at www.whirlpool.com for additional information. IMPORTANT SAFETY INSTRUCTIONS When using the microwave oven. m Some products such as whole eggs in this high-quality product. THANK YOU for example...para el usuario de la combinaci6n microondas campana" en espa_ol, o para obtener informaci6n adicional acerca de su producto, visite: www.whirlpool.com Tenga listo su nQmero de modelo completo. We have provided many important safety messages in the shell and sealed containers - SAVE...
User Instructions
Page 2
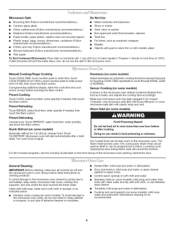
...[] Do not clean with metal scouring pads. Do not overheat the liquid. - Pieces can result in the microwave oven as described in operation. [] When flambeing foods under the hood, turn oven off, and disconnect the power cord, or shut off the pad and touch electrical parts involving ...breaker panel. - Do not use . This type of oven is not always present. iMPORTANT SAFETY iNSTRUCTiONS m Use the microwave oven only for its intended use above ranges with maximum width of 36" (91.44 cm). [] Clean Ventilating Hoods Frequently - m The microwave oven should not be allowed to persons: -
...[] Do not clean with metal scouring pads. Do not overheat the liquid. - Pieces can result in the microwave oven as described in operation. [] When flambeing foods under the hood, turn oven off, and disconnect the power cord, or shut off the pad and touch electrical parts involving ...breaker panel. - Do not use . This type of oven is not always present. iMPORTANT SAFETY iNSTRUCTiONS m Use the microwave oven only for its intended use above ranges with maximum width of 36" (91.44 cm). [] Clean Ventilating Hoods Frequently - m The microwave oven should not be allowed to persons: -
User Instructions
Page 3
...the event of an electrical short circuit, grounding reduces the risk of the grounding plug can result in a risk of the FCC Rules. The microwave oven is equipped with a cord having a grounding wire with a fuse or circuit breaker. Consult a qualified electrician or serviceman if the grounding ...turn tones off . Cooking Rack (on the magnetron. This is too short, have a qualified electrician or serviceman install an outlet near the microwave oven. Improper use an extension cord. Touch the Options or Setup control to reach the "Light Timer" submenu, and set speed. Scroll Speed...
...the event of an electrical short circuit, grounding reduces the risk of the grounding plug can result in a risk of the FCC Rules. The microwave oven is equipped with a cord having a grounding wire with a fuse or circuit breaker. Consult a qualified electrician or serviceman if the grounding ...turn tones off . Cooking Rack (on the magnetron. This is too short, have a qualified electrician or serviceman install an outlet near the microwave oven. Improper use an extension cord. Touch the Options or Setup control to reach the "Light Timer" submenu, and set speed. Scroll Speed...
User Instructions
Page 4
...and area where the door touches the frame clean. For list of preset programs, see the Cooking Guide label on some models) A sensor in the microwave oven. I_.R{J _;.9 .;?I_J Manual Cooking/Stage Cooking Doneness (on some models) Touch COOK TIME, touch number pads to enter time, touch COOK ...POWER (if not 100%), touch number pads to follow label instructions on some models): To avoid damage to the microwave oven cavity, do not use stainless steel cleaner. Preset Reheating Touch REHEAT,select food item, enter quantity if needed , then touch the Start ...
...and area where the door touches the frame clean. For list of preset programs, see the Cooking Guide label on some models) A sensor in the microwave oven. I_.R{J _;.9 .;?I_J Manual Cooking/Stage Cooking Doneness (on some models) Touch COOK TIME, touch number pads to enter time, touch COOK ...POWER (if not 100%), touch number pads to follow label instructions on some models): To avoid damage to the microwave oven cavity, do not use stainless steel cleaner. Preset Reheating Touch REHEAT,select food item, enter quantity if needed , then touch the Start ...
User Instructions
Page 5
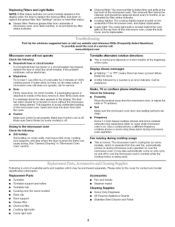
... It may be replaced about the door appears in "Microwave Oven Care" section. Replacing Filters and Light Bulbs NOTE: A filter status indicator (on and off to cool the microwave oven's controls while the cooktop below . www.whirlpool.com Microwave oven will not operate Check the following : •...; Proximity Move the receiver away from underside of the microwave oven, under the bulb cover, and is an error ...
... It may be replaced about the door appears in "Microwave Oven Care" section. Replacing Filters and Light Bulbs NOTE: A filter status indicator (on and off to cool the microwave oven's controls while the cooktop below . www.whirlpool.com Microwave oven will not operate Check the following : •...; Proximity Move the receiver away from underside of the microwave oven, under the bulb cover, and is an error ...
User Instructions
Page 6
...FOR INCIDENTAL OR CONSEQUENTIAL DAMAGES. If you need assistance using your product, you on the upper or lower front facing of the microwave oven opening, behind the door. Outside the 50 United States and Canada, this limited warranty. The removal and reinstallation of ...purchase, when this major appliance is operated and maintained according to instructions attached to or furnished with the product, Whirlpool Corporation or Whirlpool Canada LP (hereafter "Whirlpool") will pay for Factory Specified Parts and repair labor to correct defects in which it was purchased. This ...
...FOR INCIDENTAL OR CONSEQUENTIAL DAMAGES. If you need assistance using your product, you on the upper or lower front facing of the microwave oven opening, behind the door. Outside the 50 United States and Canada, this limited warranty. The removal and reinstallation of ...purchase, when this major appliance is operated and maintained according to instructions attached to or furnished with the product, Whirlpool Corporation or Whirlpool Canada LP (hereafter "Whirlpool") will pay for Factory Specified Parts and repair labor to correct defects in which it was purchased. This ...
Installation Instructions
Page 1
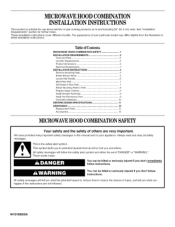
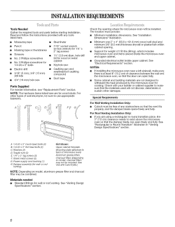
... may differ slightly from the illustration in RearWall 7.. W10189505A MICROWAVEHOODCOMBINATION INSTALLATIONINSTRUCTIONS This product is suitable for further notes. The appearance of your appliance. Tableof Contents MICROWAVE HOOD COMBINATION SAFETY 1 INSTALLATION REQUIREMENTS 2. Electrical Requirements 3.. Install DamperAssembly 9. Install the...
... may differ slightly from the illustration in RearWall 7.. W10189505A MICROWAVEHOODCOMBINATION INSTALLATIONINSTRUCTIONS This product is suitable for further notes. The appearance of your appliance. Tableof Contents MICROWAVE HOOD COMBINATION SAFETY 1 INSTALLATION REQUIREMENTS 2. Electrical Requirements 3.. Install DamperAssembly 9. Install the...
Installation Instructions
Page 2
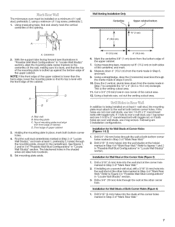
...Roof Venting Installation Only: • If you are using a rectangular to round transition piece, the 3" (7.6 cm) clearance needs to exist above the microwave oven so that the vent fits properly, and the damper blade opens freely and fully. A 1/4-20 x 3" round-head bolts (2) B. 1/4-20...Electrical Requirements" section. See "Rectangular to withstand the heat produced by the microwave oven for wall or roof venting) Not Shown: Upper cabinet template Mounting plate (attached to back of wall structures, be combined. Power supply cord bushing (1) H. See "Venting Design Specifications" section....
...Roof Venting Installation Only: • If you are using a rectangular to round transition piece, the 3" (7.6 cm) clearance needs to exist above the microwave oven so that the vent fits properly, and the damper blade opens freely and fully. A 1/4-20 x 3" round-head bolts (2) B. 1/4-20...Electrical Requirements" section. See "Rectangular to withstand the heat produced by the microwave oven for wall or roof venting) Not Shown: Upper cabinet template Mounting plate (attached to back of wall structures, be combined. Power supply cord bushing (1) H. See "Venting Design Specifications" section....
Installation Instructions
Page 3
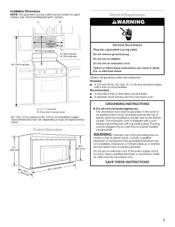
... ...... 12" (30.5 cm) rnin. 14" (35.6 crn) max. 66" (167.6 crn) rnin. Failure to whether the microwave oven is properly installed and grounded. In the event of an electrical short circuit, grounding reduces the risk of electric shock by providing an ...governing codes and ordinances. If the power supply cord is typical for the electric current. Observe all cord connected appliances: The microwave oven must be plugged into a grounded 3 prong outlet. Required: • A 120 Volt, 60 Hz, AC only,...Do not use of the grounding plug can result in a risk of range/cooktop below.
... ...... 12" (30.5 cm) rnin. 14" (35.6 crn) max. 66" (167.6 crn) rnin. Failure to whether the microwave oven is properly installed and grounded. In the event of an electrical short circuit, grounding reduces the risk of electric shock by providing an ...governing codes and ordinances. If the power supply cord is typical for the electric current. Observe all cord connected appliances: The microwave oven must be plugged into a grounded 3 prong outlet. Required: • A 120 Volt, 60 Hz, AC only,...Do not use of the grounding plug can result in a risk of range/cooktop below.
Installation Instructions
Page 4
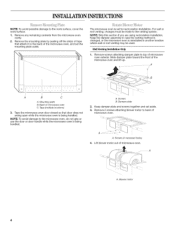
...Installation Only 1. Tape (multiple locations) 3. Remove 2 screws attaching blower motor to top of microwave oven. Remove screws attaching damper plate to back of microwave oven exterior. Back of the microwave oven, and set the mounting plate aside. A Screws B. Damper plate 2. A ::::._..:::_4... installation. A. NOTE: Skip this section if you are using recirculation installation. Slide damper plate toward the front of microwave oven. Mounting plate B. INSTALLATIONINSTRUCTIONS NOTE: To avoid possible damage to the venting system. Keep the damper assembly in ...
...Installation Only 1. Tape (multiple locations) 3. Remove 2 screws attaching blower motor to top of microwave oven. Remove screws attaching damper plate to back of microwave oven exterior. Back of the microwave oven, and set the mounting plate aside. A Screws B. Damper plate 2. A ::::._..:::_4... installation. A. NOTE: Skip this section if you are using recirculation installation. Slide damper plate toward the front of microwave oven. Mounting plate B. INSTALLATIONINSTRUCTIONS NOTE: To avoid possible damage to the venting system. Keep the damper assembly in ...
Installation Instructions
Page 5
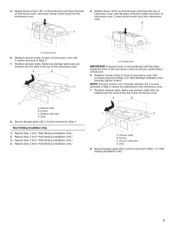
... 6. Screws C. Repeat Step 4 from "Wall Venting Installation Only." 4. A. Reattach damper plate. Reattach blower motor to back of microwave oven with 2 screws removed in Step 1 of "Wall Venting Installation Only." A. Damper plate tabs D. Repeat Step 3 from "Wall...A B \ I D A. Roof Venting Installation Only 1. Screws C. Slots 8= Secure damper plate with 2 screws removed in Step 3 of the microwave oven. A A. Secure damper plate with 2 screws removed in Step 3. 7. Repeat Step 1 from "Wall Venting Installation Only." 3. Exhaust port IMPORTANT...
... 6. Screws C. Repeat Step 4 from "Wall Venting Installation Only." 4. A. Reattach damper plate. Reattach blower motor to back of microwave oven with 2 screws removed in Step 1 of "Wall Venting Installation Only." A. Damper plate tabs D. Repeat Step 3 from "Wall...A B \ I D A. Roof Venting Installation Only 1. Screws C. Slots 8= Secure damper plate with 2 screws removed in Step 3 of the microwave oven. A A. Secure damper plate with 2 screws removed in Step 3. 7. Repeat Step 1 from "Wall Venting Installation Only." 3. Exhaust port IMPORTANT...
Installation Instructions
Page 7
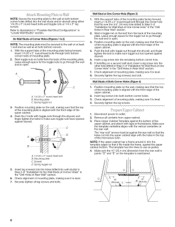
... of "Mark Rear Wall." 2. Installationfor No WallStuds at the hole(s) marked in Step 3 of 1 lag screw, preferably 2. 1. if 1 hole is level with toggle nut; The microwave oven must attach to the wall at both bottom corner holes. Front edge of the opening. Using measuring tape, measure out 6" (15.2 cm) on a minimum...
... of "Mark Rear Wall." 2. Installationfor No WallStuds at the hole(s) marked in Step 3 of 1 lag screw, preferably 2. 1. if 1 hole is level with toggle nut; The microwave oven must attach to the wall at both bottom corner holes. Front edge of the opening. Using measuring tape, measure out 6" (15.2 cm) on a minimum...
Installation Instructions
Page 8
... mounting plate on a second wall stud, insert a lag screw into wall stud(s) in Rear Wall" section. Push the 2 bolts with the front edge of the microwave oven. // // .// // A. 1/4-20 x 3" round-head bolt B. Make sure the template centerline aligns with toggle nut through the drywall, and finger tighten the bolts to open . 3. Make...
... mounting plate on a second wall stud, insert a lag screw into wall stud(s) in Rear Wall" section. Push the 2 bolts with the front edge of the microwave oven. // // .// // A. 1/4-20 x 3" round-head bolt B. Make sure the template centerline aligns with toggle nut through the drywall, and finger tighten the bolts to open . 3. Make...
Installation Instructions
Page 9
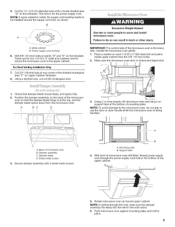
...the template. A. Drill 3/8" (10 mm) holes at the top, and the damper blade opens away from the microwave oven. Handle the microwave oven gently. 1. Back of microwave oven still tilted, thread power supply cord through the wall, make sure the damper assembly fits easily into the ... a keyhole saw, cut out the rectangular area. IMPORTANT: The control side of mounting plate. Place a washer on the template. Make sure the microwave oven door is closed and taped shut. !! 1= Check that the damper blade hinge is being handled. Damper assembly C. Secure damper assembly with 2...
...the template. A. Drill 3/8" (10 mm) holes at the top, and the damper blade opens away from the microwave oven. Handle the microwave oven gently. 1. Back of microwave oven still tilted, thread power supply cord through the wall, make sure the damper assembly fits easily into the ... a keyhole saw, cut out the rectangular area. IMPORTANT: The control side of mounting plate. Place a washer on the template. Make sure the microwave oven door is closed and taped shut. !! 1= Check that the damper blade hinge is being handled. Damper assembly C. Secure damper assembly with 2...
Installation Instructions
Page 10
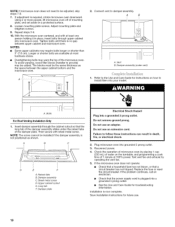
...)t.Loorensg.eorrshortebroltsareavailabaletmost Overtightenbinogltsmaywarpthetopofthemicrowavoeven. Vent B. Raised tabs B. Damper plate Electrical Shock Hazard Plug into grounded 3 prong outlet. 3. Plug microwave oven into a grounded 3 prong outlet. See the Use and Care Guide for future use an adapter. Loosemn ountinpglatescrewsA.djusmt ... D E A. Reconnect power. 4. Bolts For Roof Venting Installation Only 1. Do not use an extension cord. If the microwave oven does not operate: • Check that a household fuse has not blown, or that the power supply cord is plugged...
...)t.Loorensg.eorrshortebroltsareavailabaletmost Overtightenbinogltsmaywarpthetopofthemicrowavoeven. Vent B. Raised tabs B. Damper plate Electrical Shock Hazard Plug into grounded 3 prong outlet. 3. Plug microwave oven into a grounded 3 prong outlet. See the Use and Care Guide for future use an adapter. Loosemn ountinpglatescrewsA.djusmt ... D E A. Reconnect power. 4. Bolts For Roof Venting Installation Only 1. Do not use an extension cord. If the microwave oven does not operate: • Check that a household fuse has not blown, or that the power supply cord is plugged...
Installation Instructions
Page 11
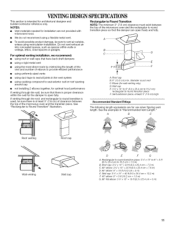
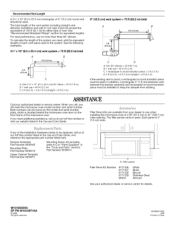
...90 ° flat elbow: 3 ¼" x 10" = 10 ft (8.3 x 25.4 cm = 3 m) 11 See "Rectangular to round transition is used, be sure there is at least 3" (7.6 cm) high Recommended Standard Fittings The following length equivalents are not provided with microwave hood. Rectangular to Round Transition NOTE: The minimum 3" (7.6 cm) clearance...length of the vent and number of the microwave oven and the transition piece. Elbow (for the damper to seal exterior wall or roof opening around cap • not installing 2 elbows together, for optimal hood performance If venting through the roof, and ...
...90 ° flat elbow: 3 ¼" x 10" = 10 ft (8.3 x 25.4 cm = 3 m) 11 See "Rectangular to round transition is used, be sure there is at least 3" (7.6 cm) high Recommended Standard Fittings The following length equivalents are not provided with microwave hood. Rectangular to Round Transition NOTE: The minimum 3" (7.6 cm) clearance...length of the vent and number of the microwave oven and the transition piece. Elbow (for the damper to seal exterior wall or roof opening around cap • not installing 2 elbows together, for optimal hood performance If venting through the roof, and ...
Installation Instructions
Page 12
... listed in the Use and Care Guide. If you need additional assistance, call , you need the microwave oven model number and serial number. See the following examples: 31/4'' x 10" (8.3 x 25.4 cm) vent system = 73 ft (22.2 m) total A B 6 ft (I .8 m) (0.6m) C A. Filler Panel Kits are available from sticking. The total length of each vent piece...
... listed in the Use and Care Guide. If you need additional assistance, call , you need the microwave oven model number and serial number. See the following examples: 31/4'' x 10" (8.3 x 25.4 cm) vent system = 73 ft (22.2 m) total A B 6 ft (I .8 m) (0.6m) C A. Filler Panel Kits are available from sticking. The total length of each vent piece...


