

Owners Manual
Page 2
... not place any openings on . ■ Use care when cleaning the vent-hood filter. Call an authorized service company for examination, repair, or adjustment. ■ See door surface cleaning instructions in the "Microwave Oven Care" section. ■ To reduce the risk of injury to accumulate on ...hood or filter. ■ Do not use . ■ Do not store anything directly on models with the...
... not place any openings on . ■ Use care when cleaning the vent-hood filter. Call an authorized service company for examination, repair, or adjustment. ■ See door surface cleaning instructions in the "Microwave Oven Care" section. ■ To reduce the risk of injury to accumulate on ...hood or filter. ■ Do not use . ■ Do not store anything directly on models with the...

Owners Manual
Page 3
...or Setup control to reach the "Vent Fan" submenu, and select the setting. Filter Reset Reset the filter status after 2-level cooking. Scroll Speed Scroll speed of electric shock. To avoid damage to the microwave oven due to avoid unintended start. or 20-amp electrical supply with a grounding ...reach the "Scroll Speed" submenu, and select the scroll speed. Cooking Rack (on automatically as to the microwave oven, always remove rack after replacing and/or cleaning the filters. Do not remove ground prong. In the event of an electrical short circuit, grounding reduces the risk ...
...or Setup control to reach the "Vent Fan" submenu, and select the setting. Filter Reset Reset the filter status after 2-level cooking. Scroll Speed Scroll speed of electric shock. To avoid damage to the microwave oven due to avoid unintended start. or 20-amp electrical supply with a grounding ...reach the "Scroll Speed" submenu, and select the scroll speed. Cooking Rack (on automatically as to the microwave oven, always remove rack after replacing and/or cleaning the filters. Do not remove ground prong. In the event of an electrical short circuit, grounding reduces the risk ...

Owners Manual
Page 4
...any type of abrasive cleanser or scrubbers. ■ Grease filter: mild soap and water or dishwasher. ■ Door and exterior: mild soap and water, or glass cleaner applied to soil buildup, keep cavity, microwave inlet cover, cooking rack supports, and area where the...Warm Hold can be programmed to enter power level (10-90), then touch the Start control. Always follow a cooking cycle. Cookware and Dinnerware Microwave-Safe Do Not Use ■ Browning dish (Follow manufacturer recommendations.) ■ Ceramic glass, glass ■ China, earthenware (Follow manufacturer recommendations...
...any type of abrasive cleanser or scrubbers. ■ Grease filter: mild soap and water or dishwasher. ■ Door and exterior: mild soap and water, or glass cleaner applied to soil buildup, keep cavity, microwave inlet cover, cooking rack supports, and area where the...Warm Hold can be programmed to enter power level (10-90), then touch the Start control. Always follow a cooking cycle. Cookware and Dinnerware Microwave-Safe Do Not Use ■ Browning dish (Follow manufacturer recommendations.) ■ Ceramic glass, glass ■ China, earthenware (Follow manufacturer recommendations...

Owners Manual
Page 5
...door. Turntable alternates rotation directions ■ This is on. Reset the clock. ■ A letter followed by filter status indicator. ■ Charcoal filter: The charcoal filter is behind the vent grille at the top front of cold water for 2 minutes at the beginning of available ...has been a power failure. Troubleshooting First try the steps below is off. www.whirlpool.com Microwave oven will not operate Check the following : ■ Soil buildup Soil buildup on cavity walls, microwave inlet cover, cooking rack supports, and area where the door touches the frame can ...
...door. Turntable alternates rotation directions ■ This is on. Reset the clock. ■ A letter followed by filter status indicator. ■ Charcoal filter: The charcoal filter is behind the vent grille at the top front of cold water for 2 minutes at the beginning of available ...has been a power failure. Troubleshooting First try the steps below is off. www.whirlpool.com Microwave oven will not operate Check the following : ■ Soil buildup Soil buildup on cavity walls, microwave inlet cover, cooking rack supports, and area where the door touches the frame can ...

Owners Manual
Page 6
...LIMITED WARRANTY SHALL BE PRODUCT REPAIR AS PROVIDED HEREIN. You can write to Whirlpool with the removal from your home of your product, you on the upper or lower front facing of the microwave oven opening, behind the door. If you need assistance using your major ...or repair house fuses, or to obtain service under these excluded circumstances shall be provided by Whirlpool. 5. Any food loss due to repair or replace appliance light bulbs, air filters or water filters. SOME STATES AND PROVINCES DO NOT ALLOW THE EXCLUSION OR LIMITATION OF INCIDENTAL OR CONSEQUENTIAL DAMAGES...
...LIMITED WARRANTY SHALL BE PRODUCT REPAIR AS PROVIDED HEREIN. You can write to Whirlpool with the removal from your home of your product, you on the upper or lower front facing of the microwave oven opening, behind the door. If you need assistance using your major ...or repair house fuses, or to obtain service under these excluded circumstances shall be provided by Whirlpool. 5. Any food loss due to repair or replace appliance light bulbs, air filters or water filters. SOME STATES AND PROVINCES DO NOT ALLOW THE EXCLUSION OR LIMITATION OF INCIDENTAL OR CONSEQUENTIAL DAMAGES...

Installation Instructions
Page 2
... are using a rectangular to round transition piece, the 3" (7.6 cm) clearance needs to exist above the microwave oven so that the materials used will be free of packaging) Aluminum grease filters Charcoal filters (Depending on model, aluminum grease filter and charcoal filter may not be combined. Damper assembly (for cooking. Toggle nuts (2) E. 1/4" x 2" lag screws (2) F. Set the...
... are using a rectangular to round transition piece, the 3" (7.6 cm) clearance needs to exist above the microwave oven so that the materials used will be free of packaging) Aluminum grease filters Charcoal filters (Depending on model, aluminum grease filter and charcoal filter may not be combined. Damper assembly (for cooking. Toggle nuts (2) E. 1/4" x 2" lag screws (2) F. Set the...
Installation Instructions
Page 10
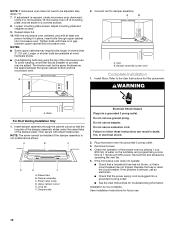
... . 10 Reconnect power. 4. If the problem continues, call an electrician. ■ Check that the long tab of microwave oven by operating the vent fan. 5. A 2. A B A. Install filters. A B C D E F A. Long tab F. Adjust mounting plate and retighten screws. 9. Check the operation of...or shorter than 3" (7.6 cm). Save Installation Instructions for filter placement. Do not use an adapter. Raised tabs B. If adjustment is now complete. Using 2 or more people, lift microwave oven off of the microwave oven. Plug microwave oven into a grounded 3 prong outlet.
... . 10 Reconnect power. 4. If the problem continues, call an electrician. ■ Check that the long tab of microwave oven by operating the vent fan. 5. A 2. A B A. Install filters. A B C D E F A. Long tab F. Adjust mounting plate and retighten screws. 9. Check the operation of...or shorter than 3" (7.6 cm). Save Installation Instructions for filter placement. Do not use an adapter. Raised tabs B. If adjustment is now complete. Using 2 or more people, lift microwave oven off of the microwave oven. Plug microwave oven into a grounded 3 prong outlet.


