
Use & Care Guide
Page 1
www.whirlpool.com Table of Contents 2 W10389942B Model WMC20005 ® MICROWAVE OVEN Use & Care Guide For questions about features, operation/performance, parts, accessories or service, call: 1-800-253-1301. or visit our website at...
www.whirlpool.com Table of Contents 2 W10389942B Model WMC20005 ® MICROWAVE OVEN Use & Care Guide For questions about features, operation/performance, parts, accessories or service, call: 1-800-253-1301. or visit our website at...

Use & Care Guide
Page 2
TABLE OF CONTENTS MICROWAVE OVEN SAFETY 3 INSTALLATION INSTRUCTIONS 4 Unpacking 4 Location Requirements 4 Electrical Requirements 5 PARTS AND FEATURES 5 Turntable 5 MICROWAVE OVEN CONTROL 6 Display 6 Start 6 Cancel/Off 6 Add 30 Seconds 6 Clock 7 Timer 7 Tones 7 Control Lock 7 MICROWAVE OVEN USE 8 Food Characteristics 8 Cooking Guidelines 8 Cookware and Dinnerware 9 Aluminum Foil and Metal 9 Microwave Cooking Power 9 Manual Cooking 10 Defrost 10 Reheat 11 Popcorn 11 MICROWAVE OVEN CARE 12 General Cleaning 12 TROUBLESHOOTING 13 ASSISTANCE OR SERVICE 14 Replacement ...
TABLE OF CONTENTS MICROWAVE OVEN SAFETY 3 INSTALLATION INSTRUCTIONS 4 Unpacking 4 Location Requirements 4 Electrical Requirements 5 PARTS AND FEATURES 5 Turntable 5 MICROWAVE OVEN CONTROL 6 Display 6 Start 6 Cancel/Off 6 Add 30 Seconds 6 Clock 7 Timer 7 Tones 7 Control Lock 7 MICROWAVE OVEN USE 8 Food Characteristics 8 Cooking Guidelines 8 Cookware and Dinnerware 9 Aluminum Foil and Metal 9 Microwave Cooking Power 9 Manual Cooking 10 Defrost 10 Reheat 11 Popcorn 11 MICROWAVE OVEN CARE 12 General Cleaning 12 TROUBLESHOOTING 13 ASSISTANCE OR SERVICE 14 Replacement ...

Use & Care Guide
Page 3
... power cord, or shut off the pad and touch electrical parts involving a risk of electric shock. Connect only to explode and should be inserted in the microwave oven as whole eggs in the "Microwave Oven Care" section. - Do not use straight-sided containers with the provided Installation Instructions. ■ Some products such as they may create a fire or risk of electric shock. ■ Do not clean...
... power cord, or shut off the pad and touch electrical parts involving a risk of electric shock. Connect only to explode and should be inserted in the microwave oven as whole eggs in the "Microwave Oven Care" section. - Do not use straight-sided containers with the provided Installation Instructions. ■ Some products such as they may create a fire or risk of electric shock. ■ Do not clean...

Use & Care Guide
Page 4
... attempt to operate this microwave oven outdoors. INSTALLATION INSTRUCTIONS Unpacking 1. Clean the inside it is damaged. If vents are in place to ensure proper airflow. The microwave oven should work properly once it and made any needed repairs. This device complies with Part 18 of the microwave oven. Check for proper operation. ■ Do not block the exhaust vents or air intake openings. Location Requirements ■ Place the microwave oven on a cart, counter, table or...
... attempt to operate this microwave oven outdoors. INSTALLATION INSTRUCTIONS Unpacking 1. Clean the inside it is damaged. If vents are in place to ensure proper airflow. The microwave oven should work properly once it and made any needed repairs. This device complies with Part 18 of the microwave oven. Check for proper operation. ■ Do not block the exhaust vents or air intake openings. Location Requirements ■ Place the microwave oven on a cart, counter, table or...
Use & Care Guide
Page 5
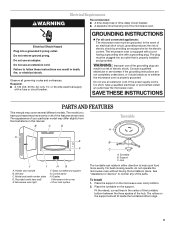
... THESE INSTRUCTIONS PARTS AND FEATURES This manual may differ slightly from the illustrations in place. Glass turntable and support G. If the power supply cord is properly installed and grounded. B C D A Turntable A E F J I . Door lock system B C A. Microwave oven light HG F. To Install: 1. WARNING: Improper use an extension cord. Do not use of the grounding plug can rotate in a risk of electric shock by providing an escape wire for the electric current. Display I A. Microwave inlet cover J. or 20-amp electrical supply...
... THESE INSTRUCTIONS PARTS AND FEATURES This manual may differ slightly from the illustrations in place. Glass turntable and support G. If the power supply cord is properly installed and grounded. B C D A Turntable A E F J I . Door lock system B C A. Microwave oven light HG F. To Install: 1. WARNING: Improper use an extension cord. Do not use of the grounding plug can rotate in a risk of electric shock by providing an escape wire for the electric current. Display I A. Microwave inlet cover J. or 20-amp electrical supply...
Use & Care Guide
Page 6
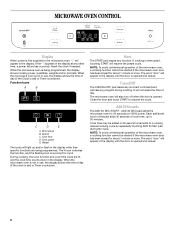
... more . Reset the clock if needed. During cooking, the cook function and cook time icons are being programmed, the display shows cooking power, quantities, weights and/or prompts. NOTE: To avoid unintentional operation of day (if the clock is being programmed. Cook time may be started if the microwave oven door has been closed for 30 seconds at any other time, a power failure has occurred. When the microwave oven is not in the display. Microwaves B. Start The START pad...
... more . Reset the clock if needed. During cooking, the cook function and cook time icons are being programmed, the display shows cooking power, quantities, weights and/or prompts. NOTE: To avoid unintentional operation of day (if the clock is being programmed. Cook time may be started if the microwave oven door has been closed for 30 seconds at any other time, a power failure has occurred. When the microwave oven is not in the display. Microwaves B. Start The START pad...
Use & Care Guide
Page 7
...:00 To Set: 1. To Lock/Unlock Control: The microwave oven must be off . 1. To Cancel Clock: Enter Clock mode, then touch CANCEL/OFF. Touch START. When the set ) after 3 seconds. The display will sound. 7 If any control pad is touched while the Control Lock is active, "Loc" reappears in the display for 3 seconds. To Set: The microwave oven must be off . The "minutes" digits will flash. Cook functions may be used while the Timer is...
...:00 To Set: 1. To Lock/Unlock Control: The microwave oven must be off . 1. To Cancel Clock: Enter Clock mode, then touch CANCEL/OFF. Touch START. When the set ) after 3 seconds. The display will sound. 7 If any control pad is touched while the Control Lock is active, "Loc" reappears in the display for 3 seconds. To Set: The microwave oven must be off . The "minutes" digits will flash. Cook functions may be used while the Timer is...
Use & Care Guide
Page 8
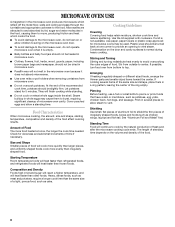
... friction and heat which reflect off the metal floor, walls and ceiling and pass through the turntable and appropriate cookware to the food. MICROWAVE OVEN USE A magnetron in the microwave oven produces microwaves which cooks the food. ■ To avoid damage to the microwave oven, do not lean on or allow children to swing on the microwave oven door. ■ To avoid damage to the microwave oven, do not operate microwave oven when...
... friction and heat which reflect off the metal floor, walls and ceiling and pass through the turntable and appropriate cookware to the food. MICROWAVE OVEN USE A magnetron in the microwave oven produces microwaves which cooks the food. ■ To avoid damage to the microwave oven, do not lean on or allow children to swing on the microwave oven door. ■ To avoid damage to the microwave oven, do not operate microwave oven when...

Use & Care Guide
Page 9
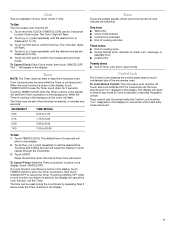
... gold or silver trim or a metallic glaze should not be used with another metal object during microwave cooking. To Test Cookware or Dinnerware for Microwave Use: 1. Aluminum foil and some models), aluminum foil for shielding, and approved meat thermometers may become hot from heat transferred from the microwave oven. PERCENT/NAME USE 100%, High (default setting) (700W) Quick heating convenience foods and foods with 1 cup (250 mL) of light...
... gold or silver trim or a metallic glaze should not be used with another metal object during microwave cooking. To Test Cookware or Dinnerware for Microwave Use: 1. Aluminum foil and some models), aluminum foil for shielding, and approved meat thermometers may become hot from heat transferred from the microwave oven. PERCENT/NAME USE 100%, High (default setting) (700W) Quick heating convenience foods and foods with 1 cup (250 mL) of light...
Use & Care Guide
Page 10
... touching START - Place food on the turntable and close the door. 2. The default time of -cycle tones will show in the display, and the end-of 5 seconds will sound. 5. "End" will appear in the display. 3. To Change Cook Power During Cooking: Touch COOK POWER repeatedly to set the desired time. Touch the [+] or [-] pad repeatedly to scroll through the power levels. Touch CANCEL/OFF or open the door. Touch COOK POWER. Touch START. New power is set immediately. The Defrost feature uses weight input. Open door, turn Food...
... touching START - Place food on the turntable and close the door. 2. The default time of -cycle tones will show in the display, and the end-of 5 seconds will sound. 5. "End" will appear in the display. 3. To Change Cook Power During Cooking: Touch COOK POWER repeatedly to set the desired time. Touch the [+] or [-] pad repeatedly to scroll through the power levels. Touch CANCEL/OFF or open the door. Touch COOK POWER. Touch START. New power is set immediately. The Defrost feature uses weight input. Open door, turn Food...

Use & Care Guide
Page 11
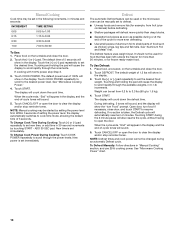
... tones will sound. 5. When the cycle ends. See "Microwave Cooking Power" chart. NOTE: During Popcorn function, as with all times. NOTE: Popping times and cook power cannot be changed during a Reheat cycle. Reheat time may vary by brand and fat content. Touch REHEAT. The display will show briefly in the display. 3. Touch CANCEL/OFF or open the door to set the desired time. Touch START. For bag sizes not listed in the display, and...
... tones will sound. 5. When the cycle ends. See "Microwave Cooking Power" chart. NOTE: During Popcorn function, as with all times. NOTE: Popping times and cook power cannot be changed during a Reheat cycle. Reheat time may vary by brand and fat content. Touch REHEAT. The display will show briefly in the display. 3. Touch CANCEL/OFF or open the door to set the desired time. Touch START. For bag sizes not listed in the display, and...
Use & Care Guide
Page 12
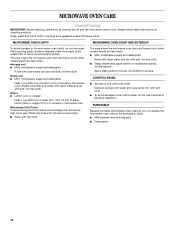
... microwave oven door and frame touch when closed should be kept clean. ■ Mild, nonabrasive soaps and detergents: Rinse with clean water and dry with wet cloth. Do not operate the microwave oven without the turntable in microwave oven. TURNTABLE Replace turntable immediately after cleaning. Microwave Inlet Cover To avoid arcing and microwave oven damage, the microwave inlet cover (see "Parts and Features") should be kept clean. ■ Wipe with soft, lint-free cloth. ■ Glass...
... microwave oven door and frame touch when closed should be kept clean. ■ Mild, nonabrasive soaps and detergents: Rinse with clean water and dry with wet cloth. Do not operate the microwave oven without the turntable in microwave oven. TURNTABLE Replace turntable immediately after cleaning. Microwave Inlet Cover To avoid arcing and microwave oven damage, the microwave inlet cover (see "Parts and Features") should be kept clean. ■ Wipe with soft, lint-free cloth. ■ Glass...

Use & Care Guide
Page 13
... for service. See "Turntable" section. ■ Is the turntable support operating properly? Cooking times seem too long ■ Is the cooking power set ? Make sure these items during microwave oven operation. 13 Use a corded phone or a different frequency cordless phone, or avoid using these areas are clean. ■ Is the cordless phone frequency 2.4 GHz? Nothing will not affect performance. Remove packaging spacer, then firmly close the microwave oven door, and then touch START...
... for service. See "Turntable" section. ■ Is the turntable support operating properly? Cooking times seem too long ■ Is the cooking power set ? Make sure these items during microwave oven operation. 13 Use a corded phone or a different frequency cordless phone, or avoid using these areas are clean. ■ Is the cordless phone frequency 2.4 GHz? Nothing will not affect performance. Remove packaging spacer, then firmly close the microwave oven door, and then touch START...

Use & Care Guide
Page 14
... at: Whirlpool Brand Home Appliances Customer eXperience Center 553 Benson Road Benton Harbor, MI 49022-2692 Please include a daytime phone number in the United States. When calling, please know the purchase date and the complete model and serial number of your correspondence. In the U.S.A. Replacement Parts Glass Turntable Part Number W10398722 Turntable Hub Part Number W10398734 Turntable Support/Roller Assembly Part Number W10398732 Cleaning Supplies Heavy Duty Degreaser Part Number 31552 All...
... at: Whirlpool Brand Home Appliances Customer eXperience Center 553 Benson Road Benton Harbor, MI 49022-2692 Please include a daytime phone number in the United States. When calling, please know the purchase date and the complete model and serial number of your correspondence. In the U.S.A. Replacement Parts Glass Turntable Part Number W10398722 Turntable Hub Part Number W10398734 Turntable Support/Roller Assembly Part Number W10398732 Cleaning Supplies Heavy Duty Degreaser Part Number 31552 All...
Use & Care Guide
Page 15
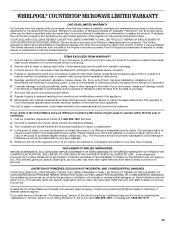
... "Troubleshooting" section of the Use & Care Guide. Please include your Whirlpool Countertop Microwave should be found by checking the "Assistance or Service" section or by a Whirlpool designated service company. If you reside in the United States and your name and address on the duration of implied warranties of merchantability or fitness, so this microwave is used in which it is reported to repair or replace light bulbs...
... "Troubleshooting" section of the Use & Care Guide. Please include your Whirlpool Countertop Microwave should be found by checking the "Assistance or Service" section or by a Whirlpool designated service company. If you reside in the United States and your name and address on the duration of implied warranties of merchantability or fitness, so this microwave is used in which it is reported to repair or replace light bulbs...

Use & Care Guide
Page 16
... you obtain assistance or service if you ever need it. You can find this book and your sales slip together for in China Dealer name Address Phone number Model number Serial number Purchase date W10389942B SP W10389944B © 2011 Whirlpool Corporation. You must provide proof of Whirlpool, U.S.A. 3/11 Printed in -warranty service. Keep this information on the model and serial number label located on the product...
... you obtain assistance or service if you ever need it. You can find this book and your sales slip together for in China Dealer name Address Phone number Model number Serial number Purchase date W10389942B SP W10389944B © 2011 Whirlpool Corporation. You must provide proof of Whirlpool, U.S.A. 3/11 Printed in -warranty service. Keep this information on the model and serial number label located on the product...

Warranty Information
Page 1
... province to operate within the first year of ownership: 1. Microwaves with the product, Whirlpool Corporation or Whirlpool Canada LP (hereafter "Whirlpool") will not be borne by calling Whirlpool. The cost of the Use & Care Guide. Call our Customer eXperience Center at 1-800-253-1301 (toll-free). 2. In the event of repair, you need service, first see the "Troubleshooting" section of repair or replacement under this warranty does...
... province to operate within the first year of ownership: 1. Microwaves with the product, Whirlpool Corporation or Whirlpool Canada LP (hereafter "Whirlpool") will not be borne by calling Whirlpool. The cost of the Use & Care Guide. Call our Customer eXperience Center at 1-800-253-1301 (toll-free). 2. In the event of repair, you need service, first see the "Troubleshooting" section of repair or replacement under this warranty does...

Warranty Information
Page 2
... ever need it. Dealer name Address Phone number Model number Serial number Purchase date W10389942B SP W10389944B © 2011 Whirlpool Corporation. Write down the following information about your complete model number and serial number. All rights reserved. ® Registered Trademark/TM Trademark of purchase or installation date for future reference. You must provide proof of Whirlpool, U.S.A. 3/11 Printed in -warranty service. You can find this book...
... ever need it. Dealer name Address Phone number Model number Serial number Purchase date W10389942B SP W10389944B © 2011 Whirlpool Corporation. Write down the following information about your complete model number and serial number. All rights reserved. ® Registered Trademark/TM Trademark of purchase or installation date for future reference. You must provide proof of Whirlpool, U.S.A. 3/11 Printed in -warranty service. You can find this book...


