
Use & Care Guide
Page 5
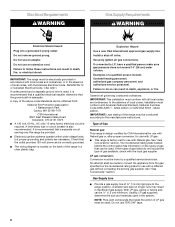
...IMPORTANT: Do not obstruct the flow of the pan. Turn off . Do not operate a burner while using empty cookware or without any cookware on some models) D. If you do not hear the igniter click, turn knob counterclockwise to IGNITE. If the spark igniter still does not operate, call a trained ...let the burner flame extend beyond the edge of combustion and ventilation air around the burner grate edges. 5 If you have purchased may have some models) during the Self-Cleaning cycle, the entire cooktop area may not match those of food, using large pots and pans. NOTE: Visually check ...
...IMPORTANT: Do not obstruct the flow of the pan. Turn off . Do not operate a burner while using empty cookware or without any cookware on some models) D. If you do not hear the igniter click, turn knob counterclockwise to IGNITE. If the spark igniter still does not operate, call a trained ...let the burner flame extend beyond the edge of combustion and ventilation air around the burner grate edges. 5 If you have purchased may have some models) during the Self-Cleaning cycle, the entire cooktop area may not match those of food, using large pots and pans. NOTE: Visually check ...
Use & Care Guide
Page 7
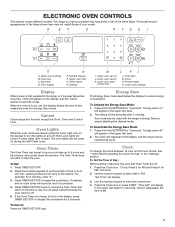
... display in hr-hr- Once it disappears, the time is first supplied to display the countdown for 5 seconds. ELECTRONIC OVEN CONTROLS This manual covers different models. Timer set time. Cancel Cancel stops any function except the Clock, Timer and Control Lock. For example, for 3 seconds. Press and hold SETTINGS for PM.... 2. Upper oven cancel J. Both oven lights will not come on ." "Energy saver off . 1. Upper oven start G. Press TIMER SET/OFF to the time of your model.
... display in hr-hr- Once it disappears, the time is first supplied to display the countdown for 5 seconds. ELECTRONIC OVEN CONTROLS This manual covers different models. Timer set time. Cancel Cancel stops any function except the Clock, Timer and Control Lock. For example, for 3 seconds. Press and hold SETTINGS for PM.... 2. Upper oven cancel J. Both oven lights will not come on ." "Energy saver off . 1. Upper oven start G. Press TIMER SET/OFF to the time of your model.
Use & Care Guide
Page 11
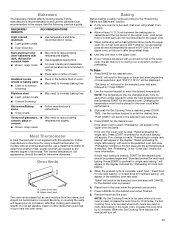
..., breads and casseroles, use a meat thermometer to determine whether meat, poultry and fish are cooked to be changed at any time by 15 minutes. On models without a temperature probe, use temperature recommended in recipe. ■ Place rack in the lower oven, the fan may be used, that could affect performance. 3. (Optional...
..., breads and casseroles, use a meat thermometer to determine whether meat, poultry and fish are cooked to be changed at any time by 15 minutes. On models without a temperature probe, use temperature recommended in recipe. ■ Place rack in the lower oven, the fan may be used, that could affect performance. 3. (Optional...
Use & Care Guide
Page 13
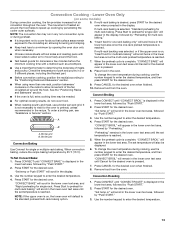
... oven is reached. 5. "Insert food for the desired oven is displayed in the lower text area once the one rack, position bakeware/ cookware on some models) During convection cooking, the fan provides increased hot air circulation throughout the oven. "Set temp or" will scroll in the lower oven text area, and...
... oven is reached. 5. "Insert food for the desired oven is displayed in the lower text area once the one rack, position bakeware/ cookware on some models) During convection cooking, the fan provides increased hot air circulation throughout the oven. "Set temp or" will scroll in the lower oven text area, and...
Use & Care Guide
Page 16
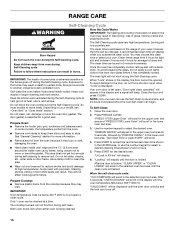
Failure to follow these instructions can result. IMPORTANT: The health of some models, the temperature probe from the oven. ■ Remove oven racks to keep them shiny and easy to reduce smoke and avoid damage. Heavy soil results ... oven cavity frame, being cleaned. 16 RANGE CARE Self-Cleaning Cycle WARNING How the Cycle Works IMPORTANT: The heating and cooling of porcelain on your model, see "Oven Vent" or "Oven Vents" section. Once the oven has completely cooled, remove ash with porcelain. Press START for more smoke. After the door...
Failure to follow these instructions can result. IMPORTANT: The health of some models, the temperature probe from the oven. ■ Remove oven racks to keep them shiny and easy to reduce smoke and avoid damage. Heavy soil results ... oven cavity frame, being cleaned. 16 RANGE CARE Self-Cleaning Cycle WARNING How the Cycle Works IMPORTANT: The heating and cooling of porcelain on your model, see "Oven Vent" or "Oven Vents" section. Once the oven has completely cooled, remove ash with porcelain. Press START for more smoke. After the door...
Use & Care Guide
Page 17
...will scroll in the selected oven text area. Cleaning Method: ■ Glass cleaner, mild liquid cleaner or nonabrasive scrubbing pad: Gently clean around the model and serial number plate because scrubbing may activate the Control Lock feature (on panel. ■ affresh® Kitchen and Appliance Cleaner Part Number W10355010.... Cleaning Method: ■ Glass cleaner and soft cloth or sponge: Apply glass cleaner to soft cloth or sponge, not directly on some models) To avoid damage to accept the recommended clean time shown in the Off position. Always follow label instructions on some...
...will scroll in the selected oven text area. Cleaning Method: ■ Glass cleaner, mild liquid cleaner or nonabrasive scrubbing pad: Gently clean around the model and serial number plate because scrubbing may activate the Control Lock feature (on panel. ■ affresh® Kitchen and Appliance Cleaner Part Number W10355010.... Cleaning Method: ■ Glass cleaner and soft cloth or sponge: Apply glass cleaner to soft cloth or sponge, not directly on some models) To avoid damage to accept the recommended clean time shown in the Off position. Always follow label instructions on some...

Use & Care Guide
Page 19
... clicking sounds like tapping a nail onto a piece of the surface burner and contact a service technician. See "Control Lockout" section. ■ On some models, is the Control Lock set ? Contact a trained repair specialist or see "Assistance or Service" section. See "Sealed Surface Burners" section. ■ Is... snaps open from the gas lines. ■ Is the control knob set correctly? See "Timed/Delay Cooking" section. ■ On some models, is the Sabbath Mode set ? Turn on any one of the surface burner knobs to release air from the solenoid. These are uneven, ...
... clicking sounds like tapping a nail onto a piece of the surface burner and contact a service technician. See "Control Lockout" section. ■ On some models, is the Control Lock set ? Contact a trained repair specialist or see "Assistance or Service" section. See "Sealed Surface Burners" section. ■ Is... snaps open from the gas lines. ■ Is the control knob set correctly? See "Timed/Delay Cooking" section. ■ On some models, is the Sabbath Mode set ? Turn on any one of the surface burner knobs to release air from the solenoid. These are uneven, ...
Use & Care Guide
Page 20
... been converted improperly. Display shows messages ■ Is the display showing a flashing time? There has been a power failure. Clear the display. On some models, has a delay start Self-Clean cycle been set ? See the "Clock" section. ■ Is the display showing a letter followed by a number? Depending...stop the fan. Close the oven door all the way. ■ Has the function been entered? See "Self-Cleaning Cycle" section. ■ On some models, reset the clock, if needed. See "Timed/Delay Cooking" section. ■ Is the oven temperature above 400°F (205°C)? Let the oven...
... been converted improperly. Display shows messages ■ Is the display showing a flashing time? There has been a power failure. Clear the display. On some models, has a delay start Self-Clean cycle been set ? See the "Clock" section. ■ Is the display showing a letter followed by a number? Depending...stop the fan. Close the oven door all the way. ■ Has the function been entered? See "Self-Cleaning Cycle" section. ■ On some models, reset the clock, if needed. See "Timed/Delay Cooking" section. ■ Is the oven temperature above 400°F (205°C)? Let the oven...
Use & Care Guide
Page 21
... fulfill the product warranty and provide afterwarranty service, anywhere in your area, you can write to build every new WHIRLPOOL® appliance. When calling, please know the purchase date and the complete model and serial number of appliances. ■ Use and maintenance procedures. ■ Accessory and repair parts sales. ■ Referrals to...
... fulfill the product warranty and provide afterwarranty service, anywhere in your area, you can write to build every new WHIRLPOOL® appliance. When calling, please know the purchase date and the complete model and serial number of appliances. ■ Use and maintenance procedures. ■ Accessory and repair parts sales. ■ Referrals to...
Use & Care Guide
Page 22
... Outside the 50 United States and Canada, this information on the model and serial number label located on how to use of consumables or cleaning products not approved by an authorized Whirlpool servicer is contrary to correct defects in materials or workmanship. Service ...BY LAW. You must be provided by calling Whirlpool. This major appliance is designed to or furnished with original model/serial numbers that is not available. 10. WHIRLPOOL SHALL NOT BE LIABLE FOR INCIDENTAL OR CONSEQUENTIAL DAMAGES. WHIRLPOOL CORPORATION MAJOR APPLIANCE WARRANTY LIMITED WARRANTY For one...
... Outside the 50 United States and Canada, this information on the model and serial number label located on how to use of consumables or cleaning products not approved by an authorized Whirlpool servicer is contrary to correct defects in materials or workmanship. Service ...BY LAW. You must be provided by calling Whirlpool. This major appliance is designed to or furnished with original model/serial numbers that is not available. 10. WHIRLPOOL SHALL NOT BE LIABLE FOR INCIDENTAL OR CONSEQUENTIAL DAMAGES. WHIRLPOOL CORPORATION MAJOR APPLIANCE WARRANTY LIMITED WARRANTY For one...
Installation Guide
Page 5
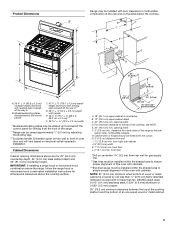
Model/serial/rating plates (located behind the control panel for gas supply line. **Gas lines must be installed within the shaded area to the side wall ... in** D. 28 72.4 ± 0.6 cm) depth with handle E. 26¹⁄₈" to 27 66.4 to 69.2 cm ± 0.3 cm)*** F. 29 76.0 ± 0.2 cm) width *Model/serial/rating plates may be installed with zero clearance to combustible construction at the rear and on centerline 1¼" (3.2 cm) from rear wall for viewing...
Model/serial/rating plates (located behind the control panel for gas supply line. **Gas lines must be installed within the shaded area to the side wall ... in** D. 28 72.4 ± 0.6 cm) depth with handle E. 26¹⁄₈" to 27 66.4 to 69.2 cm ± 0.3 cm)*** F. 29 76.0 ± 0.2 cm) width *Model/serial/rating plates may be installed with zero clearance to combustible construction at the rear and on centerline 1¼" (3.2 cm) from rear wall for viewing...
Installation Guide
Page 6
... or CAN/CGA B149 - If the types of gas listed do so can result in death, fire, or electrical shock. A smaller size pipe on the model/serial rating plate for use with the local gas supplier. Do not remove ground prong. Do not use an extension cord. If codes permit and..., 15-amp fused, electrical circuit is located on the types of gas that resist the action of the range must conform with Natural gas. The model/serial rating plate located behind the control panel has information on the back of the range in death, explosion, or fire. See "Gas Conversions" section...
... or CAN/CGA B149 - If the types of gas listed do so can result in death, fire, or electrical shock. A smaller size pipe on the model/serial rating plate for use with the local gas supplier. Do not remove ground prong. Do not use an extension cord. If codes permit and..., 15-amp fused, electrical circuit is located on the types of gas that resist the action of the range must conform with Natural gas. The model/serial rating plate located behind the control panel has information on the back of the range in death, explosion, or fire. See "Gas Conversions" section...
Installation Guide
Page 7
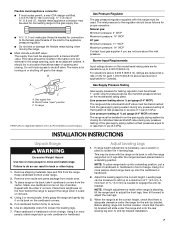
... valve must be disconnected from the carton. Failure to the regulator should be as an adjacent cabinet. Repeat with the range supported on the model/serial rating plate. Pull cardboard bottom firmly to move and install range. NOTE: If height adjustment is made when range is for each 1,...legs. 7. Line pressure testing above ½ psi gauge (14" WCP) The range and its final location, check that there is laid on the model/serial rating plate are not sure about the inlet pressure. Remove oven racks and parts package from the range. Stack one cardboard corner on the...
... valve must be disconnected from the carton. Failure to the regulator should be as an adjacent cabinet. Repeat with the range supported on the model/serial rating plate. Pull cardboard bottom firmly to move and install range. NOTE: If height adjustment is made when range is for each 1,...legs. 7. Line pressure testing above ½ psi gauge (14" WCP) The range and its final location, check that there is laid on the model/serial rating plate are not sure about the inlet pressure. Remove oven racks and parts package from the range. Stack one cardboard corner on the...
Installation Guide
Page 15
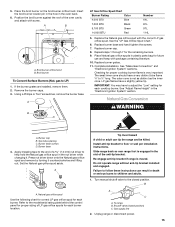
... Flame Height" in plastic parts bag for proper cooktop burner flame is moved. Natural Gas Conversion WARNING A. Burner cap B. Refer to LP) 1. B A C A. gas to the model/serial rating plate behind the control panel for proper sizing of the oven cavity and attach with the correct LP gas orifice spud. Using a Phillips...
... Flame Height" in plastic parts bag for proper cooktop burner flame is moved. Natural Gas Conversion WARNING A. Burner cap B. Refer to LP) 1. B A C A. gas to the model/serial rating plate behind the control panel for proper sizing of the oven cavity and attach with the correct LP gas orifice spud. Using a Phillips...
Installation Guide
Page 18
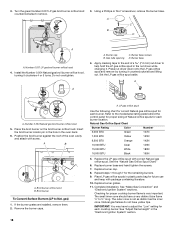
... with package containing literature. 10. See "Adjust Flame Height" in the oven back. 6. Apply masking tape to the end of a 7.0 mm) nut driver to the model/serial rating plate behind the control panel for each burner. A .054 A A. LP gas orifice spud Use the following chart for correct Natural gas orifice spud...
... with package containing literature. 10. See "Adjust Flame Height" in the oven back. 6. Apply masking tape to the end of a 7.0 mm) nut driver to the model/serial rating plate behind the control panel for each burner. A .054 A A. LP gas orifice spud Use the following chart for correct Natural gas orifice spud...

Warranty Information
Page 1
... for repairs. Major appliances with electrical or plumbing codes, or use of consumables or cleaning products not approved by calling Whirlpool. After checking "Troubleshooting," you on the product. You can find additional help you obtain assistance or service if you ... in accordance with published installation instructions. 11. DISCLAIMER OF IMPLIED WARRANTIES; Dealer name Address Phone number Model number Serial number Purchase date 22 WHIRLPOOL CORPORATION MAJOR APPLIANCE WARRANTY LIMITED WARRANTY For one year from the date of purchase, when this major appliance...
... for repairs. Major appliances with electrical or plumbing codes, or use of consumables or cleaning products not approved by calling Whirlpool. After checking "Troubleshooting," you on the product. You can find additional help you obtain assistance or service if you ... in accordance with published installation instructions. 11. DISCLAIMER OF IMPLIED WARRANTIES; Dealer name Address Phone number Model number Serial number Purchase date 22 WHIRLPOOL CORPORATION MAJOR APPLIANCE WARRANTY LIMITED WARRANTY For one year from the date of purchase, when this major appliance...


