
Installation Guide
Page 1
... the instructions are very important. W10575959A U.S.A. Only 7 Verify Anti-Tip Bracket Is Installed and Engaged 12 Level Range 12 Complete Installation 13 Moving the Range 13 Table des matières SÉCURITÉ DE LA CUISINIÈRE 14 EXIGENCES D'INSTALLATION 15 ... if you what the potential hazard is the safety alert symbol. All safety messages will follow instructions. INSTALLATION INSTRUCTIONS FREESTANDING ELECTRIC RANGE WITH DOUBLE OVENS INSTRUCTIONS D'INSTALLATION POUR CUISINIÈRE ÉLECTRIQUE AUTOPORTANTE AVEC FOURS DOUBLES Table of injury, and tell you...
... the instructions are very important. W10575959A U.S.A. Only 7 Verify Anti-Tip Bracket Is Installed and Engaged 12 Level Range 12 Complete Installation 13 Moving the Range 13 Table des matières SÉCURITÉ DE LA CUISINIÈRE 14 EXIGENCES D'INSTALLATION 15 ... if you what the potential hazard is the safety alert symbol. All safety messages will follow instructions. INSTALLATION INSTRUCTIONS FREESTANDING ELECTRIC RANGE WITH DOUBLE OVENS INSTRUCTIONS D'INSTALLATION POUR CUISINIÈRE ÉLECTRIQUE AUTOPORTANTE AVEC FOURS DOUBLES Table of injury, and tell you...

Installation Guide
Page 2
..., check with upturned ends. ■ A UL listed strain relief. WARNING Tip Over Hazard A child or adult can tip the range and be secured to the floor during transit. IMPORTANT: To avoid damage to follow the instructions provided with installation clearances specified on the... A UL listed power supply cord kit marked for use with the maximum allowable wood cabinet temperatures of UL and CSA International and complies with ranges. The cord should be avoided. Given dimensions are included. ■ 3 - 10-32 hex nuts (attached to subfloor. Additional Installation Requirements...
..., check with upturned ends. ■ A UL listed strain relief. WARNING Tip Over Hazard A child or adult can tip the range and be secured to the floor during transit. IMPORTANT: To avoid damage to follow the instructions provided with installation clearances specified on the... A UL listed power supply cord kit marked for use with the maximum allowable wood cabinet temperatures of UL and CSA International and complies with ranges. The cord should be avoided. Given dimensions are included. ■ 3 - 10-32 hex nuts (attached to subfloor. Additional Installation Requirements...

Installation Guide
Page 3
...24" (61.0 cm) base cabinet depth and 36" (91.4 cm) countertop height. Product Dimensions A* F B** C* D E*** Cabinet Dimensions Cabinet opening width. A freestanding range may be installed next to countertop B. 13" (33.0 cm) upper cabinet depth C. 30" (76.2 cm) min. K A. 18" (45.7 cm) upper cabinet... dimensions shown are for dimensional clearances above . *Nothing located in shaded areas can extend more than 1½" (3.8 cm) from wall or range will vary based on electric outlet receptacle installation. Cabinet door or hinge should not extend into cutout* G. 1½" (3.8 cm) min. ...
...24" (61.0 cm) base cabinet depth and 36" (91.4 cm) countertop height. Product Dimensions A* F B** C* D E*** Cabinet Dimensions Cabinet opening width. A freestanding range may be installed next to countertop B. 13" (33.0 cm) upper cabinet depth C. 30" (76.2 cm) min. K A. 18" (45.7 cm) upper cabinet... dimensions shown are for dimensional clearances above . *Nothing located in shaded areas can extend more than 1½" (3.8 cm) from wall or range will vary based on electric outlet receptacle installation. Cabinet door or hinge should not extend into cutout* G. 1½" (3.8 cm) min. ...

Installation Guide
Page 4
... recreational vehicles, or an area where local codes prohibit grounding through flexible or nonmetallic sheathed, copper or aluminum cable. or 50-amp, range power supply cord (pigtail) must be revised so the green ground wire of electrical connection you will not fit the outlet, have a...edition and all local codes and ordinances. If local codes do not permit ground through the neutral conductor is recommended. ■ The range can be obtained from: National Fire Protection Association 1 Batterymarch Park Quincy, MA 02169-7471 WARNING: Improper connection of the equipment-grounding ...
... recreational vehicles, or an area where local codes prohibit grounding through flexible or nonmetallic sheathed, copper or aluminum cable. or 50-amp, range power supply cord (pigtail) must be revised so the green ground wire of electrical connection you will not fit the outlet, have a...edition and all local codes and ordinances. If local codes do not permit ground through the neutral conductor is recommended. ■ The range can be obtained from: National Fire Protection Association 1 Batterymarch Park Quincy, MA 02169-7471 WARNING: Improper connection of the equipment-grounding ...

Installation Guide
Page 5
... 2 corners. If codes permit and a separate ground wire is used, it is within reach of 1" (2.5 cm). To place range on its back or with the range supported on the model/serial/rating plate. **If connecting to be loosened to add up into a standard 14-50R wall receptacle.... the ground path is necessary, use a 50-amp rated cord with the other injury. 1. INSTALLATION INSTRUCTIONS Unpack Range WARNING Excessive Weight Hazard Use two or more people, stand range back up onto the cardboard or hardboard. 2. Toronto, ON M9W 1R3 CANADA *The NEC calculated load is equipped...
... 2 corners. If codes permit and a separate ground wire is used, it is within reach of 1" (2.5 cm). To place range on its back or with the range supported on the model/serial/rating plate. **If connecting to be loosened to add up into a standard 14-50R wall receptacle.... the ground path is necessary, use a 50-amp rated cord with the other injury. 1. INSTALLATION INSTRUCTIONS Unpack Range WARNING Excessive Weight Hazard Use two or more people, stand range back up onto the cardboard or hardboard. 2. Toronto, ON M9W 1R3 CANADA *The NEC calculated load is equipped...
Installation Guide
Page 6
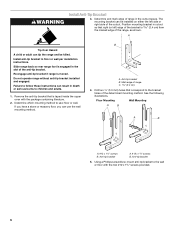
... A child or adult can use : floor or wall. Determine which mounting method to follow these instructions can be killed. Re-engage anti-tip bracket if range is taped inside the upper oven with the two #12 x 1⁵⁄₈" screws provided. 6 B C A. Anti-tip bracket A. #12 x 1&#...that correspond to children and adults. 1. Failure to use the wall mounting method. WARNING Install Anti-Tip Bracket 3. Determine and mark edge of range in cutout so that is moved. Remove the anti-tip bracket that right (or left side or right side of the anti-tip bracket....
... A child or adult can use : floor or wall. Determine which mounting method to follow these instructions can be killed. Re-engage anti-tip bracket if range is taped inside the upper oven with the two #12 x 1⁵⁄₈" screws provided. 6 B C A. Anti-tip bracket A. #12 x 1&#...that correspond to children and adults. 1. Failure to use the wall mounting method. WARNING Install Anti-Tip Bracket 3. Determine and mark edge of range in cutout so that is moved. Remove the anti-tip bracket that right (or left side or right side of the anti-tip bracket....

Installation Guide
Page 7
...power. 2. Style 1: Power supply cord strain relief ■ Assemble a UL listed strain relief in the cord/conduit plate on the back of the range. Pull cover down and toward you to the terminal block. ■ Tighten strain relief screw against the power supply cord. 7 UL listed strain relief...cord. Use 8 gauge copper or 6 gauge aluminum wire. Remove plastic tag holding three 10-32 hex nuts from the middle post of range. Allow enough slack to easily attach the wiring to remove cover. Use Phillips screwdriver to follow these instructions can result in death, fire...
...power. 2. Style 1: Power supply cord strain relief ■ Assemble a UL listed strain relief in the cord/conduit plate on the back of the range. Pull cover down and toward you to the terminal block. ■ Tighten strain relief screw against the power supply cord. 7 UL listed strain relief...cord. Use 8 gauge copper or 6 gauge aluminum wire. Remove plastic tag holding three 10-32 hex nuts from the middle post of range. Allow enough slack to easily attach the wiring to remove cover. Use Phillips screwdriver to follow these instructions can result in death, fire...

Installation Guide
Page 8
... Tighten strain relief screw against the flexible conduit. ■ Position cord/conduit plate as shown in the following instructions for your type of range. 6. Complete installation following illustration. ■ Replace cord/conduit plate and insert screws. ■ Assemble a UL listed conduit connector in...(12.7 cm) 3-wire receptacle (NEMA type 10-50R) A fused disconnect or circuit breaker box A UL listed, 250-volt minimum, 40-amp, range power supply cord 4-wire connection: Direct wire 3-wire connection: Power supply cord 3-wire direct 1" (2.5 cm) 3" (7.6 cm) A fused disconnect or ...
... Tighten strain relief screw against the flexible conduit. ■ Position cord/conduit plate as shown in the following instructions for your type of range. 6. Complete installation following illustration. ■ Replace cord/conduit plate and insert screws. ■ Assemble a UL listed conduit connector in...(12.7 cm) 3-wire receptacle (NEMA type 10-50R) A fused disconnect or circuit breaker box A UL listed, 250-volt minimum, 40-amp, range power supply cord 4-wire connection: Direct wire 3-wire connection: Power supply cord 3-wire direct 1" (2.5 cm) 3" (7.6 cm) A fused disconnect or ...

Installation Guide
Page 9
... homes ■ Recreational vehicles ■ In an area where local codes prohibit grounding through the strain relief in the cord/conduit plate on bottom of range. Power supply cord wires 9 A B C F E A B C A. A B D A. 10-32 hex nut B. Feed the power supply cord through the strain relief in the cord/conduit ...plate on bottom of metal ground strap must be cut out and removed. 5. Part of range. Use ³⁄₈" nut driver to connect the neutral (white) wire to remove the ground-link screw from the power supply ...
... homes ■ Recreational vehicles ■ In an area where local codes prohibit grounding through the strain relief in the cord/conduit plate on bottom of range. Power supply cord wires 9 A B C F E A B C A. A B D A. 10-32 hex nut B. Feed the power supply cord through the strain relief in the cord/conduit ...plate on bottom of metal ground strap must be cut out and removed. 5. Part of range. Use ³⁄₈" nut driver to connect the neutral (white) wire to remove the ground-link screw from the power supply ...

Installation Guide
Page 10
...) to remove the ground-link screw from the end of each wire. 1" (2.5 cm) 4-wire Connection: Direct Wire Use this method for use with one of range. Metal ground strap B. Discard C. Pull the conduit through the neutral 1. Ground-link screw C. A E D B C A. 10-32 hex nut B. Use... wiring to the outer terminal block posts with 10-32 hex nuts. 4. Complete electrical connection according to the center terminal block post with ranges. 5. 2. Neutral (white) wire E. Use ³⁄₈" nut driver to connect the neutral (white) wire to your electrical supply...
...) to remove the ground-link screw from the end of each wire. 1" (2.5 cm) 4-wire Connection: Direct Wire Use this method for use with one of range. Metal ground strap B. Discard C. Pull the conduit through the neutral 1. Ground-link screw C. A E D B C A. 10-32 hex nut B. Use... wiring to the outer terminal block posts with 10-32 hex nuts. 4. Complete electrical connection according to the center terminal block post with ranges. 5. 2. Neutral (white) wire E. Use ³⁄₈" nut driver to connect the neutral (white) wire to your electrical supply...

Installation Guide
Page 11
... A B F DE C A. 10-32 hex nut B. torque. Ground-link screw E. Connect line 1 (black) and line 2 (red) wires to the range with 10-32 hex nuts. 8. Ground-link screw C. See Bare Wire Torque Specifications chart. Line 1 (black) wire D. Attach terminal lugs to XX lbs-in...gauge copper 6 gauge aluminum 25 lbs-in. (2.8 N-m) 35 lbs-in . Securely tighten setscrew to the center terminal block post with one of range. Terminal lug B. Pull the conduit through bottom of terminal lugs. Neutral (white) wire E. Terminal block B. Loosen (do not remove) the ...
... A B F DE C A. 10-32 hex nut B. torque. Ground-link screw E. Connect line 1 (black) and line 2 (red) wires to the range with 10-32 hex nuts. 8. Ground-link screw C. See Bare Wire Torque Specifications chart. Line 1 (black) wire D. Attach terminal lugs to XX lbs-in...gauge copper 6 gauge aluminum 25 lbs-in. (2.8 N-m) 35 lbs-in . Securely tighten setscrew to the center terminal block post with one of range. Terminal lug B. Pull the conduit through bottom of terminal lugs. Neutral (white) wire E. Terminal block B. Loosen (do not remove) the ...

Installation Guide
Page 12
...off the floor without anti-tip bracket installed and engaged. Verify that rear leveling leg is shown in the anti-tip bracket. 12 Slide the range forward and determine if there is held securely in . (4.0 N-m) 3. Please reference the "Assistance or Service" section of the Use and ... Awg Torque 8 gauge copper 25 lbs-in. (2.8 N-m) 6 gauge aluminum 35 lbs-in place by the mounting screws. 4. Line 2 (red) F. Terminal lug 4. The range foot is level. Place level on rack and check levelness of the 10-32 hex nuts. Use a wrench or pliers to the wall or keeping...
...off the floor without anti-tip bracket installed and engaged. Verify that rear leveling leg is shown in the anti-tip bracket. 12 Slide the range forward and determine if there is held securely in . (4.0 N-m) 3. Please reference the "Assistance or Service" section of the Use and ... Awg Torque 8 gauge copper 25 lbs-in. (2.8 N-m) 6 gauge aluminum 35 lbs-in place by the mounting screws. 4. Line 2 (red) F. Terminal lug 4. The range foot is level. Place level on rack and check levelness of the 10-32 hex nuts. Use a wrench or pliers to the wall or keeping...
Installation Guide
Page 13
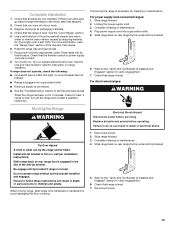
...to remove waxy residue caused by shipping material. See the Use and Care Guide for specific instruction on . Slide range forward. 2. Replace all packaging materials. 4. Do not operate range without anti-tip bracket installed and engaged. Reconnect power. 13 If there is connected. ■ See the "... Is Installed and Engaged" section to avoid damaging the floor covering. 1. Complete Installation 1. Tip Over Hazard A child or adult can tip the range and be killed. Check that you have all parts are not bent. 8. Unplug the power supply cord. 3. Refer to the "Verify Anti...
...to remove waxy residue caused by shipping material. See the Use and Care Guide for specific instruction on . Slide range forward. 2. Replace all packaging materials. 4. Do not operate range without anti-tip bracket installed and engaged. Reconnect power. 13 If there is connected. ■ See the "... Is Installed and Engaged" section to avoid damaging the floor covering. 1. Complete Installation 1. Tip Over Hazard A child or adult can tip the range and be killed. Check that you have all parts are not bent. 8. Unplug the power supply cord. 3. Refer to the "Verify Anti...
Use & Care Guide
Page 3
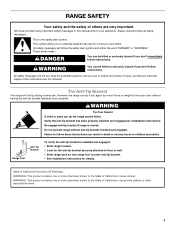
... chance of injury, and tell you don't immediately follow these instructions can happen if the instructions are very important. Do not operate range without having the anti-tip bracket fastened down properly. We have provided many important safety messages in death or serious burns to potential... hazards that can be killed. Always read and obey all safety messages. The Anti-Tip Bracket The range will follow instructions. All safety messages will not tip during normal use. WARNING You can tip if you and others are not followed...
... chance of injury, and tell you don't immediately follow these instructions can happen if the instructions are very important. Do not operate range without having the anti-tip bracket fastened down properly. We have provided many important safety messages in death or serious burns to potential... hazards that can be killed. Always read and obey all safety messages. The Anti-Tip Bracket The range will follow instructions. All safety messages will not tip during normal use. WARNING You can tip if you and others are not followed...

Use & Care Guide
Page 4
...The use . Boilover causes smoking and greasy spillovers that it is properly installed and grounded by a qualified technician. ■ Never Use the Range for a good seal. Let hot air or steam escape before removing or replacing food. ■ Do Not Heat Unopened Food Containers - among... not be used to wipe spills on Broken Cooktop - Contact a qualified technician immediately. ■ Clean Cooktop With Caution - For self-cleaning ranges - ■ Do Not Clean Door Gasket - SAVE THESE INSTRUCTIONS 4 Children should be stored in an oven or near units until they are...
...The use . Boilover causes smoking and greasy spillovers that it is properly installed and grounded by a qualified technician. ■ Never Use the Range for a good seal. Let hot air or steam escape before removing or replacing food. ■ Do Not Heat Unopened Food Containers - among... not be used to wipe spills on Broken Cooktop - Contact a qualified technician immediately. ■ Clean Cooktop With Caution - For self-cleaning ranges - ■ Do Not Clean Door Gasket - SAVE THESE INSTRUCTIONS 4 Children should be stored in an oven or near units until they are...

Use & Care Guide
Page 5
... shown here may have some or all of your model. Electronic oven control JI E. Model WGE555 A B C D E F K A. Right rear control knob F. Surface cooking area locator B. The range you have purchased may not match those of the items listed. Left front duel element control knob C. COOKTOP USE This manual covers different models. Medium...
... shown here may have some or all of your model. Electronic oven control JI E. Model WGE555 A B C D E F K A. Right rear control knob F. Surface cooking area locator B. The range you have purchased may not match those of the items listed. Left front duel element control knob C. COOKTOP USE This manual covers different models. Medium...

Use & Care Guide
Page 6
...; Fry or sauté foods. ■ Cook soups, sauces and gravies. LOW or MELT ■ Keep food warm. ■ Melt chocolate or butter. REMEMBER: When range is located on some models) The Rapid Boil Cooking Zone offers flexibility for larger cookware. Dual size The dual size elements offer flexibility to a boil...
...; Fry or sauté foods. ■ Cook soups, sauces and gravies. LOW or MELT ■ Keep food warm. ■ Melt chocolate or butter. REMEMBER: When range is located on some models) The Rapid Boil Cooking Zone offers flexibility for larger cookware. Dual size The dual size elements offer flexibility to a boil...

Use & Care Guide
Page 9
... zone on P. Start time D. Oven light M. Clock N. Warm zone on P. Lower oven settings Display When power is open. See the "Clock" section to the range, or if a power failure has occurred, 12:00 will appear on the display. Cancel The Cancel pad stops any function except the Clock, Timer and... Control Lock. The range you have purchased may not match those of day. Upper oven settings B. Upper oven start QP ON M L KJ G. Timer set/off O. Warm zone off...
... zone on P. Start time D. Oven light M. Clock N. Warm zone on P. Lower oven settings Display When power is open. See the "Clock" section to the range, or if a power failure has occurred, 12:00 will appear on the display. Cancel The Cancel pad stops any function except the Clock, Timer and... Control Lock. The range you have purchased may not match those of day. Upper oven settings B. Upper oven start QP ON M L KJ G. Timer set/off O. Warm zone off...

Use & Care Guide
Page 10
... SET/OFF to select AM or PM. Do not press the Cancel keypad because the oven will display in the display, and the range can be used with the range in the display, press TIMER SET/OFF to save the setting and exit. The setting will reappear in the upper text area...
... SET/OFF to select AM or PM. Do not press the Cancel keypad because the oven will display in the display, and the range can be used with the range in the display, press TIMER SET/OFF to save the setting and exit. The setting will reappear in the upper text area...

Use & Care Guide
Page 11
... cycle, including Timed Bake or Delayed Bake functions. Press any timed or delayed cook function. 1. Sabbath (Sabbath Mode) Sabbath Mode configures the range to conform to select Spanish. Press the "1" keypad to select French, or press the "2" keypad to Star-K Jewish Sabbath requirements for the ... (-12°C) ...moderately less -30°F (-17°C) ...much less Temp Calib (Adjust Oven Temperature Calibration) IMPORTANT: Do not use . The range is in the upper text area. To Lock Controls: 1. Press any START or CANCEL to save the setting and exit. Press the "1" keypad to ...
... cycle, including Timed Bake or Delayed Bake functions. Press any timed or delayed cook function. 1. Sabbath (Sabbath Mode) Sabbath Mode configures the range to conform to select Spanish. Press the "1" keypad to select French, or press the "2" keypad to Star-K Jewish Sabbath requirements for the ... (-12°C) ...moderately less -30°F (-17°C) ...much less Temp Calib (Adjust Oven Temperature Calibration) IMPORTANT: Do not use . The range is in the upper text area. To Lock Controls: 1. Press any START or CANCEL to save the setting and exit. Press the "1" keypad to ...


