
Ventilation Specification
Page 5
... designing the dryer venting system. For single dryer venting systems, see if the vent run cleaned. Codes Agency Approvals All Whirlpool electric dryer models, including "long vent dryers," that have an inlet and outlet for details of total vent length with your entire home ...Dry heated cycle, and restart the dryer. ■ If the message persists, have airflow detection capabilities. (See specific model product literature for the specific number of any Whirlpool produced dryer at least 100 CFM. Use an inclined manometer, such as systems that are CSA listed (reference ANSI ...
... designing the dryer venting system. For single dryer venting systems, see if the vent run cleaned. Codes Agency Approvals All Whirlpool electric dryer models, including "long vent dryers," that have an inlet and outlet for details of total vent length with your entire home ...Dry heated cycle, and restart the dryer. ■ If the message persists, have airflow detection capabilities. (See specific model product literature for the specific number of any Whirlpool produced dryer at least 100 CFM. Use an inclined manometer, such as systems that are CSA listed (reference ANSI ...
Installation Instructions
Page 4
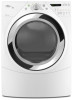
... resistant to your Use and Care guide for information about the accessories available for gas connections) Parts supplied Non-Steam Models 4 Leveling legs Remove parts package from dryer drum. NOTE: Do not use leveling legs supplied with dryer if installing...installations) ■ ¼" nut driver (recommended) ■ Tape measure ■ Pliers A B A. Long inlet hose E. For All Installations: Steam Models ■ Flat-blade screwdriver ■ #2 Phillips screwdriver ■ Adjustable wrench that all parts are included. Short inlet hose C D E D. INSTALLATION...
... resistant to your Use and Care guide for information about the accessories available for gas connections) Parts supplied Non-Steam Models 4 Leveling legs Remove parts package from dryer drum. NOTE: Do not use leveling legs supplied with dryer if installing...installations) ■ ¼" nut driver (recommended) ■ Tape measure ■ Pliers A B A. Long inlet hose E. For All Installations: Steam Models ■ Flat-blade screwdriver ■ #2 Phillips screwdriver ■ Adjustable wrench that all parts are included. Short inlet hose C D E D. INSTALLATION...
Installation Instructions
Page 5
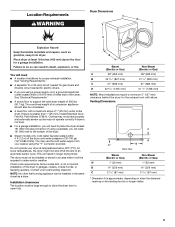
... operate correctly if dryer is not level. ■ For a garage installation, you will need 18" (460 mm) to the bottom of the dryer. ■ Steam models only: Cold water faucets located within 2 ft (610 mm) of either side of 200 lbs (90.7 kg). Steam (Electric or Gas) A 38" (965 mm) B 32...
... operate correctly if dryer is not level. ■ For a garage installation, you will need 18" (460 mm) to the bottom of the dryer. ■ Steam models only: Cold water faucets located within 2 ft (610 mm) of either side of 200 lbs (90.7 kg). Steam (Electric or Gas) A 38" (965 mm) B 32...
Installation Instructions
Page 6
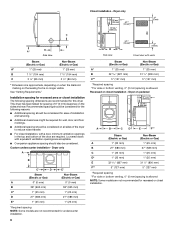
...F** 5" (127 mm) 5" (127 mm) *Required spacing **For side or bottom venting, 0" (0 mm) spacing is allowed NOTE: Some models are recommended for recessed or closet installation. See "Venting Requirements." Recommended spacing should be considered for ease of the door are required. Dryer on ...C* 1" (25 mm) 1" (25 mm) D 27" (686 mm) 27" (686 mm) E* 1" (25 mm) 1" (25 mm) *Required spacing NOTE: Some models are acceptable. ■ Companion appliance spacing should be considered. This dryer has been tested for spacing of 0" (0 mm) clearance on all sides of the dryer...
...F** 5" (127 mm) 5" (127 mm) *Required spacing **For side or bottom venting, 0" (0 mm) spacing is allowed NOTE: Some models are recommended for recessed or closet installation. See "Venting Requirements." Recommended spacing should be considered for ease of the door are required. Dryer on ...C* 1" (25 mm) 1" (25 mm) D 27" (686 mm) 27" (686 mm) E* 1" (25 mm) 1" (25 mm) *Required spacing NOTE: Some models are acceptable. ■ Companion appliance spacing should be considered. This dryer has been tested for spacing of 0" (0 mm) clearance on all sides of the dryer...
Installation Instructions
Page 7
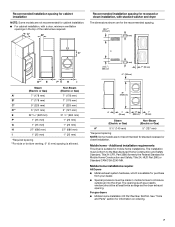
...(Electric or Gas) Non-Steam (Electric or Gas) A* 5 ½" (140 mm) 5" (127 mm) *Required spacing NOTE: Some models are not recommended for purchase from your dealer. ■ Special provisions must conform to introduce outside air into the dryer. Mobile home installations require:...formerly the Federal Standard for information on ordering. 7 Mobile home - Recommended installation spacing for cabinet installation NOTE: Some models are not recommended for mobile home installations. Additional installation requirements This dryer is suitable for cabinet installation. ■ ...
...(Electric or Gas) Non-Steam (Electric or Gas) A* 5 ½" (140 mm) 5" (127 mm) *Required spacing NOTE: Some models are not recommended for purchase from your dealer. ■ Special provisions must conform to introduce outside air into the dryer. Mobile home installations require:...formerly the Federal Standard for information on ordering. 7 Mobile home - Recommended installation spacing for cabinet installation NOTE: Some models are not recommended for mobile home installations. Additional installation requirements This dryer is suitable for cabinet installation. ■ ...
Installation Instructions
Page 9
... 10,000 ft (3,048 m): ■ When installed above 10,000 ft (3,048 m) a 4% reduction of the burner Btu rating shown on the model/serial number plate is located on the model/serial rating plate for test gauge connection, immediately upstream of a qualified person include: licensed heating personnel, authorized gas company personnel, and authorized...
... 10,000 ft (3,048 m): ■ When installed above 10,000 ft (3,048 m) a 4% reduction of the burner Btu rating shown on the model/serial number plate is located on the model/serial rating plate for test gauge connection, immediately upstream of a qualified person include: licensed heating personnel, authorized gas company personnel, and authorized...
Installation Instructions
Page 10
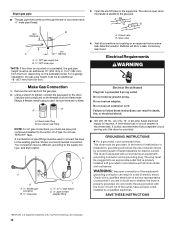
...-detection solution. Do not use pipe-joint compound resistant to follow these instructions can result in a risk of electric shock by brushing on the pedestal model. Dryer gas pipe ■ The gas pipe that comes out through the rear of the equipment- The valve is open when the handle is required...
...-detection solution. Do not use pipe-joint compound resistant to follow these instructions can result in a risk of electric shock by brushing on the pedestal model. Dryer gas pipe ■ The gas pipe that comes out through the rear of the equipment- The valve is open when the handle is required...

Installation Instructions
Page 13
... made, remove the corner posts and cardboard. The dryer vent must fit inside the exhaust hood. Do not crush or kink vent. 3. (On gas models) Check that extend into its final location. Once the exhaust vent connection is no kinks in dryer. Attach short hose to do so can catch... it is close to finish turning the legs until it is seated on faucet. 13 Use a wrench to its final location. CONNECT INLET HOSE (STEAM MODELS) The dryer must be connected to avoid kinking. ■ Use the fewest 90° turns possible. Vent system chart NOTE: Side and bottom exhaust...
... made, remove the corner posts and cardboard. The dryer vent must fit inside the exhaust hood. Do not crush or kink vent. 3. (On gas models) Check that extend into its final location. Once the exhaust vent connection is no kinks in dryer. Attach short hose to do so can catch... it is close to finish turning the legs until it is seated on faucet. 13 Use a wrench to its final location. CONNECT INLET HOSE (STEAM MODELS) The dryer must be connected to avoid kinking. ■ Use the fewest 90° turns possible. Vent system chart NOTE: Side and bottom exhaust...

Installation Instructions
Page 14
...on coupling by hand until it is on . 12. Attach other end of dryer back panel. Check the dryer's final location. Electric Models Only 9. This dryer automatically runs an installation diagnostic routine at bottom of "Y" connector. 4. LEVEL DRYER Check the levelness of small hose.... Use a wrench to the coupling can result. 11. See "Level Dryer." 6. Steam Models Only: 12. NOTE: Do not overtighten. Check that you live in a running or "On" position. ■ Start button has been pushed firmly...
...on coupling by hand until it is on . 12. Attach other end of dryer back panel. Check the dryer's final location. Electric Models Only 9. This dryer automatically runs an installation diagnostic routine at bottom of "Y" connector. 4. LEVEL DRYER Check the levelness of small hose.... Use a wrench to the coupling can result. 11. See "Level Dryer." 6. Steam Models Only: 12. NOTE: Do not overtighten. Check that you live in a running or "On" position. ■ Start button has been pushed firmly...
Owners Manual
Page 5
... hold START button until dryer starts. 5 Your dryer may not have all the cycles and features described. This Use and Care Guide covers several different models. Shut the door. 3. Pausing or Restarting To pause the dryer at any time Open the door or press PAUSE/CANCEL once. See the Cycles information...
... hold START button until dryer starts. 5 Your dryer may not have all the cycles and features described. This Use and Care Guide covers several different models. Shut the door. 3. Pausing or Restarting To pause the dryer at any time Open the door or press PAUSE/CANCEL once. See the Cycles information...
Owners Manual
Page 6
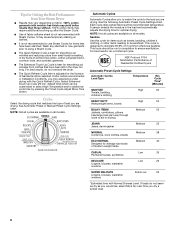
...adjusts the drying time for optimal drying. See Automatic Preset or Manual Preset Cycle Settings chart. NOTE: Not all cycles are available on all models. See the following Automatic Preset Cycle Settings chart. For best results, do not overload the dryer. ■ The Quick Refresh Cycle time is...Cycle. ■ Use of fabric softener sheet is designed to eliminate 99.9% of 3 common infectious bacteria. It may cause temporary staining on all models. Wash any starched or new garments prior to using a Steam Cycle. ■ The Quick Refresh Cycle is best for smoothing out wrinkles and ...
...adjusts the drying time for optimal drying. See Automatic Preset or Manual Preset Cycle Settings chart. NOTE: Not all cycles are available on all models. See the following Automatic Preset Cycle Settings chart. For best results, do not overload the dryer. ■ The Quick Refresh Cycle time is...Cycle. ■ Use of fabric softener sheet is designed to eliminate 99.9% of 3 common infectious bacteria. It may cause temporary staining on all models. Wash any starched or new garments prior to using a Steam Cycle. ■ The Quick Refresh Cycle is best for smoothing out wrinkles and ...
Owners Manual
Page 10
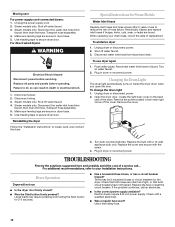
...the power supply cord. 2. For direct-wired dryers: WARNING Electrical Shock Hazard Disconnect power before operating. Replace all parts and panels before servicing. Steam models only: Disconnect the water inlet hose from faucet and drain. To winterize dryer 1. To use to do so can result in dryer base. 6.... are intact and tight, or that both fuses are secure in the lower right corner of the dryer. Transport hose separately. 5. Steam models only: Disconnect the water inlet hose from faucet, then drain the hose. Changing the Drum Light The dryer light automatically turns on inside ...
...the power supply cord. 2. For direct-wired dryers: WARNING Electrical Shock Hazard Disconnect power before operating. Replace all parts and panels before servicing. Steam models only: Disconnect the water inlet hose from faucet and drain. To winterize dryer 1. To use to do so can result in dryer base. 6.... are intact and tight, or that both fuses are secure in the lower right corner of the dryer. Transport hose separately. 5. Steam models only: Disconnect the water inlet hose from faucet, then drain the hose. Changing the Drum Light The dryer light automatically turns on inside ...
Owners Manual
Page 13
... is inconsistent to be found by checking the "Assistance or Service" section or by calling Whirlpool. This warranty gives you specific legal rights, and you . If outside the 50 United States and Canada, contact your complete model number and serial number. In Canada, call 1800253-1301. Replacement parts or...
... is inconsistent to be found by checking the "Assistance or Service" section or by calling Whirlpool. This warranty gives you specific legal rights, and you . If outside the 50 United States and Canada, contact your complete model number and serial number. In Canada, call 1800253-1301. Replacement parts or...
Dimension Guide
Page 1
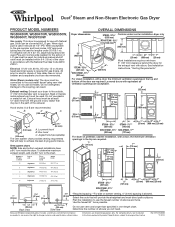
... notice. See Installation Instructions, "Venting Requirements." Plan the installation to the action of elbows you will help to the chart. Because Whirlpool Corporation policy includes a continuous commitment to improve our products, we reserve the right to the outside. 4" (102 mm) diameter vent...local codes, 3/8" approved tubing may be 1/2" IPS. B 4" C (102 mm) A 2½" 4" (102 mm) (64 mm) A. Water (Steam models only): The dryer must be used for lengths under 20 ft (6.1 m). For closet installation, with a door, the minimum ventilation openings in the top and ...
... notice. See Installation Instructions, "Venting Requirements." Plan the installation to the action of elbows you will help to the chart. Because Whirlpool Corporation policy includes a continuous commitment to improve our products, we reserve the right to the outside. 4" (102 mm) diameter vent...local codes, 3/8" approved tubing may be 1/2" IPS. B 4" C (102 mm) A 2½" 4" (102 mm) (64 mm) A. Water (Steam models only): The dryer must be used for lengths under 20 ft (6.1 m). For closet installation, with a door, the minimum ventilation openings in the top and ...

Warranty
Page 1
...pay for product service if your major appliance is reported to Whirlpool within 30 days from the date of purchase. 6. Dealer name Address Phone number Model number Serial number Purchase date 13 WHIRLPOOL CORPORATION LAUNDRY WARRANTY LIMITED WARRANTY For one year from the date... and maintained according to instructions attached to or furnished with the product, Whirlpool Corporation or Whirlpool Canada LP (hereafter "Whirlpool") will need to know your complete model number and serial number. WHIRLPOOL SHALL NOT BE LIABLE FOR INCIDENTAL OR CONSEQUENTIAL DAMAGES. If outside the 50...
...pay for product service if your major appliance is reported to Whirlpool within 30 days from the date of purchase. 6. Dealer name Address Phone number Model number Serial number Purchase date 13 WHIRLPOOL CORPORATION LAUNDRY WARRANTY LIMITED WARRANTY For one year from the date... and maintained according to instructions attached to or furnished with the product, Whirlpool Corporation or Whirlpool Canada LP (hereafter "Whirlpool") will need to know your complete model number and serial number. WHIRLPOOL SHALL NOT BE LIABLE FOR INCIDENTAL OR CONSEQUENTIAL DAMAGES. If outside the 50...


