Owners Manual
Page 4
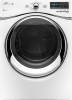
... working and storage area. In Canada, call 1-800-901-2042, or visit us at : www.whirlpool.com/accessories. whirlpoolparts.ca 15" Pedestal Color matched pedestals raise the washer and dryer to be installed on options and ordering, call 1-800-807-6777 or visit us at www. ACCESSORIES... Enhance your new washer and dryer with the following genuine Whirlpool accessories. Stack Kit If space is at a premium, the...
... working and storage area. In Canada, call 1-800-901-2042, or visit us at : www.whirlpool.com/accessories. whirlpoolparts.ca 15" Pedestal Color matched pedestals raise the washer and dryer to be installed on options and ordering, call 1-800-807-6777 or visit us at www. ACCESSORIES... Enhance your new washer and dryer with the following genuine Whirlpool accessories. Stack Kit If space is at a premium, the...
Owners Manual
Page 5
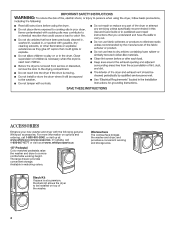
... Cycles. Proper venting will be paid by pressing the Timed Dry Adjust More Time button. 5 n Remove lint from the front the dryer. n Clear away items from the entire length of wrinkle-free cotton, cotton-polyester blend, common knits, and synthetic garments. CHECK YOUR...check. each load. Wash any starched or new garments prior to over-drying. n Replace plastic or foil vent material with your steam dryer n Results may vary depending on clothes. See Installation Instructions. Service calls caused by improper venting are sensed in shrinkage, wrinkling, and...
... Cycles. Proper venting will be paid by pressing the Timed Dry Adjust More Time button. 5 n Remove lint from the front the dryer. n Clear away items from the entire length of wrinkle-free cotton, cotton-polyester blend, common knits, and synthetic garments. CHECK YOUR...check. each load. Wash any starched or new garments prior to over-drying. n Replace plastic or foil vent material with your steam dryer n Results may vary depending on clothes. See Installation Instructions. Service calls caused by improper venting are sensed in shrinkage, wrinkling, and...
Owners Manual
Page 6
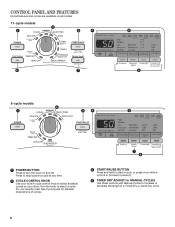
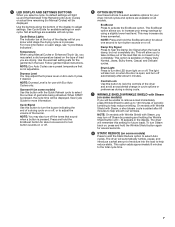
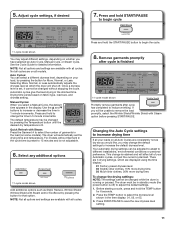
... Dry cycle. 6 Press to stop/cancel a cycle at any time. 2 CYCLE CONTROL KNOB Use your dryer's cycle control knob to select a cycle for MANUAL CYCLES Use these buttons with Manual Cycles to turn the dryer on your laundry load. Turn the knob to select available cycles on and off. See Cycle... Guide for detailed descriptions of cycles. 7 6 3 START/PAUSE BUTTON Press and hold to start a cycle, or press once while a cycle is in process to pause it. 4 TIMED DRY ADJUST for your dryer.
... Dry cycle. 6 Press to stop/cancel a cycle at any time. 2 CYCLE CONTROL KNOB Use your dryer's cycle control knob to select a cycle for MANUAL CYCLES Use these buttons with Manual Cycles to turn the dryer on your laundry load. Turn the knob to select available cycles on and off. See Cycle... Guide for detailed descriptions of cycles. 7 6 3 START/PAUSE BUTTON Press and hold to start a cycle, or press once while a cycle is in process to pause it. 4 TIMED DRY ADJUST for your dryer.
Owners Manual
Page 7
...cycle to activate the EcoBoost option. Damp Dry Signal Press to help smooth out wrinkles. This option adds approximately 8 minutes to increase your dryer. Use the warmest setting safe for more information on or off . NOTE: You may adjust the Dryness Level on some models) Press to...you may turn off Steam by using Manual Cycles or Enhanced Touch Up, you may increase dry times somewhat. Follow garment label instructions. The dryer will automatically tumble, pause, and introduce a small amount of moisture into the load to help reduce wrinkling. The light will also turn on...
...cycle to activate the EcoBoost option. Damp Dry Signal Press to help smooth out wrinkles. This option adds approximately 8 minutes to increase your dryer. Use the warmest setting safe for more information on or off . NOTE: You may adjust the Dryness Level on some models) Press to...you may turn off Steam by using Manual Cycles or Enhanced Touch Up, you may increase dry times somewhat. Follow garment label instructions. The dryer will automatically tumble, pause, and introduce a small amount of moisture into the load to help reduce wrinkling. The light will also turn on...
Owners Manual
Page 8
...items This is available only with High and Medium Drying Temperature settings. Items need to about 1/2 full. do not overfill dryer drum. Undergarments, Delicate Extra Low More 35 blouses, lingerie, Normal performance wear Less Damp Dry Signal Uses Extra Low heat ... Use for large loads of mixed fabrics and items. Normal is time to reduce household bacteria. Medium load: Fill the dryer drum up to tumble freely. 8 Load Size Recommendations For best results, follow the wet load size recommendations noted for improved...
...items This is available only with High and Medium Drying Temperature settings. Items need to about 1/2 full. do not overfill dryer drum. Undergarments, Delicate Extra Low More 35 blouses, lingerie, Normal performance wear Less Damp Dry Signal Uses Extra Low heat ... Use for large loads of mixed fabrics and items. Normal is time to reduce household bacteria. Medium load: Fill the dryer drum up to tumble freely. 8 Load Size Recommendations For best results, follow the wet load size recommendations noted for improved...
Owners Manual
Page 9
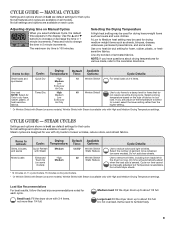
..., refer to remove wrinkles, including from loads left in 1 Timed Dry Adjust AirmOnilny uteLeisns cDrryeme1nts. Medium load: Fill the dryer drum up to about drying temperatures for each cycle. Do not overload. NOTE: If you are available on some models). ... are designed for foam, rubber, plastic, or heatsensitive fabrics. Use the s and t ELoxtbwrauLottwonNMsoortrmeoaDlriDynrycre24a-- 35se or dSLooeuftdcrease the time in the dryer too long. A Low to dry foam, Low rubber, plastic, or Extra Low heat-sensitive Air Only fabrics. Items to dry: Drying...
..., refer to remove wrinkles, including from loads left in 1 Timed Dry Adjust AirmOnilny uteLeisns cDrryeme1nts. Medium load: Fill the dryer drum up to about drying temperatures for each cycle. Do not overload. NOTE: If you are available on some models). ... are designed for foam, rubber, plastic, or heatsensitive fabrics. Use the s and t ELoxtbwrauLottwonNMsoortrmeoaDlriDynrycre24a-- 35se or dSLooeuftdcrease the time in the dryer too long. A Low to dry foam, Low rubber, plastic, or Extra Low heat-sensitive Air Only fabrics. Items to dry: Drying...
Owners Manual
Page 10
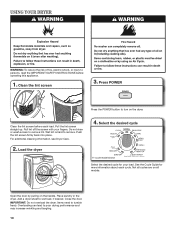
... to poor drying performance and may increase wrinkling and tangling. 10 Close the door. Place laundry in the dryer. Overloading can lead to wet load, if desired. Wet lint is hard to tumble freely. Select the desired cycle 11-cycle model shown Select the ... button to remove lint. Roll lint off the screen with your load. Do not rinse or wash screen to turn on the dryer. Load the dryer 4. IMPORTANT: Do not overload the dryer. Push the lint screen firmly back into place. Open the door by pulling on all models. Clean the lint screen before...
... to poor drying performance and may increase wrinkling and tangling. 10 Close the door. Place laundry in the dryer. Overloading can lead to wet load, if desired. Wet lint is hard to tumble freely. Select the desired cycle 11-cycle model shown Select the ... button to remove lint. Roll lint off the screen with your load. Do not rinse or wash screen to turn on the dryer. Load the dryer 4. IMPORTANT: Do not overload the dryer. Push the lint screen firmly back into place. Open the door by pulling on all models. Clean the lint screen before...
Owners Manual
Page 11
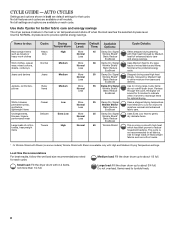
...button to begin the cycle. 11-cycle model shown You may change is retained and will automatically set , it cannot be changed while the dryer is finished NOTE: Not all Auto Cycles are on fabric type, load size, and dryness setting. Selecting More, Normal, or Less automatically... Cool Steam Static Down Reduce to different installations, environmental conditions or personal preference. To change the time in the shortest time. The dryer must be adjusted to adapt to reduce Done Wrinkle Shield wrinkling. See the Cycle Guide for refresh cycles 11-cycle model shown Wrinkle ...
...button to begin the cycle. 11-cycle model shown You may change is retained and will automatically set , it cannot be changed while the dryer is finished NOTE: Not all Auto Cycles are on fabric type, load size, and dryness setting. Selecting More, Normal, or Less automatically... Cool Steam Static Down Reduce to different installations, environmental conditions or personal preference. To change the time in the shortest time. The dryer must be adjusted to adapt to reduce Done Wrinkle Shield wrinkling. See the Cycle Guide for refresh cycles 11-cycle model shown Wrinkle ...
Owners Manual
Page 12
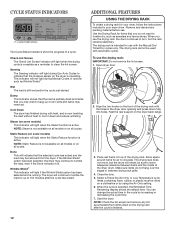
.... 12 When you do not hang over the edges or between items and the inside of the drying rack. Allow space around items for your dryer, follow the instructions included in the cycle by using the Air Only setting. 6. Make sure items do not want to 150 minutes after the ... USING THE DRYING RACK To obtain a drying rack for air to turn, but the drum will light when the Steam function is running. Start the dryer. Check Lint Screen The Check Lint Screen indicator will light if the Wrinkle Shield option has been selected and is active. CYCLE STATUS INDICATORS Check...
.... 12 When you do not hang over the edges or between items and the inside of the drying rack. Allow space around items for your dryer, follow the instructions included in the cycle by using the Air Only setting. 6. Make sure items do not want to 150 minutes after the ... USING THE DRYING RACK To obtain a drying rack for air to turn, but the drum will light when the Steam function is running. Start the dryer. Check Lint Screen The Check Lint Screen indicator will light if the Wrinkle Shield option has been selected and is active. CYCLE STATUS INDICATORS Check...
Owners Manual
Page 13
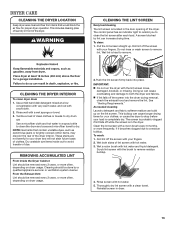
... off the screen with your load is probably clogged if lint falls off the screen into place. Wet both the dryer and fabrics. Pull the lint screen straight up on dryer usage. 2. Do not rinse or wash screen to clean the lint screen after each load. Wet lint is located...screen with hot water. 5. Rinse well with a clean towel. Tumble a load of clean clothes or towels to remove. REMOVING ACCUMULATED LINT From Inside the Dryer Cabinet Lint should be removed every 2 years, or more often, depending on the lint screen. To wash: 1. Cleaning should be done by lint can ...
... off the screen with your load is probably clogged if lint falls off the screen into place. Wet both the dryer and fabrics. Pull the lint screen straight up on dryer usage. 2. Do not rinse or wash screen to clean the lint screen after each load. Wet lint is located...screen with hot water. 5. Rinse well with a clean towel. Tumble a load of clean clothes or towels to remove. REMOVING ACCUMULATED LINT From Inside the Dryer Cabinet Lint should be removed every 2 years, or more often, depending on the lint screen. To wash: 1. Cleaning should be done by lint can ...
Owners Manual
Page 14
... leveling legs are at home. Because some water may stay in the hose, freezing can damage your dryer where it . This helps to avoid unintended flooding (due to the dryer. Gas models only: Cap the open fuel supply line. 5. Make sure leveling legs are found. Disconnect... Replace inlet hose and hose screen after 5 years of hose failure. To Winterize the Dryer 1. Unplug dryer or disconnect power. 2. Shut off water faucet. 4. To Use the Dryer Again 1. Flush water pipes. For direct-wired dryers: 1. Disconnect power. 2. Steam models only: Shut off water faucet. 3. Steam models...
... leveling legs are at home. Because some water may stay in the hose, freezing can damage your dryer where it . This helps to avoid unintended flooding (due to the dryer. Gas models only: Cap the open fuel supply line. 5. Make sure leveling legs are found. Disconnect... Replace inlet hose and hose screen after 5 years of hose failure. To Winterize the Dryer 1. Unplug dryer or disconnect power. 2. Shut off water faucet. 4. To Use the Dryer Again 1. Flush water pipes. For direct-wired dryers: 1. Disconnect power. 2. Steam models only: Shut off water faucet. 3. Steam models...
Owners Manual
Page 15
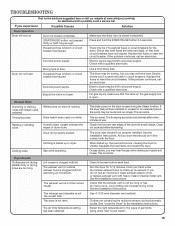
... seconds. Check that the exhaust vent is closed completely. The exhaust vent or outside exhaust hood to check air movement. For gas dryers, make sure that both circuit breakers have heat. See the Installation Instructions. Long venting will not run longer. See "Cycle Guide".... metal or flexible metal vent. Household fuse is not level. The dryer is blown or circuit breaker has tripped. TROUBLESHOOTING First try the solutions suggested here or visit our website at www.whirlpool.com/help for small objects. If the problem continues, call an ...
... seconds. Check that the exhaust vent is closed completely. The exhaust vent or outside exhaust hood to check air movement. For gas dryers, make sure that both circuit breakers have heat. See the Installation Instructions. Long venting will not run longer. See "Cycle Guide".... metal or flexible metal vent. Household fuse is not level. The dryer is blown or circuit breaker has tripped. TROUBLESHOOTING First try the solutions suggested here or visit our website at www.whirlpool.com/help for small objects. If the problem continues, call an ...
Owners Manual
Page 16
... clothing. Dry smaller loads that it only once. TROUBLESHOOTING First try the solutions suggested here or visit our website at www.whirlpool.com/help for assistance and to dry quickly. If you may also vary depending on drum Loads are too long The load... is too short Lint on Automatic Cycles. See the Installation Instructions. Under certain environmental or installation conditions you experience Possible Causes Solution Dryer Results (cont.) Clothes are not drying satisfactorily or drying times are wrinkled Improper use of your garments. default time), which can be...
... clothing. Dry smaller loads that it only once. TROUBLESHOOTING First try the solutions suggested here or visit our website at www.whirlpool.com/help for assistance and to dry quickly. If you may also vary depending on drum Loads are too long The load... is too short Lint on Automatic Cycles. See the Installation Instructions. Under certain environmental or installation conditions you experience Possible Causes Solution Dryer Results (cont.) Clothes are not drying satisfactorily or drying times are wrinkled Improper use of your garments. default time), which can be...
Owners Manual
Page 17
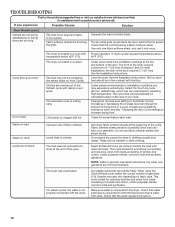
... code is present. the vent is clogged; The dryer will continue to run when this diagnostic code is present. Call for small loads of service. First try the solutions suggested here or visit our website at www.whirlpool.com/help for assistance and to both the faucet ...and dryer's water inlet valve. If the message persists, have your dryer is free of vent you experience Possible Causes Solution Dryer Results (cont.) Odors Load too hot Recent painting, ...
... code is present. the vent is clogged; The dryer will continue to run when this diagnostic code is present. Call for small loads of service. First try the solutions suggested here or visit our website at www.whirlpool.com/help for assistance and to both the faucet ...and dryer's water inlet valve. If the message persists, have your dryer is free of vent you experience Possible Causes Solution Dryer Results (cont.) Odors Load too hot Recent painting, ...
Dimension Guide
Page 1
...m) 4 Rigid metal 27 ft. (8.2 m) 21 ft. (6.4 m) 3/4"* (18 mm) 143/8" (365 mm) 253/4" (654 mm) 61/8"* (156 mm) * Approximate measurement Recommended installation clearances (dryer only) 5" (127 mm) 18" min. (457 mm) 3" (76 mm) 48 in.2 min. (310 cm2) 24 in.2 min. (155 cm2) 3" (76 mm) 1" (25 mm...minimum ventilation openings in accordance with the National Fuel Gas Code ANSI Z223.1. Determine the number of elbows and turns. Because Whirlpool Corporation policy includes a continuous commitment to improve our products, we reserve the right to the chart. Pipe-joint compounds resistant...
...m) 4 Rigid metal 27 ft. (8.2 m) 21 ft. (6.4 m) 3/4"* (18 mm) 143/8" (365 mm) 253/4" (654 mm) 61/8"* (156 mm) * Approximate measurement Recommended installation clearances (dryer only) 5" (127 mm) 18" min. (457 mm) 3" (76 mm) 48 in.2 min. (310 cm2) 24 in.2 min. (155 cm2) 3" (76 mm) 1" (25 mm...minimum ventilation openings in accordance with the National Fuel Gas Code ANSI Z223.1. Determine the number of elbows and turns. Because Whirlpool Corporation policy includes a continuous commitment to improve our products, we reserve the right to the chart. Pipe-joint compounds resistant...
Installation Instructions
Page 2
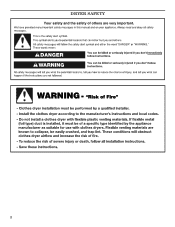
DRYER SAFETY 2
DRYER SAFETY 2
Installation Instructions
Page 3
IMPORTANT: When discarding or storing your old clothes dryer, remove the door. 3
IMPORTANT: When discarding or storing your old clothes dryer, remove the door. 3
Installation Instructions
Page 4
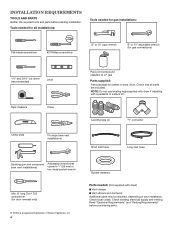
... codes. Check existing electrical supply and venting. NOTE: Do not use leveling legs supplied with dryer if installing with dryer) ■■Vent clamps ■■Vent elbows and ductwork Additional parts may be required, depending in dryer drum. Tools needed for all parts are included. INSTALLATION REQUIREMENTS TOOLS AND PARTS Gather the...
... codes. Check existing electrical supply and venting. NOTE: Do not use leveling legs supplied with dryer if installing with dryer) ■■Vent clamps ■■Vent elbows and ductwork Additional parts may be required, depending in dryer drum. Tools needed for all parts are included. INSTALLATION REQUIREMENTS TOOLS AND PARTS Gather the...
Installation Instructions
Page 5
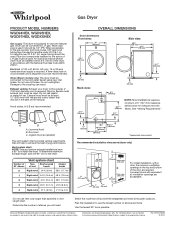
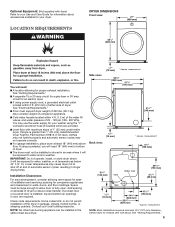
... outlet located within 4 ft. (1.2 m) of the water fill valves, and water pressure of 20 - 120 psi (138 - 827 kPa). LOCATION REQUIREMENTS DRYER DIMENSIONS Front view: 27" (686 mm) 381/8" (968 mm) You will need : ■■A location allowing for your local building inspector. See ... walls, doors, and floor moldings. spacing for companion appliances and clearances for ease of 200 lbs. (90.7 kg). Space must support dryer weight of installation and servicing; Contact your washer using the "Y" connector and short hose (if needed) which are required. measurement 507/8" ...
... outlet located within 4 ft. (1.2 m) of the water fill valves, and water pressure of 20 - 120 psi (138 - 827 kPa). LOCATION REQUIREMENTS DRYER DIMENSIONS Front view: 27" (686 mm) 381/8" (968 mm) You will need : ■■A location allowing for your local building inspector. See ... walls, doors, and floor moldings. spacing for companion appliances and clearances for ease of 200 lbs. (90.7 kg). Space must support dryer weight of installation and servicing; Contact your washer using the "Y" connector and short hose (if needed) which are required. measurement 507/8" ...
Installation Instructions
Page 6
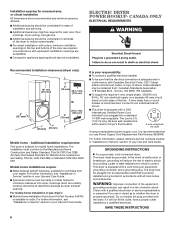
... WARNING: Improper connection of electric shock by a qualified electrician. The installation must be at least twice as large as to whether the dryer is 5 ft. (1.52 m) long. For further information, see "Assistance or Service" section in mobile homes to the Manufactured Home ...min. (310 cm2) 5" (127 mm) 24 in a risk of electric shock. The cord is properly grounded. Louvered doors with the dryer: if it is properly installed and grounded in accordance with a qualified electrician or service representative or personnel if you use Power Supply Cord Replacement...
... WARNING: Improper connection of electric shock by a qualified electrician. The installation must be at least twice as large as to whether the dryer is 5 ft. (1.52 m) long. For further information, see "Assistance or Service" section in mobile homes to the Manufactured Home ...min. (310 cm2) 5" (127 mm) 24 in a risk of electric shock. The cord is properly grounded. Louvered doors with the dryer: if it is properly installed and grounded in accordance with a qualified electrician or service representative or personnel if you use Power Supply Cord Replacement...


