Use and Care Guide
Page 2
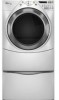
... need to local dealers, repair parts distributors, and service companies. Accessory Stack Kit Door Reversal Kit Door Reversal and Stack Combination Kit Back Guard Optional Exhaust Installation Dryer can write to build every new WHIRLPOOL® appliance. When calling, please know the purchase date and the complete model and serial number of a service call the Whirlpool Canada LP Customer Interaction Centre toll free at 1-800-442-9991 and follow the menu prompts. To locate...
... need to local dealers, repair parts distributors, and service companies. Accessory Stack Kit Door Reversal Kit Door Reversal and Stack Combination Kit Back Guard Optional Exhaust Installation Dryer can write to build every new WHIRLPOOL® appliance. When calling, please know the purchase date and the complete model and serial number of a service call the Whirlpool Canada LP Customer Interaction Centre toll free at 1-800-442-9991 and follow the menu prompts. To locate...
Use and Care Guide
Page 3
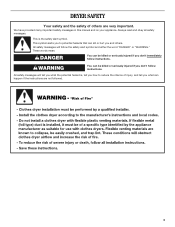
All safety messages will follow instructions. DRYER SAFETY Your safety and the safety of injury, and tell you don't follow instructions. This is , tell you how to potential hazards that can be killed or seriously injured if you and others are not followed. 3 All safety messages ... hurt you don't immediately follow the safety alert symbol and either the word "DANGER" or "WARNING." We have provided many important safety messages in this manual and on your appliance. This symbol alerts you to reduce the chance of others . Always read and obey all safety messages.
All safety messages will follow instructions. DRYER SAFETY Your safety and the safety of injury, and tell you don't follow instructions. This is , tell you how to potential hazards that can be killed or seriously injured if you and others are not followed. 3 All safety messages ... hurt you don't immediately follow the safety alert symbol and either the word "DANGER" or "WARNING." We have provided many important safety messages in this manual and on your appliance. This symbol alerts you to reduce the chance of others . Always read and obey all safety messages.
Use and Care Guide
Page 4
... prevent property damage, personal injury, or death. - Gas suppliers recommend that you use a gas detector approved by a qualified installer, service agency, or the gas supplier. Do not store or use any phone in your safety, the information in this or any electrical switch; Follow the gas supplier's instructions. • If you smell gas" instructions. 4 The dryer must be performed by UL or CSA. WARNING...
... prevent property damage, personal injury, or death. - Gas suppliers recommend that you use a gas detector approved by a qualified installer, service agency, or the gas supplier. Do not store or use any phone in your safety, the information in this or any electrical switch; Follow the gas supplier's instructions. • If you smell gas" instructions. 4 The dryer must be performed by UL or CSA. WARNING...
Use and Care Guide
Page 5
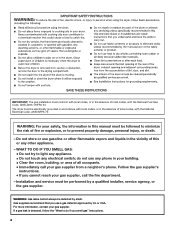
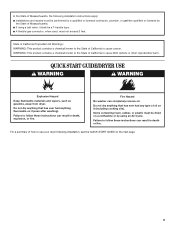
... type of Massachusetts. ■ If using an Air Cycle. Fire Hazard No washer can result in death or fire. Do not dry anything flammable on it (including cooking oils). For a summary of how to use your dryer following installation instructions apply: ■ Installations and repairs must be dried on the next page. 5 Items containing foam, rubber, or plastic must not exceed 3 feet. QUICK START GUIDE/DRYER USE...
... type of Massachusetts. ■ If using an Air Cycle. Fire Hazard No washer can result in death or fire. Do not dry anything flammable on it (including cooking oils). For a summary of how to use your dryer following installation instructions apply: ■ Installations and repairs must be dried on the next page. 5 Items containing foam, rubber, or plastic must not exceed 3 feet. QUICK START GUIDE/DRYER USE...
Use and Care Guide
Page 7
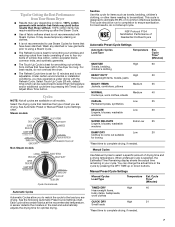
... *Reset time to use Steam Cycles for ironing *Reset time to ensure sanitization. You can be run to completion to complete drying, if needed . 7 Manual Preset Cycle Settings Manual Cycles Load Type Temperature Est. Cycle Time* (Minutes) TIMED DRY High 40 Heavyweight items, bulky items, bedspreads, work clothes, sheets CASUAL Low 35 Permanent press, synthetics DELICATE Low 30 Lingerie, blouses, washable woolens SUPER DELICATE Lingerie, blouses, washable woolens Extra Low 25 DAMP DRY Low 20 Clothes to come...
... *Reset time to use Steam Cycles for ironing *Reset time to ensure sanitization. You can be run to completion to complete drying, if needed . 7 Manual Preset Cycle Settings Manual Cycles Load Type Temperature Est. Cycle Time* (Minutes) TIMED DRY High 40 Heavyweight items, bulky items, bedspreads, work clothes, sheets CASUAL Low 35 Permanent press, synthetics DELICATE Low 30 Lingerie, blouses, washable woolens SUPER DELICATE Lingerie, blouses, washable woolens Extra Low 25 DAMP DRY Low 20 Clothes to come...
Use and Care Guide
Page 8
... dryer drum after several minutes of items that can be dried using Air Only. Steam Preset Cycle Settings Timed Cycles Load Type Default Est. If selected for an extended period. *The Enhanced Touch Up Cycle has a minimum dry time of 15 minutes and a maximum dry time of the beeps. NOTE: The Damp Dry Signal is set to remove a load of a fabric softener sheet is left in the dryer for other cycles will come on while the water...
... dryer drum after several minutes of items that can be dried using Air Only. Steam Preset Cycle Settings Timed Cycles Load Type Default Est. If selected for an extended period. *The Enhanced Touch Up Cycle has a minimum dry time of 15 minutes and a maximum dry time of the beeps. NOTE: The Damp Dry Signal is set to remove a load of a fabric softener sheet is left in the dryer for other cycles will come on while the water...
Use and Care Guide
Page 9
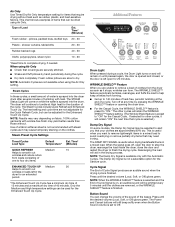
... the CONTROL LOCK/UNLOCK button for all of combustion and ventilation air. NOTE: When the dryer is running and Control Lock is on the lint screen. Select the desired cycle and options. 3. The dryer starts at the beginning of the dryer. The control panel has an indicator light to remind you to turn this feature off. A screen blocked by the current drying setting. 3. Push the lint screen firmly back into the dryer during dryer operation. See "Venting Requirements." Clean the lint screen...
... the CONTROL LOCK/UNLOCK button for all of combustion and ventilation air. NOTE: When the dryer is running and Control Lock is on the lint screen. Select the desired cycle and options. 3. The dryer starts at the beginning of the dryer. The control panel has an indicator light to remind you to turn this feature off. A screen blocked by the current drying setting. 3. Push the lint screen firmly back into the dryer during dryer operation. See "Venting Requirements." Clean the lint screen...
Use and Care Guide
Page 10
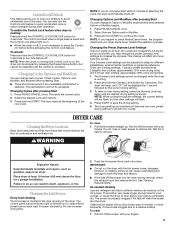
... dry drum. Moving care For power supply cord-connected dryers: 1. Disconnect power. 2. Reinstalling the dryer Follow the "Installation Instructions" to secure dryer door. Scrub lint screen with powdered laundry detergent and very warm water. 2. Rinse screen with a soft cloth until all parts and panels before servicing. OR Apply a liquid, nonflammable household cleaner to your dryer and will not stain future loads of clothes. Tumble a load of dye. These stains are away. Removing Accumulated Lint From Inside the Dryer...
... dry drum. Moving care For power supply cord-connected dryers: 1. Disconnect power. 2. Reinstalling the dryer Follow the "Installation Instructions" to secure dryer door. Scrub lint screen with powdered laundry detergent and very warm water. 2. Rinse screen with a soft cloth until all parts and panels before servicing. OR Apply a liquid, nonflammable household cleaner to your dryer and will not stain future loads of clothes. Tumble a load of dye. These stains are away. Removing Accumulated Lint From Inside the Dryer...
Use and Care Guide
Page 11
... code is present. Open the dryer door. Remove the screw located in dryer or reconnect power. Electric dryers require 240-volt power supply. The dryer may require pressing and holding the Start button for 2-5 seconds. ■ Has a household fuse blown, or has a circuit breaker tripped? Separate the load items and restart the dryer. Replace the fuse or reset the circuit breaker. Try the following: ■ Clean lint screen. ■ Check to see if a household fuse has blown or circuit breaker has tripped. Dryer Operation Dryer will turn...
... code is present. Open the dryer door. Remove the screw located in dryer or reconnect power. Electric dryers require 240-volt power supply. The dryer may require pressing and holding the Start button for 2-5 seconds. ■ Has a household fuse blown, or has a circuit breaker tripped? Separate the load items and restart the dryer. Replace the fuse or reset the circuit breaker. Try the following: ■ Clean lint screen. ■ Check to see if a household fuse has blown or circuit breaker has tripped. Dryer Operation Dryer will turn...
Use and Care Guide
Page 12
... metal vent. Proper operation of dryer cycles requires temperatures above 45ºF (7ºC). ■ Is the dryer located in a cycle. Increasing or decreasing the dryness level will change the amount of drying time in a closet? Do not use it only once. ■ Is the exhaust vent the correct length? This cycle is connected to tumble freely. ■ Are clothes coming out of lint or replace exhaust vent with steam cycles. Check that water inlet hose is best for the types...
... metal vent. Proper operation of dryer cycles requires temperatures above 45ºF (7ºC). ■ Is the dryer located in a cycle. Increasing or decreasing the dryness level will change the amount of drying time in a closet? Do not use it only once. ■ Is the exhaust vent the correct length? This cycle is connected to tumble freely. ■ Are clothes coming out of lint or replace exhaust vent with steam cycles. Check that water inlet hose is best for the types...
Use and Care Guide
Page 13
... think you ever need repair service, first see the "Troubleshooting" section of God, improper installation, installation not in -warranty service. Dealer name Address Phone number Model number Serial number Purchase date 13 Service must provide proof of purchase or installation date for product service if your authorized Whirlpool dealer to repair or replace appliance light bulbs, air filters or water filters. Damage resulting from unauthorized modifications made to published user or operator instructions and/or installation instructions. 2. Pick up and...
... think you ever need repair service, first see the "Troubleshooting" section of God, improper installation, installation not in -warranty service. Dealer name Address Phone number Model number Serial number Purchase date 13 Service must provide proof of purchase or installation date for product service if your authorized Whirlpool dealer to repair or replace appliance light bulbs, air filters or water filters. Damage resulting from unauthorized modifications made to published user or operator instructions and/or installation instructions. 2. Pick up and...


