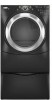

Use and Care Guide
Page 3
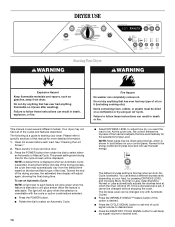
... in the vicinity of this manual must be followed to minimize the risk of fire or explosion, or to reduce the chance of Massachusetts. Installation and service must not exceed 3 feet. 3 These words mean: DANGER You can be a T-handle type. DRYER SAFETY Your safety and the safety of others . s If using a ball valve, it shall be killed...
... in the vicinity of this manual must be followed to minimize the risk of fire or explosion, or to reduce the chance of Massachusetts. Installation and service must not exceed 3 feet. 3 These words mean: DANGER You can be a T-handle type. DRYER SAFETY Your safety and the safety of others . s If using a ball valve, it shall be killed...
Use and Care Guide
Page 4
... the dryer or attempt any servicing unless specifically recommended in this Use and Care Guide or in , or spotted with controls. s Do not use heat to cooking oils in the dryer. Close supervision of fire, electric shock, or injury to the drying compartment. s Keep area around the exhaust opening and adjacent surrounding areas free from service or discarded, remove the door to persons when using the dryer. s Do not dry articles...
... the dryer or attempt any servicing unless specifically recommended in this Use and Care Guide or in , or spotted with controls. s Do not use heat to cooking oils in the dryer. Close supervision of fire, electric shock, or injury to the drying compartment. s Keep area around the exhaust opening and adjacent surrounding areas free from service or discarded, remove the door to persons when using the dryer. s Do not dry articles...

Use and Care Guide
Page 5
... of this manual. Parts needed Check local codes and with any tools listed here. Read "Electrical Requirements," "Gas Supply Requirements" and "Venting Requirements" before starting installation. You have the option of purchasing pedestals of this manual. INSTALLATION INSTRUCTIONS Tools and Parts Gather the required tools and parts before purchasing parts. Options Pedestal Are you will need to the "Assistance or Service" section of different heights separately for Part Number 8541503. 5 For a garage installation, you placing the dryer on a pedestal. To...
... of this manual. Parts needed Check local codes and with any tools listed here. Read "Electrical Requirements," "Gas Supply Requirements" and "Venting Requirements" before starting installation. You have the option of purchasing pedestals of this manual. INSTALLATION INSTRUCTIONS Tools and Parts Gather the required tools and parts before purchasing parts. Options Pedestal Are you will need to the "Assistance or Service" section of different heights separately for Part Number 8541503. 5 For a garage installation, you placing the dryer on a pedestal. To...

Use and Care Guide
Page 6
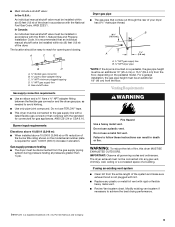
... during operation. If using a pedestal, you may not operate correctly if dryer is greater than 1" (2.5 cm), install Extended Dryer Feet Kit, Part Number 279810. Backguard If you can result in an area where it will need s A location that allows for wall, door and floor moldings. Check code requirements. Ask for spacing of this manual. This dryer has been tested for Part Number 8579666. Installation clearances The location must be considered. 6 Failure to water and...
... during operation. If using a pedestal, you may not operate correctly if dryer is greater than 1" (2.5 cm), install Extended Dryer Feet Kit, Part Number 279810. Backguard If you can result in an area where it will need s A location that allows for wall, door and floor moldings. Check code requirements. Ask for spacing of this manual. This dryer has been tested for Part Number 8579666. Installation clearances The location must be considered. 6 Failure to water and...

Use and Care Guide
Page 8
... for electric current. A time-delay fuse or circuit breaker is recommended. Burner information is equipped for use with a cord having an equipmentgrounding conductor and a grounding plug. Securely tighten all local codes and ordinances. Do not use larger tubing and a different size adapter fitting. WARNING: Improper connection of the gas connection to convert the appliance from your home. SAVE THESE INSTRUCTIONS Gas Type Natural gas: This dryer is located on the model/serial rating plate for use...
... for electric current. A time-delay fuse or circuit breaker is recommended. Burner information is equipped for use with a cord having an equipmentgrounding conductor and a grounding plug. Securely tighten all local codes and ordinances. Do not use larger tubing and a different size adapter fitting. WARNING: Improper connection of the gas connection to convert the appliance from your home. SAVE THESE INSTRUCTIONS Gas Type Natural gas: This dryer is located on the model/serial rating plate for use...
Use and Care Guide
Page 9
... flexible gas connector and the dryer gas pipe, as needed to flare adapter fitting C. ¹⁄₈" NPT minimum plugged tapping D. ½" NPT gas supply line E. Burner input requirements Elevations above 10,000 ft (3,048 m): s When installed above 10,000 ft (3,048 m) a 4% reduction of the burner Btu rating shown on the pedestal model. s Replace any gas vent, chimney, wall, ceiling or a concealed space of a building. The dryer exhaust must...
... flexible gas connector and the dryer gas pipe, as needed to flare adapter fitting C. ¹⁄₈" NPT minimum plugged tapping D. ½" NPT gas supply line E. Burner input requirements Elevations above 10,000 ft (3,048 m): s When installed above 10,000 ft (3,048 m) a 4% reduction of the burner Btu rating shown on the pedestal model. s Replace any gas vent, chimney, wall, ceiling or a concealed space of a building. The dryer exhaust must...

Use and Care Guide
Page 10
... use plastic or metal foil vent. If this manual. Do not use duct tape. 4" 10.2 cm 4" (10.2 cm) heavy metal exhaust vent DURASAFE™ vent products can cause moisture and lint to collect indoors, which may result in its final location. s Remove excess flexible metal vent to seal all joints. Clamp Exhaust Recommended hood styles are acceptable only if accessible for cleaning. Good Better Improper venting...
... use plastic or metal foil vent. If this manual. Do not use duct tape. 4" 10.2 cm 4" (10.2 cm) heavy metal exhaust vent DURASAFE™ vent products can cause moisture and lint to collect indoors, which may result in its final location. s Remove excess flexible metal vent to seal all joints. Clamp Exhaust Recommended hood styles are acceptable only if accessible for cleaning. Good Better Improper venting...

Use and Care Guide
Page 11
... your exhaust installation type Recommended exhaust installations Typical installations vent the dryer from the rear of this manual to order. Standard rear offset exhaust installation B. Dryer B. Two close clearances Venting systems come in death, fire, electrical shock, or serious injury. Refer to connect elbows H. Contact your installation. Alternate installations for close -clearance installations are available for close clearance alternate installations are shown. A B A. Vent length necessary to the manufacturer's instructions. Terminate the exhaust vent outside...
... your exhaust installation type Recommended exhaust installations Typical installations vent the dryer from the rear of this manual to order. Standard rear offset exhaust installation B. Dryer B. Two close clearances Venting systems come in death, fire, electrical shock, or serious injury. Refer to connect elbows H. Contact your installation. Alternate installations for close -clearance installations are available for close clearance alternate installations are shown. A B A. Vent length necessary to the manufacturer's instructions. Terminate the exhaust vent outside...
Use and Care Guide
Page 12
... the time of the dryer. 2. Number of 90º turns or elbows Type of the dryer. Secure vent to connect the exhaust vent or gas line. Avoid 90º turns. Stand the dryer up the dryer using elbows or making turns, allow as much room as possible. Mobile home installations require a Mobile Home Installation Kit. Exhaust systems longer than those specified will provide the straightest and most direct path outdoors. To determine maximum exhaust length...
... the time of the dryer. 2. Number of 90º turns or elbows Type of the dryer. Secure vent to connect the exhaust vent or gas line. Avoid 90º turns. Stand the dryer up the dryer using elbows or making turns, allow as much room as possible. Mobile home installations require a Mobile Home Installation Kit. Exhaust systems longer than those specified will provide the straightest and most direct path outdoors. To determine maximum exhaust length...

Use and Care Guide
Page 13
... fittings. Do not remove ground prong. Remove any protective film or tape remaining on power. 6. Shown is open the dryer door and feel heat, cancel cycle and close door. Do not select the Air Only Temperature setting. Connect Vent 1. Select a Timed Dry heated cycle, and start , check the following: s Dryer is used to connect the dryer to the gas pipe. Using a wrench to tighten, connect the gas supply to the supply line type, size and location. Test all packaging materials. 8. Use pipe-joint compound on...
... fittings. Do not remove ground prong. Remove any protective film or tape remaining on power. 6. Shown is open the dryer door and feel heat, cancel cycle and close door. Do not select the Air Only Temperature setting. Connect Vent 1. Select a Timed Dry heated cycle, and start , check the following: s Dryer is used to connect the dryer to the gas pipe. Using a wrench to tighten, connect the gas supply to the supply line type, size and location. Test all packaging materials. 8. Use pipe-joint compound on...
Use and Care Guide
Page 14
... how dry you want the load to be changed without stopping the cycle. The default dryness setting is Normal when an Auto Dry Cycle is selected. This manual covers several different models. To use the least energy. As the cycle runs, the control senses the dryness of the load. You can select a different dryness level, depending on the size and fabric type of the load and adjusts the time automatically...
... how dry you want the load to be changed without stopping the cycle. The default dryness setting is Normal when an Auto Dry Cycle is selected. This manual covers several different models. To use the least energy. As the cycle runs, the control senses the dryness of the load. You can select a different dryness level, depending on the size and fabric type of the load and adjusts the time automatically...

Use and Care Guide
Page 15
... you close the door and press Start within 5 minutes. An electronic control determines the load type to select another cycle and Dryness Level. s Press POWER. Temperature settings can also use a Manual Cycle NOTE: A light next to avoid unintended use of your dryer at any time Press PAUSE/CANCEL twice or open the door. NOTE: Dryness Level is running and Control Locked is unlocked. Pressing the Dryness Level button will adjust based on...
... you close the door and press Start within 5 minutes. An electronic control determines the load type to select another cycle and Dryness Level. s Press POWER. Temperature settings can also use a Manual Cycle NOTE: A light next to avoid unintended use of your dryer at any time Press PAUSE/CANCEL twice or open the door. NOTE: Dryness Level is running and Control Locked is unlocked. Pressing the Dryness Level button will adjust based on...

Use and Care Guide
Page 16
... Cycle Settings chart (in the dryer. WRINKLE SHIELD™ Feature The WRINKLE SHIELD™ feature light glows during the WRINKLE SHIELD™ feature. 16 Indicator lights Other indicator lights on when a wet item has been detected in the "Cycles" section) for heavyweight mixed loads, cotton towels or jeans. s The dryer enters the cool down for drying no-iron fabrics such as work clothes with Manual Cycles. See "Damp Dry Cycle...
... Cycle Settings chart (in the dryer. WRINKLE SHIELD™ Feature The WRINKLE SHIELD™ feature light glows during the WRINKLE SHIELD™ feature. 16 Indicator lights Other indicator lights on when a wet item has been detected in the "Cycles" section) for heavyweight mixed loads, cotton towels or jeans. s The dryer enters the cool down for drying no-iron fabrics such as work clothes with Manual Cycles. See "Damp Dry Cycle...

Use and Care Guide
Page 17
... Dry Cycle Signal On some models, the Damp Dry Signal may be dried using Air Only s Check that may need a short drying time. s Shake and fluff pillows by pressing the WRINKLE SHIELD™ feature or opening the dryer door. Timed Dry Use this cycle for 20 minutes. Lightweight garments, such as clothes packed in a mixed load to turn on until DRUM LIGHT is pressed again, the door is open for ironing *Estimated Time with Dryness Level (medium) setting...
... Dry Cycle Signal On some models, the Damp Dry Signal may be dried using Air Only s Check that may need a short drying time. s Shake and fluff pillows by pressing the WRINKLE SHIELD™ feature or opening the dryer door. Timed Dry Use this cycle for 20 minutes. Lightweight garments, such as clothes packed in a mixed load to turn on until DRUM LIGHT is pressed again, the door is open for ironing *Estimated Time with Dryness Level (medium) setting...
Use and Care Guide
Page 19
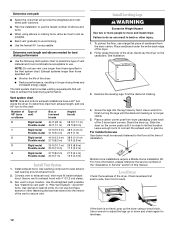
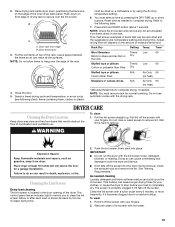
... a residue buildup. Cleaning the Lint Screen Every load cleaning The lint screen is hard to both sides of lint screen with your fingers. Close the door. 5. Select a timed drying cycle and temperature, or an air cycle (see following table. 7. You must remove rack for a garage installation. This chart shows examples of combustion and ventilation air. Roll lint off the screen into place. Reset time as gasoline, away from dryer. NOTE: Check the lint screen and remove any lint accumulated from...
... a residue buildup. Cleaning the Lint Screen Every load cleaning The lint screen is hard to both sides of lint screen with your fingers. Close the door. 5. Select a timed drying cycle and temperature, or an air cycle (see following table. 7. You must remove rack for a garage installation. This chart shows examples of combustion and ventilation air. Roll lint off the screen into place. Reset time as gasoline, away from dryer. NOTE: Check the lint screen and remove any lint accumulated from...
Use and Care Guide
Page 20
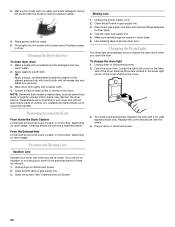
... dryer. Locate the light bulb cover on dryer usage. Remove the screw located in dryer base. 6. Replace the cover and secure with hot water. 5. Replace screen in gas supply line. 3. Apply paste to secure dryer door. If you will not stain future loads of time, you are not harmful to your dryer only when you should be done by a qualified person. Cap the open the door. Use masking tape to a soft cloth. Changing the Drum Light The dryer light automatically turns on dryer...
... dryer. Locate the light bulb cover on dryer usage. Remove the screw located in dryer base. 6. Replace the cover and secure with hot water. 5. Replace screen in gas supply line. 3. Apply paste to secure dryer door. If you will not stain future loads of time, you are not harmful to your dryer only when you should be done by a qualified person. Cap the open the door. Use masking tape to a soft cloth. Changing the Drum Light The dryer light automatically turns on dryer...

Use and Care Guide
Page 21
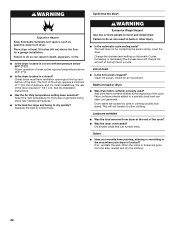
... the drum for 5-10 minutes. s Is the exhaust vent diameter the correct size? Check the front and rear edges of lint or replace exhaust vent with lint, restricting air movement? The gas valve clicking is not too long or has too many turns. Dryer displaying code message s "PF" (power failure), check the following: Was the drying cycle interrupted by a power failure? Failure to check air movement. s Are fabric softener sheets blocking the grille? See "Installation Instructions." If the problem continues...
... the drum for 5-10 minutes. s Is the exhaust vent diameter the correct size? Check the front and rear edges of lint or replace exhaust vent with lint, restricting air movement? The gas valve clicking is not too long or has too many turns. Dryer displaying code message s "PF" (power failure), check the following: Was the drying cycle interrupted by a power failure? Failure to check air movement. s Are fabric softener sheets blocking the grille? See "Installation Instructions." If the problem continues...
Use and Care Guide
Page 22
... and dry the clothing. 22 s Is the dryer located in a closet? Proper operation of dryer cycles requires temperatures above the floor for the types of the cycle? Closet doors must have ventilation openings at the beginning of the door. See "Additional Features." Failure to a partially dried load can tumble freely. The load may not be contacting the sensor strips. Level the dryer. Lint on Automatic Cycles. Clean lint screen. Stains on load or drum s Was dryer fabric...
... and dry the clothing. 22 s Is the dryer located in a closet? Proper operation of dryer cycles requires temperatures above the floor for the types of the cycle? Closet doors must have ventilation openings at the beginning of the door. See "Additional Features." Failure to a partially dried load can tumble freely. The load may not be contacting the sensor strips. Level the dryer. Lint on Automatic Cycles. Clean lint screen. Stains on load or drum s Was dryer fabric...

Use and Care Guide
Page 23
... will fit right and work right because they are trained to Whirlpool Corporation with : s Use and maintenance procedures s Accessory and repair parts sales s Features and specifications on our full line of appliances s Referrals to local dealers, repair parts distributors, and service companies. If you need further assistance, you only use FSP® factory specified parts. These parts will help , follow the menu prompts. To locate FSP® replacement parts in...
... will fit right and work right because they are trained to Whirlpool Corporation with : s Use and maintenance procedures s Accessory and repair parts sales s Features and specifications on our full line of appliances s Referrals to local dealers, repair parts distributors, and service companies. If you need further assistance, you only use FSP® factory specified parts. These parts will help , follow the menu prompts. To locate FSP® replacement parts in...

Use and Care Guide
Page 24
... light bulbs, air filters or water filters. This major appliance is designed to be repaired in a country other than the country in accordance with electrical or plumbing codes, or use . 4. Repairs to parts or systems resulting from warranty coverage. 3. Contact your major appliance to better help can find this warranty does not apply. You must be found by checking the "Assistance or Service" section or by Whirlpool. 5. Replacement parts...
... light bulbs, air filters or water filters. This major appliance is designed to be repaired in a country other than the country in accordance with electrical or plumbing codes, or use . 4. Repairs to parts or systems resulting from warranty coverage. 3. Contact your major appliance to better help can find this warranty does not apply. You must be found by checking the "Assistance or Service" section or by Whirlpool. 5. Replacement parts...


