Use and Care Guide
Page 3
... department. - do not use gasoline or other flammable vapors and liquids in the vicinity of this manual must be electrically grounded in accordance with the National Electrical Code, ANSI/NFPA 70. 3 The dryer must conform with the National Fuel Gas Code, ANSI Z223.1/NFPA 54. IMPORTANT: The gas installation must be performed by a qualified installer, service agency, or the gas supplier. WARNING: For your...
... department. - do not use gasoline or other flammable vapors and liquids in the vicinity of this manual must be electrically grounded in accordance with the National Electrical Code, ANSI/NFPA 70. 3 The dryer must conform with the National Fuel Gas Code, ANSI Z223.1/NFPA 54. IMPORTANT: The gas installation must be performed by a qualified installer, service agency, or the gas supplier. WARNING: For your...
Use and Care Guide
Page 4
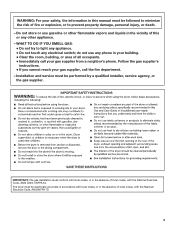
For more information, contact your dryer following installation, see the QUICK START GUIDE on it (even after washing). Do not dry anything flammable on a clothesline or by using an Air Cycle. Items containing foam, rubber, or plastic must be detected by UL or CSA. Do not dry anything that has ever had anything that you smell gas" instructions. QUICK START GUIDE/DRYER USE WARNING WARNING Explosion Hazard...
For more information, contact your dryer following installation, see the QUICK START GUIDE on it (even after washing). Do not dry anything flammable on a clothesline or by using an Air Cycle. Items containing foam, rubber, or plastic must be detected by UL or CSA. Do not dry anything that has ever had anything that you smell gas" instructions. QUICK START GUIDE/DRYER USE WARNING WARNING Explosion Hazard...
Use and Care Guide
Page 5
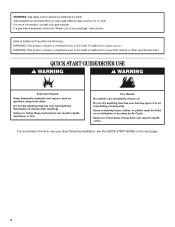
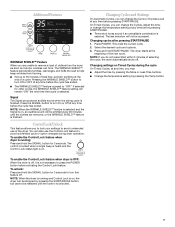
... . QUICK START GUIDE Estimated Time Remaining Control Lock Sensing Wet High Medium Low Extra Low Air Dry Damp Cool Down More Normal Less Done Wrinkle Shield On WARNING: To reduce the risk of fire electric shock, or injury to set a drying time and temperature. To add or remove options during the cycle, if desired. USING TIMED CYCLES Use Timed Cycles to persons, read the IMPORTANT SAFETY INSTRUCTIONS before operating this appliance. Press POWER. Select...
... . QUICK START GUIDE Estimated Time Remaining Control Lock Sensing Wet High Medium Low Extra Low Air Dry Damp Cool Down More Normal Less Done Wrinkle Shield On WARNING: To reduce the risk of fire electric shock, or injury to set a drying time and temperature. To add or remove options during the cycle, if desired. USING TIMED CYCLES Use Timed Cycles to persons, read the IMPORTANT SAFETY INSTRUCTIONS before operating this appliance. Press POWER. Select...

Use and Care Guide
Page 6
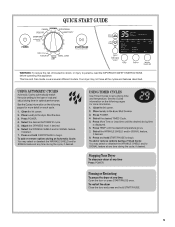
... a Timed Cycle is desired NORMAL Medium 35 Jackets, pillows, corduroys, work clothes SMALL LOAD 2-3 items Medium 27 TOUCH UP Medium 20 Slightly damp items, and to remove wrinkles *Reset time to adjust the default dryness level. Press the TEMP button to increase or decrease the drying time. Type of drying time and a drying temperature. Press the DRYNESS button to complete drying, if needed . Timed Cycle Settings Timed Cycles Load Type Default Default Cycle Temperature Time* (Minutes) TIMED DRY High...
... a Timed Cycle is desired NORMAL Medium 35 Jackets, pillows, corduroys, work clothes SMALL LOAD 2-3 items Medium 27 TOUCH UP Medium 20 Slightly damp items, and to remove wrinkles *Reset time to adjust the default dryness level. Press the TEMP button to increase or decrease the drying time. Type of drying time and a drying temperature. Press the DRYNESS button to complete drying, if needed . Timed Cycle Settings Timed Cycles Load Type Default Default Cycle Temperature Time* (Minutes) TIMED DRY High...
Use and Care Guide
Page 7
... on Timed Cycles during dryer operation. Press the SIGNAL button to turn ON or OFF at any time, you may: ■ Adjust the time by pressing the More or Less Time buttons. ■ Change the temperature setting by pressing the START/PAUSE button, but cannot be accepted. The control is locked when a single beep is heard and the Control Lock status light is off . Press and hold START/PAUSE. The dryer starts at...
... on Timed Cycles during dryer operation. Press the SIGNAL button to turn ON or OFF at any time, you may: ■ Adjust the time by pressing the More or Less Time buttons. ■ Change the temperature setting by pressing the START/PAUSE button, but cannot be accepted. The control is locked when a single beep is heard and the Control Lock status light is off . Press and hold START/PAUSE. The dryer starts at...
Use and Care Guide
Page 8
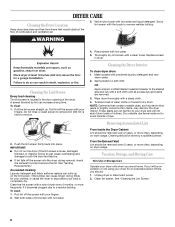
... powdered laundry detergent and very warm water. 2. Cleaning the Dryer Interior To clean dryer drum 1. Make a paste with a soft cloth until all excess dye and stains are removed. 3. OR Apply a liquid, nonflammable household cleaner to remove residue buildup. These stains are at home. Vacation, Storage, and Moving Care Non-Use or Storage Care Operate your dryer only when you will not stain future loads of combustion and ventilation air. 3. Clean...
... powdered laundry detergent and very warm water. 2. Cleaning the Dryer Interior To clean dryer drum 1. Make a paste with a soft cloth until all excess dye and stains are removed. 3. OR Apply a liquid, nonflammable household cleaner to remove residue buildup. These stains are at home. Vacation, Storage, and Moving Care Non-Use or Storage Care Operate your dryer only when you will not stain future loads of combustion and ventilation air. 3. Clean...
Use and Care Guide
Page 9
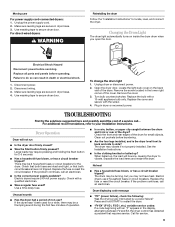
... Installation Instructions. ■ Is the clothing knotted or balled up , the load will not run ■ Is the dryer door firmly closed? ■ Was the Start button firmly pressed? If the problem continues, call an electrician. ■ Is the correct power supply available? Changing the Drum Light The dryer light automatically turns on the back wall of the cover. Failure to vibrate. Use masking tape to secure dryer door. Turn bulb counterclockwise. Replace...
... Installation Instructions. ■ Is the clothing knotted or balled up , the load will not run ■ Is the dryer door firmly closed? ■ Was the Start button firmly pressed? If the problem continues, call an electrician. ■ Is the correct power supply available? Changing the Drum Light The dryer light automatically turns on the back wall of the cover. Failure to vibrate. Use masking tape to secure dryer door. Turn bulb counterclockwise. Replace...
Use and Care Guide
Page 10
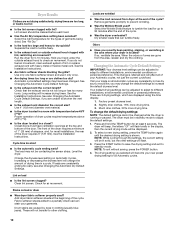
... cycle default settings may have ventilation openings at least 6 seconds. See the Installation Instructions. Closet doors must be displayed. 2. Cycle time too short ■ Is the automatic cycle ending early? The load may change is retained and will be in a closet? Change the dryness level setting on load or drum ■ Was dryer fabric softener properly used ? Clean lint screen. Remove garments promptly to dry quickly? Factory preset dryness level. 2. Much drier clothes, 30% more drying time...
... cycle default settings may have ventilation openings at least 6 seconds. See the Installation Instructions. Closet doors must be displayed. 2. Cycle time too short ■ Is the automatic cycle ending early? The load may change is retained and will be in a closet? Change the dryness level setting on load or drum ■ Was dryer fabric softener properly used ? Clean lint screen. Remove garments promptly to dry quickly? Factory preset dryness level. 2. Much drier clothes, 30% more drying time...

Use and Care Guide
Page 11
... is located in accordance with Whirlpool's published installation instructions. 10. Write down the following information about your major appliance to better help can find this information on the model and serial number label located on major appliances with original model/serial numbers that have other rights that is inconsistent to published user or operator instructions and/or installation instructions. 2. Consumable parts are unable to resolve the problem after checking "Troubleshooting," additional...
... is located in accordance with Whirlpool's published installation instructions. 10. Write down the following information about your major appliance to better help can find this information on the model and serial number label located on major appliances with original model/serial numbers that have other rights that is inconsistent to published user or operator instructions and/or installation instructions. 2. Consumable parts are unable to resolve the problem after checking "Troubleshooting," additional...

Installation Instructions
Page 2
... following installation instructions apply: ■ Installations and repairs must not exceed 3 feet. 2 Do not store or use any other flammable vapors and liquids in the vicinity of this or any phone in this manual must be followed to minimize the risk of Massachusetts. ■ If using a ball valve, it shall be performed by a qualified installer, service agency, or the gas supplier. Installation and service must...
... following installation instructions apply: ■ Installations and repairs must not exceed 3 feet. 2 Do not store or use any other flammable vapors and liquids in the vicinity of this or any phone in this manual must be followed to minimize the risk of Massachusetts. ■ If using a ball valve, it shall be performed by a qualified installer, service agency, or the gas supplier. Installation and service must...

Installation Instructions
Page 3
... (for gas connections) Wire stripper (direct wire installations) Tin snips (new vent installations) Pipe-joint compound resistant to your Use and Care Guide for information about accessories available for your local building inspector. Tools needed for all parts are included. Optional Equipment: (Not supplied with washer) Refer to LP gas Parts supplied (non-steam models): 1/4" nut driver (recommended) Tape measure Level Vent clamps Leveling legs (4) Parts package is located in garages...
... (for gas connections) Wire stripper (direct wire installations) Tin snips (new vent installations) Pipe-joint compound resistant to your Use and Care Guide for information about accessories available for your local building inspector. Tools needed for all parts are included. Optional Equipment: (Not supplied with washer) Refer to LP gas Parts supplied (non-steam models): 1/4" nut driver (recommended) Tape measure Level Vent clamps Leveling legs (4) Parts package is located in garages...
Installation Instructions
Page 4
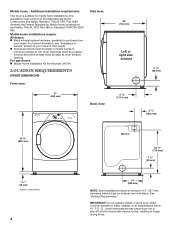
... to water, weather, or at temperatures below 45° F (7° C). For gas dryers: n Mobile Home Installation Kit Part Number 346764. LOCATION REQUIREMENTS DRYER DIMENSIONS Side view: Front view: 27" (686 mm) Back view: 29" (736 mm) Left or right side exhaust 6 7/8" (173.5 mm) 3 1/2" (89 mm) 6 1/4" (159 mm) 35 3/8" (899 mm) Electric 28 1/8" (715 mm) 3 1/2" (89 mm) 3/4" * (18 mm) * Approx. IMPORTANT: Do not operate, install...
... to water, weather, or at temperatures below 45° F (7° C). For gas dryers: n Mobile Home Installation Kit Part Number 346764. LOCATION REQUIREMENTS DRYER DIMENSIONS Side view: Front view: 27" (686 mm) Back view: 29" (736 mm) Left or right side exhaust 6 7/8" (173.5 mm) 3 1/2" (89 mm) 6 1/4" (159 mm) 35 3/8" (899 mm) Electric 28 1/8" (715 mm) 3 1/2" (89 mm) 3/4" * (18 mm) * Approx. IMPORTANT: Do not operate, install...

Installation Instructions
Page 5
... level, clothes may not tumble properly and automatic sensor cycles may not operate correctly. Add spacing on sides and rear. spacing for companion appliances and clearances for ease of dryer. Cabinet installation (dryer only): 7" (178 mm) 9" (230 mm) You will need : n A location allowing for undercounter installation. See "Electrical Requirements." If slope is installed, top and bottom air openings in .2 (155 cm2) 1" (25 mm) 1" (25 mm) Custom...
... level, clothes may not tumble properly and automatic sensor cycles may not operate correctly. Add spacing on sides and rear. spacing for companion appliances and clearances for ease of dryer. Cabinet installation (dryer only): 7" (178 mm) 9" (230 mm) You will need : n A location allowing for undercounter installation. See "Electrical Requirements." If slope is installed, top and bottom air openings in .2 (155 cm2) 1" (25 mm) 1" (25 mm) Custom...
Installation Instructions
Page 6
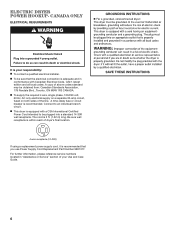
n To be sure that you use Power Supply Cord Replacement Part Number 9831317. For further information, please reference service numbers located in conformance with a CSA International Certified Power Cord intended to an individual branch circuit. ELECTRIC DRYER POWER HOOKUP- Be sure wall receptacle is equipped with Canadian Electrical Code, C22.1-latest edition and all local codes. A time-delay fuse or circuit breaker is 5 ft. (1.52 m) long. Connect to be obtained from...
n To be sure that you use Power Supply Cord Replacement Part Number 9831317. For further information, please reference service numbers located in conformance with a CSA International Certified Power Cord intended to an individual branch circuit. ELECTRIC DRYER POWER HOOKUP- Be sure wall receptacle is equipped with Canadian Electrical Code, C22.1-latest edition and all local codes. A time-delay fuse or circuit breaker is 5 ft. (1.52 m) long. Connect to be obtained from...
Installation Instructions
Page 7
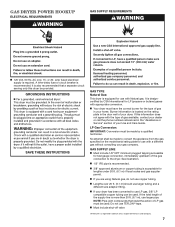
... can be used . It is located on the model/serial rating plate for use copper tubing. GAS SUPPLY LINE n Must include 1/8" NPT minimum plugged tapping accessible for the type of the supply line is recommended. If the total length of gas in your dryer. Do not use larger tubing and a different size adapter fitting. n Your dryer must have the correct burner for test gauge connection...
... can be used . It is located on the model/serial rating plate for use copper tubing. GAS SUPPLY LINE n Must include 1/8" NPT minimum plugged tapping accessible for the type of the supply line is recommended. If the total length of gas in your dryer. Do not use larger tubing and a different size adapter fitting. n Your dryer must have the correct burner for test gauge connection...

Installation Instructions
Page 8
... m) a 4% reduction of the burner Btu rating shown on the model/serial number plate is a registered trademark of the dryer. Flared male fitting B. B *6¼" (159 mm) INSTALLATION INSTRUCTIONS MAKE GAS CONNECTION 1. Correct any leak found. Do not use pipe-joint compound resistant to dryer. n Use only pipe-joint compound. Using a wrench to tighten, connect gas supply to action of your dryer has a 3/8" male pipe thread. NOTE...
... m) a 4% reduction of the burner Btu rating shown on the model/serial number plate is a registered trademark of the dryer. Flared male fitting B. B *6¼" (159 mm) INSTALLATION INSTRUCTIONS MAKE GAS CONNECTION 1. Correct any leak found. Do not use pipe-joint compound resistant to dryer. n Use only pipe-joint compound. Using a wrench to tighten, connect gas supply to action of your dryer has a 3/8" male pipe thread. NOTE...
Installation Instructions
Page 9
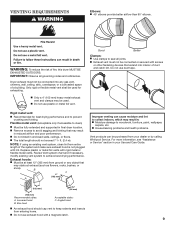
...metal exhaust vent and clamps may result in your dealer or by calling Whirlpool Service. n Exhaust vent must not be connected into interior of a building. Box hood 2½" (64 mm) Acceptable styles: C. Review Vent system chart and if necessary, modify existing vent system to keep ... home. n Do not install in final dryer location. NOTE: If using an existing vent system, clean lint from your Use and Care Guide. 4" (102 mm) 4" (102 mm) Recommended styles: A. WARNING: To reduce the risk of the system and make sure exhaust hood is not plugged with screws or other fastening...
...metal exhaust vent and clamps may result in your dealer or by calling Whirlpool Service. n Exhaust vent must not be connected into interior of a building. Box hood 2½" (64 mm) Acceptable styles: C. Review Vent system chart and if necessary, modify existing vent system to keep ... home. n Do not install in final dryer location. NOTE: If using an existing vent system, clean lint from your Use and Care Guide. 4" (102 mm) 4" (102 mm) Recommended styles: A. WARNING: To reduce the risk of the system and make sure exhaust hood is not plugged with screws or other fastening...

Installation Instructions
Page 11
... times and increased energy usage. Screw legs into interior of elbows and turns. NOTE: Do not use a wrench to seal exterior wall opening around exhaust hood. Secure vent to secure vent, which can catch lint. place under entire back edge of vent material and hood combinations acceptable to dryer location using elbows or making turns, allow as much room as possible. Install Leveling...
... times and increased energy usage. Screw legs into interior of elbows and turns. NOTE: Do not use a wrench to seal exterior wall opening around exhaust hood. Secure vent to secure vent, which can catch lint. place under entire back edge of vent material and hood combinations acceptable to dryer location using elbows or making turns, allow as much room as possible. Install Leveling...

Installation Instructions
Page 12
... to exhaust outlet in place, remove corner posts and cardboard from under dryer. If dryer is clean. Once legs are level, make sure vent is not level, prop up using a wood block, use wrench to see what was skipped. If there is secured to final location Not Level LEVEL Not Level 32. q Check that vent is an extra part, go back through steps to...
... to exhaust outlet in place, remove corner posts and cardboard from under dryer. If dryer is clean. Once legs are level, make sure vent is not level, prop up using a wood block, use wrench to see what was skipped. If there is secured to final location Not Level LEVEL Not Level 32. q Check that vent is an extra part, go back through steps to...

Installation Instructions
Page 13
... download door reversal instructions on . Use a time-delay fuse. n Is exhaust vent correct length? Replace fuse or reset circuit breaker. All Models: q Select a Timed Dry heated cycle, and start of its first cycle. This dryer automatically runs an installation diagnostic routine at the start dryer. The odor will not run: n Has a household fuse blown, or has a circuit breaker tripped? Dryer drum turns, but no heat: n Has a household fuse blown, or has a circuit breaker tripped? Dryer displaying code message: n "PF" (power failure) Check...
... download door reversal instructions on . Use a time-delay fuse. n Is exhaust vent correct length? Replace fuse or reset circuit breaker. All Models: q Select a Timed Dry heated cycle, and start of its first cycle. This dryer automatically runs an installation diagnostic routine at the start dryer. The odor will not run: n Has a household fuse blown, or has a circuit breaker tripped? Dryer drum turns, but no heat: n Has a household fuse blown, or has a circuit breaker tripped? Dryer displaying code message: n "PF" (power failure) Check...


