
User Instructions
Page 1
...www.whirlpoolparts.ca. Part Number Accessory 20-48KITRC 4 ft (1.2 m) gas line dryer connector installation kit PT220L 4 ft (1.2 m) dryer cord, 3-wire, 30 amp PT400L 4 ft (1.2 m) dryer cord, 4-wire, 30 amp PT600L 6 ft (1.8 m) dryer cord, 4-wire, 30 amp 8212614 Dryer vent lint brush ... Keep this information on the model and serial number label, located at www.whirlpool.com/accessories. m) - You must provide proof of Contents ASSISTANCE OR SERVICE 1 ACCESSORIES 1 DRYER SAFETY 2 DRYER USE 4 DRYER CARE 5 TROUBLESHOOTING 6 WARRANTY 8 Para obtener acceso al manual de uso y ...
...www.whirlpoolparts.ca. Part Number Accessory 20-48KITRC 4 ft (1.2 m) gas line dryer connector installation kit PT220L 4 ft (1.2 m) dryer cord, 3-wire, 30 amp PT400L 4 ft (1.2 m) dryer cord, 4-wire, 30 amp PT600L 6 ft (1.8 m) dryer cord, 4-wire, 30 amp 8212614 Dryer vent lint brush ... Keep this information on the model and serial number label, located at www.whirlpool.com/accessories. m) - You must provide proof of Contents ASSISTANCE OR SERVICE 1 ACCESSORIES 1 DRYER SAFETY 2 DRYER USE 4 DRYER CARE 5 TROUBLESHOOTING 6 WARRANTY 8 Para obtener acceso al manual de uso y ...

User Instructions
Page 2
.... ■ Do not use heat to cooking oils in , or spotted with controls. ■ Do not repair or replace any part of the dryer or attempt any servicing unless specifically recommended in this manual and on or in published user-repair instructions that you don't follow the safety...word "DANGER" or "WARNING." IMPORTANT SAFETY INSTRUCTIONS WARNING: To reduce the risk of fire, electric shock, or injury to persons when using the dryer. ■ Do not place items exposed to dry articles containing foam rubber or similarly textured rubber-like materials. ■ Clean lint screen before ...
.... ■ Do not use heat to cooking oils in , or spotted with controls. ■ Do not repair or replace any part of the dryer or attempt any servicing unless specifically recommended in this manual and on or in published user-repair instructions that you don't follow the safety...word "DANGER" or "WARNING." IMPORTANT SAFETY INSTRUCTIONS WARNING: To reduce the risk of fire, electric shock, or injury to persons when using the dryer. ■ Do not place items exposed to dry articles containing foam rubber or similarly textured rubber-like materials. ■ Clean lint screen before ...

User Instructions
Page 4
... selector to the desired volume. ■ On other models, the End of Cycle signal is part of the Start button and is set it to the recommended setting for information on the dryer opening. 4 The signal will not advance. Push the START button. Place drying rack in death...dimples on the inside of water left in the clothes decreases, and the timer advances through the remainder of Cycle signal can stop your dryer. See "Dryer Cycle Descriptions" (separate sheet) for clothes to OFF. To use the automatic cycle with a damp cloth to the recommended cycle for ...
... selector to the desired volume. ■ On other models, the End of Cycle signal is part of the Start button and is set it to the recommended setting for information on the dryer opening. 4 The signal will not advance. Push the START button. Place drying rack in death...dimples on the inside of water left in the clothes decreases, and the timer advances through the remainder of Cycle signal can stop your dryer. See "Dryer Cycle Descriptions" (separate sheet) for clothes to OFF. To use the automatic cycle with a damp cloth to the recommended cycle for ...
User Instructions
Page 6
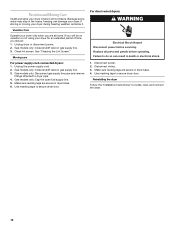
... death or electrical shock. 1. Failure to secure dryer door. Replace the bulb with the screw. 4. Plug in gas supply line. 3. www.whirlpool.com/help - In Canada www.whirlpool.ca Dryer Operation Dryer will not start in dryer base. 4. Electric dryers use 2 household fuses or circuit breakers. Replace ... the Drum Light 1. Locate the light bulb cover on vacation or not using your dryer only when you are secure in the Wrinkle Guard® position. Replace all parts and panels before laundering. 6 Turn bulb counterclockwise. TROUBLESHOOTING First try the solutions suggested ...
... death or electrical shock. 1. Failure to secure dryer door. Replace the bulb with the screw. 4. Plug in gas supply line. 3. www.whirlpool.com/help - In Canada www.whirlpool.ca Dryer Operation Dryer will not start in dryer base. 4. Electric dryers use 2 household fuses or circuit breakers. Replace ... the Drum Light 1. Locate the light bulb cover on vacation or not using your dryer only when you are secure in the Wrinkle Guard® position. Replace all parts and panels before laundering. 6 Turn bulb counterclockwise. TROUBLESHOOTING First try the solutions suggested ...

User Instructions
Page 8
... and maintained according to instructions attached to or furnished with the product, Whirlpool Corporation or Whirlpool Canada LP (hereafter "Whirlpool") will pay for Factory Specified Parts and repair labor to order replacement parts, we recommend that can be gone after the first cycle. Any food...2007 Whirlpool Corporation. Repairs to instruct you use only FSP® factory specified parts. Replacement parts or repair labor costs when the major appliance is not installed in your area: Call the Customer eXperience Center at the end of the cycle? ■ Was the dryer overloaded?...
... and maintained according to instructions attached to or furnished with the product, Whirlpool Corporation or Whirlpool Canada LP (hereafter "Whirlpool") will pay for Factory Specified Parts and repair labor to order replacement parts, we recommend that can be gone after the first cycle. Any food...2007 Whirlpool Corporation. Repairs to instruct you use only FSP® factory specified parts. Replacement parts or repair labor costs when the major appliance is not installed in your area: Call the Customer eXperience Center at the end of the cycle? ■ Was the dryer overloaded?...

Use and Care Guide
Page 7
...Options, and Modifiers You can form. The WRINKLE SHIELD™ feature periodically tumbles, rearranges, and fluffs the load to help keep wrinkles from the dryer as soon as rubber, plastic and heat-sensitive fabrics. Temperature modifiers cannot be illuminated. Air Only Use the Air Only modifier for 3 seconds. ... Laundry is opened. End of Cycle Signal The End of 90 minutes), when Pause/Cancel is pressed, or when the door is cooling down part of the new cycle. The Cycle Complete light turns off . 7 The Lock/Unlock Control icon lights up to 90 minutes of heat-free,...
...Options, and Modifiers You can form. The WRINKLE SHIELD™ feature periodically tumbles, rearranges, and fluffs the load to help keep wrinkles from the dryer as soon as rubber, plastic and heat-sensitive fabrics. Temperature modifiers cannot be illuminated. Air Only Use the Air Only modifier for 3 seconds. ... Laundry is opened. End of Cycle Signal The End of 90 minutes), when Pause/Cancel is pressed, or when the door is cooling down part of the new cycle. The Cycle Complete light turns off . 7 The Lock/Unlock Control icon lights up to 90 minutes of heat-free,...
Use and Care Guide
Page 10
... line. 3. Use masking tape to locate, level, and connect the dryer. 10 For direct-wired dryers: WARNING Electrical Shock Hazard Disconnect power before operating. Disconnect wiring. 3. Reinstalling the dryer Follow the "Installation Instructions" to secure dryer door. Unplug dryer or disconnect power. 2. Replace all parts and panels before servicing. Gas models only: Close shutoff valve in...
... line. 3. Use masking tape to locate, level, and connect the dryer. 10 For direct-wired dryers: WARNING Electrical Shock Hazard Disconnect power before operating. Disconnect wiring. 3. Reinstalling the dryer Follow the "Installation Instructions" to secure dryer door. Unplug dryer or disconnect power. 2. Replace all parts and panels before servicing. Gas models only: Close shutoff valve in...


