
User Instructions
Page 1
... serial number label, located at www.whirlpool.com/accessories. fits 29" (73.7 cm) Super Capacity, 6.5 cu. To order parts and accessories, call 1-800-807-6777, or visit us at the top inside dryer door well. In Canada call 1-800-442-9991. Part Number Accessory 20-48KITRC 4 ft (1.2 m) gas line dryer connector installation kit PT220L 4 ft (1.2 m) dryer cord, 3-wire, 30 amp PT400L 4 ft (1.2 m) dryer cord, 4-wire, 30 amp PT600L 6 ft (1.8 m) dryer cord, 4-wire, 30 amp 8212614 Dryer vent lint...
... serial number label, located at www.whirlpool.com/accessories. fits 29" (73.7 cm) Super Capacity, 6.5 cu. To order parts and accessories, call 1-800-807-6777, or visit us at the top inside dryer door well. In Canada call 1-800-442-9991. Part Number Accessory 20-48KITRC 4 ft (1.2 m) gas line dryer connector installation kit PT220L 4 ft (1.2 m) dryer cord, 3-wire, 30 amp PT400L 4 ft (1.2 m) dryer cord, 4-wire, 30 amp PT600L 6 ft (1.8 m) dryer cord, 4-wire, 30 amp 8212614 Dryer vent lint...

User Instructions
Page 2
... rubber or similarly textured rubber-like materials. ■ Clean lint screen before using the dryer. ■ Do not place items exposed to the weather. ■ Do not tamper with controls. ■ Do not repair or replace any part of the dryer or attempt any servicing unless specifically recommended in this manual and on or in published user-repair instructions that could ignite or explode. ■ Do...
... rubber or similarly textured rubber-like materials. ■ Clean lint screen before using the dryer. ■ Do not place items exposed to the weather. ■ Do not tamper with controls. ■ Do not repair or replace any part of the dryer or attempt any servicing unless specifically recommended in this manual and on or in published user-repair instructions that could ignite or explode. ■ Do...

User Instructions
Page 3
... satisfactory drying results. Follow the gas supplier's instructions. • If you cannot reach your safety, the information in a new location. Refer to secure vent. 5. Proper venting of the vent to the Installation Instructions for proper length requirements of all joints. Checking Your Vent Your dryer must be covered under the warranty. NOTE: Service calls caused by improper venting will not be followed to minimize the risk of this manual...
... satisfactory drying results. Follow the gas supplier's instructions. • If you cannot reach your safety, the information in a new location. Refer to secure vent. 5. Proper venting of the vent to the Installation Instructions for proper length requirements of all joints. Checking Your Vent Your dryer must be covered under the warranty. NOTE: Service calls caused by improper venting will not be followed to minimize the risk of this manual...

User Instructions
Page 4
... the door. 2. The drum turns, but the rack does not move. To use the automatic cycle with a damp cloth to remove a load from whom you may have all of the cycle. Place drying rack in the clothes decreases, and the timer advances through the remainder of the cycles and features described. Fire Hazard No washer can result in use. When you are unable to remove dust from dryer. Turn the START button...
... the door. 2. The drum turns, but the rack does not move. To use the automatic cycle with a damp cloth to remove a load from whom you may have all of the cycle. Place drying rack in the clothes decreases, and the timer advances through the remainder of the cycles and features described. Fire Hazard No washer can result in use. When you are unable to remove dust from dryer. Turn the START button...

User Instructions
Page 5
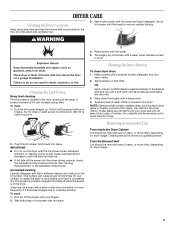
... not allow items to dry the drum. Start the dryer. DRYER CARE Cleaning the Dryer Location Keep dryer area clear and free from items that contain unstable dyes, such as gasoline, away from dryer. The lint screen is hard to do so can increase drying time. Wet lint is located in the door of the dryer door opening. Failure to remove. Roll lint off the screen with your fingers. 2. Tumble a load of clean cloths or towels to hang...
... not allow items to dry the drum. Start the dryer. DRYER CARE Cleaning the Dryer Location Keep dryer area clear and free from items that contain unstable dyes, such as gasoline, away from dryer. The lint screen is hard to do so can increase drying time. Wet lint is located in the door of the dryer door opening. Failure to remove. Roll lint off the screen with your fingers. 2. Tumble a load of clean cloths or towels to hang...
User Instructions
Page 6
... be turning, but you may not have heat. If you have a gas dryer, close shutoff valve in dryer base. 3. Clean lint screen. Unplug the power supply cord. 2. Open the dryer door. Remove the cover. Electrical Shock Hazard Disconnect power before operating. In U.S.A. Electric dryers use 2 household fuses or circuit breakers. If the problem continues, call an electrician. ■ For gas dryers, is the valve open fuel supply line. 5. Electric dryers require 240 volt power supply. Use a time-delay fuse. ■ Is the dryer door firmly closed? ■ Was the Start button...
... be turning, but you may not have heat. If you have a gas dryer, close shutoff valve in dryer base. 3. Clean lint screen. Unplug the power supply cord. 2. Open the dryer door. Remove the cover. Electrical Shock Hazard Disconnect power before operating. In U.S.A. Electric dryers use 2 household fuses or circuit breakers. If the problem continues, call an electrician. ■ For gas dryers, is the valve open fuel supply line. 5. Electric dryers require 240 volt power supply. Use a time-delay fuse. ■ Is the dryer door firmly closed? ■ Was the Start button...

User Instructions
Page 7
... exhaust vent diameter the correct size? Place dryer at least 18 inches (46 cm) above 45ºF (7ºC). ■ Is the dryer located in a cycle. Proper operation of drying time in a closet? Select the right cycle for a garage installation. WARNING Fire Hazard Use a heavy metal vent. Do not use a plastic vent. See the Installation Instructions. ■ Has an air dry cycle been selected? Stains on load ■ Is the lint screen clogged? Add dryer fabric softener sheets...
... exhaust vent diameter the correct size? Place dryer at least 18 inches (46 cm) above 45ºF (7ºC). ■ Is the dryer located in a cycle. Proper operation of drying time in a closet? Select the right cycle for a garage installation. WARNING Fire Hazard Use a heavy metal vent. Do not use a plastic vent. See the Installation Instructions. ■ Has an air dry cycle been selected? Stains on load ■ Is the lint screen clogged? Add dryer fabric softener sheets...

User Instructions
Page 8
... "Troubleshooting" section of your authorized Whirlpool dealer to be gone after the first cycle. Those consumable parts are made to correct the installation of God, improper installation, installation not in accordance with electrical or plumbing codes, or use . 4. Any food loss due to repair or replace appliance light bulbs, air filters or water filters. This limited warranty applies only when the major appliance is located? The removal and reinstallation of the Use & Care Guide...
... "Troubleshooting" section of your authorized Whirlpool dealer to be gone after the first cycle. Those consumable parts are made to correct the installation of God, improper installation, installation not in accordance with electrical or plumbing codes, or use . 4. Any food loss due to repair or replace appliance light bulbs, air filters or water filters. This limited warranty applies only when the major appliance is located? The removal and reinstallation of the Use & Care Guide...

Use and Care Guide
Page 3
... installer, service agency, or the gas supplier. The dryer must be followed to do not use any electrical switch; Follow the gas supplier's instructions. • If you use gasoline or other appliance. - WARNING: For your building. • Clear the room, building, or area of fire or explosion, or to light any...vicinity of this manual must be electrically grounded in accordance with local codes, or in the absence of local codes, with the National Electrical Code, ANSI/NFPA 70. Do not store or use a gas detector approved by smell. WHAT TO DO IF YOU SMELL GAS: • Do...
... installer, service agency, or the gas supplier. The dryer must be followed to do not use any electrical switch; Follow the gas supplier's instructions. • If you use gasoline or other appliance. - WARNING: For your building. • Clear the room, building, or area of fire or explosion, or to light any...vicinity of this manual must be electrically grounded in accordance with local codes, or in the absence of local codes, with the National Electrical Code, ANSI/NFPA 70. Do not store or use a gas detector approved by smell. WHAT TO DO IF YOU SMELL GAS: • Do...
Use and Care Guide
Page 4
... had any type of how to use your dryer following installation, see the QUICK START GUIDE on it (even after washing). Failure to follow these instructions can completely remove oil. Fire Hazard No washer can result in death, explosion, or fire. For a summary of oil on the next page. 4 Do not dry anything flammable on a clothesline or by using an Air Cycle. Items...
... had any type of how to use your dryer following installation, see the QUICK START GUIDE on it (even after washing). Failure to follow these instructions can completely remove oil. Fire Hazard No washer can result in death, explosion, or fire. For a summary of oil on the next page. 4 Do not dry anything flammable on a clothesline or by using an Air Cycle. Items...
Use and Care Guide
Page 5
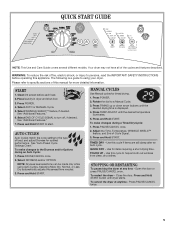
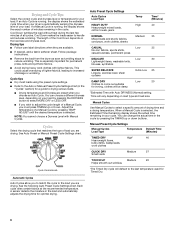
... in dryer and shut door. 3. Press POWER. 2. Press TEMP ADJUST until dryer starts. Adjust the Time, Temperature, WRINKLE SHIELD™ feature, and End of the cycles and features described. TIMED DRY - Use this cycle to persons, read the IMPORTANT SAFETY INSTRUCTIONS before each load. 2. Use this cycle if items are still damp after an Auto cycle. Open the door or press PAUSE/CANCEL once. QUICK START GUIDE NOTE: This Use and Care Guide covers several different models. Select...
... in dryer and shut door. 3. Press POWER. 2. Press TEMP ADJUST until dryer starts. Adjust the Time, Temperature, WRINKLE SHIELD™ feature, and End of the cycles and features described. TIMED DRY - Use this cycle to persons, read the IMPORTANT SAFETY INSTRUCTIONS before each load. 2. Use this cycle if items are still damp after an Auto cycle. Open the door or press PAUSE/CANCEL once. QUICK START GUIDE NOTE: This Use and Care Guide covers several different models. Select...
Use and Care Guide
Page 6
... Manual Cycles. Cycles Select the drying cycle that matches the type of a Manual Cycle, you are available. ■ If desired, add a fabric softener sheet. Manual Cycles Use Manual Cycles to reduce wrinkling. Time will vary depending on your load. Drying tips ■ Follow care label directions when they are drying. Drying and Cycle Tips Select the correct cycle and dryness level or temperature for ironing, clothes will be damp *Estimated Time with Auto DRYNESS (Normal) setting. Cycle Control knob Automatic Cycles...
... Manual Cycles. Cycles Select the drying cycle that matches the type of a Manual Cycle, you are available. ■ If desired, add a fabric softener sheet. Manual Cycles Use Manual Cycles to reduce wrinkling. Time will vary depending on your load. Drying tips ■ Follow care label directions when they are drying. Drying and Cycle Tips Select the correct cycle and dryness level or temperature for ironing, clothes will be damp *Estimated Time with Auto DRYNESS (Normal) setting. Cycle Control knob Automatic Cycles...

Use and Care Guide
Page 7
... the drying cycle is heard. Cool Down The COOL DOWN light illuminates during dryer operation. The Cycle Complete light turns off . 7 To enable the control lock feature: Press and hold START. Changing Cycles, Options, and Modifiers You can also use of the cycle. Changing Cycles after the end of a drying cycle (including the WRINKLE SHIELD™ cycle of 90 minutes), when Pause/Cancel is pressed, or when the door is cooling down part of the dryer. Temperature modifiers...
... the drying cycle is heard. Cool Down The COOL DOWN light illuminates during dryer operation. The Cycle Complete light turns off . 7 To enable the control lock feature: Press and hold START. Changing Cycles, Options, and Modifiers You can also use of the cycle. Changing Cycles after the end of a drying cycle (including the WRINKLE SHIELD™ cycle of 90 minutes), when Pause/Cancel is pressed, or when the door is cooling down part of the dryer. Temperature modifiers...
Use and Care Guide
Page 8
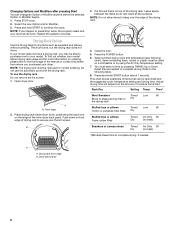
... edge of the manual or contact the dealer from whom you happen to secure over the lint screen. Open dryer door. Reset time as sweaters and pillows without tumbling. Place drying rack inside dryer drum, positioning the back wire on ordering, please refer to continue the cycle. Press the POWER button. 6. A A. Drying Rack Option Use the Drying Rack to complete drying. Push down . Leave space between the items so air can change an Option...
... edge of the manual or contact the dealer from whom you happen to secure over the lint screen. Open dryer door. Reset time as sweaters and pillows without tumbling. Place drying rack inside dryer drum, positioning the back wire on ordering, please refer to continue the cycle. Press the POWER button. 6. A A. Drying Rack Option Use the Drying Rack to complete drying. Push down . Leave space between the items so air can change an Option...
Use and Care Guide
Page 9
... air. 3. See "Venting Requirements" in the door opening of clean cloths or towels to the stained area and rub with your load is hard to remove lint. These stains are removed. 3. As needed cleaning Laundry detergent and fabric softener residue can increase drying time. NOTE: Garments that would obstruct the flow of dye. From the Exhaust Vent Lint should be removed every 2 years, or more often, depending on the lint screen. Wet lint...
... air. 3. See "Venting Requirements" in the door opening of clean cloths or towels to the stained area and rub with your load is hard to remove lint. These stains are removed. 3. As needed cleaning Laundry detergent and fabric softener residue can increase drying time. NOTE: Garments that would obstruct the flow of dye. From the Exhaust Vent Lint should be removed every 2 years, or more often, depending on the lint screen. Wet lint...
Use and Care Guide
Page 10
..."Cleaning the Lint Screen." Gas models only: Cap the open fuel supply line. 5. Disconnect power. 2. Unplug dryer or disconnect power. 2. Use masking tape to dryer pipe. 4. Unplug the power supply cord. 2. Gas models only: Close shutoff valve in dryer base. 4. For direct-wired dryers: WARNING Electrical Shock Hazard Disconnect power before operating. Replace all parts and panels before servicing. Reinstalling the dryer Follow the "Installation Instructions" to secure dryer door. Disconnect wiring. 3. Use masking tape to locate, level, and connect the dryer...
..."Cleaning the Lint Screen." Gas models only: Cap the open fuel supply line. 5. Disconnect power. 2. Unplug dryer or disconnect power. 2. Use masking tape to dryer pipe. 4. Unplug the power supply cord. 2. Gas models only: Close shutoff valve in dryer base. 4. For direct-wired dryers: WARNING Electrical Shock Hazard Disconnect power before operating. Replace all parts and panels before servicing. Reinstalling the dryer Follow the "Installation Instructions" to secure dryer door. Disconnect wiring. 3. Use masking tape to locate, level, and connect the dryer...
Use and Care Guide
Page 11
... the exhaust vent the correct length? Dryer displaying code message ■ "PF" (power failure), check the following: Was the drying cycle interrupted by a power failure? Press and hold for service. Use only one fabric softener sheet, and use it a gas dryer? See "Plan Vent System" in the Installation Instructions. ■ Are fabric softener sheets blocking the grille? Dryer Operation Dryer will not run ■ Is the dryer door firmly closed? ■ Was the Power button pressed? ■ Was the Start button...
... the exhaust vent the correct length? Dryer displaying code message ■ "PF" (power failure), check the following: Was the drying cycle interrupted by a power failure? Press and hold for service. Use only one fabric softener sheet, and use it a gas dryer? See "Plan Vent System" in the Installation Instructions. ■ Are fabric softener sheets blocking the grille? Dryer Operation Dryer will not run ■ Is the dryer door firmly closed? ■ Was the Power button pressed? ■ Was the Start button...
Use and Care Guide
Page 12
... odor will change the amount of the door. Level the dryer. The new electric heating element on load or drum ■ Was dryer fabric softener properly used for the types of the cycle? ■ Was the dryer overloaded? Closet doors must have an odor. Loads are caused by dyes in clothing (usually blue jeans). Proper operation of the dryer requires 5" (127 mm). See the Installation Instructions. ■ Has the Air Only modifier...
... odor will change the amount of the door. Level the dryer. The new electric heating element on load or drum ■ Was dryer fabric softener properly used for the types of the cycle? ■ Was the dryer overloaded? Closet doors must have an odor. Loads are caused by dyes in clothing (usually blue jeans). Proper operation of the dryer requires 5" (127 mm). See the Installation Instructions. ■ Has the Air Only modifier...
Use and Care Guide
Page 13
..., acts of God, improper installation, installation not in accordance with electrical or plumbing codes, or use or when it is installed in accordance with Whirlpool's published installation instructions. 10. Expenses for travel and transportation for other rights that is inconsistent to you need repair service, first see the "Troubleshooting" section of original purchase date is required to obtain service under this limited warranty. If you also may...
..., acts of God, improper installation, installation not in accordance with electrical or plumbing codes, or use or when it is installed in accordance with Whirlpool's published installation instructions. 10. Expenses for travel and transportation for other rights that is inconsistent to you need repair service, first see the "Troubleshooting" section of original purchase date is required to obtain service under this limited warranty. If you also may...
Dimensions
Page 1
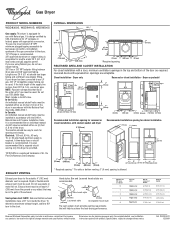
... the gas connection to achieve the best drying performance. Vent system chart: NOTE: Side and bottom exhaust installations have a 90° turn to improve Dimensions are using Natural gas, do not use larger pipe. For complete details, see Installation our products, we reserve the right to change materials and specifications without notice. Specifications subject to change without notice. W10261613 12/2009 Gas Dryer PRODUCT MODEL NUMBERS WGD8300S, WGD8410S, WGD8500S Gas supply: This dryer is...
... the gas connection to achieve the best drying performance. Vent system chart: NOTE: Side and bottom exhaust installations have a 90° turn to improve Dimensions are using Natural gas, do not use larger pipe. For complete details, see Installation our products, we reserve the right to change materials and specifications without notice. Specifications subject to change without notice. W10261613 12/2009 Gas Dryer PRODUCT MODEL NUMBERS WGD8300S, WGD8410S, WGD8500S Gas supply: This dryer is...


