Use and Care Manual
Page 3
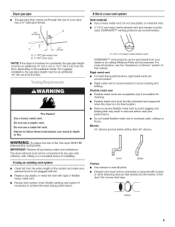
... be a T-handle type. [] A flexible gas connector, when used, must not exceed 3 feet. Follow the gas supplier's instructions. • If you cannot reach your appliance. This symbol alerts you what can kill or hurt you how to light any appliance. • Do not touch any electrical switch; Installation and service must be performed by the State of Massachusetts. [] If using a ball valve, it shall...
... be a T-handle type. [] A flexible gas connector, when used, must not exceed 3 feet. Follow the gas supplier's instructions. • If you cannot reach your appliance. This symbol alerts you what can kill or hurt you how to light any appliance. • Do not touch any electrical switch; Installation and service must be performed by the State of Massachusetts. [] If using a ball valve, it shall...

Use and Care Manual
Page 4
... of local codes, with gas supplier. Check that all instructions before or after each load. • Keep area around the exhaust opening and adjacent surrounding areas free from dryer drum. IMPORTANT SAFETY INSTRUCTIONS WARNING: To reduce the risk of fire, electric shock, or injury to persons when using the dryer, follow the instructions provided with any servicing unless specifically recommended in this Use and Care Guide or in published user-repair instructions that...
... of local codes, with gas supplier. Check that all instructions before or after each load. • Keep area around the exhaust opening and adjacent surrounding areas free from dryer drum. IMPORTANT SAFETY INSTRUCTIONS WARNING: To reduce the risk of fire, electric shock, or injury to persons when using the dryer, follow the instructions provided with any servicing unless specifically recommended in this Use and Care Guide or in published user-repair instructions that...
Use and Care Manual
Page 5
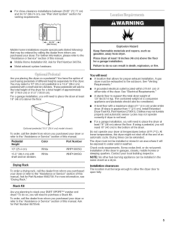
... temperatures, the dryer might not shut off at least 18" (46 cm) above the floor. Failure to do so, you will need to the outdoors. Check code requirements. I_ 34.15"--_1 (86.74 crn) Mobile home installations require special parts (listed following) that allows for Part Number 346764. • Metal exhaust system hardware. Ask for this manual. See "Electrical Requirements." • A sturdy floor to support the total dryer...
... temperatures, the dryer might not shut off at least 18" (46 cm) above the floor. Failure to do so, you will need to the outdoors. Check code requirements. I_ 34.15"--_1 (86.74 crn) Mobile home installations require special parts (listed following) that allows for Part Number 346764. • Metal exhaust system hardware. Ask for this manual. See "Electrical Requirements." • A sturdy floor to support the total dryer...

Use and Care Manual
Page 7
... not use an extension cord. or 20-amp fused electrical supply is equipped with a cord having an equipmentgrounding conductor and a grounding plug. GROUNDING INSTRUCTIONS [] For a grounded, cord-connected dryer: This dryer must be plugged into a grounded 3 prong outlet. This dryer is required. Do not remove ground prong. It is recommended. Recommended installation spacing for recessed or closet installation, with stacked washer and dryer The dimensions shown are in doubt as the dryer exhaust opening. See "Tools and Parts...
... not use an extension cord. or 20-amp fused electrical supply is equipped with a cord having an equipmentgrounding conductor and a grounding plug. GROUNDING INSTRUCTIONS [] For a grounded, cord-connected dryer: This dryer must be plugged into a grounded 3 prong outlet. This dryer is required. Do not remove ground prong. It is recommended. Recommended installation spacing for recessed or closet installation, with stacked washer and dryer The dimensions shown are in doubt as the dryer exhaust opening. See "Tools and Parts...
Use and Care Manual
Page 8
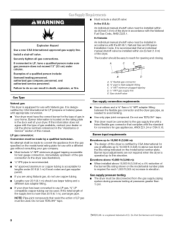
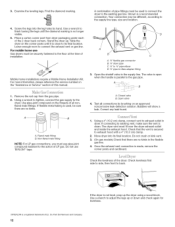
Gas Type Natural gas: This dryer is located on the model/serial number plate. Burner information is equipped for LP (propane or butane) gases with Natural gas. It is designcertified by CSA International for use larger pipe. Gas shutoff valve Gas supply connection requirements • Use an elbow and a %" flare x %" NPT adapter fitting between the flexible gas connector and the dryer gas pipe, as needed to flare adapterfitting C. _" NPT minimum plugged tapping D. ½" NPT gas supply line E. Elevations...
Gas Type Natural gas: This dryer is located on the model/serial number plate. Burner information is equipped for LP (propane or butane) gases with Natural gas. It is designcertified by CSA International for use larger pipe. Gas shutoff valve Gas supply connection requirements • Use an elbow and a %" flare x %" NPT adapter fitting between the flexible gas connector and the dryer gas pipe, as needed to flare adapterfitting C. _" NPT minimum plugged tapping D. ½" NPT gas supply line E. Elevations...
Use and Care Manual
Page 9
... Clamps Use clamps to achieve the best drying performance. 4" (10.2 cm)heavy metal exhaust vent DURASAFE TM vent products can result in death or fire. Clamp A. _/p"NPT gas supply line B. _" NPT dryer pipe *NOTE: If the dryer is mounted on a pedestal, the gas pipe height must be connected into the interior of your dealer or by calling Whirlpool Parts and Accessories. For a garage installation, the gas...
... Clamps Use clamps to achieve the best drying performance. 4" (10.2 cm)heavy metal exhaust vent DURASAFE TM vent products can result in death or fire. Clamp A. _/p"NPT gas supply line B. _" NPT dryer pipe *NOTE: If the dryer is mounted on a pedestal, the gas pipe height must be connected into the interior of your dealer or by calling Whirlpool Parts and Accessories. For a garage installation, the gas...

Use and Care Manual
Page 10
...) from the rear of the exhaust (such as flowers, rocks or bushes, snow line, etc.). • Do not use an exhaust hood with a magnetic latch. Standard rear offset exhaust installation B. Two close clearances Venting systems come in the path of the dryer. Failure to follow these instructions can cause moisture and lint to collect indoors, which may be converted to exhaust out the right side, left...
...) from the rear of the exhaust (such as flowers, rocks or bushes, snow line, etc.). • Do not use an exhaust hood with a magnetic latch. Standard rear offset exhaust installation B. Two close clearances Venting systems come in the path of the dryer. Failure to follow these instructions can cause moisture and lint to collect indoors, which may be converted to exhaust out the right side, left...

Use and Care Manual
Page 11
... dryer. 2. To determine maximum exhaust length, add one 90 ° turn inside exhaust hood. Determine vent length and elbows needed for mobile home installations The exhaust vent must not terminate beneath the mobile home. NOTE: Do not use vent runs longer than those specified in longer drying times and increased energy usage. Use caulking compound to seal all joints. Use the straightest path possible. Use clamps to seal exterior wall opening around exhaust...
... dryer. 2. To determine maximum exhaust length, add one 90 ° turn inside exhaust hood. Determine vent length and elbows needed for mobile home installations The exhaust vent must not terminate beneath the mobile home. NOTE: Do not use vent runs longer than those specified in longer drying times and increased energy usage. Use caulking compound to seal all joints. Use the straightest path possible. Use clamps to seal exterior wall opening around exhaust...
Use and Care Manual
Page 12
... dryer up the dryer using a wood block. Mobile home installations require a Mobile Home Installation Kit. For more information, please reference the service numbers in the supply line. Flared male fitting B. Non-flared male fitting NOTE: For LP gas connections, you must fit over the dryer exhaust outlet and inside the exhaust hood. Do not use pipe-joint compound resistant to finish turning the legs until it is used to connect the dryer...
... dryer up the dryer using a wood block. Mobile home installations require a Mobile Home Installation Kit. For more information, please reference the service numbers in the supply line. Flared male fitting B. Non-flared male fitting NOTE: For LP gas connections, you must fit over the dryer exhaust outlet and inside the exhaust hood. Do not use pipe-joint compound resistant to finish turning the legs until it is used to connect the dryer...

Use and Care Manual
Page 13
... door assembly) facing up . 2, A. A. You can change your door swing from a right-side opening , if desired. 1. Place the inner door assembly inside the outer door assembly edge. See illustration. See illustration. Check for fingerprints on opposite side of the dryer. Disengage locking tabs by rotating inner ring clockwise. Use a small flat-blade screwdriver to a left-side opening to remove 2 plug strips from the inner door assembly, as indicated below. Reverse...
... door assembly) facing up . 2, A. A. You can change your door swing from a right-side opening , if desired. 1. Place the inner door assembly inside the outer door assembly edge. See illustration. See illustration. Check for fingerprints on opposite side of the dryer. Disengage locking tabs by rotating inner ring clockwise. Use a small flat-blade screwdriver to a left-side opening to remove 2 plug strips from the inner door assembly, as indicated below. Reverse...

Use and Care Manual
Page 14
... do not feel heat, turn off the dryer and check that it , then repeat the 5-minute test as outlined above. • If the gas supply line shutoff valve is plugged into a grounded 3 prong outlet. Slide the head of /recycle all parts are now installed. Reattach door to remove plug strip from this angle) B. Read "Dryer Use." 9. Do not select the Air Only Temperature setting. If the dryer will not start the dryer. f 1. A. Clean the glass...
... do not feel heat, turn off the dryer and check that it , then repeat the 5-minute test as outlined above. • If the gas supply line shutoff valve is plugged into a grounded 3 prong outlet. Slide the head of /recycle all parts are now installed. Reattach door to remove plug strip from this angle) B. Read "Dryer Use." 9. Do not select the Air Only Temperature setting. If the dryer will not start the dryer. f 1. A. Clean the glass...
Use and Care Manual
Page 15
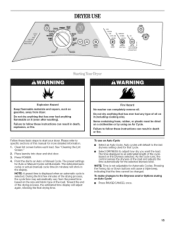
... had any type of the load. Follow these instructions can completely remove oil. Clean lint screen before each load. Do not dry anything flammable on it (even after washing). To make changes to an Auto or Manual Cycle. The time displayed is selected. Pressing the Timing Up or Down buttons will cause a triple beep, indicating that cycle. • Select DRYNESS to start your dryer. Press POWER. 4. As the cycle runs, the control senses...
... had any type of the load. Follow these instructions can completely remove oil. Clean lint screen before each load. Do not dry anything flammable on it (even after washing). To make changes to an Auto or Manual Cycle. The time displayed is selected. Pressing the Timing Up or Down buttons will cause a triple beep, indicating that cycle. • Select DRYNESS to start your dryer. Press POWER. 4. As the cycle runs, the control senses...

Use and Care Manual
Page 16
...; Follow care label directions when they are preset when you wish to lock your dryer at any time Press PAUSE/CANCEL twice. Drying temperature and Dryness are available. • If desired, add a fabric softener sheet. Press and hold END OF CYCLE SIGNAL button for 3 seconds. To restart the dryer Close the door. The LocWUnlock Control icon lights up, and a single beep tone is displayed. Cool Down...
...; Follow care label directions when they are preset when you wish to lock your dryer at any time Press PAUSE/CANCEL twice. Drying temperature and Dryness are available. • If desired, add a fabric softener sheet. Press and hold END OF CYCLE SIGNAL button for 3 seconds. To restart the dryer Close the door. The LocWUnlock Control icon lights up, and a single beep tone is displayed. Cool Down...

Use and Care Manual
Page 17
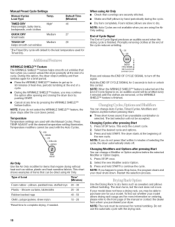
... Manual Preset Cycle Settings charts. A sensor detects the moisture in the load and automatically adjusts the drying time for drying small loads or loads that do not require an entire drying cycle. Casual Use this option is opened. Delicate Use this cycle cannot be illuminated. The temperature setting on until: • The damp dry point is cooling down part of the cycle. Time will remain on this cycle to get Extra Low heat to get Low heat...
... Manual Preset Cycle Settings charts. A sensor detects the moisture in the load and automatically adjusts the drying time for drying small loads or loads that do not require an entire drying cycle. Casual Use this option is opened. Delicate Use this cycle cannot be illuminated. The temperature setting on until: • The damp dry point is cooling down part of the cycle. Time will remain on this cycle to get Extra Low heat to get Low heat...
Use and Care Manual
Page 18
.... Manual Preset Cycle Settings Manual Cycles Load Type Temp. Default Time (Minutes) TIMED DRY High* 40 Heavyweight, bulky items, bedspreads, work clothes QUICK DRY Small loads Medium 27 TOUCH UP Medium 20 Helps smooth out wrinkles *The Timed Dry cycle will not be removed for Timed Dry, When using Air Only. End of Cycle Signal The End of Load Time* (Minutes) Foam rubber - Promptly removing clothes at the beginning of Cycle Signal is on ordering, please refer to turn off...
.... Manual Preset Cycle Settings Manual Cycles Load Type Temp. Default Time (Minutes) TIMED DRY High* 40 Heavyweight, bulky items, bedspreads, work clothes QUICK DRY Small loads Medium 27 TOUCH UP Medium 20 Helps smooth out wrinkles *The Timed Dry cycle will not be removed for Timed Dry, When using Air Only. End of Cycle Signal The End of Load Time* (Minutes) Foam rubber - Promptly removing clothes at the beginning of Cycle Signal is on ordering, please refer to turn off...
Use and Care Manual
Page 19
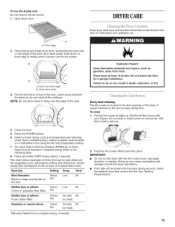
... Block to hang over the lint screen. Doing so can reach all the surfaces. A screen blocked by lint can result in the door opening of moisture items hold ) START button (about 1 second). Actual drying time will depend on the ledge of the rack. Press the POWER button. 6. DRYERCARE Keep dryer area clear and free from dryer, Place dryer at least 18 inches (46 cm) above the floor for a garage installation. Reset time...
... Block to hang over the lint screen. Doing so can reach all the surfaces. A screen blocked by lint can result in the door opening of moisture items hold ) START button (about 1 second). Actual drying time will depend on the ledge of the rack. Press the POWER button. 6. DRYERCARE Keep dryer area clear and free from dryer, Place dryer at least 18 inches (46 cm) above the floor for a garage installation. Reset time...

Use and Care Manual
Page 20
... lint screen. Thoroughly dry lint screen with hot water and liquid detergent. To clean dryer drum 1. From the Exhaust Vent Lint should be done by a qualified person. Vacation care Operate your dryer for your clothes, or cause the dryer to your fingers. 2. See "Cleaning the Lint Screen." Cap the open fuel supply line. 5. Dry unstable dye items inside out to remove residue buildup. 4. Close shutoff valve in gas supply line. 3. This buildup can build up on dryer usage. Clean lint screen. Scrub lint screen...
... lint screen. Thoroughly dry lint screen with hot water and liquid detergent. To clean dryer drum 1. From the Exhaust Vent Lint should be done by a qualified person. Vacation care Operate your dryer for your clothes, or cause the dryer to your fingers. 2. See "Cleaning the Lint Screen." Cap the open fuel supply line. 5. Dry unstable dye items inside out to remove residue buildup. 4. Close shutoff valve in gas supply line. 3. This buildup can build up on dryer usage. Clean lint screen. Scrub lint screen...
Use and Care Manual
Page 21
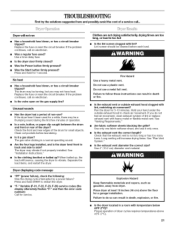
... rear edges of dryer cycles requires temperatures above the floor for small objects. Press and hold for service. Use a time-delay fuse. • Is the dryer door firmly closed? • Was the Power button firmly pressed? • Was the Start button firmly pressed? See "Installation Instructions." Dryer displaying code message • "PF" (power failure), check the following: Was the drying cycle interrupted by a power failure? Fire Hazard Use a heavy metal vent. When balled up ? Clothes are not drying...
... rear edges of dryer cycles requires temperatures above the floor for small objects. Press and hold for service. Use a time-delay fuse. • Is the dryer door firmly closed? • Was the Power button firmly pressed? • Was the Start button firmly pressed? See "Installation Instructions." Dryer displaying code message • "PF" (power failure), check the following: Was the drying cycle interrupted by a power failure? Fire Hazard Use a heavy metal vent. When balled up ? Clothes are not drying...
Use and Care Manual
Page 22
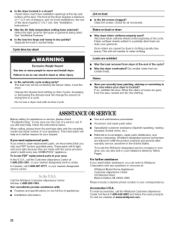
... and specifications on load or drum Was dryer fabric softener properly used to Whirlpool Corporation with an Auto Cycle. Odors Have you the cost of appliances. • Installation information. Is the dryer located in your telephone directory Yellow Pages. Do not use FSP° factory specified parts. Change the dryness level setting on load • Is the lint screen clogged? Check for assistance or service, please check "Troubleshooting." Fabric softener sheets added...
... and specifications on load or drum Was dryer fabric softener properly used to Whirlpool Corporation with an Auto Cycle. Odors Have you the cost of appliances. • Installation information. Is the dryer located in your telephone directory Yellow Pages. Do not use FSP° factory specified parts. Change the dryness level setting on load • Is the lint screen clogged? Check for assistance or service, please check "Troubleshooting." Fabric softener sheets added...
Use and Care Manual
Page 23
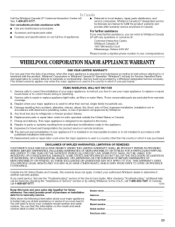
..., fire, flood, acts of God, improper installation, installation not in remote locations. 10. For further assistance If you need further assistance, you need service, first see the "Troubleshooting" section of products not approved by Whirlpool. 5. ITEMS WHIRLPOOL WILL NOT PAY FOR 1. Those consumable parts are trained to repair or replace appliance light bulbs, air filters or water filters. THIS WARRANTY GIVES YOU SPECIFIC LEGAL RIGHTS AND YOU MAY ALSO HAVE OTHER...
..., fire, flood, acts of God, improper installation, installation not in remote locations. 10. For further assistance If you need further assistance, you need service, first see the "Troubleshooting" section of products not approved by Whirlpool. 5. ITEMS WHIRLPOOL WILL NOT PAY FOR 1. Those consumable parts are trained to repair or replace appliance light bulbs, air filters or water filters. THIS WARRANTY GIVES YOU SPECIFIC LEGAL RIGHTS AND YOU MAY ALSO HAVE OTHER...


