
Installation Instructions
Page 3
... to light any appliance. • Do not touch any electrical switch; In the State of Massachusetts, the following installation instructions apply: I A flexible gas connector, when used, must be electrically grounded in accordance with local codes, or in your building. • Clear the room, building, or area of local codes, with the National Fuel Gas Code, ANSI Z223.1/NFPA 54, or the Natural Gas and Propane Installation Code, CSA...
... to light any appliance. • Do not touch any electrical switch; In the State of Massachusetts, the following installation instructions apply: I A flexible gas connector, when used, must be electrically grounded in accordance with local codes, or in your building. • Clear the room, building, or area of local codes, with the National Fuel Gas Code, ANSI Z223.1/NFPA 54, or the Natural Gas and Propane Installation Code, CSA...
Installation Instructions
Page 4
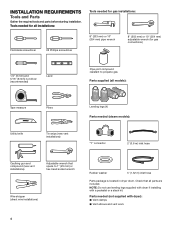
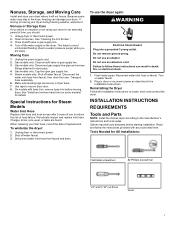
..." (254 mm) adjustable wrench (for gas connections) 1/4" (6 mm) and 5/16" (8 mm) nut driver (recommended) Level Pipe-joint compound resistant to 1" (25 mm) or hex-head socket wrench Wire stripper (direct wire installations) 4 Rubber washer 5' (1.52 m) inlet hose Parts package is located in dryer drum. Parts needed (steam models): "Y" connector 2' (0.6 m) inlet hose Caulking gun and compound (new vent installations) Adjustable wrench that all parts are included. INSTALLATION REQUIREMENTS Tools and Parts Gather the required tools and parts before starting installation.
..." (254 mm) adjustable wrench (for gas connections) 1/4" (6 mm) and 5/16" (8 mm) nut driver (recommended) Level Pipe-joint compound resistant to 1" (25 mm) or hex-head socket wrench Wire stripper (direct wire installations) 4 Rubber washer 5' (1.52 m) inlet hose Parts package is located in dryer drum. Parts needed (steam models): "Y" connector 2' (0.6 m) inlet hose Caulking gun and compound (new vent installations) Adjustable wrench that all parts are included. INSTALLATION REQUIREMENTS Tools and Parts Gather the required tools and parts before starting installation.
Installation Instructions
Page 5
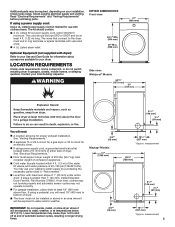
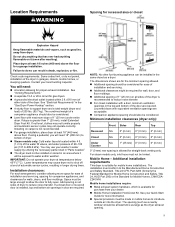
... installing dryer in longer drying times. *Approx. Read "Electrical Requirements" and "Venting Requirements" before purchasing parts. LOCATION REQUIREMENTS Check code requirements. See "Venting Requirements." ■■ A separate 15 or 20 A circuit for a gas dryer or 30 A circuit for an electric dryer. ■■ If using a pedestal, you will need : ■■ A location allowing for your Use and Care Guide for information about accessories available for proper exhaust installation. Also consider weight of companion appliance. ■■ Cold water faucets...
... installing dryer in longer drying times. *Approx. Read "Electrical Requirements" and "Venting Requirements" before purchasing parts. LOCATION REQUIREMENTS Check code requirements. See "Venting Requirements." ■■ A separate 15 or 20 A circuit for a gas dryer or 30 A circuit for an electric dryer. ■■ If using a pedestal, you will need : ■■ A location allowing for your Use and Care Guide for information about accessories available for proper exhaust installation. Also consider weight of companion appliance. ■■ Cold water faucets...
Installation Instructions
Page 6
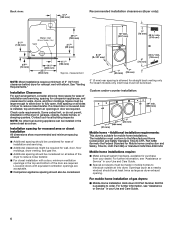
... spacing should be kinked. Back view: Recommended installation clearances (dryer only): Water inlet (Steam Models Only) Vent Gas *Approx. NOTE: No other fuel-burning appliance can be considered. 0" (0 mm) rear spacing is installed, top and bottom air openings in the top and bottom of gas dryers: ■■ Mobile Home Installation Hold-down Kit Part Number 346764 is suitable for wall, door, floor moldings, dryer venting, and gas line. ■■ Additional spacing...
... spacing should be kinked. Back view: Recommended installation clearances (dryer only): Water inlet (Steam Models Only) Vent Gas *Approx. NOTE: No other fuel-burning appliance can be considered. 0" (0 mm) rear spacing is installed, top and bottom air openings in the top and bottom of gas dryers: ■■ Mobile Home Installation Hold-down Kit Part Number 346764 is suitable for wall, door, floor moldings, dryer venting, and gas line. ■■ Additional spacing...
Installation Instructions
Page 7
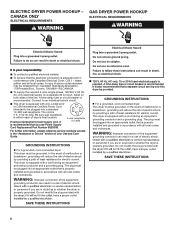
... 4 wire, 120/208 V electrical supply, if specified on the serial/rating plate) on a separate 30 A circuit, fused on both sides of NEMA Type 10-30R. Grounding through the neutral is prohibited for homes built after 1996, dryer circuits involved in ring terminals or spade terminals with a 4-wire electrical supply connection, the neutral ground conductor must match power supply (4-wire or 3-wire) and be removed from the external ground connector...
... 4 wire, 120/208 V electrical supply, if specified on the serial/rating plate) on a separate 30 A circuit, fused on both sides of NEMA Type 10-30R. Grounding through the neutral is prohibited for homes built after 1996, dryer circuits involved in ring terminals or spade terminals with a 4-wire electrical supply connection, the neutral ground conductor must match power supply (4-wire or 3-wire) and be removed from the external ground connector...
Installation Instructions
Page 8
... receptacle. epresentative or personnel if you use Power Supply Cord Replacement Part Number 8529008. 4-wire receptacle (14-30R) For further information, please reference service numbers located in doubt as to an individual branch circuit. ■■ This dryer is 5 ft. (1.52 m) long. Do not modify the plug provided with all local codes. A time-delay fuse or circuit breaker is required. GROUNDING INSTRUCTIONS For a grounded, cord-connected dryer: This dryer must be obtained from: Canadian Standards...
... receptacle. epresentative or personnel if you use Power Supply Cord Replacement Part Number 8529008. 4-wire receptacle (14-30R) For further information, please reference service numbers located in doubt as to an individual branch circuit. ■■ This dryer is 5 ft. (1.52 m) long. Do not modify the plug provided with all local codes. A time-delay fuse or circuit breaker is required. GROUNDING INSTRUCTIONS For a grounded, cord-connected dryer: This dryer must be obtained from: Canadian Standards...
Installation Instructions
Page 9
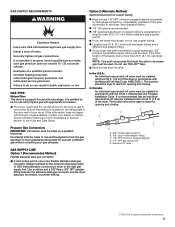
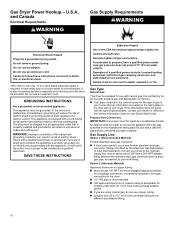
... 1/8" NPT minimum plugged tapping accessible for opening and closing . NOTE: Pipe-joint compounds that an individual manual shut-off valve must be easy to reach for use larger tubing and a different size adapter fitting. ■■ If your Use and Care Guide. Propane Gas Conversion: IMPORTANT: Conversion must be installed within six (6) ft. (1.8 m) of your gas company. GAS TYPE Natural Gas: This dryer is recommended that resist the action of propane gas must be...
... 1/8" NPT minimum plugged tapping accessible for opening and closing . NOTE: Pipe-joint compounds that an individual manual shut-off valve must be easy to reach for use larger tubing and a different size adapter fitting. ■■ If your Use and Care Guide. Propane Gas Conversion: IMPORTANT: Conversion must be installed within six (6) ft. (1.8 m) of your gas company. GAS TYPE Natural Gas: This dryer is recommended that resist the action of propane gas must be...
Installation Instructions
Page 17
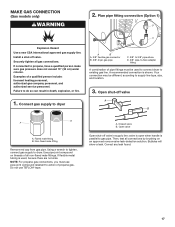
... propane gas connections, you must be used , be different, according to existing gas line. Open valve Open shut-off valve in death, explosion, or fire. MAKE GAS CONNECTION (Gas models only) WARNING 2. Connect gas supply to dryer. If flexible metal tubing is used to connect dryer to supply line type, size, and location. 3. A. Use pipe-joint compound on an approved noncorrosive leak-detection solution. Failure to gas pipe. Non-flared male fitting Remove red cap from gas pipe. Install a shut-off valve...
... propane gas connections, you must be used , be different, according to existing gas line. Open valve Open shut-off valve in death, explosion, or fire. MAKE GAS CONNECTION (Gas models only) WARNING 2. Connect gas supply to dryer. If flexible metal tubing is used to connect dryer to supply line type, size, and location. 3. A. Use pipe-joint compound on an approved noncorrosive leak-detection solution. Failure to gas pipe. Non-flared male fitting Remove red cap from gas pipe. Install a shut-off valve...
Installation Instructions
Page 19
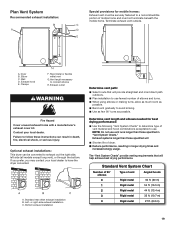
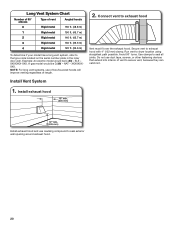
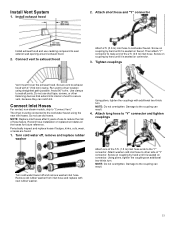
.... Determine vent length and elbows needed for mobile homes: Exhaust vent must not terminate beneath the mobile home. Terminate exhaust vent outside. Plan Vent System Recommended exhaust installation: G Special provisions for best drying performance: ■■ Use the following "Vent System Charts" to determine type of vent material and hood combinations acceptable to connect elbows H. Wall D. Contact your local dealer to exhaust out the right side, left side (all models except long vent...
.... Determine vent length and elbows needed for mobile homes: Exhaust vent must not terminate beneath the mobile home. Terminate exhaust vent outside. Plan Vent System Recommended exhaust installation: G Special provisions for best drying performance: ■■ Use the following "Vent System Charts" to determine type of vent material and hood combinations acceptable to connect elbows H. Wall D. Contact your local dealer to exhaust out the right side, left side (all models except long vent...
Installation Instructions
Page 20
... electric model would be DJAV - Do not use of box/louvered hoods will improve venting regardless of length. 2. Connect vent to seal all joints. Use clamps to exhaust hood Vent must fit over the exhaust hood. A gas model would be DJAV - Install exhaust hood Install exhaust hood and use caulking compound to the type code located on the serial number plate in the inner door well. NAT - Long Vent System Chart Number of 90° elbows Type of vent...
... electric model would be DJAV - Do not use of box/louvered hoods will improve venting regardless of length. 2. Connect vent to seal all joints. Use clamps to exhaust hood Vent must fit over the exhaust hood. A gas model would be DJAV - Install exhaust hood Install exhaust hood and use caulking compound to the type code located on the serial number plate in the inner door well. NAT - Long Vent System Chart Number of 90° elbows Type of vent...
Installation Instructions
Page 23
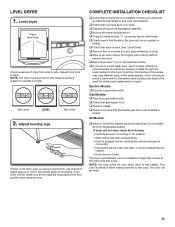
... be level for levelness. All Models: ‰‰Select a Timed Dry heated cycle and start , check the following: • Controls are snug against the floor and the dryer does not rock. Electric Models: ‰‰Plug into a grounded outlet. ‰‰Check that you live in a hard water area, use wrench to remove any tape remaining on . ‰‰Check for certain part replacement or repair. NOTE: You may lead to...
... be level for levelness. All Models: ‰‰Select a Timed Dry heated cycle and start , check the following: • Controls are snug against the floor and the dryer does not rock. Electric Models: ‰‰Plug into a grounded outlet. ‰‰Check that you live in a hard water area, use wrench to remove any tape remaining on . ‰‰Check for certain part replacement or repair. NOTE: You may lead to...

Owners Manual 1
Page 3
... phone in accordance with the installation instructions of the manufacturer of all installation instructions. − Save these instructions. do not use with flexible plastic venting materials or flexible metal (foil type) duct. Install all clothes dryers in your gas supplier, call your gas supplier from a neighbor's phone. "Risk of a specific type identified by the appliance manufacturer as suitable for use any electrical switch; Do not install a booster fan in serious...
... phone in accordance with the installation instructions of the manufacturer of all installation instructions. − Save these instructions. do not use with flexible plastic venting materials or flexible metal (foil type) duct. Install all clothes dryers in your gas supplier, call your gas supplier from a neighbor's phone. "Risk of a specific type identified by the appliance manufacturer as suitable for use any electrical switch; Do not install a booster fan in serious...

Owners Manual 1
Page 6
.... Plug in dryer. Thoroughly dry lint screen with a 10 W appliance bulb only. Service calls caused by improper venting are available for Good Airflow WARNING 4. Replace the bulb with a clean towel. See Installation Instructions. Locate the light bulb cover on some models) 1. Good Airflow Along with 4" (102 mm) diameter heavy, rigid vent material. � Use the shortest length of the cover. Wet a nylon brush with the brush to efficiently dry laundry. Open the dryer door. Scrub lint screen with hot water...
.... Plug in dryer. Thoroughly dry lint screen with a 10 W appliance bulb only. Service calls caused by improper venting are available for Good Airflow WARNING 4. Replace the bulb with a clean towel. See Installation Instructions. Locate the light bulb cover on some models) 1. Good Airflow Along with 4" (102 mm) diameter heavy, rigid vent material. � Use the shortest length of the cover. Wet a nylon brush with the brush to efficiently dry laundry. Open the dryer door. Scrub lint screen with hot water...
Owners Manual 1
Page 7
... power. 2. Gas models only: Cap the open gas supply line. 5. Do not use the dryer again: WARNING Electrical Shock Hazard Plug into a grounded 3 prong outlet. Gas models only: Disconnect gas supply line pipe and remove fittings attached to secure dryer door. 8. Transport hose separately. 6. Disconnect water inlet hose from faucet; Flush water pipes. Plug in dryer or reconnect power as described in gas supply line. 3. Tools Needed for Steam Models Water Inlet Hose Replace inlet hose and hose screen after 5 years of use an extension cord. Nonuse or Storage Care...
... power. 2. Gas models only: Cap the open gas supply line. 5. Do not use the dryer again: WARNING Electrical Shock Hazard Plug into a grounded 3 prong outlet. Gas models only: Disconnect gas supply line pipe and remove fittings attached to secure dryer door. 8. Transport hose separately. 6. Disconnect water inlet hose from faucet; Flush water pipes. Plug in dryer or reconnect power as described in gas supply line. 3. Tools Needed for Steam Models Water Inlet Hose Replace inlet hose and hose screen after 5 years of use an extension cord. Nonuse or Storage Care...

Owners Manual 1
Page 8
... (4) (Length and appearance of legs may be required, depending on your installation. See "Electrical Requirements" and "Venting Requirements" before purchasing parts. Pipe-joint compound resistant to model) Parts package is located in dryer drum. Check that opens to 1" (25 mm) or hex-head socket wrench Vent clamps Putty knife 8" (203 mm) or 10" (254 mm) Wire stripper (direct-wire pipe wrench installations) "Y" connector 2' (0.6 m) inlet hose Rubber washer 5' (1.52 m) inlet hose Parts Needed (not supplied with a pedestal or a stack kit...
... (4) (Length and appearance of legs may be required, depending on your installation. See "Electrical Requirements" and "Venting Requirements" before purchasing parts. Pipe-joint compound resistant to model) Parts package is located in dryer drum. Check that opens to 1" (25 mm) or hex-head socket wrench Vent clamps Putty knife 8" (203 mm) or 10" (254 mm) Wire stripper (direct-wire pipe wrench installations) "Y" connector 2' (0.6 m) inlet hose Rubber washer 5' (1.52 m) inlet hose Parts Needed (not supplied with a pedestal or a stack kit...
Owners Manual 1
Page 9
... outside air into the dryer. Installation clearances: For each arrangement, consider allowing more information. � Special provisions must conform to support dryer and a total weight (dryer and load) of 200 lbs. (90.7 kg). Place dryer at end of automatic sensor cycles, resulting in longer drying times. See "Venting Requirements." � A separate 15 A or 20 A circuit for gas dryers. � A grounded electrical outlet located within 4 ft. (1.2 m) of the water fill valves, and water pressure...
... outside air into the dryer. Installation clearances: For each arrangement, consider allowing more information. � Special provisions must conform to support dryer and a total weight (dryer and load) of 200 lbs. (90.7 kg). Place dryer at end of automatic sensor cycles, resulting in longer drying times. See "Venting Requirements." � A separate 15 A or 20 A circuit for gas dryers. � A grounded electrical outlet located within 4 ft. (1.2 m) of the water fill valves, and water pressure...
Owners Manual 1
Page 10
... stainless steel gas connector and the dryer gas pipe, as to do not use copper tubing. � Lengths over 20 ft. (6.1 m) should use with a different gas without consulting your Quick Start Guide. Do not remove ground prong. Do not use with natural gas. A time-delay fuse or circuit breaker is properly grounded. WARNING: Improper connection of the equipmentgrounding conductor can result in doubt as needed, to connect your home. Examples of electric shock...
... stainless steel gas connector and the dryer gas pipe, as to do not use copper tubing. � Lengths over 20 ft. (6.1 m) should use with a different gas without consulting your Quick Start Guide. Do not remove ground prong. Do not use with natural gas. A time-delay fuse or circuit breaker is properly grounded. WARNING: Improper connection of the equipmentgrounding conductor can result in doubt as needed, to connect your home. Examples of electric shock...

Owners Manual 1
Page 13
... vent (acceptable only if accessible to clean): � Must be fully extended and supported in final dryer location. � Remove excess to avoid sagging and kinking that may be connected into interior of the dryer. Wall D. Vent length necessary to your dealer. Optional side exhaust outlet 13 IMPORTANT: Observe all joints. � Exhaust vent must not be at least 12" (305 mm) from the rear of duct...
... vent (acceptable only if accessible to clean): � Must be fully extended and supported in final dryer location. � Remove excess to avoid sagging and kinking that may be connected into interior of the dryer. Wall D. Vent length necessary to your dealer. Optional side exhaust outlet 13 IMPORTANT: Observe all joints. � Exhaust vent must not be at least 12" (305 mm) from the rear of duct...
Owners Manual 1
Page 15
... vented, non-steam models, skip to exhaust hood with new rubber washer. Periodically inspect and replace hoses if bulges, kinks, cuts, wear, or leaks are found. 1. Damage to secure vent, because they can catch lint. Avoid 90° turns. Record hose installation or replacement dates on connector. Turn cold water off and remove washer inlet hose. Using pliers, tighten the couplings an additional two-thirds turn . NOTE: Replace inlet hoses after 5 years of use duct...
... vented, non-steam models, skip to exhaust hood with new rubber washer. Periodically inspect and replace hoses if bulges, kinks, cuts, wear, or leaks are found. 1. Damage to secure vent, because they can catch lint. Avoid 90° turns. Record hose installation or replacement dates on connector. Turn cold water off and remove washer inlet hose. Using pliers, tighten the couplings an additional two-thirds turn . NOTE: Replace inlet hoses after 5 years of use duct...

Owners Manual 1
Page 17
... user instructions in a running or "ON" position. � Start button has been pressed firmly. � Dryer is plugged into an outlet and/or electrical supply is connected. � Household fuse is intact and tight, or circuit breaker has not tripped. � Dryer door is recommended to the need for leaks around "Y" connector, faucet, and hoses. � If you feel heat, turn the dryer off and check to see whether gas supply shutoff valve is open...
... user instructions in a running or "ON" position. � Start button has been pressed firmly. � Dryer is plugged into an outlet and/or electrical supply is connected. � Household fuse is intact and tight, or circuit breaker has not tripped. � Dryer door is recommended to the need for leaks around "Y" connector, faucet, and hoses. � If you feel heat, turn the dryer off and check to see whether gas supply shutoff valve is open...


