Installation Instructions
Page 2
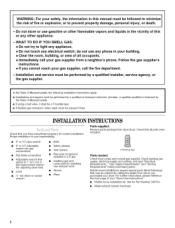
...and compound (for installing new exhaust vent) • Gloves • Pliers Parts supplied: Remove parts package from dryer drum. Follow the gas supplier's instructions. • If you cannot reach your "Dryer User Instructions." • Mobile home installation kit. Proper installation is your ... information, please reference the front page of your gas supplier, call your dryer. Installation and service must not exceed 3 feet. Mobile home installations require special parts (listed following installation instructions apply: _, Installations and repairs must be performed ...
...and compound (for installing new exhaust vent) • Gloves • Pliers Parts supplied: Remove parts package from dryer drum. Follow the gas supplier's instructions. • If you cannot reach your "Dryer User Instructions." • Mobile home installation kit. Proper installation is your ... information, please reference the front page of your gas supplier, call your dryer. Installation and service must not exceed 3 feet. Mobile home installations require special parts (listed following installation instructions apply: _, Installations and repairs must be performed ...
Installation Instructions
Page 3
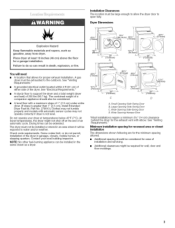
... least 18 inches (48 cm) above the floor for ease of 1" (2.5 cm) under entire dryer. (If slope is greater than 1" [2.5 cm], install Extended Dryer Feet kit, Part No. 279810.) Clothes may not operate correctly if dryer is not level. See "Venting Requirements." • A grounded electrical outlet located within 2 ft (61 cm) of either side...
... least 18 inches (48 cm) above the floor for ease of 1" (2.5 cm) under entire dryer. (If slope is greater than 1" [2.5 cm], install Extended Dryer Feet kit, Part No. 279810.) Clothes may not operate correctly if dryer is not level. See "Venting Requirements." • A grounded electrical outlet located within 2 ft (61 cm) of either side...
Installation Instructions
Page 4
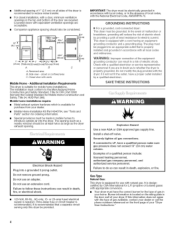
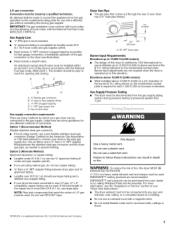
..., Title 24 CFR, Part 3280 (formerly the Federal Standard for the type of electric shock. Burner information is designcertified by CSA International for L.R (propane or butane) gases with appropriate conversion. • Your dryer must conform to do...-off vatveo Securely tighten all local codes and ordinances. GROUNDING INSTRUCTIONS m For a grounded, cord-connected dryer: This dryer must be grounded. This dryer is properly grounded. Louvereddoorswithequivalevnet ntilatioonpeningasre acceptable. Mobile home installations require: • Metal exhaust system hardware which...
..., Title 24 CFR, Part 3280 (formerly the Federal Standard for the type of electric shock. Burner information is designcertified by CSA International for L.R (propane or butane) gases with appropriate conversion. • Your dryer must conform to do...-off vatveo Securely tighten all local codes and ordinances. GROUNDING INSTRUCTIONS m For a grounded, cord-connected dryer: This dryer must be grounded. This dryer is properly grounded. Louvereddoorswithequivalevnet ntilatioonpeningasre acceptable. Mobile home installations require: • Metal exhaust system hardware which...
Installation Instructions
Page 5
...the gas supply. IMPORTANT: The gas installation must be made by which your gas dryer can be used. NOTE: Pipe joint compounds that comes out through the rear of your dealer or by calling Whirlpool Parts and Accessories. For more than 1/2psi. rating indicated on the model/serial number ...plate is operated up to 10,000 ft (3,048 m) above 10,000 ft (3,048 m) a 4% reduction of the dryer in accordance with the National Fuel Gas Code,...
...the gas supply. IMPORTANT: The gas installation must be made by which your gas dryer can be used. NOTE: Pipe joint compounds that comes out through the rear of your dealer or by calling Whirlpool Parts and Accessories. For more than 1/2psi. rating indicated on the model/serial number ...plate is operated up to 10,000 ft (3,048 m) above 10,000 ft (3,048 m) a 4% reduction of the dryer in accordance with the National Fuel Gas Code,...
Installation Instructions
Page 6
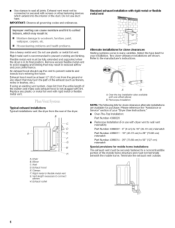
...etc.). Do not use plastic or metal foil vent. Rigid metal vent is in the path of your "Dryer User Instructions." • Over-The-Top Installation: Part Number 4396028 Periscope Installation (For use with rigid metal or flexible metal vent Alternate installations for your installation....mismatch Special provisions for purchase. Exhaust outlet Standard exhaust installation with dryer vent to wall vent mismatch): Part Number 4396037 - 0" (0 cm) to 18" (45.72 cm) mismatch Part Number 4396011 - 18" (45.72 cm) to 29" (73.66 cm) mismatch Part Number 4396014 - 29" (73.66 cm) to connect ...
...etc.). Do not use plastic or metal foil vent. Rigid metal vent is in the path of your "Dryer User Instructions." • Over-The-Top Installation: Part Number 4396028 Periscope Installation (For use with rigid metal or flexible metal vent Alternate installations for your installation....mismatch Special provisions for purchase. Exhaust outlet Standard exhaust installation with dryer vent to wall vent mismatch): Part Number 4396037 - 0" (0 cm) to 18" (45.72 cm) mismatch Part Number 4396011 - 18" (45.72 cm) to 29" (73.66 cm) mismatch Part Number 4396014 - 29" (73.66 cm) to connect ...

Installation Instructions
Page 8
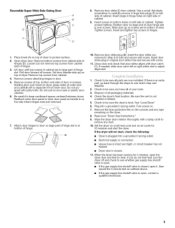
...necessary to the floor. 3. Remove bottom screws from cabinet side of LR gas. Set door on left side of dryer. Remove top screws from the gas pipe. Insert screws in large part of cabinet. 5. Tighten screws halfway. Close door and check that door strike aligns with a 4" (10.2 ...cm) clamp. 2. For ordering information please reference your door swing from cabinet side of the dryer. A. Use a wrench to -flare adapter fitting...
...necessary to the floor. 3. Remove bottom screws from cabinet side of LR gas. Set door on left side of dryer. Remove top screws from the gas pipe. Insert screws in large part of cabinet. 5. Tighten screws halfway. Close door and check that door strike aligns with a 4" (10.2 ...cm) clamp. 2. For ordering information please reference your door swing from cabinet side of the dryer. A. Use a wrench to -flare adapter fitting...
Installation Instructions
Page 9
... side where hinges were just removed. 7= Attach door hinges to be sure all parts are in large part of door (4 screws). Lift door until top screws in cabinet are in bottom of your "Dryer User Instructions." 9. Pull door forward off and check to keep cardboard spacer centered ...between doors. Check the dryer's final location. Insert plugs in hole and secure with a damp cloth to be sure the dryer is an extra part, go back through the steps to adjust alignment. 1. If there is level. Check to...
... side where hinges were just removed. 7= Attach door hinges to be sure all parts are in large part of door (4 screws). Lift door until top screws in cabinet are in bottom of your "Dryer User Instructions." 9. Pull door forward off and check to keep cardboard spacer centered ...between doors. Check the dryer's final location. Insert plugs in hole and secure with a damp cloth to be sure the dryer is an extra part, go back through the steps to adjust alignment. 1. If there is level. Check to...


