
Installation Guide
Page 4
... new exhaust vent) Utility knife 4 Putty knife You will need: ■■ A location allowing for your dryer. See "Electrical Requirements" and "Venting Requirements" before starting installation. INSTALLATION REQUIREMENTS Tools and Parts Tools needed for all parts are included. Check that opens to your local building inspector. Check code requirements. Tools needed : Check local...
... new exhaust vent) Utility knife 4 Putty knife You will need: ■■ A location allowing for your dryer. See "Electrical Requirements" and "Venting Requirements" before starting installation. INSTALLATION REQUIREMENTS Tools and Parts Tools needed for all parts are included. Check that opens to your local building inspector. Check code requirements. Tools needed : Check local...

Installation Guide
Page 5
... load) of 3.8 cu. Recessed area B. Wide opening side-swing door B. Side view - If slope is greater than 1" (25 mm), install Extended Dryer Feet Kit, Part Number 279810. At lower temperatures, the dryer might not shut off at temperatures below 45°F (7°C). closet or confined area C. Most installations require a minimum 5½" (140 mm...
... load) of 3.8 cu. Recessed area B. Wide opening side-swing door B. Side view - If slope is greater than 1" (25 mm), install Extended Dryer Feet Kit, Part Number 279810. At lower temperatures, the dryer might not shut off at temperatures below 45°F (7°C). closet or confined area C. Most installations require a minimum 5½" (140 mm...

Installation Guide
Page 6
... GROUNDING INSTRUCTIONS I For a grounded, cord-connected dryer: This dryer must conform to introduce outside air into the dryer. grounding conductor can result in mobile homes to the Manufactured Home Construction and Safety Standard, Title 24 CFR, Part 3280 (formerly the Federal Standard for Mobile Home... mobile home installations. CANADA ONLY Electrical Requirements ■■ This dryer is within reach of dryer's final location. 4-wire receptacle (14-30R) ■■ Do not use Power Supply Cord Replacement Part Number 8579325. Be sure wall receptacle is equipped with a cord...
... GROUNDING INSTRUCTIONS I For a grounded, cord-connected dryer: This dryer must conform to introduce outside air into the dryer. grounding conductor can result in mobile homes to the Manufactured Home Construction and Safety Standard, Title 24 CFR, Part 3280 (formerly the Federal Standard for Mobile Home... mobile home installations. CANADA ONLY Electrical Requirements ■■ This dryer is within reach of dryer's final location. 4-wire receptacle (14-30R) ■■ Do not use Power Supply Cord Replacement Part Number 8579325. Be sure wall receptacle is equipped with a cord...

Installation Guide
Page 11
... call 1-800-901-2042, or visit us at www.applianceaccessories.com. Two close elbow 4396007RW Through-the-wall vent cap 4396008RP 4" steel dryer venting clamps - 2 pack 8212662 Flush mounting louvered vent hood 4" Determine vent path: ■■ Select route that will help achieve best.... Terminate the exhaust vent outside. Venting Kits For more information, call 1-800-807-6777 or visit us at www.whirlpoolparts.ca. Part Number Descriptions 8171587RP 0-5" Metal vent periscope 4396037RP 0"-18" Metal vent periscope 4396011RP 18"-29" Metal vent periscope 4396014 29"-50" Metal...
... call 1-800-901-2042, or visit us at www.applianceaccessories.com. Two close elbow 4396007RW Through-the-wall vent cap 4396008RP 4" steel dryer venting clamps - 2 pack 8212662 Flush mounting louvered vent hood 4" Determine vent path: ■■ Select route that will help achieve best.... Terminate the exhaust vent outside. Venting Kits For more information, call 1-800-807-6777 or visit us at www.whirlpoolparts.ca. Part Number Descriptions 8171587RP 0-5" Metal vent periscope 4396037RP 0"-18" Metal vent periscope 4396011RP 18"-29" Metal vent periscope 4396014 29"-50" Metal...

Installation Guide
Page 13
...first heated. Not Level LEVEL Not Level 13 Level Dryer 1. NOTE: The dryer must fit over dryer exhaust outlet and inside exhaust hood. See "Level Dryer." If you have all parts are now installed. NOTE: You may notice an odor when the dryer is first used. Connect Vent 1. Use wrench ...circuit breaker has not tripped. ■■ Dryer door is clean. q Set the dryer on a full heat cycle (not an air cycle) for heat. Avoid crushing or kinking vent. Level dryer Check levelness of dryer from under the dryer. If there is an extra part, go away. q Check that all of...
...first heated. Not Level LEVEL Not Level 13 Level Dryer 1. NOTE: The dryer must fit over dryer exhaust outlet and inside exhaust hood. See "Level Dryer." If you have all parts are now installed. NOTE: You may notice an odor when the dryer is first used. Connect Vent 1. Use wrench ...circuit breaker has not tripped. ■■ Dryer door is clean. q Set the dryer on a full heat cycle (not an air cycle) for heat. Avoid crushing or kinking vent. Level dryer Check levelness of dryer from under the dryer. If there is an extra part, go away. q Check that all of...

Installation Guide
Page 14
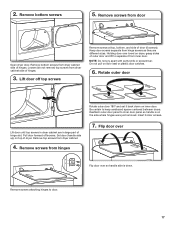
.... 4. Remove bottom screws If your door is the 27" Wide Side-Swing Door, go to steps 1-13 beginning on page 19. Remove bottom screws from dryer cabinet side of hinges. Remove screws attaching hinges to avoid damaging the surface. If your door is the 27" Wide Side-Swing Door with Glass... to steps 1-13 beginning on this page. 2. Loosen (do not remove) top screws from dryer cabinet side of hinges. 3. Set door (handle side up) on dryer Lift door until top screws in dryer cabinet are in large part of dryer to door. 14 Reverse Door Swing (Optional) If your door is the 29" Super Wide...
.... 4. Remove bottom screws If your door is the 27" Wide Side-Swing Door, go to steps 1-13 beginning on page 19. Remove bottom screws from dryer cabinet side of hinges. Remove screws attaching hinges to avoid damaging the surface. If your door is the 27" Wide Side-Swing Door with Glass... to steps 1-13 beginning on this page. 2. Loosen (do not remove) top screws from dryer cabinet side of hinges. 3. Set door (handle side up) on dryer Lift door until top screws in dryer cabinet are in large part of dryer to door. 14 Reverse Door Swing (Optional) If your door is the 29" Super Wide...
Installation Guide
Page 17
... 5. Loosen (do not remove) top screws from hinges Rotate outer door 180º and set it from door Open dryer door. Keep door screws separate from hinge screws as they are in dryer cabinet are different sizes. Remove screws attaching hinges to inner door panel so handle is down on.... 4. NOTE: Do not pry apart with putty knife or screwdriver. Rotate outer door Lift door until top screws in large part of hinges. Remove top screws from dryer cabinet side of hinge slot. Insert 6 door screws. 7. Holding door over so handle side is on the side where hinges were just ...
... 5. Loosen (do not remove) top screws from hinges Rotate outer door 180º and set it from door Open dryer door. Keep door screws separate from hinge screws as they are in dryer cabinet are different sizes. Remove screws attaching hinges to inner door panel so handle is down on.... 4. NOTE: Do not pry apart with putty knife or screwdriver. Rotate outer door Lift door until top screws in large part of hinges. Remove top screws from dryer cabinet side of hinge slot. Insert 6 door screws. 7. Holding door over so handle side is on the side where hinges were just ...
Installation Guide
Page 19
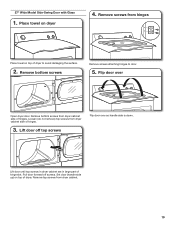
.... 19 Pull door forward off top screws Flip door over Open dryer door. Remove top screws from dryer cabinet side of hinges. Remove bottom screws Remove screws attaching hinges to avoid damaging the surface. 2. Loosen (do not remove) top screws from hinges Place ... on top of hinges. 3. Place towel on top of hinge slot. Lift door until top screws in dryer cabinet are in large part of dryer. Set door (handle side up) on dryer 4. Remove screws from dryer cabinet side of dryer to door. 5. Flip door over so handle side is down. 27" Wide Model Side-Swing Door...
.... 19 Pull door forward off top screws Flip door over Open dryer door. Remove top screws from dryer cabinet side of hinges. Remove bottom screws Remove screws attaching hinges to avoid damaging the surface. 2. Loosen (do not remove) top screws from hinges Place ... on top of hinges. 3. Place towel on top of hinge slot. Lift door until top screws in dryer cabinet are in large part of dryer. Set door (handle side up) on dryer 4. Remove screws from dryer cabinet side of dryer to door. 5. Flip door over so handle side is down. 27" Wide Model Side-Swing Door...
Use & Care Guide
Page 10
...to locate, level, and connect the dryer. Disconnect wiring. 3. Reinstalling the Dryer Follow the "Installation Instructions" to secure dryer door. To change the drying settings: NOTE: The settings cannot be changed while the dryer is retained and will be on all parts and panels before servicing. Press the ...TEMP button to secure dryer door. Vacation, storage, and moving care Non-Use or Storage Care Operate your...
...to locate, level, and connect the dryer. Disconnect wiring. 3. Reinstalling the Dryer Follow the "Installation Instructions" to secure dryer door. To change the drying settings: NOTE: The settings cannot be changed while the dryer is retained and will be on all parts and panels before servicing. Press the ...TEMP button to secure dryer door. Vacation, storage, and moving care Non-Use or Storage Care Operate your...


