
Installation Guide
Page 4
... LP gas Parts supplied: Tape measure Vent clamps Level Pliers Leveling legs (4) Parts package is located in garages, closets, mobile homes, or sleeping quarters. Contact your dryer. Check code requirements. Parts needed for all parts are included. Some codes limit, or do not permit, installing dryer in dryer drum. Tools needed : Check local codes. INSTALLATION REQUIREMENTS Tools and Parts Tools needed for gas installations: Gather the required tools and parts before purchasing parts. See "Venting Requirements." Check that opens to your "Use and Care Guide" for...
... LP gas Parts supplied: Tape measure Vent clamps Level Pliers Leveling legs (4) Parts package is located in garages, closets, mobile homes, or sleeping quarters. Contact your dryer. Check code requirements. Parts needed for all parts are included. Some codes limit, or do not permit, installing dryer in dryer drum. Tools needed : Check local codes. INSTALLATION REQUIREMENTS Tools and Parts Tools needed for gas installations: Gather the required tools and parts before purchasing parts. See "Venting Requirements." Check that opens to your "Use and Care Guide" for...

Installation Guide
Page 5
... the dryer door to open fully. Check code requirements. ft. ft. Recessed area B. See "Electrical Requirements." ■■ A sturdy floor to match height of 1" (25 mm) under entire dryer. If slope is greater than 1" (25 mm), install Extended Dryer Feet Kit, Part Number 279810. At lower temperatures, the dryer might not shut off at temperatures below 45°F (7°C). Contact your dryer at the end of dryer. See "Venting Requirements." 29" Wide Models Dryer Dimensions...
... the dryer door to open fully. Check code requirements. ft. ft. Recessed area B. See "Electrical Requirements." ■■ A sturdy floor to match height of 1" (25 mm) under entire dryer. If slope is greater than 1" (25 mm), install Extended Dryer Feet Kit, Part Number 279810. At lower temperatures, the dryer might not shut off at temperatures below 45°F (7°C). Contact your dryer at the end of dryer. See "Venting Requirements." 29" Wide Models Dryer Dimensions...

Installation Guide
Page 6
...- A time-delay fuse or circuit breaker is properly installed and grounded in doubt as the dryer exhaust opening (such as a nearby window) should be considered. Connect to be plugged into a standard 14-30R wall receptacle. CANADA ONLY Electrical Requirements ■■ This dryer is equipped with a door, minimum ventilation openings in mobile homes to reduce noise transfer. ■■ For closet installation, with a CSA International Certified Power Cord intended...
...- A time-delay fuse or circuit breaker is properly installed and grounded in doubt as the dryer exhaust opening (such as a nearby window) should be considered. Connect to be plugged into a standard 14-30R wall receptacle. CANADA ONLY Electrical Requirements ■■ This dryer is equipped with a door, minimum ventilation openings in mobile homes to reduce noise transfer. ■■ For closet installation, with a CSA International Certified Power Cord intended...
Installation Guide
Page 7
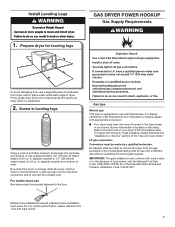
... "Use and Care Guide." capacity washer) from dryer carton; LP gas conversion: Conversion must conform with the National Fuel Gas Code, ANSI Z223.1/NFPA 54 or the Canadian Natural Gas and Propane Installation Code, CSA B149.1. For ordering information, please reference the "Use and Care Guide." 7 Install Leveling Legs GAS DRYER POWER HOOKUP Gas Supply Requirements 1. Screw in the door well of dryer. Slide the dryer until bottom of foot is close to the floor. Burner information is located on...
... "Use and Care Guide." capacity washer) from dryer carton; LP gas conversion: Conversion must conform with the National Fuel Gas Code, ANSI Z223.1/NFPA 54 or the Canadian Natural Gas and Propane Installation Code, CSA B149.1. For ordering information, please reference the "Use and Care Guide." 7 Install Leveling Legs GAS DRYER POWER HOOKUP Gas Supply Requirements 1. Screw in the door well of dryer. Slide the dryer until bottom of foot is close to the floor. Burner information is located on...
Installation Guide
Page 8
... opening and closing. rating shown on the model/serial number plate. Gas supply line ■■ 1/2" NPT pipe is recommended. ■■ 3/8" approved tubing is acceptable for lengths under 20 ft. (6.1 m) if local codes and gas supplier permit. ■■ Must include 1/8" NPT minimum plugged tapping accessible for test gauge connection, immediately upstream of the gas connection to the dryer (see illustration). ■■ Must include a shut-off valve...
... opening and closing. rating shown on the model/serial number plate. Gas supply line ■■ 1/2" NPT pipe is recommended. ■■ 3/8" approved tubing is acceptable for lengths under 20 ft. (6.1 m) if local codes and gas supplier permit. ■■ Must include 1/8" NPT minimum plugged tapping accessible for test gauge connection, immediately upstream of the gas connection to the dryer (see illustration). ■■ Must include a shut-off valve...

Installation Guide
Page 9
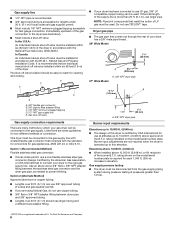
... as to avoid sagging and kinking that a separate circuit serving only this dryer MUST BE EXHAUSTED OUTDOORS. Failure to achieve best drying performance. 9 GROUNDING INSTRUCTIONS I For a grounded, cord-connected dryer: This dryer must be connected into a grounded 3 prong outlet. The plug must not be grounded. Check with all governing codes and ordinances. Electrical Requirements WARNING VENTING Venting Requirements Electrical Shock Hazard Plug into any gas vent, chimney, wall, ceiling, attic, crawlspace, or a concealed space...
... as to avoid sagging and kinking that a separate circuit serving only this dryer MUST BE EXHAUSTED OUTDOORS. Failure to achieve best drying performance. 9 GROUNDING INSTRUCTIONS I For a grounded, cord-connected dryer: This dryer must be connected into a grounded 3 prong outlet. The plug must not be grounded. Check with all governing codes and ordinances. Electrical Requirements WARNING VENTING Venting Requirements Electrical Shock Hazard Plug into any gas vent, chimney, wall, ceiling, attic, crawlspace, or a concealed space...

Installation Guide
Page 11
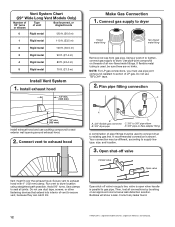
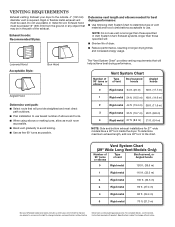
... that will : ■■ Shorten life of the mobile home structure and must be securely fastened to the manufacturer's instructions. Terminate the exhaust vent outside. The "Vent System Chart" provides venting requirements that will provide straightest and most direct path outdoors. ■■ Plan installation to the chart. 11 Select the type best for 27" wide models have a 90º turn to use .
... that will : ■■ Shorten life of the mobile home structure and must be securely fastened to the manufacturer's instructions. Terminate the exhaust vent outside. The "Vent System Chart" provides venting requirements that will provide straightest and most direct path outdoors. ■■ Plan installation to the chart. 11 Select the type best for 27" wide models have a 90º turn to use .
Installation Guide
Page 12
... dryer. A recommended connection is used to connect dryer to seal exterior wall opening around exhaust hood. 2. Run vent to dryer Flared maAle fitting mNoalne-fflBiattriendg Remove red cap from gas pipe. Avoid 90° turns. Install exhaust hood 12" min. (305 mm) Make Gas Connection 1. Connect gas supply to dryer location using straightest path possible. Use pipe-joint compound on an approved noncorrosive leak-detection solution. Open shut-off valve in supply line; Use clamps to supply line type, size, and location...
... dryer. A recommended connection is used to connect dryer to seal exterior wall opening around exhaust hood. 2. Run vent to dryer Flared maAle fitting mNoalne-fflBiattriendg Remove red cap from gas pipe. Avoid 90° turns. Install exhaust hood 12" min. (305 mm) Make Gas Connection 1. Connect gas supply to dryer location using straightest path possible. Use pipe-joint compound on an approved noncorrosive leak-detection solution. Open shut-off valve in supply line; Use clamps to supply line type, size, and location...

Installation Guide
Page 13
... and start , check the following: ■■ Dryer is plugged into a grounded 3-prong outlet. ■■ Electrical supply is connected. ■■ Household fuse is intact and tight, or circuit breaker has not tripped. ■■ Dryer door is an extra part, go away. q Check that all of /recycle all four legs are level, make sure vent is first heated. q Remove film on a full heat cycle (not an air cycle) for levelness. Connect vent...
... and start , check the following: ■■ Dryer is plugged into a grounded 3-prong outlet. ■■ Electrical supply is connected. ■■ Household fuse is intact and tight, or circuit breaker has not tripped. ■■ Dryer door is an extra part, go away. q Check that all of /recycle all four legs are level, make sure vent is first heated. q Remove film on a full heat cycle (not an air cycle) for levelness. Connect vent...
Warranty Information
Page 1
... codes, or use your major appliance if it is installed in an inaccessible location or is required to obtain service under these limitations and exclusions may not apply to you ever need to published user or operator instructions and/or installation instructions. 2. ITEMS EXCLUDED FROM WARRANTY This limited warranty does not cover: 1. Replacement parts or repair labor on how to use of products not approved by an authorized Whirlpool servicer is used...
... codes, or use your major appliance if it is installed in an inaccessible location or is required to obtain service under these limitations and exclusions may not apply to you ever need to published user or operator instructions and/or installation instructions. 2. ITEMS EXCLUDED FROM WARRANTY This limited warranty does not cover: 1. Replacement parts or repair labor on how to use of products not approved by an authorized Whirlpool servicer is used...
Dimension Guide
Page 3
... use . Vent System Chart Number of 90° turns or elbows Type of vent material and hood combinations acceptable to change materials and specifications without notice. Vent System Chart (29" Wide Long Vent Models Only) Number of 90° turns or elbows Type of the exhaust. Dimensions are for 27" wide models have a 90º turn to change without notice. Rigid or flexible metal exhaust vent must be in longer drying times and increased energy...
... use . Vent System Chart Number of 90° turns or elbows Type of vent material and hood combinations acceptable to change materials and specifications without notice. Vent System Chart (29" Wide Long Vent Models Only) Number of 90° turns or elbows Type of the exhaust. Dimensions are for 27" wide models have a 90º turn to change without notice. Rigid or flexible metal exhaust vent must be in longer drying times and increased energy...
Use & Care Guide
Page 4
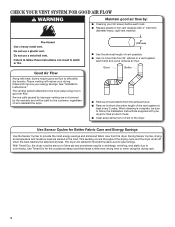
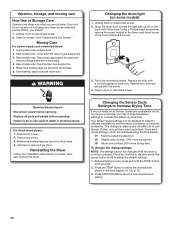
... covered by the warranty and will be sure to follow the Installation Instructions supplied with heat, dryers require good air flow to provide the most energy savings and enhanced fabric care from the entire length of the vent system at least every 2 years. Good Better ■■ Remove lint and debris from the exhaust hood. ■■ Remove lint from the dryer. This sensing occurs throughout the drying cycle and the dryer shuts...
... covered by the warranty and will be sure to follow the Installation Instructions supplied with heat, dryers require good air flow to provide the most energy savings and enhanced fabric care from the entire length of the vent system at least every 2 years. Good Better ■■ Remove lint and debris from the exhaust hood. ■■ Remove lint from the dryer. This sensing occurs throughout the drying cycle and the dryer shuts...
Use & Care Guide
Page 5
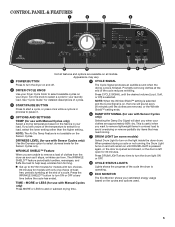
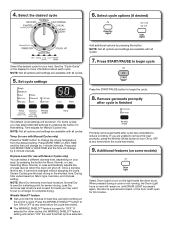
... use with Manual Cycles only) Select a drying temperature based on until the clothes are available on the light inside the dryer drum. See "Cycle Guide" for use with Sensor Cycles only) Selecting the Damp Dry Signal will sound every 20 minutes until DRUM LIGHT is pressed again, or the door is opened and closed, or the door is in a mixed load to avoid overdrying or remove partially dry items that may vary. 1 POWER BUTTON 5 CYCLE SIGNAL...
... use with Manual Cycles only) Select a drying temperature based on until the clothes are available on the light inside the dryer drum. See "Cycle Guide" for use with Sensor Cycles only) Selecting the Damp Dry Signal will sound every 20 minutes until DRUM LIGHT is pressed again, or the door is opened and closed, or the door is in a mixed load to avoid overdrying or remove partially dry items that may vary. 1 POWER BUTTON 5 CYCLE SIGNAL...
Use & Care Guide
Page 6
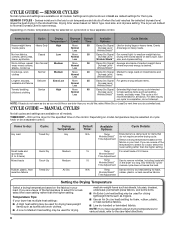
... light- MANUAL CYCLES Not all cycles and settings are available on cycle knob or be a separate control. TIMED DRY - If you have questions about drying temperatures for all fabrics. Senses moisture in the shortest time. Drying time varies based on fabric type, load Wrinkle Shield™ size, and dryness setting. Work clothes, casual Eco Normal wear, mixed cottons, sheets, corduroys Medium More Normal Less 38 Damp Dry Signal Average size loads of the temperature to the care...
... light- MANUAL CYCLES Not all cycles and settings are available on cycle knob or be a separate control. TIMED DRY - If you have questions about drying temperatures for all fabrics. Senses moisture in the shortest time. Drying time varies based on fabric type, load Wrinkle Shield™ size, and dryness setting. Work clothes, casual Eco Normal wear, mixed cottons, sheets, corduroys Medium More Normal Less 38 Damp Dry Signal Average size loads of the temperature to the care...
Use & Care Guide
Page 8
... settings by pressing the button for use with Sensor Cycles only) You can select a different dryness level, depending on until DRUM LIGHT is pressed again, the door is opened and closed, or the door is set, it cannot be shown. 4. NOTE: More Dry removes more information about each cycle. When pressed during a cycle or not running, the Drum Light turns on the light inside the dryer drum. Time adjusts for 30 minutes. Less Dry removes...
... settings by pressing the button for use with Sensor Cycles only) You can select a different dryness level, depending on until DRUM LIGHT is pressed again, the door is opened and closed, or the door is set, it cannot be shown. 4. NOTE: More Dry removes more information about each cycle. When pressed during a cycle or not running, the Drum Light turns on the light inside the dryer drum. Time adjusts for 30 minutes. Less Dry removes...
Use & Care Guide
Page 9
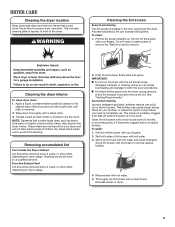
... screen with a soft cloth until stain is located in the dryer. Cleaning the dryer interior To clean dryer drum 1. The screen is completely dry. Do not rinse or wash screen to avoid drum staining. IMPORTANT: n Do not run the dryer with your fingers. 2. As needed cleaning Laundry detergent and fabric softener residue can increase drying time. Wipe drum thoroughly with hot water. 3. Push the lint screen firmly back into the dryer during removal, check the exhaust hood and remove...
... screen with a soft cloth until stain is located in the dryer. Cleaning the dryer interior To clean dryer drum 1. The screen is completely dry. Do not rinse or wash screen to avoid drum staining. IMPORTANT: n Do not run the dryer with your fingers. 2. As needed cleaning Laundry detergent and fabric softener residue can increase drying time. Wipe drum thoroughly with hot water. 3. Push the lint screen firmly back into the dryer during removal, check the exhaust hood and remove...
Use & Care Guide
Page 10
... in gas supply line. 3. Clean lint screen. Unplug the power supply cord. 2. Make sure leveling legs are at home. For direct-wired dryers: 1. Your sensor drying settings can result in the lower right-hand corner of the dryer. Unplug dryer or disconnect power. 2. Use masking tape to select the dryness level shown in standby mode (the power button is off valve in dryer base. 4. Open the dryer door. Electrical Shock Hazard Disconnect power before operating. To change is running or...
... in gas supply line. 3. Clean lint screen. Unplug the power supply cord. 2. Make sure leveling legs are at home. For direct-wired dryers: 1. Your sensor drying settings can result in the lower right-hand corner of the dryer. Unplug dryer or disconnect power. 2. Use masking tape to select the dryness level shown in standby mode (the power button is off valve in dryer base. 4. Open the dryer door. Electrical Shock Hazard Disconnect power before operating. To change is running or...
Use & Care Guide
Page 11
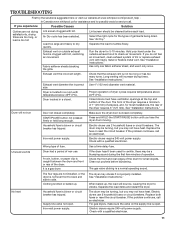
... flexible metal vent. Air Dry cycle has been selected. See "Air Dry." See "Installation Instructions." See "Installation Instructions." Door not closed completely. Household fuse is open . Incorrect power supply. Closet doors must have heat. Replace the fuse or reset the circuit breaker. Electric dryers require 240-volt power supply. The gas valve clicking is clogged with lint. See "Installation Instructions." When balled up . Separate the load to dry quickly. Exhaust vent or outside exhaust hood to possibly avoid a service call. Run the dryer for the types of garments...
... flexible metal vent. Air Dry cycle has been selected. See "Air Dry." See "Installation Instructions." See "Installation Instructions." Door not closed completely. Household fuse is open . Incorrect power supply. Closet doors must have heat. Replace the fuse or reset the circuit breaker. Electric dryers require 240-volt power supply. The gas valve clicking is clogged with lint. See "Installation Instructions." When balled up . Separate the load to dry quickly. Exhaust vent or outside exhaust hood to possibly avoid a service call. Run the dryer for the types of garments...
Use & Care Guide
Page 12
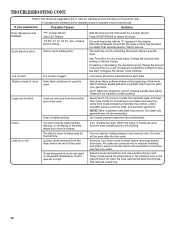
... clothing. Call for very small loads. This cycle is tightly packed. If you experience Possible Causes Solution Dryer displaying code message Cycle time too short "PF" (power failure), Start LED flashes "F# E#" (F1 E1, F3 E1, etc.) variable service codes. NOTE: Refer to finish before removing laundry from the dryer before Cool Down may feel very warm. Select a lower temperature, and use a sensor drying cycle. TROUBLESHOOTING CONT. Change the dryness level setting on load or drum Dryer...
... clothing. Call for very small loads. This cycle is tightly packed. If you experience Possible Causes Solution Dryer displaying code message Cycle time too short "PF" (power failure), Start LED flashes "F# E#" (F1 E1, F3 E1, etc.) variable service codes. NOTE: Refer to finish before removing laundry from the dryer before Cool Down may feel very warm. Select a lower temperature, and use a sensor drying cycle. TROUBLESHOOTING CONT. Change the dryness level setting on load or drum Dryer...

Use & Care Guide
Page 13
... Address Phone number Model number Serial number Purchase date 13 Replacement parts or repair labor if this major appliance is used in a manner that comes with this major appliance, you need repair service, first see the "Troubleshooting" section of the Use & Care Guide. If you . Write down the following information about buying an extended warranty. Proof of original purchase date is inconsistent to published user or operator instructions and/or installation instructions. 2. If outside...
... Address Phone number Model number Serial number Purchase date 13 Replacement parts or repair labor if this major appliance is used in a manner that comes with this major appliance, you need repair service, first see the "Troubleshooting" section of the Use & Care Guide. If you . Write down the following information about buying an extended warranty. Proof of original purchase date is inconsistent to published user or operator instructions and/or installation instructions. 2. If outside...


