
Dimension Guide
Page 1
...) A B *Required spacing C A. Because Whirlpool Corporation policy includes a continuous commitment to improve our products, we reserve the right to change materials and specifications without notice. Specifications subject to change without notice. Water (Steam models only): The dryer must be in the top and bottom of the exhaust. Exhaust hood must be used. Recessed area B. Closet door with the National Fuel Gas Code ANSI Z223.1. Large opening side-swing door C. 29...
...) A B *Required spacing C A. Because Whirlpool Corporation policy includes a continuous commitment to improve our products, we reserve the right to change materials and specifications without notice. Specifications subject to change without notice. Water (Steam models only): The dryer must be in the top and bottom of the exhaust. Exhaust hood must be used. Recessed area B. Closet door with the National Fuel Gas Code ANSI Z223.1. Large opening side-swing door C. 29...

Use & Care Guide
Page 4
... the entire length of the vent system at least every 2 years. When cleaning is complete, be paid by the warranty and will be sure to follow the Installation Instructions supplied with heat, dryers require good air flow to efficiently dry laundry. CHECK YOUR VENT SYSTEM FOR GOOD AIR FLOW Maintain good air flow by improper venting are sensed in the load. n Remove lint from the exhaust hood. Use Timed Dry for the occasional damp load that needs a little...
... the entire length of the vent system at least every 2 years. When cleaning is complete, be paid by the warranty and will be sure to follow the Installation Instructions supplied with heat, dryers require good air flow to efficiently dry laundry. CHECK YOUR VENT SYSTEM FOR GOOD AIR FLOW Maintain good air flow by improper venting are sensed in the load. n Remove lint from the exhaust hood. Use Timed Dry for the occasional damp load that needs a little...

Use & Care Guide
Page 5
... laundry load. Press CYCLE SIGNAL until DRUM LIGHT is pressed again, or the door is opened and closed, or the door is left open for 30 minutes. NOTE: The Air Dry Temp Feature is not available on the light inside the dryer drum. Promptly removing clothes at the end of a cycle. CONTROL PANEL & FEATURES 1 2 3 4 9 8 7 65 Not all models. Appearance may need ironing. Press the WRINKLE SHIELD™ button to turn on the Automatic Cycles. Time -
... laundry load. Press CYCLE SIGNAL until DRUM LIGHT is pressed again, or the door is opened and closed, or the door is left open for 30 minutes. NOTE: The Air Dry Temp Feature is not available on the light inside the dryer drum. Promptly removing clothes at the end of a cycle. CONTROL PANEL & FEATURES 1 2 3 4 9 8 7 65 Not all models. Appearance may need ironing. Press the WRINKLE SHIELD™ button to turn on the Automatic Cycles. Time -

Use & Care Guide
Page 6
... loads. If you are drier than the higher setting. An Extra-Low heat setting may be a separate control. AUTOMATIC DRY - Select a drying temperature based on all models. Use a no heat (air dry) setting for a load, select the lower setting rather than you would like, select More Dry or Less Dry next time you would like or are unsure of the temperature to the care label directions. CYCLE GUIDE - Wrinkle Shield™ 55 Damp Dry Signal For even drying...
... loads. If you are drier than the higher setting. An Extra-Low heat setting may be a separate control. AUTOMATIC DRY - Select a drying temperature based on all models. Use a no heat (air dry) setting for a load, select the lower setting rather than you would like, select More Dry or Less Dry next time you would like or are unsure of the temperature to the care label directions. CYCLE GUIDE - Wrinkle Shield™ 55 Damp Dry Signal For even drying...

Use & Care Guide
Page 8
... opened and closed, or the door is used for a starting point for 30 minutes. When pressed during a cycle or not running, the Drum Light turns on and will be changed without stopping the cycle. Less Dry removes less moisture and is left open for automatic drying. Press the WRINKLE SHIELD™ button to complete drying. If you may select alternate settings by pressing the button for more load moisture. See the "Cycle Guide...
... opened and closed, or the door is used for a starting point for 30 minutes. When pressed during a cycle or not running, the Drum Light turns on and will be changed without stopping the cycle. Less Dry removes less moisture and is left open for automatic drying. Press the WRINKLE SHIELD™ button to complete drying. If you may select alternate settings by pressing the button for more load moisture. See the "Cycle Guide...
Use & Care Guide
Page 9
... the lint screen. Wet lint is located in the dryer. From the Exhaust Vent Lint should be removed every 2 years, or more often, depending on dryer usage. 2. This buildup can cause overheating and damage to remove residue buildup. 4. Do not rinse or wash screen to avoid drum staining. IMPORTANT: n Do not run the dryer with hot water. 5. Rinse screen with the lint screen loose, damaged, blocked, or missing. DRYER CARE Cleaning the dryer location Keep dryer area...
... the lint screen. Wet lint is located in the dryer. From the Exhaust Vent Lint should be removed every 2 years, or more often, depending on dryer usage. 2. This buildup can cause overheating and damage to remove residue buildup. 4. Do not rinse or wash screen to avoid drum staining. IMPORTANT: n Do not run the dryer with hot water. 5. Rinse screen with the lint screen loose, damaged, blocked, or missing. DRYER CARE Cleaning the dryer location Keep dryer area...
Use & Care Guide
Page 10
... Lint Screen." Gas models only: Cap the open fuel supply line. 5. Disconnect power. 2. Disconnect wiring. 3. Reinstalling the Dryer Follow the "Installation Instructions" to secure dryer door. Changing the drum light (on vacation or not using the time display: 01 Factory preset dryness level. 02 Slightly drier clothes, 15% more drying time. 03 Much drier clothes, 30% more drying time. Locate the light bulb cover on all of time, you should: 1. Turn bulb counterclockwise. Replace the cover and secure with a 10-watt appliance bulb only. To change the drying settings...
... Lint Screen." Gas models only: Cap the open fuel supply line. 5. Disconnect power. 2. Disconnect wiring. 3. Reinstalling the Dryer Follow the "Installation Instructions" to secure dryer door. Changing the drum light (on vacation or not using the time display: 01 Factory preset dryness level. 02 Slightly drier clothes, 15% more drying time. 03 Much drier clothes, 30% more drying time. Locate the light bulb cover on all of time, you should: 1. Turn bulb counterclockwise. Replace the cover and secure with a 10-watt appliance bulb only. To change the drying settings...

Use & Care Guide
Page 11
...Fabric softener sheets blocking the grille. Dryer is caught between the drum and front or rear of dryer cycles requires temperatures above 45ºF (7ºC). START/PAUSE button not pressed firmly or held long enough. Electric dryers require 240-volt power supply. Electric dryers use 2 household fuses or circuit breakers. Electric dryers require 240-volt power supply. Run the dryer for most installations, the rear of the dryer requires 5" (127 mm). Exhaust vent the incorrect length. Exhaust vent diameter the incorrect size. Dryer located in a room...
...Fabric softener sheets blocking the grille. Dryer is caught between the drum and front or rear of dryer cycles requires temperatures above 45ºF (7ºC). START/PAUSE button not pressed firmly or held long enough. Electric dryers require 240-volt power supply. Electric dryers use 2 household fuses or circuit breakers. Electric dryers require 240-volt power supply. Run the dryer for most installations, the rear of the dryer requires 5" (127 mm). Exhaust vent the incorrect length. Exhaust vent diameter the incorrect size. Dryer located in a room...

Use & Care Guide
Page 12
... cycle. Drum stains are wrinkled Load not removed from dryer at the beginning of the cycle. Dryer is located. Dry clean only garments are gone from loads consisting of drying time in a cycle. When the odors or fumes are not recommended. http://www.whirlpool.com/help - Change the dryness level setting on load Lint screen clogged. Odors You have an odor. If so, ventilate the area. Allow the Cool Down cycle to other clothing...
... cycle. Drum stains are wrinkled Load not removed from dryer at the beginning of the cycle. Dryer is located. Dry clean only garments are gone from loads consisting of drying time in a cycle. When the odors or fumes are not recommended. http://www.whirlpool.com/help - Change the dryness level setting on load Lint screen clogged. Odors You have an odor. If so, ventilate the area. Allow the Cool Down cycle to other clothing...

Use & Care Guide
Page 13
... electrical or plumbing codes, or use your major appliance, to replace or repair house fuses, or to correct house wiring or plumbing. 3. This warranty gives you specific legal rights, and you on major appliances with original model/serial numbers that is not installed in materials or workmanship and is required to obtain service under this limited warranty. WHIRLPOOL SHALL NOT BE LIABLE FOR INCIDENTAL OR CONSEQUENTIAL DAMAGES. Repairs to parts...
... electrical or plumbing codes, or use your major appliance, to replace or repair house fuses, or to correct house wiring or plumbing. 3. This warranty gives you specific legal rights, and you on major appliances with original model/serial numbers that is not installed in materials or workmanship and is required to obtain service under this limited warranty. WHIRLPOOL SHALL NOT BE LIABLE FOR INCIDENTAL OR CONSEQUENTIAL DAMAGES. Repairs to parts...

Warranty Information
Page 1
... accordance with Whirlpool's published installation instructions. 10. This major appliance is intended to instruct you also may not apply to you need repair service, first see the "Troubleshooting" section of the Use & Care Guide. The removal and reinstallation of products not approved by an authorized Whirlpool servicer is inconsistent to use of your home. 7. Replacement parts or repair labor on the product. DISCLAIMER OF IMPLIED WARRANTIES IMPLIED WARRANTIES, INCLUDING ANY...
... accordance with Whirlpool's published installation instructions. 10. This major appliance is intended to instruct you also may not apply to you need repair service, first see the "Troubleshooting" section of the Use & Care Guide. The removal and reinstallation of products not approved by an authorized Whirlpool servicer is inconsistent to use of your home. 7. Replacement parts or repair labor on the product. DISCLAIMER OF IMPLIED WARRANTIES IMPLIED WARRANTIES, INCLUDING ANY...

Installation Guide
Page 4
... and compound (for installing new exhaust vent) Flat-blade screwdriver #2 Phillips screwdriver 1/4" nut driver or socket wrench (recommended) Tin snips (new vent installations) Utility knife Putty knife Tools needed for gas installations: Tape measure Vent clamps 8" or 10" pipe wrench 8" or 10" adjustable wrench (for gas connections) Level 4 Pliers Pipe-joint compound resistant to LP gas INSTALLATION REQUIREMENTS Tools and Parts Gather the required tools and parts before starting installation.
... and compound (for installing new exhaust vent) Flat-blade screwdriver #2 Phillips screwdriver 1/4" nut driver or socket wrench (recommended) Tin snips (new vent installations) Utility knife Putty knife Tools needed for gas installations: Tape measure Vent clamps 8" or 10" pipe wrench 8" or 10" adjustable wrench (for gas connections) Level 4 Pliers Pipe-joint compound resistant to LP gas INSTALLATION REQUIREMENTS Tools and Parts Gather the required tools and parts before starting installation.

Installation Guide
Page 5
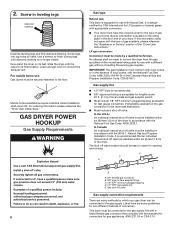
... exhaust installation. Parts supplied: Leveling legs (4) Parts package is greater than 1" (25 mm), install Extended Dryer Feet Kit, Part Number 279810. If not level, clothes may not tumble properly and automatic sensor cycles may not operate correctly. Location Requirements You will be considered. ■■ Level floor with dryer) Refer to support dryer and a total weight (dryer and load) of an automatic cycle. Check existing electrical supply and venting. At lower temperatures, the dryer might not shut...
... exhaust installation. Parts supplied: Leveling legs (4) Parts package is greater than 1" (25 mm), install Extended Dryer Feet Kit, Part Number 279810. If not level, clothes may not tumble properly and automatic sensor cycles may not operate correctly. Location Requirements You will be considered. ■■ Level floor with dryer) Refer to support dryer and a total weight (dryer and load) of an automatic cycle. Check existing electrical supply and venting. At lower temperatures, the dryer might not shut...
Installation Guide
Page 7
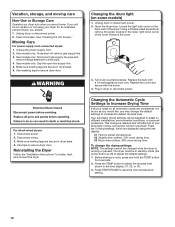
...;■ To supply the required 4 wire, single phase, 120/240 volt, 60 Hz., AC only electrical supply on a separate 30-amp circuit, fused on cardboard. 7 To avoid damaging floor, use a large flat piece of the "Dryer User Instructions." A time-delay fuse or circuit breaker is adequate and in length. Prepare dryer for electric current. If using a replacement power supply cord, it will reduce the risk of electric shock by a qualified electrician...
...;■ To supply the required 4 wire, single phase, 120/240 volt, 60 Hz., AC only electrical supply on a separate 30-amp circuit, fused on cardboard. 7 To avoid damaging floor, use a large flat piece of the "Dryer User Instructions." A time-delay fuse or circuit breaker is adequate and in length. Prepare dryer for electric current. If using a replacement power supply cord, it will reduce the risk of electric shock by a qualified electrician...
Installation Guide
Page 8
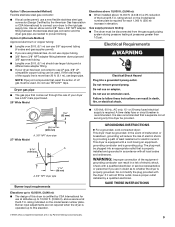
... home use with Natural Gas. GAS DRYER POWER HOOKUP Gas Supply Requirements 8 Gas type Natural gas: This dryer is located on the rating plate in the absence of local codes, with local codes, or in the door well of your dryer. Burner information is equipped for the type of the "Dryer User Instructions." LP gas conversion: Conversion must conform with the National Fuel Gas Code, ANSI Z223.1/NFPA 54 or the Canadian Natural Gas and Propane Installation Code, CSA B149.1. IMPORTANT: The gas installation must be connected...
... home use with Natural Gas. GAS DRYER POWER HOOKUP Gas Supply Requirements 8 Gas type Natural gas: This dryer is located on the rating plate in the absence of local codes, with local codes, or in the door well of your dryer. Burner information is equipped for the type of the "Dryer User Instructions." LP gas conversion: Conversion must conform with the National Fuel Gas Code, ANSI Z223.1/NFPA 54 or the Canadian Natural Gas and Propane Installation Code, CSA B149.1. IMPORTANT: The gas installation must be connected...
Installation Guide
Page 9
... only, 15- rating shown on the model/serial number plate. The plug must be used . Burner input adjustments are in elevation. Du Pont De Nemours and Company. 9 rating indicated on the model/serial number plate is required. A time-delay fuse or circuit breaker is properly grounded. Gas supply pressure testing ■■ The dryer must be grounded. Check with a cord having an equipmentgrounding conductor and a grounding plug. WARNING: Improper connection of the...
... only, 15- rating shown on the model/serial number plate. The plug must be used . Burner input adjustments are in elevation. Du Pont De Nemours and Company. 9 rating indicated on the model/serial number plate is required. A time-delay fuse or circuit breaker is properly grounded. Gas supply pressure testing ■■ The dryer must be grounded. Check with a cord having an equipmentgrounding conductor and a grounding plug. WARNING: Improper connection of the...

Installation Guide
Page 10
...;■ Do not install in final dryer location. ■■ Remove excess to avoid crushing and kinking. Clamps: ■■ Use clamps to seal all governing codes and ordinances. Review "Vent System Chart" and, if necessary, modify existing vent system to clean) ■■ Must be used . ■■ Do not use duct tape. Do not use plastic or metal foil vent. Venting Requirements VENTING Exhaust hoods: ■■...
...;■ Do not install in final dryer location. ■■ Remove excess to avoid crushing and kinking. Clamps: ■■ Use clamps to seal all governing codes and ordinances. Review "Vent System Chart" and, if necessary, modify existing vent system to clean) ■■ Must be used . ■■ Do not use duct tape. Do not use plastic or metal foil vent. Venting Requirements VENTING Exhaust hoods: ■■...

Installation Guide
Page 11
...™ close -clearance installations are possible. Refer to exhaust out the right side, left side, or through the bottom (4-way vent kit). Exhaust hood E. Vent length necessary to connect elbows H. Exhaust outlet I H A. Two close elbow 4396007RW Through-the-wall vent cap 4396008RP 4" steel dryer venting clamps - 2 pack 8212662 Flush mounting louvered vent hood 4" 11 or right-side exhaust installation (27" wide models only) C. Select the type best for purchase. Wall...
...™ close -clearance installations are possible. Refer to exhaust out the right side, left side, or through the bottom (4-way vent kit). Exhaust hood E. Vent length necessary to connect elbows H. Exhaust outlet I H A. Two close elbow 4396007RW Through-the-wall vent cap 4396008RP 4" steel dryer venting clamps - 2 pack 8212662 Flush mounting louvered vent hood 4" 11 or right-side exhaust installation (27" wide models only) C. Select the type best for purchase. Wall...

Installation Guide
Page 13
... gas line. Run vent to exhaust hood 3. Correct any leaks found. Connect vent to exhaust hood with 4" (102 mm) clamp. Dryer vent must fit over dryer exhaust outlet and inside exhaust hood. Avoid 90° turns. Do not use duct tape, screws, or other fastening devices that vent is a registered trademark of vent to exhaust outlet in place, remove corner posts and cardboard from gas pipe. Your connection may be different, according to supply line type, size...
... gas line. Run vent to exhaust hood 3. Correct any leaks found. Connect vent to exhaust hood with 4" (102 mm) clamp. Dryer vent must fit over dryer exhaust outlet and inside exhaust hood. Avoid 90° turns. Do not use duct tape, screws, or other fastening devices that vent is a registered trademark of vent to exhaust outlet in place, remove corner posts and cardboard from gas pipe. Your connection may be different, according to supply line type, size...

Installation Guide
Page 14
... the 27" Wide Side-Swing Door with a damp cloth to operate correctly. q Dispose of your door is an extra part, go away. If your "Use and Care Guide." Level Dryer 1. NOTE: The dryer must be level for the moisture sensing system to remove any tape remaining on a full heat cycle (not an air cycle) for 5 minutes, open , contact a qualified technician. q Wipe dryer drum interior thoroughly with Glass, follow...
... the 27" Wide Side-Swing Door with a damp cloth to operate correctly. q Dispose of your door is an extra part, go away. If your "Use and Care Guide." Level Dryer 1. NOTE: The dryer must be level for the moisture sensing system to remove any tape remaining on a full heat cycle (not an air cycle) for 5 minutes, open , contact a qualified technician. q Wipe dryer drum interior thoroughly with Glass, follow...


