

Installation Guide
Page 5
... not operate your local building inspector. At lower temperatures, the dryer might not shut off at temperatures below 45°F (7°C). Contact your dryer. ■■ If you are included. Parts supplied: Leveling legs (4) Parts package is greater than 1" (25 mm), install Extended Dryer Feet Kit, Part Number 279810. NOTE: No other fuel-burning appliance can...
... not operate your local building inspector. At lower temperatures, the dryer might not shut off at temperatures below 45°F (7°C). Contact your dryer. ■■ If you are included. Parts supplied: Leveling legs (4) Parts package is greater than 1" (25 mm), install Extended Dryer Feet Kit, Part Number 279810. NOTE: No other fuel-burning appliance can...

Installation Guide
Page 6
...A. The installation must conform to the Manufactured Home Construction and Safety Standard, Title 24 CFR, Part 3280 (formerly the Federal Standard for Mobile Home Construction and Safety, Title 24, HUD Part 280) or the Canadian Manufactured Home Standard CAN/CSA-Z240 MH. ■■ Metal exhaust ...29¼" 5½"* (25 mm) (686 mm) (25 mm) (25 mm) (743 mm) (140 mm) A B C A. See "Venting Requirements." 29" Wide Models Dryer Dimensions 27" Wide Models Dryer Dimensions 43 " (1092 mm) 23 ¾" (603 mm) 43 " (1092 mm) 13 ¾" (349 mm) *29 1/2" (749 mm) 27" (687 mm) A ...
...A. The installation must conform to the Manufactured Home Construction and Safety Standard, Title 24 CFR, Part 3280 (formerly the Federal Standard for Mobile Home Construction and Safety, Title 24, HUD Part 280) or the Canadian Manufactured Home Standard CAN/CSA-Z240 MH. ■■ Metal exhaust ...29¼" 5½"* (25 mm) (686 mm) (25 mm) (25 mm) (743 mm) (140 mm) A B C A. See "Venting Requirements." 29" Wide Models Dryer Dimensions 27" Wide Models Dryer Dimensions 43 " (1092 mm) 23 ¾" (603 mm) 43 " (1092 mm) 13 ¾" (349 mm) *29 1/2" (749 mm) 27" (687 mm) A ...
Installation Guide
Page 7
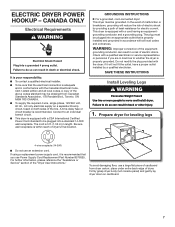
... installer. ■■ To be plugged into a standard 14-30R wall receptacle. GROUNDING INSTRUCTIONS � For a grounded, cord-connected dryer: This dryer must be sure that is equipped with a qualified electrician or service representative or personnel if you use a large flat piece of cardboard from...the above codes standard may be grounded. To avoid damaging floor, use Power Supply Cord Replacement Part Number 8579325. Firmly grasp dryer body (not console panel) and gently lay dryer down on both sides of least resistance for leveling legs 4-wire receptacle (14-30R) ■...
... installer. ■■ To be plugged into a standard 14-30R wall receptacle. GROUNDING INSTRUCTIONS � For a grounded, cord-connected dryer: This dryer must be sure that is equipped with a qualified electrician or service representative or personnel if you use a large flat piece of cardboard from...the above codes standard may be grounded. To avoid damaging floor, use Power Supply Cord Replacement Part Number 8579325. Firmly grasp dryer body (not console panel) and gently lay dryer down on both sides of least resistance for leveling legs 4-wire receptacle (14-30R) ■...

Installation Guide
Page 11
.... Refer to exhaust out the right side, left side, or through the bottom (4-way vent kit). Dryer B. Exhaust hood E. Exhaust outlet I H A. For ordering information, see "Venting Kits." or right-side exhaust installation (27" wide models only) C. Part Number Descriptions 8171587RP 0-5" Metal vent periscope 4396037RP 0"-18" Metal vent periscope 4396011RP 18"-29" Metal...
.... Refer to exhaust out the right side, left side, or through the bottom (4-way vent kit). Dryer B. Exhaust hood E. Exhaust outlet I H A. For ordering information, see "Venting Kits." or right-side exhaust installation (27" wide models only) C. Part Number Descriptions 8171587RP 0-5" Metal vent periscope 4396037RP 0"-18" Metal vent periscope 4396011RP 18"-29" Metal...

Installation Guide
Page 14
...is the 27" Wide Side-Swing Door, follow steps 1-14. The odor will not start the dryer. 14 If your door is not crushed or kinked. If dryer is first used. If there is an extra part, go away. Be sure vent is the 29" Large Side-Swing Door, follow steps 1-13...the moisture sensing system to see what was skipped. q Read "Dryer Use" in your tools. q Dispose of/recycle all parts are level, make sure all of dryer from front to side. q Check dryer's final location. NOTE: The dryer must be level for heat. Level dryer Check levelness of your "Use and Care Guide." q Check that...
...is the 27" Wide Side-Swing Door, follow steps 1-14. The odor will not start the dryer. 14 If your door is not crushed or kinked. If dryer is first used. If there is an extra part, go away. Be sure vent is the 29" Large Side-Swing Door, follow steps 1-13...the moisture sensing system to see what was skipped. q Read "Dryer Use" in your tools. q Dispose of/recycle all parts are level, make sure all of dryer from front to side. q Check dryer's final location. NOTE: The dryer must be level for heat. Level dryer Check levelness of your "Use and Care Guide." q Check that...
Installation Guide
Page 15
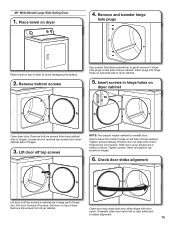
..., flat-blade screwdriver to gently remove 4 hinge hole plugs on top of dryer cabinet. Remove bottom screws from dryer cabinet. Tighten screws halfway. Insert and tighten top screws in large part of hinges. Insert plugs into bottom holes on dryer cabinet Open dryer door. Slide door up so screws are in hinges. 6. Remove top screws...
..., flat-blade screwdriver to gently remove 4 hinge hole plugs on top of dryer cabinet. Remove bottom screws from dryer cabinet. Tighten screws halfway. Insert and tighten top screws in large part of hinges. Insert plugs into bottom holes on dryer cabinet Open dryer door. Slide door up so screws are in hinges. 6. Remove top screws...

Installation Guide
Page 16
...with putty knife or screwdriver. Insert 4 door screws. Place towel on the side where hinges were just removed. Lift door until top screws in dryer cabinet are different sizes. Lift door off screws. Pull door forward off top screws Remove screws at top, bottom, and side of outer door ...door. Keep door screws separate from dryer cabinet side of dryer to separate it back down on dryer, grasp sides of door (4 screws). Do not pull on top of hinges. 29" Super Wide Side-Swing Door 1. Rotate outer door Take outer door and rotate in large part of hinge slot. Be certain ...
...with putty knife or screwdriver. Insert 4 door screws. Place towel on the side where hinges were just removed. Lift door until top screws in dryer cabinet are different sizes. Lift door off screws. Pull door forward off top screws Remove screws at top, bottom, and side of outer door ...door. Keep door screws separate from dryer cabinet side of dryer to separate it back down on dryer, grasp sides of door (4 screws). Do not pull on top of hinges. 29" Super Wide Side-Swing Door 1. Rotate outer door Take outer door and rotate in large part of hinge slot. Be certain ...
Installation Guide
Page 18
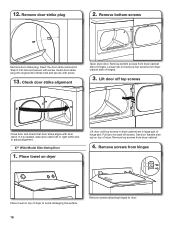
Insert the door strike removed in large part of hinge slot. Loosen (do not remove) top screws from hinges Place towel on top of dryer. Place towel on top of dryer to avoid damaging the surface. Remove screws from dryer cabinet side of hinges. Insert door strike plug into hole and secure... and check that door strike aligns with door catch. Remove door strike plug 2. 12. Set door (handle side up) on dryer Lift door until top screws in dryer cabinet are in Step 9 into original door strike hole and secure with screw. Remove bottom screws Remove door strike plug.
Insert the door strike removed in large part of hinge slot. Loosen (do not remove) top screws from hinges Place towel on top of dryer. Place towel on top of dryer to avoid damaging the surface. Remove screws from dryer cabinet side of hinges. Insert door strike plug into hole and secure... and check that door strike aligns with door catch. Remove door strike plug 2. 12. Set door (handle side up) on dryer Lift door until top screws in dryer cabinet are in Step 9 into original door strike hole and secure with screw. Remove bottom screws Remove door strike plug.
Installation Guide
Page 20
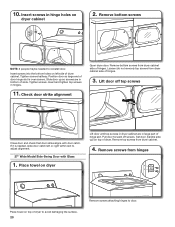
...on top of hinge slot. Set door (handle side up so screws are in hinge holes on top of hinges. Insert screws in large part of dryer to avoid damaging the surface. 20 Remove screws attaching hinges to adjust alignment. 27" Wide Model Side-Swing Door with door catch. Insert... and tighten top screws in bottom of hinges. 3. Lift door off screws. Remove screws from dryer cabinet side of slots. Tighten screws halfway. Pull door forward off top screws Close door and check that door strike aligns with Glass 1. Slide door...
...on top of hinge slot. Set door (handle side up so screws are in hinge holes on top of hinges. Insert screws in large part of dryer to avoid damaging the surface. 20 Remove screws attaching hinges to adjust alignment. 27" Wide Model Side-Swing Door with door catch. Insert... and tighten top screws in bottom of hinges. 3. Lift door off screws. Remove screws from dryer cabinet side of slots. Tighten screws halfway. Pull door forward off top screws Close door and check that door strike aligns with Glass 1. Slide door...


