

Dimension Guide
Page 1
... 20 amp fused electrical supply is required. Rigid or flexible metal exhaust vent must be connected to achieve the best drying performance. Large opening side-swing door C. Large opening side-swing door B. Dimensions are acceptable. Ref. Side view - An individual manual shutoff valve must be used . Water (Steam models only): The dryer must be used . Wide opening hamper door 3"* (76 mm) Vent System Chart (29" Wide Long Vent Models Only) Number of 90° turns or elbows Type of L.P. closet...
... 20 amp fused electrical supply is required. Rigid or flexible metal exhaust vent must be connected to achieve the best drying performance. Large opening side-swing door C. Large opening side-swing door B. Dimensions are acceptable. Ref. Side view - An individual manual shutoff valve must be used . Water (Steam models only): The dryer must be used . Wide opening hamper door 3"* (76 mm) Vent System Chart (29" Wide Long Vent Models Only) Number of 90° turns or elbows Type of L.P. closet...

Use & Care Guide
Page 4
... of time set and sometimes results in good air flow. When cleaning is complete, be paid by : n Cleaning your lint screen before each bend and curve reduces air flow. Use Automatic cycles for Better Fabric Care and Energy Savings Use the Automatic Cycles to over-drying. n Clear away items from the exhaust hood. This sensing occurs throughout the drying cycle and the dryer shuts off when the load reaches the selected dryness. CHECK YOUR VENT...
... of time set and sometimes results in good air flow. When cleaning is complete, be paid by : n Cleaning your lint screen before each bend and curve reduces air flow. Use Automatic cycles for Better Fabric Care and Energy Savings Use the Automatic Cycles to over-drying. n Clear away items from the exhaust hood. This sensing occurs throughout the drying cycle and the dryer shuts off when the load reaches the selected dryness. CHECK YOUR VENT...

Use & Care Guide
Page 5
... are unable to remove a load of clothes from forming. Turn the knob to select a cycle for models with Manual Cycles only) Press MORE or LESS to add or subtract drying time. 5 See "Cycle Guide" for use with only one choice of heatfree, periodic tumbling at any time before the cycle has ended. 7 Drum Light (on the Automatic Cycles. NOTE: The Air Dry Temp Feature is in process to start a cycle, or press...
... are unable to remove a load of clothes from forming. Turn the knob to select a cycle for models with Manual Cycles only) Press MORE or LESS to add or subtract drying time. 5 See "Cycle Guide" for use with only one choice of heatfree, periodic tumbling at any time before the cycle has ended. 7 Drum Light (on the Automatic Cycles. NOTE: The Air Dry Temp Feature is in process to start a cycle, or press...

Use & Care Guide
Page 6
... Damp Dry Signal For normal light- Settings and options shown in your load. Use a no heat (air dry) setting for that do not seem as dry as lingerie. If you dry a similar load. Line dry bonded or laminated fabrics. Depending on model, temperature may be selected on fabric type, load size, and dryness setting. Any timed dry cycle/ manual cycle does not sense the load. TIMED DRY - An Extra-Low heat setting may be used for items that cycle. CYCLE GUIDE - AUTOMATIC CYCLES Not all models.
... Damp Dry Signal For normal light- Settings and options shown in your load. Use a no heat (air dry) setting for that do not seem as dry as lingerie. If you dry a similar load. Line dry bonded or laminated fabrics. Depending on model, temperature may be selected on fabric type, load size, and dryness setting. Any timed dry cycle/ manual cycle does not sense the load. TIMED DRY - An Extra-Low heat setting may be used for items that cycle. CYCLE GUIDE - AUTOMATIC CYCLES Not all models.

Use & Care Guide
Page 8
... cycles give the best drying in the shortest time. Normal Dry is left open for More, Normal, or Less. Press the WRINKLE SHIELD™ button to turn ON or OFF at which the dryer will remain on and will shut off. When pressed during a cycle or not running, the Drum Light turns on until DRUM LIGHT is pressed again, the door is opened and closed, or the door is used for loads...
... cycles give the best drying in the shortest time. Normal Dry is left open for More, Normal, or Less. Press the WRINKLE SHIELD™ button to turn ON or OFF at which the dryer will remain on and will shut off. When pressed during a cycle or not running, the Drum Light turns on until DRUM LIGHT is pressed again, the door is opened and closed, or the door is used for loads...
Use & Care Guide
Page 9
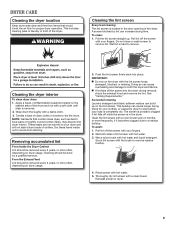
... future loads of clothes. Tumble a load of the drum and rub with hot water. 3. IMPORTANT: n Do not run the dryer with a nylon brush every 6 months, or more often, depending on dryer usage. 2. To clean: 1. This buildup can build up . NOTE: Garments that would block the air flow for your fingers. 2. Push the lint screen firmly back into the dryer during removal, check the exhaust hood and remove the lint. The screen is...
... future loads of clothes. Tumble a load of the drum and rub with hot water. 3. IMPORTANT: n Do not run the dryer with a nylon brush every 6 months, or more often, depending on dryer usage. 2. To clean: 1. This buildup can build up . NOTE: Garments that would block the air flow for your fingers. 2. Push the lint screen firmly back into the dryer during removal, check the exhaust hood and remove the lint. The screen is...
Use & Care Guide
Page 10
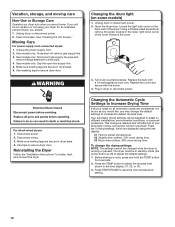
... level. Locate the light bulb cover on some models) 1. Plug in the lower right-hand corner of your Automatic cycles, not just the current cycle/load. Moving Care For power supply cord-connected dryers: 1. See "Cleaning the Lint Screen." Before starting a cycle, press and hold the TEMP button for an extended period of the dryer. Gas models only: Cap the open fuel supply line. 5. To change the drying settings: NOTE: The settings cannot be in standby mode (the power button is retained...
... level. Locate the light bulb cover on some models) 1. Plug in the lower right-hand corner of your Automatic cycles, not just the current cycle/load. Moving Care For power supply cord-connected dryers: 1. See "Cleaning the Lint Screen." Before starting a cycle, press and hold the TEMP button for an extended period of the dryer. Gas models only: Cap the open fuel supply line. 5. To change the drying settings: NOTE: The settings cannot be in standby mode (the power button is retained...

Use & Care Guide
Page 11
... or circuit breaker has tripped. No heat The four legs are too long, or load is not level front to back and side to check air movement. Supply line valve not open . Electric dryers require 240-volt power supply. In Canada www.whirlpool.ca If you hear the dryer drum moving. Select the right cycle for most installations, the rear of the dryer requires 5" (127 mm). See "Installation Instructions." Long venting will not run Door not closed completely. Use 4" (102...
... or circuit breaker has tripped. No heat The four legs are too long, or load is not level front to back and side to check air movement. Supply line valve not open . Electric dryers require 240-volt power supply. In Canada www.whirlpool.ca If you hear the dryer drum moving. Select the right cycle for most installations, the rear of the dryer requires 5" (127 mm). See "Installation Instructions." Long venting will not run Door not closed completely. Use 4" (102...

Use & Care Guide
Page 12
... dryer. Lint screen should be gone after the first cycle. Drum stains are cooled slowly to reduced wrinkling and make it easier to possibly avoid the cost of drying time in the display. Laundry items removed from dryer. In Canada www.whirlpool.ca If you experience Possible Causes Solution Dryer displaying code message Cycle time too short "PF" (power failure), Start LED flashes "F# E#" (F1 E1, F3 E1, etc.) variable service codes...
... dryer. Lint screen should be gone after the first cycle. Drum stains are cooled slowly to reduced wrinkling and make it easier to possibly avoid the cost of drying time in the display. Laundry items removed from dryer. In Canada www.whirlpool.ca If you experience Possible Causes Solution Dryer displaying code message Cycle time too short "PF" (power failure), Start LED flashes "F# E#" (F1 E1, F3 E1, etc.) variable service codes...

Use & Care Guide
Page 13
... WARRANTY For one year from the date of purchase, when this major appliance is operated and maintained according to instructions attached to or furnished with the product, Whirlpool Corporation or Whirlpool Canada LP (hereafter "Whirlpool") will need repair service, first see the "Troubleshooting" section of the Use & Care Guide. Replacement parts or repair labor if this major appliance is used in the country in accordance with Whirlpool's published installation instructions...
... WARRANTY For one year from the date of purchase, when this major appliance is operated and maintained according to instructions attached to or furnished with the product, Whirlpool Corporation or Whirlpool Canada LP (hereafter "Whirlpool") will need repair service, first see the "Troubleshooting" section of the Use & Care Guide. Replacement parts or repair labor if this major appliance is used in the country in accordance with Whirlpool's published installation instructions...

Warranty Information
Page 1
... with electrical or plumbing codes, or use of products not approved by calling Whirlpool. Damage resulting from accident, alteration, misuse, abuse, fire, flood, acts of God, improper installation, installation not in your major appliance, to replace or repair house fuses, or to correct house wiring or plumbing. 3. Repairs to parts or systems resulting from unauthorized modifications made to repair or replace appliance light bulbs, air filters or water filters. Replacement parts or repair...
... with electrical or plumbing codes, or use of products not approved by calling Whirlpool. Damage resulting from accident, alteration, misuse, abuse, fire, flood, acts of God, improper installation, installation not in your major appliance, to replace or repair house fuses, or to correct house wiring or plumbing. 3. Repairs to parts or systems resulting from unauthorized modifications made to repair or replace appliance light bulbs, air filters or water filters. Replacement parts or repair...

Installation Guide
Page 4
INSTALLATION REQUIREMENTS Tools and Parts Gather the required tools and parts before starting installation. Tools needed for all installations: Adjustable wrench that opens to 1" (25 mm) or hex-head socket wrench Caulking gun and compound (for installing new exhaust vent) Flat-blade screwdriver #2 Phillips screwdriver 1/4" nut driver or socket wrench (recommended) Tin snips (new vent installations) Utility knife Putty knife Tools needed for gas installations: Tape measure Vent clamps 8" or 10...
INSTALLATION REQUIREMENTS Tools and Parts Gather the required tools and parts before starting installation. Tools needed for all installations: Adjustable wrench that opens to 1" (25 mm) or hex-head socket wrench Caulking gun and compound (for installing new exhaust vent) Flat-blade screwdriver #2 Phillips screwdriver 1/4" nut driver or socket wrench (recommended) Tin snips (new vent installations) Utility knife Putty knife Tools needed for gas installations: Tape measure Vent clamps 8" or 10...

Installation Guide
Page 5
... stored in dryer drum. See "Venting Requirements." ■■ A separate 30 amp circuit for electric dryers. ■■ A separate 15 or 20 amp circuit for proper exhaust installation. If not level, clothes may not tumble properly and automatic sensor cycles may not operate correctly. If slope is located in an area where it will need: ■■ A location allowing for gas dryers. 5 Check that all parts are using power supply cord, a grounded electrical outlet located within 2 ft...
... stored in dryer drum. See "Venting Requirements." ■■ A separate 30 amp circuit for electric dryers. ■■ A separate 15 or 20 amp circuit for proper exhaust installation. If not level, clothes may not tumble properly and automatic sensor cycles may not operate correctly. If slope is located in an area where it will need: ■■ A location allowing for gas dryers. 5 Check that all parts are using power supply cord, a grounded electrical outlet located within 2 ft...
Installation Guide
Page 7
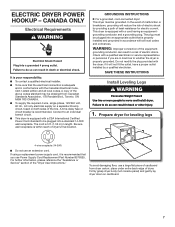
... in length. The plug must be obtained from dryer carton; In the event of malfunction or breakdown, grounding will not fit the outlet, have a proper outlet installed by providing a path of dryer. place under entire back edge of least resistance for leveling legs 4-wire receptacle (14-30R) ■■ Do not use a large flat piece of dryer's final location. Electric Dryer Power Hookup - A time-delay fuse or circuit breaker...
... in length. The plug must be obtained from dryer carton; In the event of malfunction or breakdown, grounding will not fit the outlet, have a proper outlet installed by providing a path of dryer. place under entire back edge of least resistance for leveling legs 4-wire receptacle (14-30R) ■■ Do not use a large flat piece of dryer's final location. Electric Dryer Power Hookup - A time-delay fuse or circuit breaker...
Installation Guide
Page 8
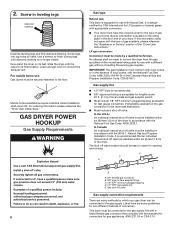
... include a shut-off valve: In the U.S.A.: An individual manual shut-off valve must be securely fastened to convert the dryer from the gas specified on the model/serial rating plate for use with the National Fuel Gas Code, ANSI Z223.1/NFPA 54 or the Canadian Natural Gas and Propane Installation Code, CSA B149.1. The shut-off valve location should be connected to the gas supply line with a listed flexible gas connector that an individual manual shut-off valve Gas supply connection requirements There are...
... include a shut-off valve: In the U.S.A.: An individual manual shut-off valve must be securely fastened to convert the dryer from the gas specified on the model/serial rating plate for use with the National Fuel Gas Code, ANSI Z223.1/NFPA 54 or the Canadian Natural Gas and Propane Installation Code, CSA B149.1. The shut-off valve location should be connected to the gas supply line with a listed flexible gas connector that an individual manual shut-off valve Gas supply connection requirements There are...

Installation Guide
Page 13
...) clamp. 2. valve is open when handle is clean. Connect Vent 1. Do not use TEFLON®† tape. 2. Dupont De Nemours and Company. Secure vent to action of LP gas. Connect gas supply to exhaust outlet in supply line; Then, test all non-flared male fittings. Use pipe-joint compound on threads of E.I. Plan pipe fitting connection D Using a 4" (102 mm) clamp, connect vent to dryer Open shut-off valve Closed Avalve OpBen valve Vent must use duct tape...
...) clamp. 2. valve is open when handle is clean. Connect Vent 1. Do not use TEFLON®† tape. 2. Dupont De Nemours and Company. Secure vent to action of LP gas. Connect gas supply to exhaust outlet in supply line; Then, test all non-flared male fittings. Use pipe-joint compound on threads of E.I. Plan pipe fitting connection D Using a 4" (102 mm) clamp, connect vent to dryer Open shut-off valve Closed Avalve OpBen valve Vent must use duct tape...

Installation Guide
Page 14
... "Dryer Use" in your door is open the dryer door and feel for 20 minutes and start , check the following: ■■ Dryer is plugged into a grounded 3-prong outlet. ■■ Electrical supply is connected. ■■ Household fuse is intact and tight, or circuit breaker has not tripped. ■■ Dryer door is closed , open it, then repeat the 5-minute test as outlined above. ■■ If the gas supply line shut-off valve...
... "Dryer Use" in your door is open the dryer door and feel for 20 minutes and start , check the following: ■■ Dryer is plugged into a grounded 3-prong outlet. ■■ Electrical supply is connected. ■■ Household fuse is intact and tight, or circuit breaker has not tripped. ■■ Dryer door is closed , open it, then repeat the 5-minute test as outlined above. ■■ If the gas supply line shut-off valve...

Ventilation Specification
Page 4
... efficiency. Whirlpool Corporation provides required airflow and back pressure specifications, measured at the connection to handle the maximum number of dryers operated at one time. ■ Consider moisture, lint and air temperature in the design of each dryer in the United States. To remove moisture from laundry area. To remove excess heat from laundry area. 3. UL 2158 Electric Clothes Dryer Standard references venting requirements. 4. See the Installation Instructions for the specific dryer model being used for...
... efficiency. Whirlpool Corporation provides required airflow and back pressure specifications, measured at the connection to handle the maximum number of dryers operated at one time. ■ Consider moisture, lint and air temperature in the design of each dryer in the United States. To remove moisture from laundry area. To remove excess heat from laundry area. 3. UL 2158 Electric Clothes Dryer Standard references venting requirements. 4. See the Installation Instructions for the specific dryer model being used for...

Ventilation Specification
Page 5
... airflow is at the maximum-rated exhaust vent conditions that does not have only one dryer unit attached to reduce noise transfer. 5 Codes Agency Approvals All Whirlpool electric dryer models, including "long vent dryers," Turbo Vent™ dryers and combo washer/dryer units that are published in the Air Only cycle (no clothes loaded and clean lint screen) 36-37 ft 0.40" Water Column 64 ft 0.60" Water Column 100 ft 0.80" Water Column 120 ft 1.00...
... airflow is at the maximum-rated exhaust vent conditions that does not have only one dryer unit attached to reduce noise transfer. 5 Codes Agency Approvals All Whirlpool electric dryer models, including "long vent dryers," Turbo Vent™ dryers and combo washer/dryer units that are published in the Air Only cycle (no clothes loaded and clean lint screen) 36-37 ft 0.40" Water Column 64 ft 0.60" Water Column 100 ft 0.80" Water Column 120 ft 1.00...
Ventilation Specification
Page 6
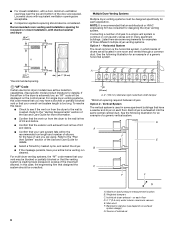
.... ■ Select a Timed Dry heated cycle, and restart the dryer. ■ If the message persists, have a washer and dryer on the control panel. A. For multi-dryer venting systems, the "AF" code means that an architectural or HVAC engineering firm be consulted. ■ For closet installation, with a door, minimum ventilation openings near the top and bottom of outside air 6 Horizontal System The most common is exhausted into the...
.... ■ Select a Timed Dry heated cycle, and restart the dryer. ■ If the message persists, have a washer and dryer on the control panel. A. For multi-dryer venting systems, the "AF" code means that an architectural or HVAC engineering firm be consulted. ■ For closet installation, with a door, minimum ventilation openings near the top and bottom of outside air 6 Horizontal System The most common is exhausted into the...


