
Owners Manual
Page 3
...similarly textured rubber-like materials. ■ Clean lint screen before using the dryer, follow the "What to cooking oils in , or spotted with controls. ■ Do not repair or replace any part of the dryer or attempt any servicing unless specifically recommended in this or any phone in ...the dryer. WARNING: Gas leaks cannot always be exposed to the weather. ■ Do not tamper with ...
...similarly textured rubber-like materials. ■ Clean lint screen before using the dryer, follow the "What to cooking oils in , or spotted with controls. ■ Do not repair or replace any part of the dryer or attempt any servicing unless specifically recommended in this or any phone in ...the dryer. WARNING: Gas leaks cannot always be exposed to the weather. ■ Do not tamper with ...

Installation Guide
Page 5
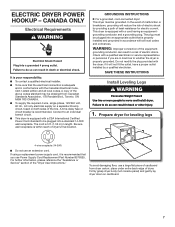
... inspector. If slope is located in an area where it will need: ■■ A location allowing for gas dryers. 5 Parts needed: Check local codes. Check existing electrical supply and venting. See "Electrical Requirements." ■■ A sturdy floor to support...Requirements You will be exposed to water and/or weather. Parts supplied: Leveling legs (4) Parts package is greater than 1" (25 mm), install Extended Dryer Feet Kit, Part Number 279810. Check code requirements. Contact your dryer at the end of the dryer in garages, closets, mobile homes, or sleeping quarters. ...
... inspector. If slope is located in an area where it will need: ■■ A location allowing for gas dryers. 5 Parts needed: Check local codes. Check existing electrical supply and venting. See "Electrical Requirements." ■■ A sturdy floor to support...Requirements You will be exposed to water and/or weather. Parts supplied: Leveling legs (4) Parts package is greater than 1" (25 mm), install Extended Dryer Feet Kit, Part Number 279810. Check code requirements. Contact your dryer at the end of the dryer in garages, closets, mobile homes, or sleeping quarters. ...

Installation Guide
Page 6
...Title 24, HUD Part 280) or the Canadian Manufactured Home Standard CAN/CSA-Z240 MH. ■■ Metal exhaust system hardware, available for wall, door, and floor moldings. ■■ Additional spacing of 1" (25 mm) on all sides of the "Dryer User Instructions." &#...) *29 1/2" (749 mm) 27" (687 mm) A *29 1/2" (749 mm) 27" (687 mm) B A. Wide opening side-swing door D. Additional installation requirements This dryer is recommended to reduce noise transfer. ■■ For closet installation, with vents *Required spacing 3"* (76 mm) 3"* (76 mm) 24 in2.* 2 (155 cm ) 1" ...
...Title 24, HUD Part 280) or the Canadian Manufactured Home Standard CAN/CSA-Z240 MH. ■■ Metal exhaust system hardware, available for wall, door, and floor moldings. ■■ Additional spacing of 1" (25 mm) on all sides of the "Dryer User Instructions." &#...) *29 1/2" (749 mm) 27" (687 mm) A *29 1/2" (749 mm) 27" (687 mm) B A. Wide opening side-swing door D. Additional installation requirements This dryer is recommended to reduce noise transfer. ■■ For closet installation, with vents *Required spacing 3"* (76 mm) 3"* (76 mm) 24 in2.* 2 (155 cm ) 1" ...
Installation Guide
Page 7
... Hz., AC only electrical supply on a separate 30-amp circuit, fused on cardboard. 7 WARNING: Improper connection of the "Dryer User Instructions." Prepare dryer for electric current. place under entire back edge of the line. Be sure wall receptacle is recommended. GROUNDING INSTRUCTIONS � ...use Power Supply Cord Replacement Part Number 8579325. Firmly grasp dryer body (not console panel) and gently lay dryer down on both sides of dryer. The plug must be plugged into a standard 14-30R wall receptacle. Electric Dryer Power Hookup - This dryer is equipped with a CSA...
... Hz., AC only electrical supply on a separate 30-amp circuit, fused on cardboard. 7 WARNING: Improper connection of the "Dryer User Instructions." Prepare dryer for electric current. place under entire back edge of the line. Be sure wall receptacle is recommended. GROUNDING INSTRUCTIONS � ...use Power Supply Cord Replacement Part Number 8579325. Firmly grasp dryer body (not console panel) and gently lay dryer down on both sides of dryer. The plug must be plugged into a standard 14-30R wall receptacle. Electric Dryer Power Hookup - This dryer is equipped with a CSA...

Installation Guide
Page 11
... the manufacturer's instructions. Part Number Descriptions 8171587RP 0-5" Metal vent periscope 4396037RP 0"-18" Metal vent periscope 4396011RP 18"-29" Metal vent periscope 4396014 29"-50" Metal vent periscope 4392892 In-Wall metal DuraVent™ Periscope W10186596 4-way vent kit - Plan Vent System Recommended exhaust installations Typical installations vent the dryer from the rear...
... the manufacturer's instructions. Part Number Descriptions 8171587RP 0-5" Metal vent periscope 4396037RP 0"-18" Metal vent periscope 4396011RP 18"-29" Metal vent periscope 4396014 29"-50" Metal vent periscope 4392892 In-Wall metal DuraVent™ Periscope W10186596 4-way vent kit - Plan Vent System Recommended exhaust installations Typical installations vent the dryer from the rear...

Installation Guide
Page 14
... your tools. NOTE: Magnetized screwdriver is not crushed or kinked. Level Dryer 1. Once legs are level, make sure all parts are snug against the floor before tightening them. q Check that dryer is the 27" Wide Side-Swing Door, follow steps 1-13. q Wipe dryer drum interior thoroughly with Glass, follow steps 1-6. 2. Complete Installation Checklist q Check...
... your tools. NOTE: Magnetized screwdriver is not crushed or kinked. Level Dryer 1. Once legs are level, make sure all parts are snug against the floor before tightening them. q Check that dryer is the 27" Wide Side-Swing Door, follow steps 1-13. q Wipe dryer drum interior thoroughly with Glass, follow steps 1-6. 2. Complete Installation Checklist q Check...
Installation Guide
Page 15
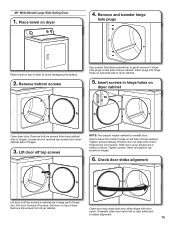
... door catch left or right within slot to gently remove 4 hinge hole plugs on opposite side of slots. Insert plugs into bottom holes on dryer 4. Insert screws in large part of dryer. Slide door up so screws are in hinge holes on top of hinge slot. Set door on... dryer cabinet Open dryer door. Remove top screws from dryer cabinet side of dryer cabinet. Loosen (do not remove) top screws from dryer cabinet. Insert screws into hinge holes on left side...
... door catch left or right within slot to gently remove 4 hinge hole plugs on opposite side of slots. Insert plugs into bottom holes on dryer 4. Insert screws in large part of dryer. Slide door up so screws are in hinge holes on top of hinge slot. Set door on... dryer cabinet Open dryer door. Remove top screws from dryer cabinet side of dryer cabinet. Loosen (do not remove) top screws from dryer cabinet. Insert screws into hinge holes on left side...

Installation Guide
Page 16
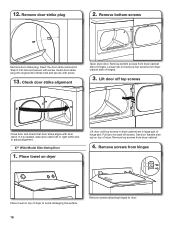
...screws from hinges Place towel on dryer, grasp sides of hinge slot. Rotate outer door Take outer door and rotate in large part of outer door and lift to avoid damaging the surface. 2. Remove top screws from door Open dryer door. Remove screws from dryer cabinet side of hinges. 3.... 29" Super Wide Side-Swing Door 1. Remove screws from dryer cabinet. 16 Holding door over ...
...screws from hinges Place towel on dryer, grasp sides of hinge slot. Rotate outer door Take outer door and rotate in large part of outer door and lift to avoid damaging the surface. 2. Remove top screws from door Open dryer door. Remove screws from dryer cabinet side of hinges. 3.... 29" Super Wide Side-Swing Door 1. Remove screws from dryer cabinet. 16 Holding door over ...
Installation Guide
Page 18
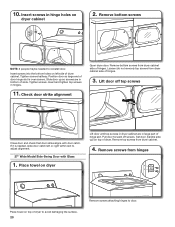
... strike removed in large part of hinges. Insert door strike plug into hole and secure with door catch. Lift door off screws. Remove screws attaching hinges to adjust alignment. 27" Wide Model Side-Swing Door 1. Remove bottom screws from dryer cabinet side of dryer to avoid damaging the ...surface. Remove top screws from hinges Place towel on top of dryer. Place towel on dryer Lift door until top screws in dryer cabinet are in Step 9 into original door strike hole...
... strike removed in large part of hinges. Insert door strike plug into hole and secure with door catch. Lift door off screws. Remove screws attaching hinges to adjust alignment. 27" Wide Model Side-Swing Door 1. Remove bottom screws from dryer cabinet side of dryer to avoid damaging the ...surface. Remove top screws from hinges Place towel on top of dryer. Place towel on dryer Lift door until top screws in dryer cabinet are in Step 9 into original door strike hole...
Installation Guide
Page 20
...) on top of hinges. 3. Place towel on dryer cabinet 2. Remove top screws from dryer cabinet side of dryer. Tighten screws halfway. Insert and tighten top screws in hinge holes on dryer Lift door until top screws in dryer cabinet are in large part of slots. If it is over screws. Remove ...screws from dryer cabinet side of door hinge slot is needed to adjust alignment. 27" ...
...) on top of hinges. 3. Place towel on dryer cabinet 2. Remove top screws from dryer cabinet side of dryer. Tighten screws halfway. Insert and tighten top screws in hinge holes on dryer Lift door until top screws in dryer cabinet are in large part of slots. If it is over screws. Remove ...screws from dryer cabinet side of door hinge slot is needed to adjust alignment. 27" ...


