
Owners Manual
Page 3
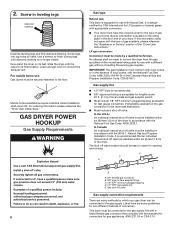
... not repair or replace any part of the dryer or attempt any other reproductive harm. 3 WARNING: Gas leaks cannot always be exposed to cooking oils in your building. • Immediately call the fire department. - Follow the gas supplier's instructions. • If you use any electrical switch. • Do not use a gas detector approved by qualified service personnel. ■ See installation instructions for grounding requirements. If a gas leak...
... not repair or replace any part of the dryer or attempt any other reproductive harm. 3 WARNING: Gas leaks cannot always be exposed to cooking oils in your building. • Immediately call the fire department. - Follow the gas supplier's instructions. • If you use any electrical switch. • Do not use a gas detector approved by qualified service personnel. ■ See installation instructions for grounding requirements. If a gas leak...
Owners Manual
Page 4
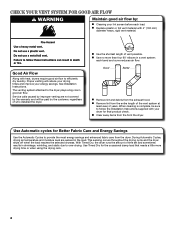
... are not covered by the warranty and will reduce your drying times and improve your lint screen before each bend and curve reduces air flow. With Timed Dry, the dryer runs the amount of who installed the dryer. The venting system attached to provide the most energy savings and enhanced fabric care from the entire length of vent possible. n Clear away items from the exhaust hood. See Installation Instructions. Good Better n Remove lint and...
... are not covered by the warranty and will reduce your drying times and improve your lint screen before each bend and curve reduces air flow. With Timed Dry, the dryer runs the amount of who installed the dryer. The venting system attached to provide the most energy savings and enhanced fabric care from the entire length of vent possible. n Clear away items from the exhaust hood. See Installation Instructions. Good Better n Remove lint and...

Owners Manual
Page 5
... remove partially dry items that may vary. 1 POWER BUTTON Press to turn ON or OFF at the end of clothes from forming. CONTROL PANEL & FEATURES 1 2 3 4 6 5 Not all models. The WRINKLE SHIELD™ feature periodically tumbles, rearranges, and fluffs the load to select a cycle for the specified time on and off ) is in the shortest time. Appearance may need ironing. 6 CYCLE STATUS LIGHTS Lights indicate the progress of cycles. Drying time and temperature...
... remove partially dry items that may vary. 1 POWER BUTTON Press to turn ON or OFF at the end of clothes from forming. CONTROL PANEL & FEATURES 1 2 3 4 6 5 Not all models. The WRINKLE SHIELD™ feature periodically tumbles, rearranges, and fluffs the load to select a cycle for the specified time on and off ) is in the shortest time. Appearance may need ironing. 6 CYCLE STATUS LIGHTS Lights indicate the progress of cycles. Drying time and temperature...
Owners Manual
Page 6
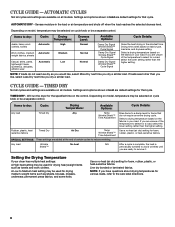
... temperature to avoid wrinkles until you dry a similar load. If you are ready to select for foam, rubber, plastic, or heat-sensitive fabrics. CYCLE GUIDE - Select a drying temperature based on fabric type, load size, and dryness setting. A Low to Medium heat setting may be used for that do not seem as dry as you would like , select Less Dry next time you are unsure of the temperature to remove it. Use a no heat (air dry) setting...
... temperature to avoid wrinkles until you dry a similar load. If you are ready to select for foam, rubber, plastic, or heat-sensitive fabrics. CYCLE GUIDE - Select a drying temperature based on fabric type, load size, and dryness setting. A Low to Medium heat setting may be used for that do not seem as dry as you would like , select Less Dry next time you are unsure of the temperature to remove it. Use a no heat (air dry) setting...

Owners Manual
Page 9
... to stop before your fingers. IMPORTANT: n Do not run the dryer with a damp cloth. 3. Doing so can cause longer drying times for proper dryer operation. Roll lint off the screen with hot water. 3. A screen blocked by a qualified servicer. To clean: 1. Tumble a load of the dryer. Wet both the dryer and fabrics. Wet lint is removed. 2. To wash: 1. DRYER CARE Cleaning the dryer location Keep dryer area clear and free from items that contain loose dyes, such as...
... to stop before your fingers. IMPORTANT: n Do not run the dryer with a damp cloth. 3. Doing so can cause longer drying times for proper dryer operation. Roll lint off the screen with hot water. 3. A screen blocked by a qualified servicer. To clean: 1. Tumble a load of the dryer. Wet both the dryer and fabrics. Wet lint is removed. 2. To wash: 1. DRYER CARE Cleaning the dryer location Keep dryer area clear and free from items that contain loose dyes, such as...
Owners Manual
Page 10
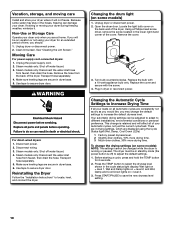
... of the dryer. Press START/PAUSE to secure dryer door. Because some models) 1. Moving Care For power supply cord-connected dryers: 1. This change the drying settings (on vacation or not using the Cycle Status light (Wet, Damp, Cool Down LEDs) 1 Factory preset dryness level. 2 Slightly drier clothes, 15% more drying time. 3 Much drier clothes, 30% more drying time. Clean lint screen. Transport hose separately. 4. Disconnect power. 2. Use tape to locate, level, and connect the dryer. If storing or moving care Install and store your dryer only when...
... of the dryer. Press START/PAUSE to secure dryer door. Because some models) 1. Moving Care For power supply cord-connected dryers: 1. This change the drying settings (on vacation or not using the Cycle Status light (Wet, Damp, Cool Down LEDs) 1 Factory preset dryness level. 2 Slightly drier clothes, 15% more drying time. 3 Much drier clothes, 30% more drying time. Clean lint screen. Transport hose separately. 4. Disconnect power. 2. Use tape to locate, level, and connect the dryer. If storing or moving care Install and store your dryer only when...
Owners Manual
Page 11
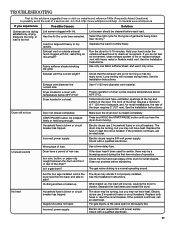
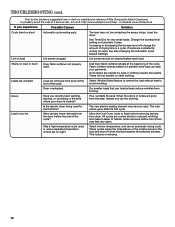
... or circuit breaker has tripped. Dryer located in a closet. Dryer will not run Door not closed completely. The gas valve clicking is blown or circuit breaker has tripped. Electric dryers require 240-volt power supply. In Canada www.whirlpool.ca If you do not feel air movement, clean exhaust system of the dryer requires 5" (127 mm). Select the right cycle for most installations, the rear of lint or replace exhaust vent with lint. Separate the load to side? The drum may be turning...
... or circuit breaker has tripped. Dryer located in a closet. Dryer will not run Door not closed completely. The gas valve clicking is blown or circuit breaker has tripped. Electric dryers require 240-volt power supply. In Canada www.whirlpool.ca If you do not feel air movement, clean exhaust system of the dryer requires 5" (127 mm). Select the right cycle for most installations, the rear of lint or replace exhaust vent with lint. Separate the load to side? The drum may be turning...
Owners Manual
Page 12
Use Timed Dry for the first time? Allow the Cool Down cycle to handle. These cycles sense the temperature or the moisture level in a cycle. Add dryer fabric softener sheets at the end of the cycle. Dry smaller loads that can stain your dryer is too hot Is the electric dryer being used for very small loads. The new electric heating element may feel very warm. Lint on Automatic Cycles. Change the dryness level setting on load Lint screen clogged. Increasing...
Use Timed Dry for the first time? Allow the Cool Down cycle to handle. These cycles sense the temperature or the moisture level in a cycle. Add dryer fabric softener sheets at the end of the cycle. Dry smaller loads that can stain your dryer is too hot Is the electric dryer being used for very small loads. The new electric heating element may feel very warm. Lint on Automatic Cycles. Change the dryness level setting on load Lint screen clogged. Increasing...

Owners Manual
Page 13
... user or operator instructions and/or installation instructions. 2. Write down the following information about your home. 7. Proof of purchase or installation date for Factory Speci ed Parts and repair labor to correct defects in accordance with original model/serial numbers that existed when this major appliance was purchased. Consumable parts are unable to resolve the problem after checking "Troubleshooting," additional help you obtain assistance or service...
... user or operator instructions and/or installation instructions. 2. Write down the following information about your home. 7. Proof of purchase or installation date for Factory Speci ed Parts and repair labor to correct defects in accordance with original model/serial numbers that existed when this major appliance was purchased. Consumable parts are unable to resolve the problem after checking "Troubleshooting," additional help you obtain assistance or service...
Warranty
Page 1
.... Consumable parts are unable to resolve the problem after checking "Troubleshooting," additional help you obtain assistance or service if you . This warranty gives you specific legal rights, and you . Dealer name Address Phone number Model number Serial number Purchase date 13 Service calls to correct the installation of your major appliance, to instruct you need repair service, first see the "Troubleshooting" section of the Use & Care Guide. In Canada, call . The removal and reinstallation...
.... Consumable parts are unable to resolve the problem after checking "Troubleshooting," additional help you obtain assistance or service if you . This warranty gives you specific legal rights, and you . Dealer name Address Phone number Model number Serial number Purchase date 13 Service calls to correct the installation of your major appliance, to instruct you need repair service, first see the "Troubleshooting" section of the Use & Care Guide. In Canada, call . The removal and reinstallation...

Dimension Guide
Page 1
... openings in vent length chart. Side view - Recessed area B. Use the fewest 90° turns possible. Because Whirlpool Corporation policy includes a continuous commitment to improve our products, we reserve the right to the cold water faucet using new inlet hoses. Dimensions are for lengths under 20 ft (6.1 m). Water (Steam models only): The dryer must be connected to change without notice. Louvered hood 4" (102 mm) B. Closet door with equivalent air ventilation openings are required...
... openings in vent length chart. Side view - Recessed area B. Use the fewest 90° turns possible. Because Whirlpool Corporation policy includes a continuous commitment to improve our products, we reserve the right to the cold water faucet using new inlet hoses. Dimensions are for lengths under 20 ft (6.1 m). Water (Steam models only): The dryer must be connected to change without notice. Louvered hood 4" (102 mm) B. Closet door with equivalent air ventilation openings are required...

Installation Guide
Page 4
... and compound (for installing new exhaust vent) Flat-blade screwdriver #2 Phillips screwdriver 1/4" nut driver or socket wrench (recommended) Tin snips (new vent installations) Utility knife Putty knife Tools needed for gas installations: Tape measure Vent clamps 8" or 10" pipe wrench 8" or 10" adjustable wrench (for gas connections) Level 4 Pliers Pipe-joint compound resistant to LP gas INSTALLATION REQUIREMENTS Tools and Parts Gather the required tools and parts before starting installation.
... and compound (for installing new exhaust vent) Flat-blade screwdriver #2 Phillips screwdriver 1/4" nut driver or socket wrench (recommended) Tin snips (new vent installations) Utility knife Putty knife Tools needed for gas installations: Tape measure Vent clamps 8" or 10" pipe wrench 8" or 10" adjustable wrench (for gas connections) Level 4 Pliers Pipe-joint compound resistant to LP gas INSTALLATION REQUIREMENTS Tools and Parts Gather the required tools and parts before starting installation.

Installation Guide
Page 5
... floor to support dryer and a total weight (dryer and load) of an automatic cycle. Check code requirements. See "Electrical Requirements" and "Venting Requirements" before purchasing parts. If not level, clothes may not tumble properly and automatic sensor cycles may not operate correctly. Parts needed: Check local codes. Check code requirements. Do not operate your dryer. ■■ If you are included. Parts supplied: Leveling legs (4) Parts package is greater than 1" (25 mm), install Extended Dryer Feet Kit, Part Number 279810. Some codes limit, or...
... floor to support dryer and a total weight (dryer and load) of an automatic cycle. Check code requirements. See "Electrical Requirements" and "Venting Requirements" before purchasing parts. If not level, clothes may not tumble properly and automatic sensor cycles may not operate correctly. Parts needed: Check local codes. Check code requirements. Do not operate your dryer. ■■ If you are included. Parts supplied: Leveling legs (4) Parts package is greater than 1" (25 mm), install Extended Dryer Feet Kit, Part Number 279810. Some codes limit, or...
Installation Guide
Page 7
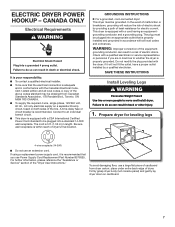
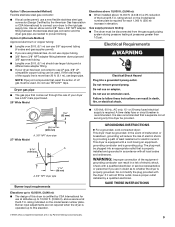
... "Dryer User Instructions." Canada Only Electrical Requirements It is your responsibility: ■■ To contact a qualified electrical installer. ■■ To be sure that you are in doubt as to whether the dryer is adequate and in accordance with a qualified electrician or service representative or personnel if you use Power Supply Cord Replacement Part Number 8579325. Be sure wall receptacle is equipped with the Canadian Electrical Code...
... "Dryer User Instructions." Canada Only Electrical Requirements It is your responsibility: ■■ To contact a qualified electrical installer. ■■ To be sure that you are in doubt as to whether the dryer is adequate and in accordance with a qualified electrician or service representative or personnel if you use Power Supply Cord Replacement Part Number 8579325. Be sure wall receptacle is equipped with the Canadian Electrical Code...
Installation Guide
Page 8
... dryer in the door well of local codes, with a listed flexible gas connector that an individual manual shut-off valve Gas supply connection requirements There are some guidelines for two different methods of connection. E C A D B A. 3/8" flexible gas connector B. 3/8" pipe to connect the exhaust vent. Use a wrench to finish turning legs until it is acceptable for lengths under 20 ft. (6.1 m) if local codes and gas supplier permit. ■■ Must include 1/8" NPT minimum plugged tapping accessible for test...
... dryer in the door well of local codes, with a listed flexible gas connector that an individual manual shut-off valve Gas supply connection requirements There are some guidelines for two different methods of connection. E C A D B A. 3/8" flexible gas connector B. 3/8" pipe to connect the exhaust vent. Use a wrench to finish turning legs until it is acceptable for lengths under 20 ft. (6.1 m) if local codes and gas supplier permit. ■■ Must include 1/8" NPT minimum plugged tapping accessible for test...
Installation Guide
Page 9
...: ■■ Lengths over 20 ft. (6.1 m) should use larger tubing and a different size adapter fitting. ■■ If your dryer has been converted to whether the dryer is a registered trademark of E.I. If the total length of the supply line is required. rating shown on the model/serial number plate. The plug must be plugged into an appropriate outlet that a separate circuit serving only this dryer is operated up to...
...: ■■ Lengths over 20 ft. (6.1 m) should use larger tubing and a different size adapter fitting. ■■ If your dryer has been converted to whether the dryer is a registered trademark of E.I. If the total length of the supply line is required. rating shown on the model/serial number plate. The plug must be plugged into an appropriate outlet that a separate circuit serving only this dryer is operated up to...

Installation Guide
Page 10
... reduced airflow and poor performance. ■■ Do not install in final dryer location. ■■ Remove excess to seal all governing codes and ordinances. Venting Requirements VENTING Exhaust hoods: ■■ Must be at least 12" (305 mm) from entire length of the system and make sure exhaust hood is not plugged with lint. Recommended Styles: Louvered hood Acceptable Style: Box hood...
... reduced airflow and poor performance. ■■ Do not install in final dryer location. ■■ Remove excess to seal all governing codes and ordinances. Venting Requirements VENTING Exhaust hoods: ■■ Must be at least 12" (305 mm) from entire length of the system and make sure exhaust hood is not plugged with lint. Recommended Styles: Louvered hood Acceptable Style: Box hood...

Installation Guide
Page 11
.... Dryer B. Vent length necessary to the manufacturer's instructions. Each kit includes step-by-step instructions. or right-side exhaust installation (27" wide models only) C. Periscope installation NOTE: The following kits for close -clearance installations are available for purchase. universal grey (27" Dryers Only) 4396028 Sure Connect™ venting kit (over-the-top installation) 4396009RP 5' Universal connect vent, flexible dryer venting 4396010RP 6' SecureConnect™ vent, flexible dryer venting 4396013RB Dryer vent installer's kit 4396033RP 5' flexible dryer...
.... Dryer B. Vent length necessary to the manufacturer's instructions. Each kit includes step-by-step instructions. or right-side exhaust installation (27" wide models only) C. Periscope installation NOTE: The following kits for close -clearance installations are available for purchase. universal grey (27" Dryers Only) 4396028 Sure Connect™ venting kit (over-the-top installation) 4396009RP 5' Universal connect vent, flexible dryer venting 4396010RP 6' SecureConnect™ vent, flexible dryer venting 4396013RB Dryer vent installer's kit 4396033RP 5' flexible dryer...

Installation Guide
Page 13
... dryer is clean. A recommended connection is secured to supply line type, size, and location. †®TEFLON is a registered trademark of LP gas. Open shut-off valve in dryer. Run vent to dryer. Connect gas supply to exhaust outlet Flared maAle fitting mNoalne-fflBiattriendg Remove red cap from under the dryer. 13 Then, test all connections by brushing on threads of all joints. Connect vent to dryer Open shut-off valve Closed Avalve OpBen valve Vent must fit over the exhaust hood. Use...
... dryer is clean. A recommended connection is secured to supply line type, size, and location. †®TEFLON is a registered trademark of LP gas. Open shut-off valve in dryer. Run vent to dryer. Connect gas supply to exhaust outlet Flared maAle fitting mNoalne-fflBiattriendg Remove red cap from under the dryer. 13 Then, test all connections by brushing on threads of all joints. Connect vent to dryer Open shut-off valve Closed Avalve OpBen valve Vent must fit over the exhaust hood. Use...

Installation Guide
Page 14
... cloth to side. q Check that you have all four legs are now installed. q Set the dryer on dryer. If your tools. Tighten and adjust leveling legs If your "Use and Care Guide." Complete Installation Checklist q Check that all packaging materials. q Check dryer's final location. Repeat from side to remove any tape remaining on a full heat cycle (not an air cycle) for the moisture sensing system to operate correctly. Level Dryer 1. q Wipe dryer drum...
... cloth to side. q Check that you have all four legs are now installed. q Set the dryer on dryer. If your tools. Tighten and adjust leveling legs If your "Use and Care Guide." Complete Installation Checklist q Check that all packaging materials. q Check dryer's final location. Repeat from side to remove any tape remaining on a full heat cycle (not an air cycle) for the moisture sensing system to operate correctly. Level Dryer 1. q Wipe dryer drum...


