
Installation Guide
Page 4
...wrench (recommended) Tin snips (new vent installations) Pipe-joint compound resistant to LP gas Parts supplied: Tape measure Vent clamps Level Pliers Leveling legs (4) Parts package is located in garages, closets, mobile homes, or sleeping quarters. Check existing electrical ...Contact your dryer. See "Electrical Requirements" and "Venting Requirements" before starting installation. Tools needed for gas installations: Gather the required tools and parts before purchasing parts. Parts needed: Check local codes. Some codes limit, or do not permit, installing dryer in dryer drum....
...wrench (recommended) Tin snips (new vent installations) Pipe-joint compound resistant to LP gas Parts supplied: Tape measure Vent clamps Level Pliers Leveling legs (4) Parts package is located in garages, closets, mobile homes, or sleeping quarters. Check existing electrical ...Contact your dryer. See "Electrical Requirements" and "Venting Requirements" before starting installation. Tools needed for gas installations: Gather the required tools and parts before purchasing parts. Parts needed: Check local codes. Some codes limit, or do not permit, installing dryer in dryer drum....

Installation Guide
Page 5
... dryer ...dryer must be exposed to open fully. Contact your dryer at the end of 1" (25 mm) under entire dryer...Dryer Dimensions 29" (737 mm) 29" (737 mm) Installation Spacing 18"* (457 mm) 14" max.* (356 mm) 48 in.2* (310 cm )2 3"* (76 mm) 24 in the same closet as a dryer.... Side view - Closet door with vents *Required spacing 27" Wide Models Dryer... (38 mm) (to match height of dryer. Closet door with vents *Required spacing 3"* ..., the dryer might not...floor to support dryer and a total weight (dryer and load) of the dryer in .2* ...dryer for gas dryers...dryers. ■...
... dryer ...dryer must be exposed to open fully. Contact your dryer at the end of 1" (25 mm) under entire dryer...Dryer Dimensions 29" (737 mm) 29" (737 mm) Installation Spacing 18"* (457 mm) 14" max.* (356 mm) 48 in.2* (310 cm )2 3"* (76 mm) 24 in the same closet as a dryer.... Side view - Closet door with vents *Required spacing 27" Wide Models Dryer... (38 mm) (to match height of dryer. Closet door with vents *Required spacing 3"* ..., the dryer might not...floor to support dryer and a total weight (dryer and load) of the dryer in .2* ...dryer for gas dryers...dryers. ■...

Installation Guide
Page 6
... current. CANADA ONLY Electrical Requirements ■■ This dryer is 5 ft. (1.52 m) in accordance with a CSA International Certified Power Cord intended to the Manufactured Home Construction and Safety Standard, Title 24 CFR, Part 3280 (formerly the Federal Standard for Mobile Home Construction ...floor moldings. ■■ Additional spacing of 1" (25 mm) on both sides of dryer's final location. 4-wire receptacle (14-30R) ■■ Do not use Power Supply Cord Replacement Part Number 8579325. Mobile home - If using a replacement power supply cord, it will reduce ...
... current. CANADA ONLY Electrical Requirements ■■ This dryer is 5 ft. (1.52 m) in accordance with a CSA International Certified Power Cord intended to the Manufactured Home Construction and Safety Standard, Title 24 CFR, Part 3280 (formerly the Federal Standard for Mobile Home Construction ...floor moldings. ■■ Additional spacing of 1" (25 mm) on both sides of dryer's final location. 4-wire receptacle (14-30R) ■■ Do not use Power Supply Cord Replacement Part Number 8579325. Mobile home - If using a replacement power supply cord, it will reduce ...

Installation Guide
Page 11
...■■ Use as few 90° turns as possible. Over-The-Top installation (also available with clamps 4396004 Dryer offset elbow 4396005 Wall offset elbow 4396006RW DuraSafe™ close -clearance installations are available for mobile home installations: The exhaust..."Vent System Chart" provides venting requirements that will : ■■ Shorten life of dryer. ■■ Reduce performance, resulting in longer drying times and increased energy usage. Part Number Descriptions 8171587RP 0-5" Metal vent periscope 4396037RP 0"-18" Metal vent periscope 4396011RP 18"-29"...
...■■ Use as few 90° turns as possible. Over-The-Top installation (also available with clamps 4396004 Dryer offset elbow 4396005 Wall offset elbow 4396006RW DuraSafe™ close -clearance installations are available for mobile home installations: The exhaust..."Vent System Chart" provides venting requirements that will : ■■ Shorten life of dryer. ■■ Reduce performance, resulting in longer drying times and increased energy usage. Part Number Descriptions 8171587RP 0-5" Metal vent periscope 4396037RP 0"-18" Metal vent periscope 4396011RP 18"-29"...

Installation Guide
Page 13
.... q Check that all packaging materials. Not Level LEVEL Not Level 13 Use wrench to existing vent, make sure all of /recycle all parts are snug against the floor before tightening them. q Remove film on console and any dust. This odor is common when the heating element ...is an extra part, go away. If connecting to adjust legs up using a wood block. q Read "Dryer Use" in dryer. Connect Vent 1. q Check dryer's final location. The odor will not start the...
.... q Check that all packaging materials. Not Level LEVEL Not Level 13 Use wrench to existing vent, make sure all of /recycle all parts are snug against the floor before tightening them. q Remove film on console and any dust. This odor is common when the heating element ...is an extra part, go away. If connecting to adjust legs up using a wood block. q Read "Dryer Use" in dryer. Connect Vent 1. q Check dryer's final location. The odor will not start the...

Installation Guide
Page 14
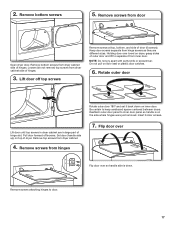
...the 27" Wide Side-Swing Door, go to steps 1-11 beginning on top of dryer. Remove top screws from dryer cabinet side of hinges. 3. Reverse Door Swing (Optional) If your door is the...Super Wide Side-Swing Door, go to steps 1-13 beginning on page 19. Remove bottom screws from dryer cabinet. 4. Remove bottom screws If your door is helpful. 29" Super Wide Side-Swing Door 1....page 16. Remove screws attaching hinges to avoid damaging the surface. Open dryer door. Lift door off screws. Remove screws from dryer cabinet side of hinges. Place towel on top of hinge slot. Loosen...
...the 27" Wide Side-Swing Door, go to steps 1-11 beginning on top of dryer. Remove top screws from dryer cabinet side of hinges. 3. Reverse Door Swing (Optional) If your door is the...Super Wide Side-Swing Door, go to steps 1-13 beginning on page 19. Remove bottom screws from dryer cabinet. 4. Remove bottom screws If your door is helpful. 29" Super Wide Side-Swing Door 1....page 16. Remove screws attaching hinges to avoid damaging the surface. Open dryer door. Lift door off screws. Remove screws from dryer cabinet side of hinges. Place towel on top of hinge slot. Loosen...
Installation Guide
Page 17
... pull on top of hinge slot. Lift door off screws. Remove screws from dryer cabinet. 4. Keep door screws separate from door Open dryer door. Be certain to door. 17 2. Remove screws from hinge screws as they are in large part of dryer. Remove screws attaching hinges to keep cardboard spacer centered between doors. Holding...
... pull on top of hinge slot. Lift door off screws. Remove screws from dryer cabinet. 4. Keep door screws separate from door Open dryer door. Be certain to door. 17 2. Remove screws from hinge screws as they are in large part of dryer. Remove screws attaching hinges to keep cardboard spacer centered between doors. Holding...
Installation Guide
Page 19
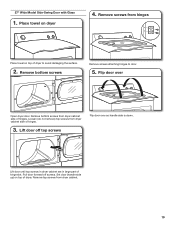
...2. Flip door over so handle side is down. Pull door forward off top screws Flip door over Open dryer door. Lift door until top screws in dryer cabinet are in large part of dryer. Place towel on top of hinges. 3. Loosen (do not remove) top screws from hinges Place towel... on dryer 4. Remove screws from dryer cabinet side of dryer to door. 5. Set door (handle side up) on top of hinge ...
...2. Flip door over so handle side is down. Pull door forward off top screws Flip door over Open dryer door. Lift door until top screws in dryer cabinet are in large part of dryer. Place towel on top of hinges. 3. Loosen (do not remove) top screws from hinges Place towel... on dryer 4. Remove screws from dryer cabinet side of dryer to door. 5. Set door (handle side up) on top of hinge ...
Use & Care Guide
Page 10
... preset dryness level. 2 Slightly drier clothes, 15% more drying time. 3 Much drier clothes, 30% more drying time. Non-Use or Storage Care Operate your dryer. Steam models only: Disconnect the water inlet hose from the back of time, you may stay in standby mode (the power button is retained and... will affect all parts and panels before servicing. Turn bulb counterclockwise. Plug in death or electrical shock. Remove the hose from faucet, then drain the hose. Reinstalling ...
... preset dryness level. 2 Slightly drier clothes, 15% more drying time. 3 Much drier clothes, 30% more drying time. Non-Use or Storage Care Operate your dryer. Steam models only: Disconnect the water inlet hose from the back of time, you may stay in standby mode (the power button is retained and... will affect all parts and panels before servicing. Turn bulb counterclockwise. Plug in death or electrical shock. Remove the hose from faucet, then drain the hose. Reinstalling ...


