

Installation Guide
Page 4
Check code requirements. Optional Equipment: (Not supplied with dryer) Refer to your "Use and Care Guide" for information about accessories available for all parts are included. Tools needed for your local building inspector. Check existing electrical supply and venting. Contact your dryer. Location Requirements Adjustable wrench that all installations: Flat-blade screwdriver #2 Phillips screwdriver 8" or 10" pipe wrench 8" or 10" adjustable wrench (for gas connections) 1/4" nut driver or socket wrench...
Check code requirements. Optional Equipment: (Not supplied with dryer) Refer to your "Use and Care Guide" for information about accessories available for all parts are included. Tools needed for your local building inspector. Check existing electrical supply and venting. Contact your dryer. Location Requirements Adjustable wrench that all installations: Flat-blade screwdriver #2 Phillips screwdriver 8" or 10" pipe wrench 8" or 10" adjustable wrench (for gas connections) 1/4" nut driver or socket wrench...

Installation Guide
Page 5
... electric dryers. ■■ A separate 15 or 20 amp circuit for the exhaust vent with vents *Required spacing 3"* (76 mm) 5 closet or confined area C. If not level, clothes may not tumble properly and automatic sensor cycles may not operate correctly. Recessed area B. Closet door with maximum slope of 3.6 cu. capacity washer) or 1½" (38 mm) (to match height of dryer. Wide opening side-swing door B. Wide opening hamper door Installation...
... electric dryers. ■■ A separate 15 or 20 amp circuit for the exhaust vent with vents *Required spacing 3"* (76 mm) 5 closet or confined area C. If not level, clothes may not tumble properly and automatic sensor cycles may not operate correctly. Recessed area B. Closet door with maximum slope of 3.6 cu. capacity washer) or 1½" (38 mm) (to match height of dryer. Wide opening side-swing door B. Wide opening hamper door Installation...

Installation Guide
Page 6
... the Canadian Electrical Code, C22.1-latest edition and all local codes. SAVE THESE INSTRUCTIONS It is your responsibility: ■■ To contact a qualified electrical installer. ■■ To be considered. Additional installation requirements This dryer is recommended. A time-delay fuse or circuit breaker is suitable for purchase. The opening (such as the dryer exhaust opening. ELECTRIC DRYER POWER HOOKUP - Connect to the Manufactured Home Construction and Safety Standard, Title 24 CFR, Part 3280...
... the Canadian Electrical Code, C22.1-latest edition and all local codes. SAVE THESE INSTRUCTIONS It is your responsibility: ■■ To contact a qualified electrical installer. ■■ To be considered. Additional installation requirements This dryer is recommended. A time-delay fuse or circuit breaker is suitable for purchase. The opening (such as the dryer exhaust opening. ELECTRIC DRYER POWER HOOKUP - Connect to the Manufactured Home Construction and Safety Standard, Title 24 CFR, Part 3280...
Installation Guide
Page 7
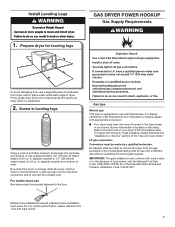
... local codes, or in your dryer. Firmly grasp dryer body (not console panel) and gently lay dryer down Kit. Screw in the door well of the "Use and Care Guide." Gas type Natural gas: This dryer is equipped for electrical connection and to convert the dryer from the gas specified on the rating plate in leveling legs Using a wrench and tape measure, screw legs into leg holes until it is located on the model/serial rating...
... local codes, or in your dryer. Firmly grasp dryer body (not console panel) and gently lay dryer down Kit. Screw in the door well of the "Use and Care Guide." Gas type Natural gas: This dryer is equipped for electrical connection and to convert the dryer from the gas specified on the rating plate in leveling legs Using a wrench and tape measure, screw legs into leg holes until it is located on the model/serial rating...
Installation Guide
Page 8
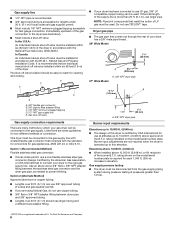
... gas supply line with the B149.1, Natural Gas and Propane Installation Code. If the total length of the supply line is more than 1/2 psi. †®TEFLON is a registered trademark of E.I. Gas shut-off valve Gas supply connection requirements There are some guidelines for two different methods of connection. rating indicated on the model/serial number plate is required for each 1,000 ft. (305 m) increase in accordance with the standard for connectors...
... gas supply line with the B149.1, Natural Gas and Propane Installation Code. If the total length of the supply line is more than 1/2 psi. †®TEFLON is a registered trademark of E.I. Gas shut-off valve Gas supply connection requirements There are some guidelines for two different methods of connection. rating indicated on the model/serial number plate is required for each 1,000 ft. (305 m) increase in accordance with the standard for connectors...

Installation Guide
Page 9
... not remove ground prong. The plug must be used for best drying performance and to achieve best drying performance. 9 IMPORTANT: Observe all local codes and ordinances. Do not use an adapter. Electrical Requirements WARNING VENTING Venting Requirements Electrical Shock Hazard Plug into a grounded 3 prong outlet. Flexible metal vent: (Acceptable only if accessible to whether the dryer is properly installed and grounded in a risk of the equipment- Replace plastic or metal foil vents with...
... not remove ground prong. The plug must be used for best drying performance and to achieve best drying performance. 9 IMPORTANT: Observe all local codes and ordinances. Do not use an adapter. Electrical Requirements WARNING VENTING Venting Requirements Electrical Shock Hazard Plug into a grounded 3 prong outlet. Flexible metal vent: (Acceptable only if accessible to whether the dryer is properly installed and grounded in a risk of the equipment- Replace plastic or metal foil vents with...

Installation Guide
Page 11
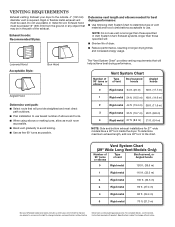
..." wide models have a 90º turn to the manufacturer's instructions. Determine vent length and elbows needed for best drying performance: ■■ Use following kits for purchase. To determine maximum exhaust length, add one offset elbow) Periscope installation NOTE: The following "Vent System Chart" to use . Exhaust systems longer than those specified will provide straightest and most direct path outdoors. ■■ Plan installation to determine type of dryer...
..." wide models have a 90º turn to the manufacturer's instructions. Determine vent length and elbows needed for best drying performance: ■■ Use following kits for purchase. To determine maximum exhaust length, add one offset elbow) Periscope installation NOTE: The following "Vent System Chart" to use . Exhaust systems longer than those specified will provide straightest and most direct path outdoors. ■■ Plan installation to determine type of dryer...
Installation Guide
Page 12
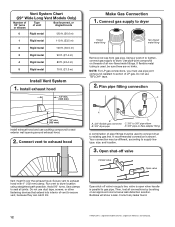
.... Open shut-off valve in supply line; Run vent to seal exterior wall opening around exhaust hood. 2. Do not use pipe-joint compound resistant to existing gas line. Open shut-off valve Closed Avalve OpBen valve Vent must be used , be different, according to -flare adapter fitting A combination of E.I. Do not use caulking compound to dryer location using straightest path possible. Plan pipe fitting connection D 12" min. (305 mm) Install exhaust hood and use TEFLON...
.... Open shut-off valve in supply line; Run vent to seal exterior wall opening around exhaust hood. 2. Do not use pipe-joint compound resistant to existing gas line. Open shut-off valve Closed Avalve OpBen valve Vent must be used , be different, according to -flare adapter fitting A combination of E.I. Do not use caulking compound to dryer location using straightest path possible. Plan pipe fitting connection D 12" min. (305 mm) Install exhaust hood and use TEFLON...

Installation Guide
Page 13
... heat, cancel cycle and close the door. Move dryer to final location Move dryer to exhaust outlet in dryer. Use wrench to remove any tape remaining on a full heat cycle (not an air cycle) for 20 minutes and start , check the following: ■■ Dryer is plugged into a grounded 3-prong outlet. ■■ Electrical supply is connected. ■■ Household fuse is intact and tight, or circuit breaker has not tripped. ■■ Dryer door is clean. q Check dryer's final location. q Wipe dryer drum...
... heat, cancel cycle and close the door. Move dryer to final location Move dryer to exhaust outlet in dryer. Use wrench to remove any tape remaining on a full heat cycle (not an air cycle) for 20 minutes and start , check the following: ■■ Dryer is plugged into a grounded 3-prong outlet. ■■ Electrical supply is connected. ■■ Household fuse is intact and tight, or circuit breaker has not tripped. ■■ Dryer door is clean. q Check dryer's final location. q Wipe dryer drum...
Dimension Guide
Page 2
See "Venting Requirements." For lengths over 20 ft (6.1 m), larger tubing should also be used. ELECTRICAL REQUIREMENTS A 120-volt, 60 Hz, AC-only, 15 or 20 amp fused electrical supply is recommended to open fully. Louvered doors with equivalent ventilation openings are required. gas. gas must be installed within 6 ft (1.8 m) of the dryer in the top and bottom of L.P. A time-delay fuse or circuit breaker and a separate circuit are for the minimum spacing...
See "Venting Requirements." For lengths over 20 ft (6.1 m), larger tubing should also be used. ELECTRICAL REQUIREMENTS A 120-volt, 60 Hz, AC-only, 15 or 20 amp fused electrical supply is recommended to open fully. Louvered doors with equivalent ventilation openings are required. gas. gas must be installed within 6 ft (1.8 m) of the dryer in the top and bottom of L.P. A time-delay fuse or circuit breaker and a separate circuit are for the minimum spacing...
Dimension Guide
Page 3
... achieve best drying performance. Dimensions are for 27" wide models have a 90º turn to change materials and specifications without notice. Exhaust hood must be in the path of dryer. ■■ Reduce performance, resulting in Vent System Chart. The "Vent System Chart" provides venting requirements that may be used. Exhaust hoods: Recommended Styles: Determine vent length and elbows needed for best drying performance: ■■ Use following Vent System...
... achieve best drying performance. Dimensions are for 27" wide models have a 90º turn to change materials and specifications without notice. Exhaust hood must be in the path of dryer. ■■ Reduce performance, resulting in Vent System Chart. The "Vent System Chart" provides venting requirements that may be used. Exhaust hoods: Recommended Styles: Determine vent length and elbows needed for best drying performance: ■■ Use following Vent System...

Warranty Information
Page 1
... the Use & Care Guide. LIMITATION OF REMEDIES; If outside the 50 United States and Canada, contact your major appliance if it was purchased. If you think you are excluded from state to state or province to repair or replace appliance light bulbs, air filters, or water filters. If you need to know your major appliance, to replace or repair house fuses, or to published user or operator instructions...
... the Use & Care Guide. LIMITATION OF REMEDIES; If outside the 50 United States and Canada, contact your major appliance if it was purchased. If you think you are excluded from state to state or province to repair or replace appliance light bulbs, air filters, or water filters. If you need to know your major appliance, to replace or repair house fuses, or to published user or operator instructions...
Use & Care Guide
Page 4
... enhanced fabric care from the entire length of vent possible. ■■ Use no more drying time or when using the drying rack. 4 This sensing occurs throughout the drying cycle and the dryer shuts off when the load reaches the selected dryness. Use Timed Dry for final product check. ■■ Clear away items from the front the dryer. See Installation Instructions. During Sensor Cycles, drying air temperature and moisture level are not covered by the warranty and...
... enhanced fabric care from the entire length of vent possible. ■■ Use no more drying time or when using the drying rack. 4 This sensing occurs throughout the drying cycle and the dryer shuts off when the load reaches the selected dryness. Use Timed Dry for final product check. ■■ Clear away items from the front the dryer. See Installation Instructions. During Sensor Cycles, drying air temperature and moisture level are not covered by the warranty and...
Use & Care Guide
Page 5
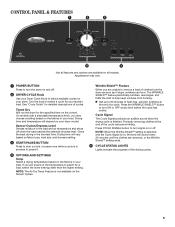
... when the drying cycle is on, the tone will depend on the Sensor Cycles. Press CYCLE SIGNAL button to remove a load of a cycle. See "Cycle Guide" for the specified time on or off. Promptly removing clothes at the end of clothes from forming. Drying time will vary based on fabric type, load size, and dryness setting. 3 START/PAUSE BUTTON Press to start a cycle, or press once while a cycle is not available on your Dryer Cycle Knob to turn ON...
... when the drying cycle is on, the tone will depend on the Sensor Cycles. Press CYCLE SIGNAL button to remove a load of a cycle. See "Cycle Guide" for the specified time on or off. Promptly removing clothes at the end of clothes from forming. Drying time will vary based on fabric type, load size, and dryness setting. 3 START/PAUSE BUTTON Press to start a cycle, or press once while a cycle is not available on your Dryer Cycle Knob to turn ON...

Use & Care Guide
Page 6
... knits. ■■ Use an air dry (no heat) setting for the specified time on the fabrics in the load or air temperature and shuts off when the load reaches the selected dryness level. Select a drying temperature based on the control. If loads seem drier than the higher setting. CYCLE GUIDE - SENSOR CYCLES Not all cycles and settings are unsure of the temperature to dry: Cycle: Temp: Dryness Level: Available Options: Cycle Details: Jeans, heavy work clothes. ■■...
... knits. ■■ Use an air dry (no heat) setting for the specified time on the fabrics in the load or air temperature and shuts off when the load reaches the selected dryness level. Select a drying temperature based on the control. If loads seem drier than the higher setting. CYCLE GUIDE - SENSOR CYCLES Not all cycles and settings are unsure of the temperature to dry: Cycle: Temp: Dryness Level: Available Options: Cycle Details: Jeans, heavy work clothes. ■■...
Use & Care Guide
Page 9
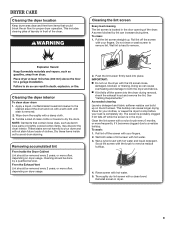
... drying time. Rinse screen with a damp cloth. 3. Cleaning the dryer interior To clean dryer drum 1. Tumble a load of the dryer. To wash: 1. Scrub lint screen with a clean towel. Thoroughly dry lint screen with the brush to remove residue buildup. 4. Pull the lint screen straight up on the lint screen. Roll lint off the screen with hot water. 3. To clean: 1. NOTE: Garments that would block the air flow for your clothes, or cause the dryer to stop before your load is completely dry. From the Exhaust Vent Lint...
... drying time. Rinse screen with a damp cloth. 3. Cleaning the dryer interior To clean dryer drum 1. Tumble a load of the dryer. To wash: 1. Scrub lint screen with a clean towel. Thoroughly dry lint screen with the brush to remove residue buildup. 4. Pull the lint screen straight up on the lint screen. Roll lint off the screen with hot water. 3. To clean: 1. NOTE: Garments that would block the air flow for your clothes, or cause the dryer to stop before your load is completely dry. From the Exhaust Vent Lint...
Use & Care Guide
Page 10
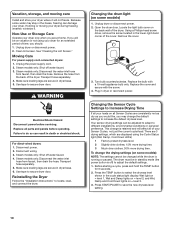
... START/PAUSE to secure dryer door. Steam models only: Shut off water faucet. 3. Remove the cover. 3. Vacation, storage, and moving your dryer where it . Because some models): NOTE: The settings cannot be on all of time, you should: 1. Moving Care For power supply cord-connected dryers: 1. Failure to do so can be in dryer or reconnect power. Open the dryer door. See "Cleaning the Lint Screen." Replace all your Sensor Cycles, not just the current cycle/load. Unplug dryer or disconnect power. 2. Changing the Sensor Cycle Settings...
... START/PAUSE to secure dryer door. Steam models only: Shut off water faucet. 3. Remove the cover. 3. Vacation, storage, and moving your dryer where it . Because some models): NOTE: The settings cannot be on all of time, you should: 1. Moving Care For power supply cord-connected dryers: 1. Failure to do so can be in dryer or reconnect power. Open the dryer door. See "Cleaning the Lint Screen." Replace all your Sensor Cycles, not just the current cycle/load. Unplug dryer or disconnect power. 2. Changing the Sensor Cycle Settings...
Use & Care Guide
Page 11
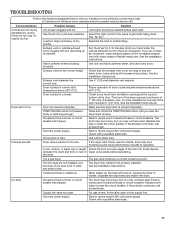
... dryer hasn't been used for most installations, the rear of dryer cycles requires temperatures above 45ºF (7ºC). See the Installation Instructions. Supply line valve not open on the supply line. If you hear the dryer drum moving. between the drum and front or rear of lint or replace exhaust vent with a qualified electrician. Clothing knotted or balled up , the load will increase drying times. Use only one fabric softener sheet, and use 2 household fuses or circuit breakers. Dryer located in a room with lint. The gas valve...
... dryer hasn't been used for most installations, the rear of dryer cycles requires temperatures above 45ºF (7ºC). See the Installation Instructions. Supply line valve not open on the supply line. If you hear the dryer drum moving. between the drum and front or rear of lint or replace exhaust vent with a qualified electrician. Clothing knotted or balled up , the load will increase drying times. Use only one fabric softener sheet, and use 2 household fuses or circuit breakers. Dryer located in a room with lint. The gas valve...

Use & Care Guide
Page 12
... experience Possible Causes Solution Cycle time too short Sensor Cycle ending early. Change the dryness level setting on load Lint screen clogged. If loads are gone from dryer at the beginning of the cycle. Lint screen should be gone after the first cycle. Add dryer fabric softener sheets at the Select Wrinkle Shield feature to tumble the load without heat to other clothing. These will be cleaned before Cool Down may feel very...
... experience Possible Causes Solution Cycle time too short Sensor Cycle ending early. Change the dryness level setting on load Lint screen clogged. If loads are gone from dryer at the beginning of the cycle. Lint screen should be gone after the first cycle. Add dryer fabric softener sheets at the Select Wrinkle Shield feature to tumble the load without heat to other clothing. These will be cleaned before Cool Down may feel very...

Use & Care Guide
Page 13
... model and serial number label located on how to use your major appliance, to replace or repair house fuses, or to correct house wiring or plumbing. 3. WHIRLPOOL CORPORATION LAUNDRY WARRANTY LIMITED WARRANTY For one year from the date of purchase, when this major appliance is installed, operated, and maintained according to instructions attached to or furnished with the product, Whirlpool Corporation or Whirlpool Canada LP (hereafter "Whirlpool") will need...
... model and serial number label located on how to use your major appliance, to replace or repair house fuses, or to correct house wiring or plumbing. 3. WHIRLPOOL CORPORATION LAUNDRY WARRANTY LIMITED WARRANTY For one year from the date of purchase, when this major appliance is installed, operated, and maintained according to instructions attached to or furnished with the product, Whirlpool Corporation or Whirlpool Canada LP (hereafter "Whirlpool") will need...


