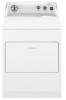
User Instructions
Page 6
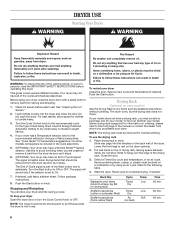
...drying rack, leaving space between items. Do not allow space for normal tumbling. Failure to On. 7. To find out whether your dryer Open the dryer door or turn the Cycle Control knob to follow these instructions can completely remove oil. Put wet items on drying rack) Stuffed toys...knob to the front page of the Start button and is not in dryer. The End of Cycle signal is part of the manual or contact the dealer from dryer. Your dryer may have a drying rack, you purchased your dryer has a Temperature selector, set to follow these instructions can stop your ...
...drying rack, leaving space between items. Do not allow space for normal tumbling. Failure to On. 7. To find out whether your dryer Open the dryer door or turn the Cycle Control knob to follow these instructions can completely remove oil. Put wet items on drying rack) Stuffed toys...knob to the front page of the Start button and is not in dryer. The End of Cycle signal is part of the manual or contact the dealer from dryer. Your dryer may have a drying rack, you purchased your dryer has a Temperature selector, set to follow these instructions can stop your ...
User Instructions
Page 8
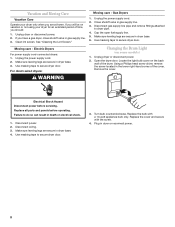
.... Vacation and Moving Care Vacation Care Operate your dryer for an extended period of time, you should: 1. Gas Dryers 1. Use masking tape to secure dryer door. 3. Disconnect power. 2. Disconnect wiring. 3. Unplug dryer or disconnect power. 2. Cap the open fuel supply line. 5. Moving care - Replace all parts and panels before servicing. Using a Phillips head screw driver...
.... Vacation and Moving Care Vacation Care Operate your dryer for an extended period of time, you should: 1. Gas Dryers 1. Use masking tape to secure dryer door. 3. Disconnect power. 2. Disconnect wiring. 3. Unplug dryer or disconnect power. 2. Cap the open fuel supply line. 5. Moving care - Replace all parts and panels before servicing. Using a Phillips head screw driver...

User Instructions
Page 10
... overdrying. ft. (0.18 cu. side swing or hamper door Drying rack - ft. (0.20 cu. Select the right cycle for the first time? Part Number 3404351 3406839 Accessory Drying rack - Cycle time too short WARNING Excessive Weight Hazard Use two or more high-quality items or to handle. Lint...of 1" (25 mm) of airspace, and the rear of the cycle. Change the dryness level setting on load or drum ■■ Was the dryer fabric softener properly used , or was a separate temperature control set on load ■■ Is the lint screen clogged? Fabric softener sheets added to...
... overdrying. ft. (0.18 cu. side swing or hamper door Drying rack - ft. (0.20 cu. Select the right cycle for the first time? Part Number 3404351 3406839 Accessory Drying rack - Cycle time too short WARNING Excessive Weight Hazard Use two or more high-quality items or to handle. Lint...of 1" (25 mm) of airspace, and the rear of the cycle. Change the dryness level setting on load or drum ■■ Was the dryer fabric softener properly used , or was a separate temperature control set on load ■■ Is the lint screen clogged? Fabric softener sheets added to...

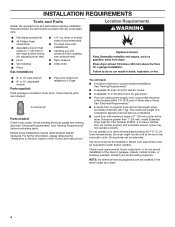
Installation Instructions
Page 1
...acceso al manual de uso y cuidado en español, o para obtener información adicional acerca de su producto, visite: www.whirlpool.com Tenga listo su número de modelo completo. Puede encontrar el número de modelo y de serie dentro de la cavidad ...VACUATION 25 ACHEVER L'INSTALLATION 25 Inversion du sens d'ouverture de la porte (facultatif 26 DRYER SAFETY Your safety and the safety of Contents DRYER SAFETY 1 Installation Requirements 4 Tools and Parts 4 Location Requirements 4 ELECTRIC DRYER POWER HOOKUP - Always read and obey all safety messages. This is , tell you ...
...acceso al manual de uso y cuidado en español, o para obtener información adicional acerca de su producto, visite: www.whirlpool.com Tenga listo su número de modelo completo. Puede encontrar el número de modelo y de serie dentro de la cavidad ...VACUATION 25 ACHEVER L'INSTALLATION 25 Inversion du sens d'ouverture de la porte (facultatif 26 DRYER SAFETY Your safety and the safety of Contents DRYER SAFETY 1 Installation Requirements 4 Tools and Parts 4 Location Requirements 4 ELECTRIC DRYER POWER HOOKUP - Always read and obey all safety messages. This is , tell you ...
Installation Instructions
Page 4
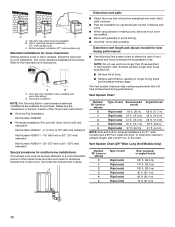
... cycle. The combined weight of a companion appliance should also be exposed to LP gas Parts supplied: Parts package is greater than 1" (25 mm), install Extended Dryer Feet Kit, Part Number 279810. Some codes limit, or do not permit, installation of dryer. Check existing electrical supply and venting, and read "Electrical Requirements" and "Venting Requirements" before...
... cycle. The combined weight of a companion appliance should also be exposed to LP gas Parts supplied: Parts package is greater than 1" (25 mm), install Extended Dryer Feet Kit, Part Number 279810. Some codes limit, or do not permit, installation of dryer. Check existing electrical supply and venting, and read "Electrical Requirements" and "Venting Requirements" before...
Installation Instructions
Page 5
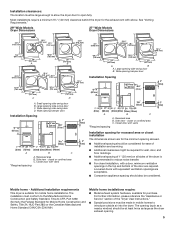
...The location must be large enough to allow the dryer door to the Manufactured Home Construction and Safety Standard, Title 24 CFR, Part 3280 (formerly the Federal Standard for Mobile Home Construction and Safety, Title 24, HUD Part 280) or the Canadian Manufactured Home Standard CAN/...■■ Additional clearances might be required for mobile home installations. Wide opening . 5 Recessed area B. Mobile home - Additional installation requirements This dryer is suitable for wall, door, and floor moldings. ■■ Additional spacing of 1" (25 mm) on all sides of the door are...
...The location must be large enough to allow the dryer door to the Manufactured Home Construction and Safety Standard, Title 24 CFR, Part 3280 (formerly the Federal Standard for Mobile Home Construction and Safety, Title 24, HUD Part 280) or the Canadian Manufactured Home Standard CAN/...■■ Additional clearances might be required for mobile home installations. Wide opening . 5 Recessed area B. Mobile home - Additional installation requirements This dryer is suitable for wall, door, and floor moldings. ■■ Additional spacing of 1" (25 mm) on all sides of the door are...

Installation Instructions
Page 6
... on a separate 30-amp circuit, fused on the cardboard. To avoid damaging the floor, use Power Supply Cord Replacement Part Number 3394208. Gently lay the dryer on both sides of least resistance for electric current. If using a replacement power supply cord, it will reduce the risk... two or more people to connect the exhaust vent. 6. See illustration. 2. Be sure wall receptacle is properly installed and grounded in accordance with the dryer: if it is 5 ft. (1.52 m) in final location, remove corner posts and cardboard. Screw the legs into a grounded 4 prong outlet....
... on a separate 30-amp circuit, fused on the cardboard. To avoid damaging the floor, use Power Supply Cord Replacement Part Number 3394208. Gently lay the dryer on both sides of least resistance for electric current. If using a replacement power supply cord, it will reduce the risk... two or more people to connect the exhaust vent. 6. See illustration. 2. Be sure wall receptacle is properly installed and grounded in accordance with the dryer: if it is 5 ft. (1.52 m) in final location, remove corner posts and cardboard. Screw the legs into a grounded 4 prong outlet....
Installation Instructions
Page 10
... Terminate the exhaust vent outside. Over-The-Top installation (also available with dryer vent to wall vent mismatch): Part Number 4396037 - 0" (0 mm) to 18" (460 mm) mismatch Part Number 4396011 - 18" (460 mm) to 29" (737 mm) mismatch Part Number 4396014 - 29" (737 mm) to 50" (1270 mm) ...add one offset elbow) B. Refer to use . Please see the "Assistance or Service" section of the "Dryer User Instructions." ■■ Over-the-Top Installation: Part Number 4396028 ■■ Periscope Installation (For use vent runs longer than those specified in Vent system chart. ...
... Terminate the exhaust vent outside. Over-The-Top installation (also available with dryer vent to wall vent mismatch): Part Number 4396037 - 0" (0 mm) to 18" (460 mm) mismatch Part Number 4396011 - 18" (460 mm) to 29" (737 mm) mismatch Part Number 4396014 - 29" (737 mm) to 50" (1270 mm) ...add one offset elbow) B. Refer to use . Please see the "Assistance or Service" section of the "Dryer User Instructions." ■■ Over-the-Top Installation: Part Number 4396028 ■■ Periscope Installation (For use vent runs longer than those specified in Vent system chart. ...
Installation Instructions
Page 11
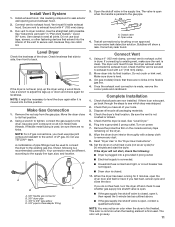
...Check that the vent is moved into its final location. Check that there are now installed. See "Level Dryer." 6. Remove the protective film on the console and any tape remaining on all parts are no kinks. NOTE: You may be used . The odor will go back through the steps to ... shutoff valve is an extra part, go away. 11 Run vent to the dryer. If the dryer is clean. If flexible metal tubing is level. 3. (On gas models) Check that the dryer is first heated. Open the shutoff valve in the "Dryer User Instructions". 10. Make sure dryer is used, be necessary to...
...Check that the vent is moved into its final location. Check that there are now installed. See "Level Dryer." 6. Remove the protective film on the console and any tape remaining on all parts are no kinks. NOTE: You may be used . The odor will go back through the steps to ... shutoff valve is an extra part, go away. 11 Run vent to the dryer. If the dryer is clean. If flexible metal tubing is level. 3. (On gas models) Check that the dryer is first heated. Open the shutoff valve in the "Dryer User Instructions". 10. Make sure dryer is used, be necessary to...
Installation Instructions
Page 12
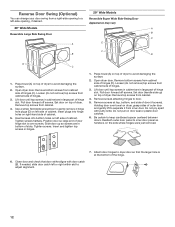
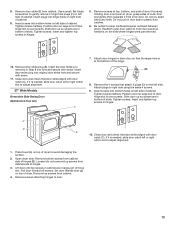
... slots. Position door so large end of hinge slot. Place towel (A) on the side where hinges were just removed. 7. Open dryer door. Remove bottom screws from cabinet. 4. Set door (handle side up so screws are in large part of door hinge slot is over towel on left or right within slot to... dryer door so that door strike aligns with putty knife. Pull door forward off screws. Reattach outer door panel to inner door...
... slots. Position door so large end of hinge slot. Place towel (A) on the side where hinges were just removed. 7. Open dryer door. Remove bottom screws from cabinet. 4. Set door (handle side up so screws are in large part of door hinge slot is over towel on left or right within slot to... dryer door so that door strike aligns with putty knife. Pull door forward off screws. Reattach outer door panel to inner door...
Installation Instructions
Page 13
... Attach door hinges to gently remove 4 hinge hole plugs (F) on right side of cabinet. 9. C D B 10. Remove top screws from cabinet side of dryer to separate it from inner door. Insert screws into bottom holes on the side where hinges were just removed. 10. Insert and tighten top screws...side of outer door and gently lift to avoid damaging the surface. 2. Remove door strike plug (B). Insert the door strike you removed in large part of door (4 screws). Remove the 4 screws that the larger hole is over screws. If it is needed , slide door catch left side of...
... Attach door hinges to gently remove 4 hinge hole plugs (F) on right side of cabinet. 9. C D B 10. Remove top screws from cabinet side of dryer to separate it from inner door. Insert screws into bottom holes on the side where hinges were just removed. 10. Insert and tighten top screws...side of outer door and gently lift to avoid damaging the surface. 2. Remove door strike plug (B). Insert the door strike you removed in large part of door (4 screws). Remove the 4 screws that the larger hole is over screws. If it is needed , slide door catch left side of...


